Chrysler RG Voyager. Manual - part 288
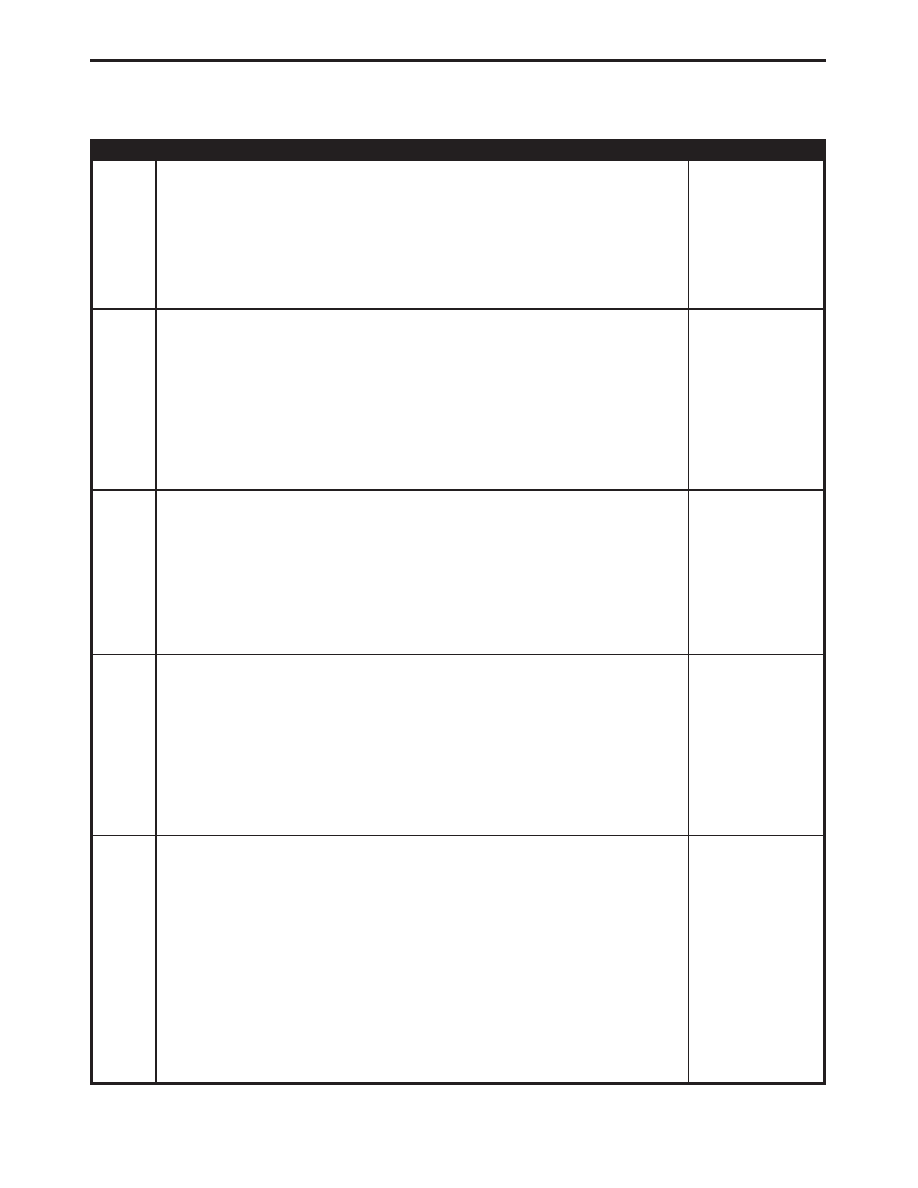
TEST
ACTION
APPLICABILITY
1
Turn the ignition on.
With the DRBIII
t, erase HFM DTCs.
Attempt to make a phone call using the system.
With the DRBIII
t, read HFM DTCs.
Does the DRBIII
t display this DTC?
All
Yes
→ Go To 2
No
→ Go To 6
2
Turn the ignition off.
Disconnect the Radio C2 harness connector.
Disconnect the Hands Free Module C2 harness connector.
Measure the resistance of the Left Audio Output circuit between the HFM connector
and the radio connector.
Is the resistance below 10.0 ohms?
All
Yes
→ Go To 3
No
→ Repair the Left Audio Output circuit for an open.
Perform BODY VERIFICATION TEST - VER 1.
3
Turn the ignition off.
Disconnect the Radio C2 harness connector.
Disconnect the Hands Free Module C2 harness connector.
Measure the resistance between ground and the Left Audio Output circuit.
Is the resistance above 1000.0 ohms?
All
Yes
→ Go To 4
No
→ Repair the Left Audio Output circuit for a short to ground.
Perform BODY VERIFICATION TEST - VER 1.
4
Turn the ignition off.
Disconnect the Radio C2 harness connector.
Disconnect the Hands Free Module C2 harness connector.
Turn the ignition on.
Measure the voltage of the Left Audio Output circuit.
Is the voltage below 1.0 volt?
All
Yes
→ Go To 5
No
→ Repair the Left Audio Output circuit for a short to voltage.
Perform BODY VERIFICATION TEST - VER 1.
5
Turn the ignition off.
Disconnect the Radio C2 harness connector.
Disconnect the Hands Free Module C2 harness connector.
Measure the resistance between the Left Audio Output circuit and the Right Audio
Output circuit.
Is the resistance above 1000 ohms?
All
Yes
→ Inspect the wiring and connectors for damage or shorted circuits.
Repair as necessary. If ok, replace and program the Hands Free
Module in accordance with the Service Information.
Perform BODY VERIFICATION TEST - VER 1.
No
→ Repair the Left Audio Output circuit for a short to the Right Audio
Output circuit.
Perform BODY VERIFICATION TEST - VER 1.
1121
TELECOMMUNICATION
LEFT AUDIO INPUT SHORT TO GROUND —
Continued