Chrysler Pacifica. Manual - part 547
INSTALLATION
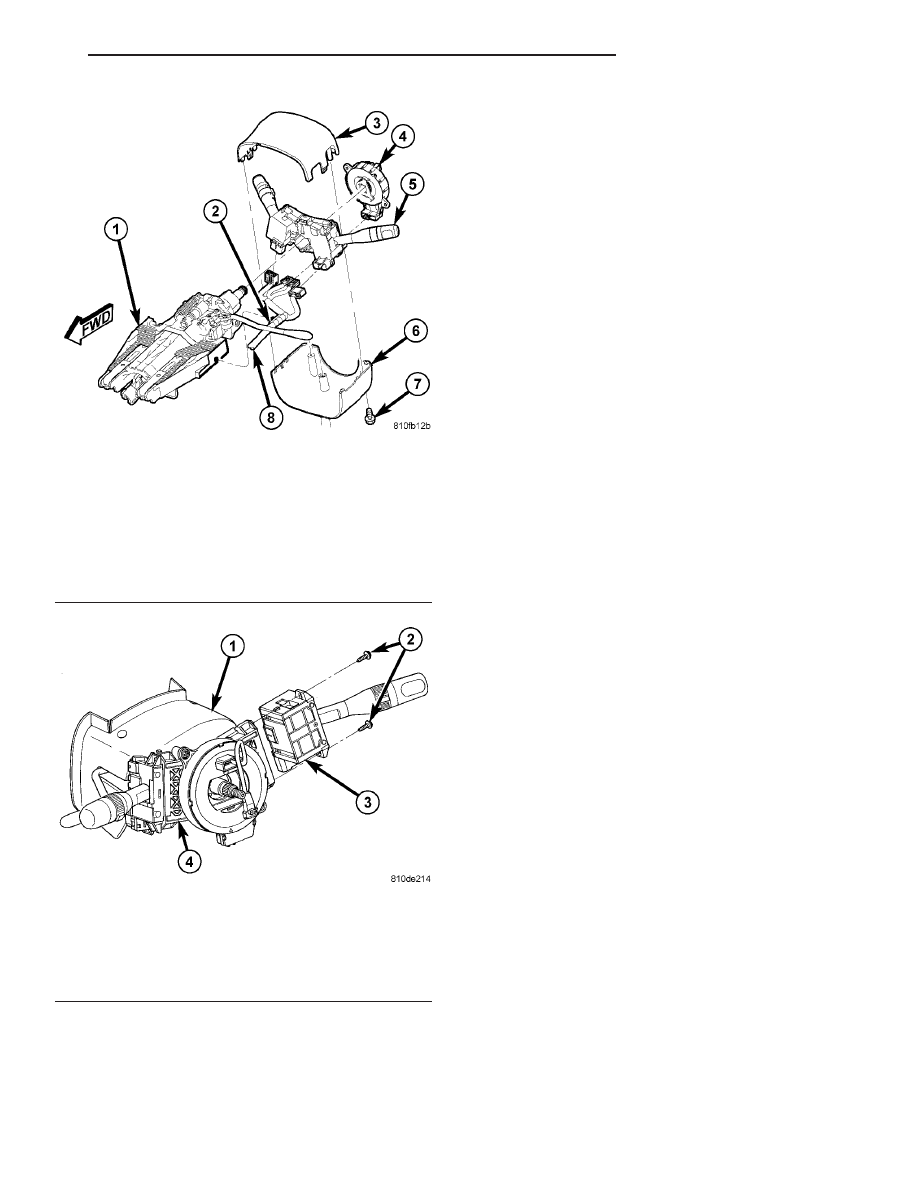
(1) Position the right multi-function switch onto
the multi-function switch mounting housing (Fig. 11).
(2) Install the two screws that secure the right
multi-function switch to the multi-function switch
mounting housing. Torque the screws to 2.5 N·m (22
in. lbs.).
(3) Connect the instrument panel wire harness
connector to the right multi-function switch.
(4) Install the upper and lower steering column
shrouds (Fig. 10) (Refer to 19 - STEERING/COL-
UMN/UPPER
SHROUD
-
INSTALLATION)
and
(Refer
to
19
-
STEERING/COLUMN/LOWER
SHROUD - INSTALLATION). Torque the screws to 2
N·m (17 in. lbs.).
(5) Connect the battery negative cable.
(6) Verify vehicle and system operation.
WASHER FLUID LEVEL
SWITCH
REMOVAL
(1) Open hood, disconnect and isolate the battery
negative cable.
(2) Hoist vehicle.
(3) Turn the front of the left wheel inward.
(4) Loosen inner splash shield enough to gain
access to the washer reservoir.
(5) Disconnect
the
electrical
connector
to
the
washer fluid level switch.
(6) Pull the washer fluid level switch from the res-
ervoir (Fig. 17).
NOTE: Make sure to use a new grommet when
installing a new switch, or even reinstalling the old
switch back into the reservoir.
INSTALLATION
NOTE: Make sure to use a new grommet when
installing a new switch, or even reinstalling the old
switch back into the reservoir.
(1) With grommet installed, position the washer
fluid level switch in grommet and firmly snap into
place (Fig. 17).
(2) Connect the washer fluid level switch electrical
connector.
(3) Install inner splash shield.
(4) Lower vehicle from hoist.
(5) Connect the battery negative cable.
(6) Top off washer fluid reservoir.
(7) Close hood.
(8) Verify vehicle and system operation.
Fig. 10 UPPER/LOWER SHROUDS - REMOVE/
INSTALL
1 - STEERING COLUMN
2 - WIRING HARNESS CLIP
3 - UPPER SHROUD
4 - CLOCKSPRING
5 - SWITCH MODULE
6 - LOWER SHROUD
7 - SHROUD MOUNTING SCREW
8 - WIRING HARNESS
Fig. 11 RIGHT MULTI-FUNCTION SWITCH -
REMOVE/INSTALL
1 - STEERING COLUMN
2 - SCREWS (2)
3 - RIGHT MULTI-FUNCTION SWITCH
4 - MULTI-FUNCTION SWITCH MOUNTING HOUSING
CS
WIPERS/WASHERS
8R - 17
RIGHT MULTI-FUNCTION SWITCH (Continued)