Chrysler Stratus Convertible. Manual - part 134
 

  Index      Chrysler     Chrysler Stratus Convertible - service repair manual 1995-2000 year


Search            


Content   ..  132  133  134  135   ..


Chrysler Stratus Convertible. Manual - part 134


INSTALLATION

(1) Position quarter panel outer belt weatherstrip/

molding on vehicle.

(2) Push outer belt weatherstrip/molding down-

ward until weatherstrip/molding is fully seated.

(3) Install screws attaching outer belt weatherstrip

to outer quarter panel.

(4) Tighten fasteners for upper belt molding.
(5) Install quarter trim panel.
(6) Raise and secure convertible top.

UPPER DECK MOLDING

REMOVAL

(1) Lower convertible top to midway position.
(2) Remove screws attaching upper deck molding

to rear deck panel above convertible top rear attach-
ment.

(3) Open decklid.
(4) Remove screws attaching upper deck molding

to rear deck panel inside decklid water trough.

(5) Disconnect wire connector for CHMSL.
(6) Remove upper deck molding from vehicle.

INSTALLATION

(1) Position upper deck molding on vehicle.
(2) Connect wire connector for CHMSL.
(3) Install screws attaching upper deck molding to

rear deck panel inside decklid water trough.

(4) Install screws attaching upper deck molding to

rear deck panel above convertible top rear attach-
ment.

(5) Raise and secure convertible top.

SUN VISOR

All vehicles with driver and passenger side airbags

must have a colored coded five Bullet point airbag
warning label applied to the sun visor, verify label
availability and ensure the label is installed.

REMOVAL

(1) Disengage sun visor from sun visor support.
(2) Remove screws holding sun visor to header

panel.

(3) Disconnect lighted vanity mirror and universal

garage door opener wiring, if so equipped.

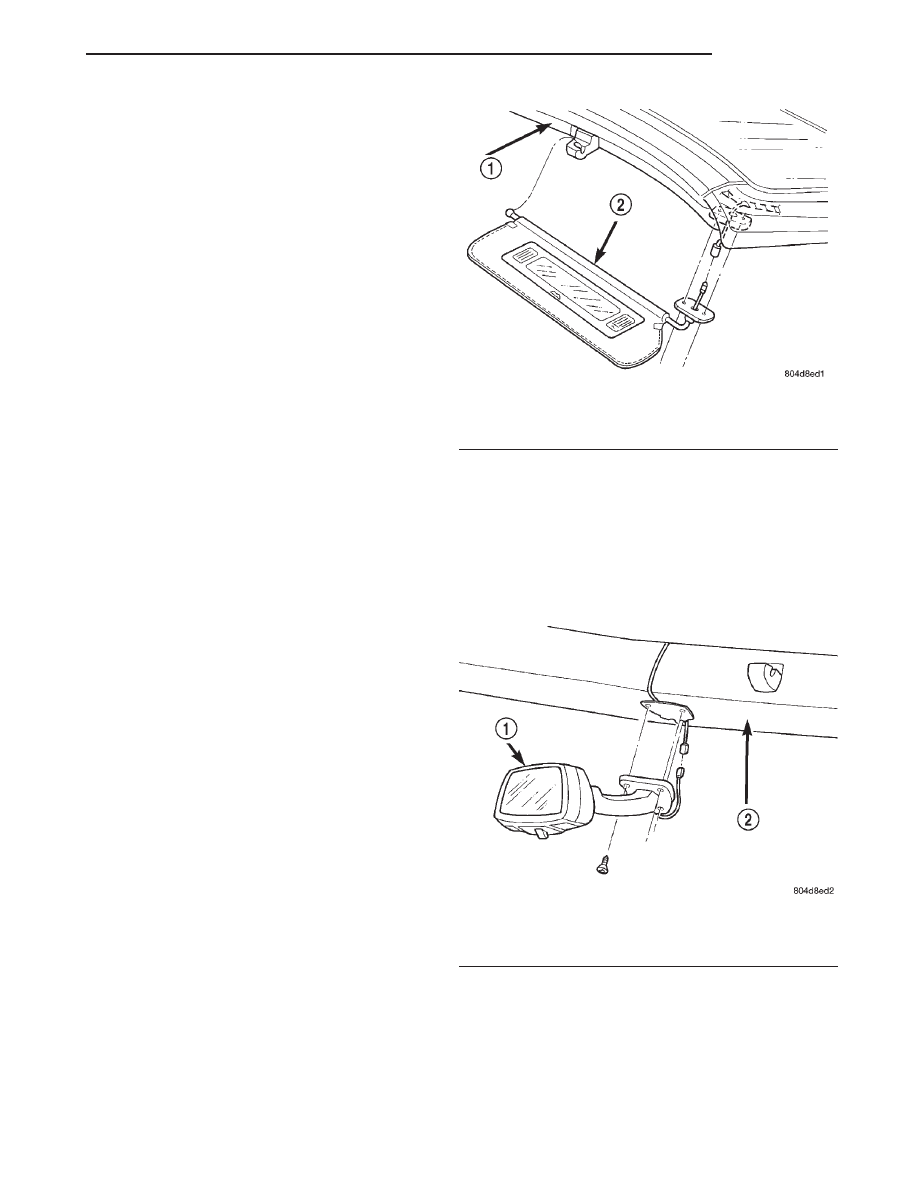
(4) Separate sun visor from vehicle (Fig. 81).

INSTALLATION

(1) Position sun visor to vehicle.
(2) Connect lighted vanity mirror and universal

garage door opener wiring, if so equipped.

(3) Install screws holding sun visor to header

panel.

(4) Engage sun visor to sun visor support.

INSIDE REAR VIEW MIRROR

REMOVAL

(1) Remove screws attaching inside rear view mir-

ror to header panel.

(2) Disconnect wire connector to rear view mirror,

if so equipped.

(3) Remove rear view mirror from vehicle (Fig. 82).

INSTALLATION

(1) Position inside rear view mirror to vehicle.
(2) Connect wire connector to rear view mirror, if

so equipped.

(3) Install screws attaching rear view mirror to

header panel.

Fig. 81 Sun Visor

1 – HEADER PANEL
2 – SUN VISOR

Fig. 82 Inside Rear View Mirror

1 – INSIDE REAR VIEW MIRROR
2 – HEADER PANEL

JX

BODY

23 - 69

REMOVAL AND INSTALLATION (Continued)

ADJUSTMENTS

FRONT DOOR GLASS ADJUSTMENT

NOTE: Verify that the door is properly adjusted to
the body prior to adjusting the door glass.

NOTE: Lower quarter glass to the full down posi-
tion while making door glass adjustments, unless
otherwise instructed.

UP-STOP ADJUSTMENTS

(1) Remove door trim panel.
(2) Remove water shield as necessary to gain

access to adjuster.

(3) Loosen up stop nut (Fig. 83) and bolt (Fig. 84).
(4) Remove

weatherstrip

from

location

to

be

adjusted.

NOTE: Remove only one weatherstrip section at a
time or the glass to weatherstrip retainer measure-
ments will not be accurate.

(5) Close door and raise door glass.
(6) Slide up stop to achieve proper glass to weath-

erstrip retainer gap. Refer to Front Door Glass
Adjustment Table.

(7) Tighten all fasteners.
(8) Verify that forward up stop fully contacts hook

on glass. Adjust contact bolt on forward up stop as
necessary.

Fig. 83 Forward Up Stop Adjustment

1 – FORWARD UPSTOP
2 – ADJUSTMENT BOLT
3 – CONTACT BOLT

Fig. 84 Rear Up Stop Adjustment

1 – REAR UPSTOP
2 – UPSTOP ADJUSTMENT NUT

23 - 70

BODY

JX

TOP OF GLASS – INBOARD/OUTBOARD
ADJUSTMENTS

(1) Remove door trim panel.
(2) Remove water shield as necessary to gain

access to adjusters.

(3) Using a suitable wrench, loosen the lower jack

screw jam-nuts (Fig. 85).

(4) Remove weatherstrip from side rail weather-

strip retainer at point to be adjusted.

(5) Close door and raise glass.
(6) Using a suitable allen wrench, rotate jack

screws to achieve the proper gap between the door
glass weatherstrip retainer strip. Refer to Front Door
Glass Adjustment Table.

NOTE: Remove only one weatherstrip section at a
time or the glass to weatherstrip retainer measure-
ments will not be accurate.

(7) Verify that the top edge of the door glass is

beneath the lip of the weatherstrip.

(8) Tighten all fasteners.

FRONT DOOR GLASS ADJUSTMENT SPECIFICATIONS

Fig. 85 Inboard/Outboard Glass Adjustment

1 – IN/OUT JACK SCREW
2 – FORWARD UP-STOP
3 – REAR UP-STOP
4 – ROLLER CHANNEL ADJUSTMENT
5 – IN/OUT JACK SCREW

JX

BODY

23 - 71

ADJUSTMENTS (Continued)

GLASS – FRONT/REAR ADJUSTMENT

(1) Remove door trim panel and water shield.
(2) Lower door glass to gain access to glass attach-

ments.

(3) Loosen three glass attachment bolts.
(4) Raise door glass and position correctly (Fig.

86).

(5) Tighten the two accessible glass fasteners in

the full up position.

(6) Lower door glass and tighten the remaining

glass fastener.

(7) Raise glass to top of travel and verify position-

ing. Refer to Front Door Glass Adjustment Table and
(Fig. 86).

(8) To verify proper fit of the door glass to the

header/A-pillar weatherstrip,

(a) Lower door glass slightly.
(b) Place a paper strip between the glass and

weatherstrip near mirror flag and another near the
front upper corner of the door glass.

(c) Raise glass to full up position.
(d) Pull the strip from between the door glass

and the weatherstrip. There should be slight ten-
sion on the paper.

DOOR GLASS ALIGNMENT VERIFICATION

NOTE: Door Glass Alignment Verification procedure
must be done whenever the door glass is adjusted
and after all adjustments are made.

(1) Raise quarter glass to full up position.
(2) Close door and cycle door glass between full up

and full down positions.

(3) Verify that door glass operates smoothly and

maintains correct alignment to convertible top and
quarter glass.

(4) Verify that quarter glass weatherstrip fully

contacts door glass.

(5) Verify that no scissoring of the door glass and

weatherstrip occurs.

(6) If any of the above conditions are found,

(a) Adjust quarter glass. Refer to Quarter Glass

Adjustment procedures found in this section.

(b) Readjust the door glass as necessary to cure

the condition.

Fig. 86 Front/Rear Glass Position

1 – DOOR GLASS
2 – MIRROR STANCHION
3 – DOOR GLASS

4 – FLUSH
5 – MIRROR STANCHION
6 – DOOR

23 - 72

BODY

JX

ADJUSTMENTS (Continued)


Content   ..  132  133  134  135   ..