Chrysler Stratus Convertible. Manual - part 131
(6) Remove decklid from vehicle.
INSTALLATION
(1) Position decklid on vehicle.
(2) With aid of a helper, loosely install bolts
attaching decklid to decklid hinge.
(3) Align marks made on decklid previously to
decklid hinge and tighten bolts attaching decklid to
decklid hinge.
(4) Connect all wire connectors to decklid latch
and install wire harness to decklid.
(5) Verify fit of decklid to deck panel. Adjust as
necessary.
DECKLID HINGE AND GAS SUPPORT
CYLINDER
REMOVAL
(1) Release decklid latch and open decklid.
(2) Mark outline of decklid hinge on decklid and
quarter panel trough to aid in installation.
(3) Place suitable padding to cover deck panel in
order to protect paint finish.
(4) Using a suitable wooden dowel or other prop
rod, support decklid.
(5) Pull out caps at each end of gas support cylin-
der.
(6) Disconnect gas support cylinder from decklid
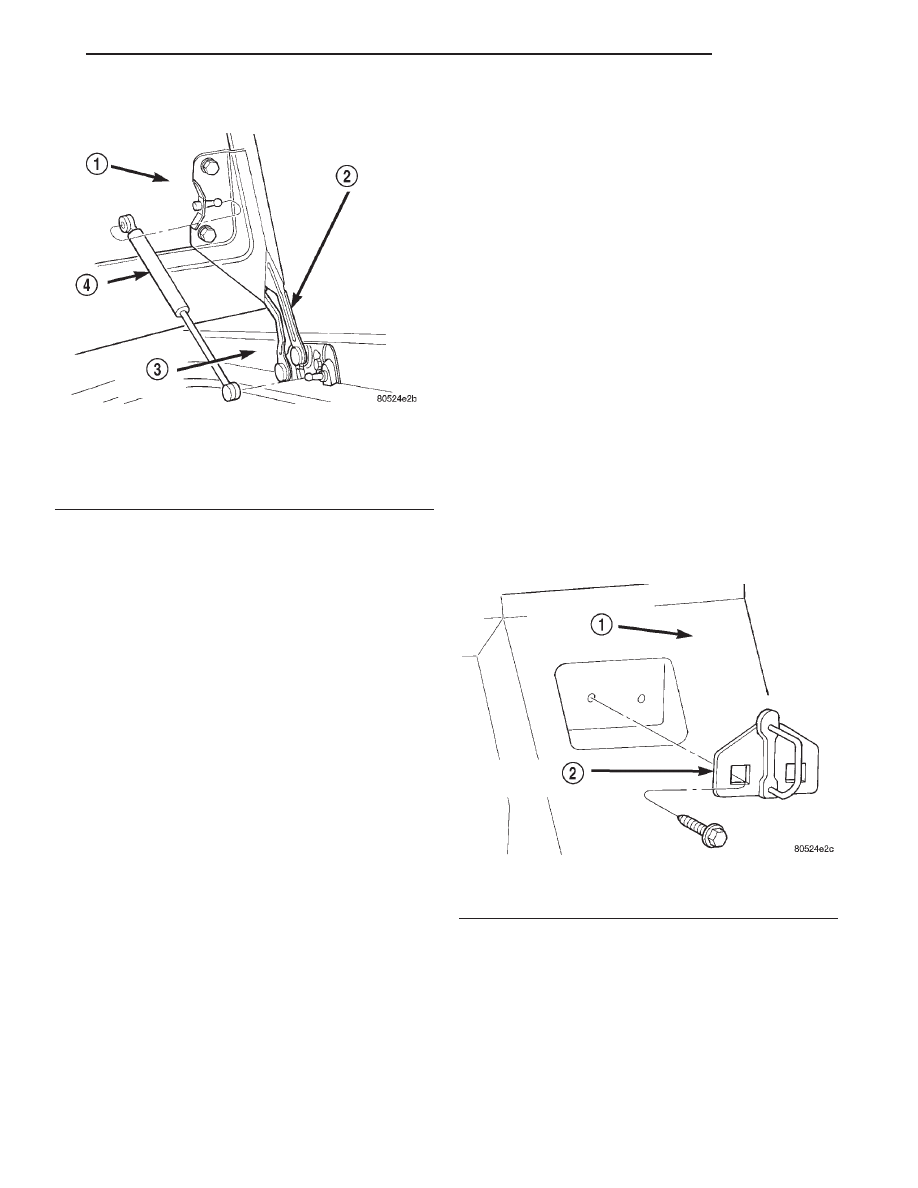
hinge by prying cylinder from ball stud on hinge (Fig.
53).
(7) With aid of a helper, remove bolts attaching
decklid hinge to decklid.
(8) Remove bolts attaching decklid hinge to quar-
ter panel.
(9) Remove decklid hinge from vehicle.
INSTALLATION
(1) Position decklid hinge to vehicle.
(2) Loosely install bolts attaching decklid hinge to
quarter panel.
(3) Loosely install bolts attaching decklid hinge to
decklid.
(4) Align decklid hinge to marks made previously
and tighten all fasteners.
(5) Install gas support cylinder to decklid hinge.
(6) Install caps at each end of gas support cylinder.
(7) Verify fit of decklid to deck panel. Adjust as
necessary.
DECKLID LATCH STRIKER
REMOVAL
(1) Release decklid latch and open decklid.
(2) Mark outline of decklid latch striker on rear
closure panel to aid in installation.
(3) Remove bolts attaching decklid latch striker to
rear closure panel (Fig. 54).
(4) Remove striker from vehicle.
INSTALLATION
(1) Position striker in vehicle.
(2) Loosely install bolts attaching decklid latch
striker to rear closure panel.
(3) Align decklid latch striker to marks made pre-
viously on rear closure panel and tighten bolts.
(4) Verify fit of decklid to deck panel and operation
of decklid latch. Adjust as necessary.
Fig. 53 Decklid Hinge And Gas Support Cylinder
1 – TRUNK LID
2 – TRUNK HINGE
3 – QUARTER PANEL TROUGH
4 – GAS SUPPORT CYLINDER
Fig. 54 Decklid Latch Striker
1 – REAR CLOSURE PANEL
2 – TRUNK LATCH STRIKER
JX
BODY
23 - 57
REMOVAL AND INSTALLATION (Continued)