Chrysler New Yorker. Manual - part 336
CAUTION: Cap off all lines that are not being
replaced. Cap the expansion valve tubes and all
condenser tubes.
(4) Disconnect filter/drier bracket fastener and
separate bracket from strut panel (there are two hid-
den plastic fasteners to pry out).
(5) Disconnect liquid line fastener at condenser
(M13 Hex).
NOTE: Radiator
upper
crossmember
must
be
removed to access the liquid line fastener. Refer to
Group 23, Body for Removal and Installation proce-
dures.
(6) Remove liquid line from vehicle. Cap off all fit-
tings if reusing to prevent moisture from entering
system.
INSTALLATION
For installation, reverse the above procedures.
Then torque liquid line fasteners as follows: TXV and
condenser: 15 ft–lbs. Plastic bracket and screws:
5 ft–lbs.
MODE DOOR ACTUATOR
The mode door actuator is an electric motor. It
mechanically positions the A/C unit panel/bi-level
door and the floor/defrost door. This actuator con-
tains a feedback strip which allows the computer
control to know the exact position of the mode door
at all times. The mode door actuator is not service-
able and must be replaced if found to be defective.
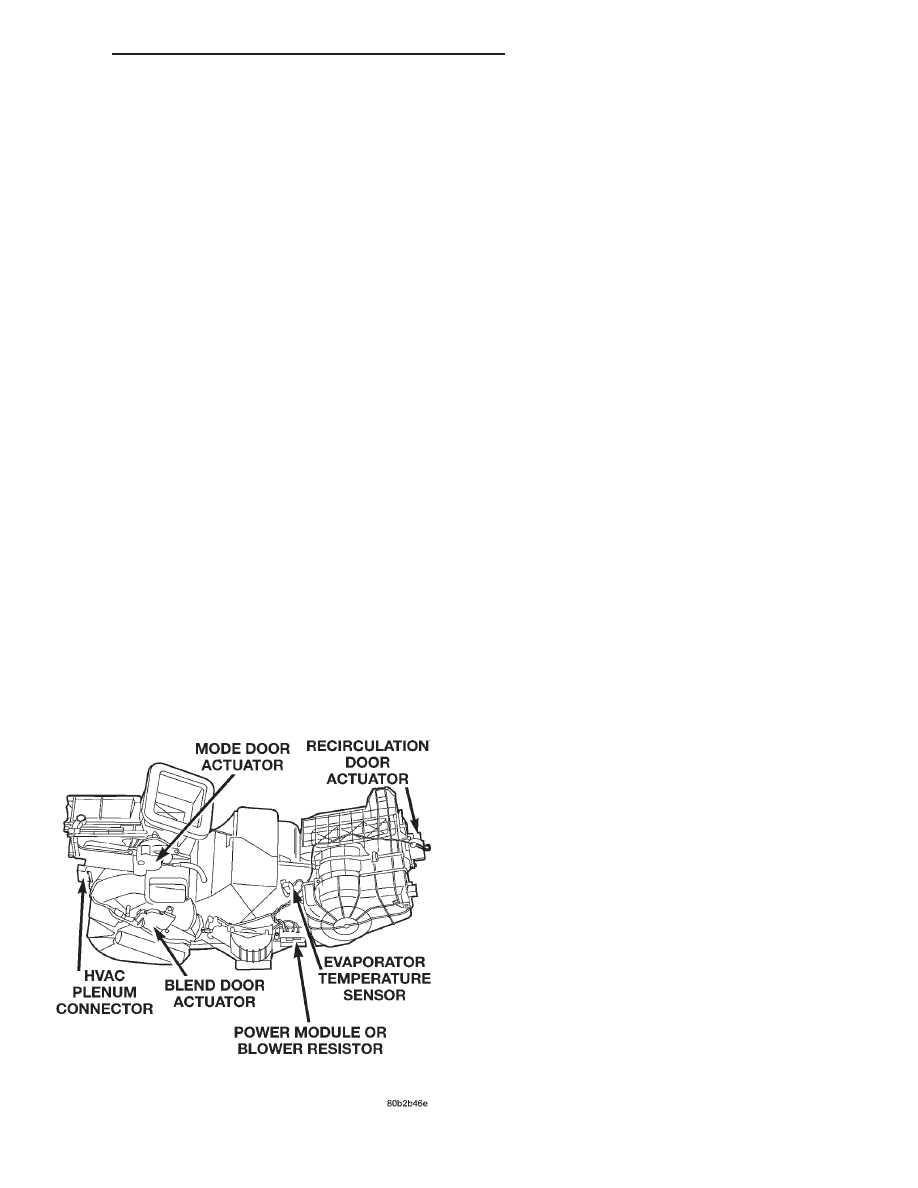
The mode door actuator is located on the lower left
side of the HVAC unit housing (Fig. 23).
REMOVAL
(1) Open hood and disconnect the negative battery
cable remote terminal from the remote battery post
(Fig. 13).
(2) Remove left and right underpanel ducts.
(3) Remove floor console.
(4) Remove center floor heat adaptor duct.
(5) Remove rear seat heat forward adaptor duct.
(6) Loosen center support bracket and pry rear-
ward to gain access to the actuator.
(7) Remove actuator retaining screws. Then pull
actuator straight down. Upon removal, note the shaft
position of the actuator, because the shaft on this
motor is keyed. When installing new actuator, its
shaft must be positioned in the same location.
(8) Remove electrical connection on actuator.
INSTALLATION
For installation, reverse the above procedures.
RECIRCULATION DOOR ACTUATOR
The recirculation door actuator is located on the
right side of the heater housing (Fig. 23).
The recirculation door actuator is an electric motor.
It mechanically positions the recirculation door in
either the open or closed position. The recirculation
door actuator does not have a feedback signal. The
outside Air/Recirc door actuator is not serviceable
and must be replaced if found to be defective.
REMOVAL
(1) Open hood and disconnect the negative battery
cable remote terminal from the remote battery post
(Fig. 13).
(2) Remove instrument panel. Refer to Group 8E,
Instrument Panel and Systems for Removal and
Installation procedures.
(3) Remove actuator retaining screws. Pull actua-
tor
straight
off
recirculation
door
shaft.
Upon
removal, note the shaft position of the actuator,
because the shaft on this motor is keyed. When
installing new actuator, its shaft must be positioned
in the same location.
(4) Disconnect electrical connection.
(5) Remove recirculation door motor from vehicle.
INSTALLATION
For installation, reverse the above procedures.
SUCTION LINE
REMOVAL
(1) Remove refrigerant from the A/C system using
a refrigerant recovery machine.
(2) Remove one nut holding suction line at expan-
sion valve.
Fig. 23 Mode Door Actuator Location
300M
HEATING AND AIR CONDITIONING
24 - 23
REMOVAL AND INSTALLATION (Continued)