Chrysler New Yorker. Manual - part 89


  Index      Chrysler     Chrysler New Yorker - service repair manual 1997-1999 year


Search            


Content   ..  87  88  89  90   ..


Chrysler New Yorker. Manual - part 89


(1) Push bulb into lamp socket.
(2) Place lamp socket into headlamp housing and

rotate retaining ring to the lock position.

(3) Connect wire connector to lamp socket(s).
(4) Place lamp housing in position on vehicle.
(5) Verify headlamp operation.
(6) Install jackscrews to attach headlamp housing

to crossmember.

(7) Verify headlamp operation and alignment.

LICENSE PLATE LAMP BULB – REAR BUMPER
FASCIA

REMOVAL

(1) Remove screws attaching license plate lamp to

rear bumper fascia.

(2) Remove license plate lamp from rear bumper

fascia.

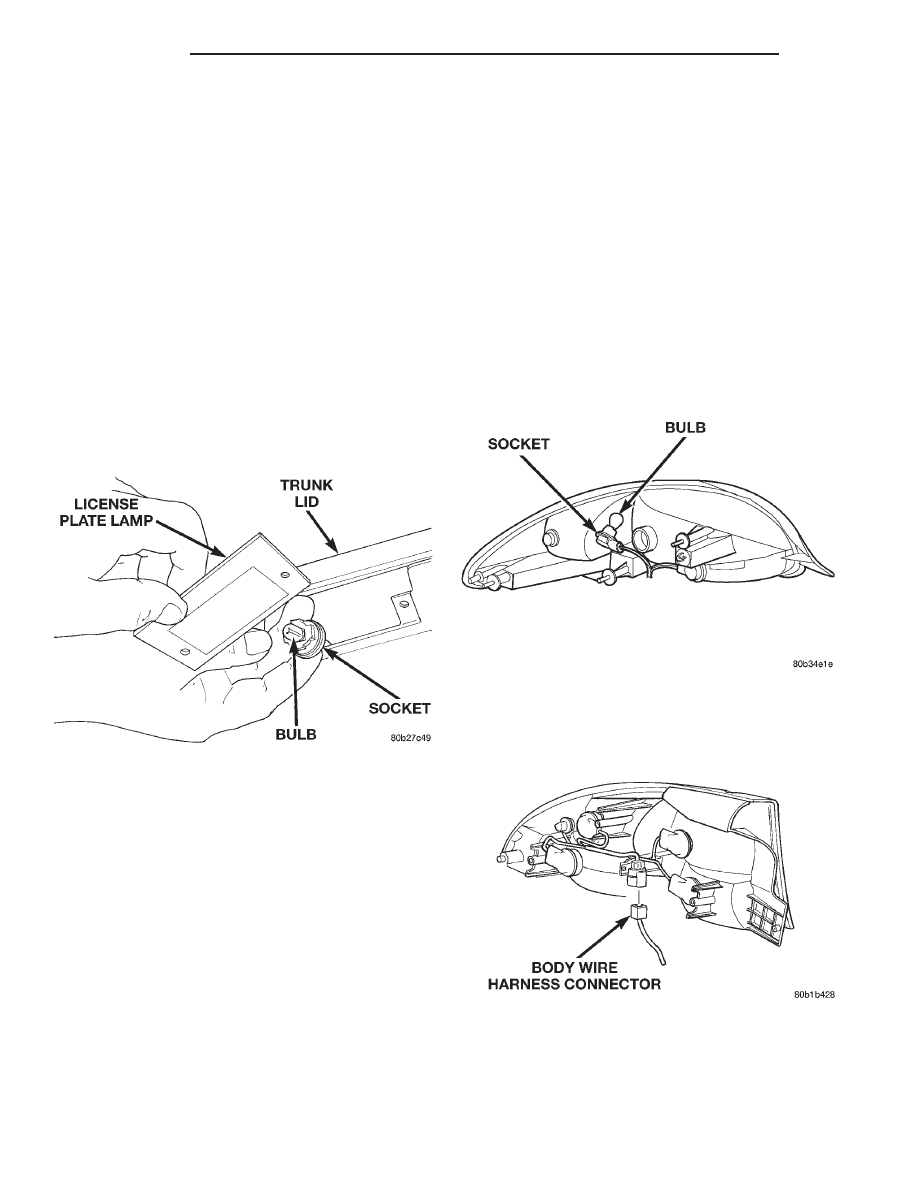
(3) Remove socket from lamp (Fig. 13).
(4) Pull bulb from socket.

INSTALLATION

(1) Push bulb into socket.
(2) Install socket into lamp.
(3) Place license plate lamp in position on rear

bumper fascia.

(4) Install screws to attach license plate lamp to

rear bumper fascia.

TAIL, STOP, BACK UP, AND TURN SIGNAL LAMP
BULB

REMOVAL

(1) Release deck latch and open deck lid.
(2) Remove trunk lining from rear closure panel as

necessary to gain access to tail lamp fasteners.

(3) Remove nuts attaching tail lamp to rear clo-

sure panel.

(4) Remove tail lamp from rear closure panel.
(5) Remove socket(s) from tail lamp (Fig. 14), (Fig.

15), and (Fig. 16).

(6) Pull bulb from socket.

INSTALLATION

(1) Push bulb into socket.
(2) Install socket(s) in tail lamp.
(3) Place tail lamp in position on rear closure

panel.

(4) Install nuts attaching tail lamp to rear closure

panel.

(5) Install trunk lining.
(6) Verify lamp operation.

Fig. 13 License Plate Lamp Bulb

Fig. 14 Tail, Stop, Back up, and Turn Signal Lamp

Bulb – Concorde/LHS

Fig. 15 Tail, Stop, Back up, and Turn Signal Lamp

Bulb – Intrepid

8L - 14

LAMPS

300M

REMOVAL AND INSTALLATION (Continued)

DECK LID LAMP BULB

REMOVAL

(1) Remove lens from lamp (Fig. 17).
(2) Pull bulb from socket.

INSTALLATION

(1) Insert bulb into socket.
(2) Install lamp lens.

Fig. 16 Tail, Stop, Back up, and Turn Signal Lamp

Bulb – 300M

Fig. 17 Deck Lid Lamp Bulb

300M

LAMPS

8L - 15

REMOVAL AND INSTALLATION (Continued)

EXTERIOR LAMP HOUSINGS

INDEX

page

page

REMOVAL AND INSTALLATION

CHMSL AND APPLIQUE HOUSING –

INTREPID . . . . . . . . . . . . . . . . . . . . . . . . . . . . 17

CHMSL HOUSING – 300M . . . . . . . . . . . . . . . . . 17
CHMSL HOUSING – CONCORDE/LHS . . . . . . . . 16
FOG LAMP HOUSING . . . . . . . . . . . . . . . . . . . . 17
FRONT PARKING, AND TURN SIGNAL

LAMP HOUSING – LHS . . . . . . . . . . . . . . . . . . 18

FRONT PARKING, SIDE MARKER,

AND TURN SIGNAL LAMP HOUSING –
CONCORDE/300M . . . . . . . . . . . . . . . 
. . . . . . 18

FRONT PARKING, SIDE MARKER, AND TURN

SIGNAL LAMP HOUSING – INTREPID . . . . . . . 18

FRONT SIDE MARKER HOUSING – LHS . . . . . . 18
HEADLAMP HOUSING –

CONCORDE/LHS/330M . . . . . . . . . . . . . . . . . . 19

HEADLAMP HOUSING – INTREPID . . . . . . . . . . 20
LICENSE PLATE LAMP –

REAR BUMPER FASCIA . . . . . . . . . . . . . . . . . 20

TAIL, STOP, BACK UP, AND

TURN SIGNAL LAMP . . . . . . . . . . . . . . . . . . . 21

REMOVAL AND INSTALLATION

CHMSL HOUSING – CONCORDE/LHS

REMOVAL

(1) Release deck lid latch and open deck lid.
(2) From

under

rear

shelf

panel,

disconnect

CHMSL wire connector from body harness.

(3) Remove rear shelf upper panel.
(4) Remove fasteners attaching the CHMSL to rear

shelf upper panel (Fig. 1).

(5) Remove CHMSL from rear shelf upper panel.

INSTALLATION

(1) Place CHMSL in position on rear shelf upper

panel.

(2) Install fasteners to attach CHMSL to rear shelf

upper panel.

(3) Install rear shelf upper panel.
(4) Connect CHMSL wire connector to body harness.
(5) Verify CHMSL operation.

Fig. 1 CHMSL – Rear Shelf

8L - 16

LAMPS

300M

CHMSL AND APPLIQUE HOUSING – INTREPID

REMOVAL

(1) Release deck lid latch and open deck lid.
(2) Remove deck lid cover.
(3) Disconnect CHMSL wire connector from body

harness (Fig. 2).

(4) Remove fasteners attaching CHMSL and appli-

que to the deck lid.

(5) Remove CHMSL from deck lid.

INSTALLATION

(1) Place CHMSL in position on deck lid.
(2) Install fasteners attaching CHMSL and appli-

que to deck lid.

(3) Connect CHMSL wire connector to body harness.
(4) Verify CHMSL operation.
(5) Install deck lid cover.

CHMSL HOUSING – 300M

REMOVAL

(1) Release deck lid latch and open deck lid.
(2) Remove deck lid cover.
(3) Disconnect CHMSL wire connector from body

harness (Fig. 3).

(4) Remove fasteners attaching CHMSL to the

deck lid.

(5) Remove CHMSL from deck lid.

INSTALLATION

(1) Place CHMSL in position on deck lid.
(2) Install fasteners attaching CHMSL to deck lid.
(3) Connect CHMSL wire connector to body harness.
(4) Verify CHMSL operation.
(5) Install deck lid cover.

FOG LAMP HOUSING

REMOVAL

(1) Remove screw(s) attaching fog lamp to fascia

(Fig. 4), (Fig. 5), and (Fig. 6).

(2) Pull fog lamp forward from opening in front

bumper fascia.

(3) Disconnect fog lamp wire connector from front

lighting wire harness.

(4) Remove fog lamp from vehicle.

INSTALLATION

(1) Place fog lamp in position on vehicle.
(2) Connect fog lamp wire connector to front light-

ing wire harness.

Fig. 2 CHMSL Housing – Intrepid

Fig. 3 CHMSL – Deck Lid

Fig. 4 Fog Lamp – Intrepid

300M

LAMPS

8L - 17

REMOVAL AND INSTALLATION (Continued)


Content   ..  87  88  89  90   ..