Content .. 2125 2126 2127 2128 ..
Chrysler 300/300 Touring/300C, Dodge Magnum. Manual - part 2127
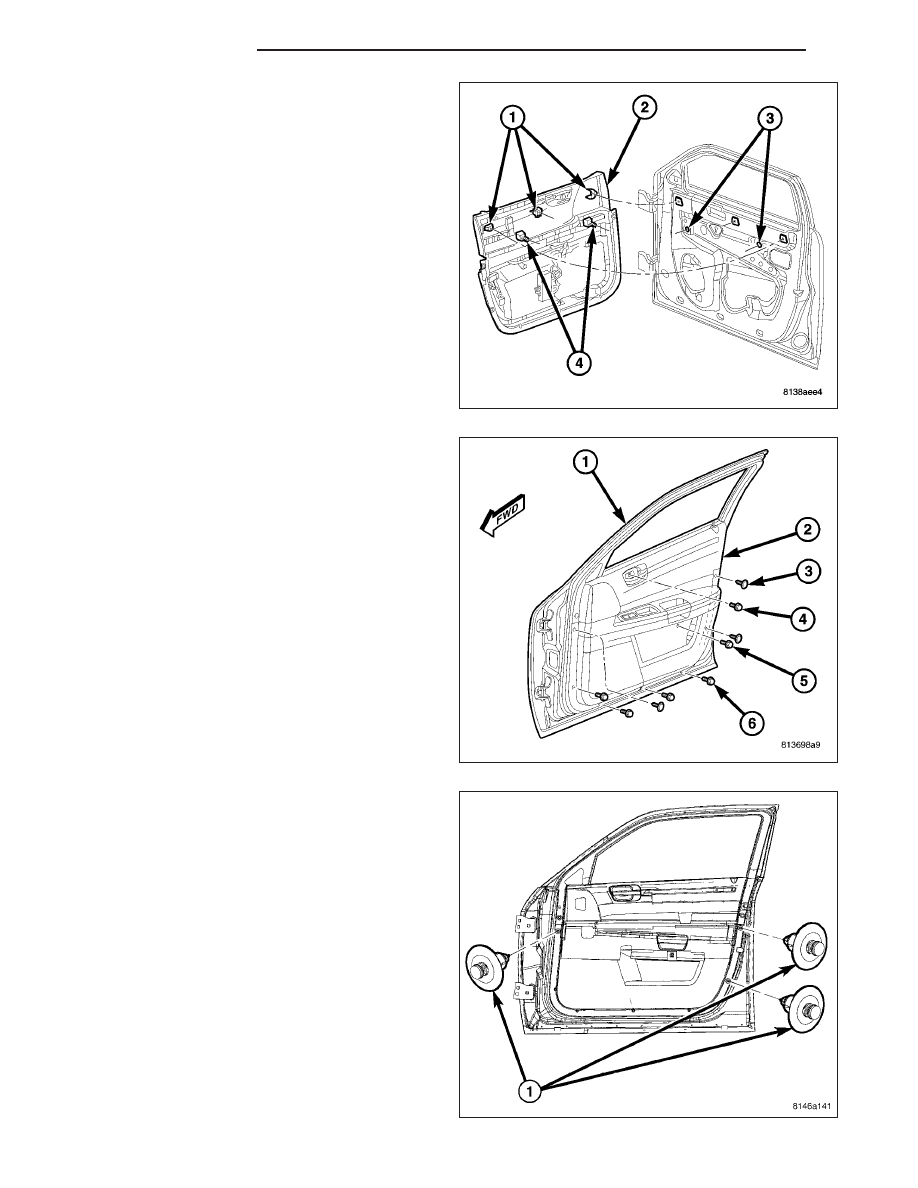
8. Position the two locator pins (4) on the back of the
trim panel (2) to the locator holes (3) on the inside
of the door panel and simultaneously push the
three upper pins (1) into the grommet plugs near
the top of the door. Make certain that the upper
edges of the trim panel are engaged in the grooves
of the window moldings.
9. Install and tighten the screw (4) that secures the
interior remote handle recess of the trim panel (2)
to the inside of the door (1). Tighten the screw to 2
N·m (16 in. lbs.). Fold and snap the screw cap over
the screw.
10. Install and tighten the screw (5) that secures the
trim panel (2) to the pull cup bracket below the
trim panel pull cup. Tighten the screw to 2 N·m
(16 in. lbs.). Fold and snap the screw cap over
the screw.
11. Install the three push-pin retainers (1) that secure
the trim panel to the inside of the door. (Refer to
23 - BODY/DOOR - FRONT - DESCRIPTION -
FASTENERS).
12. Install and tighten the four screws (6) that secure
the bottom and front lower corner of the trim
panel to the inside of the door. Tighten the screws
to 2 N·m (16 in. lbs.).
NOTE: For vehicles equipped with the optional
Automatic Express Up power window feature, cal-
ibration of this feature is required whenever power
to the door module is disrupted. A battery recon-
nect procedure must be performed anytime the
battery has been disconnected. (Refer to 8 - ELEC-
TRICAL/BATTERY SYSTEM - STANDARD PROCE-
DURE).
13. Reconnect the battery negative cable.
23 - 56
DOOR - FRONT
LX