Chery Tiggo 5 (T21). Manual - part 240
 

  Index      Chery     Chery Tiggo 5 (T21) - service repair manual 2014 year


Search            


Content   ..  238  239  240  241   ..


Chery Tiggo 5 (T21). Manual - part 240


19–

15

19

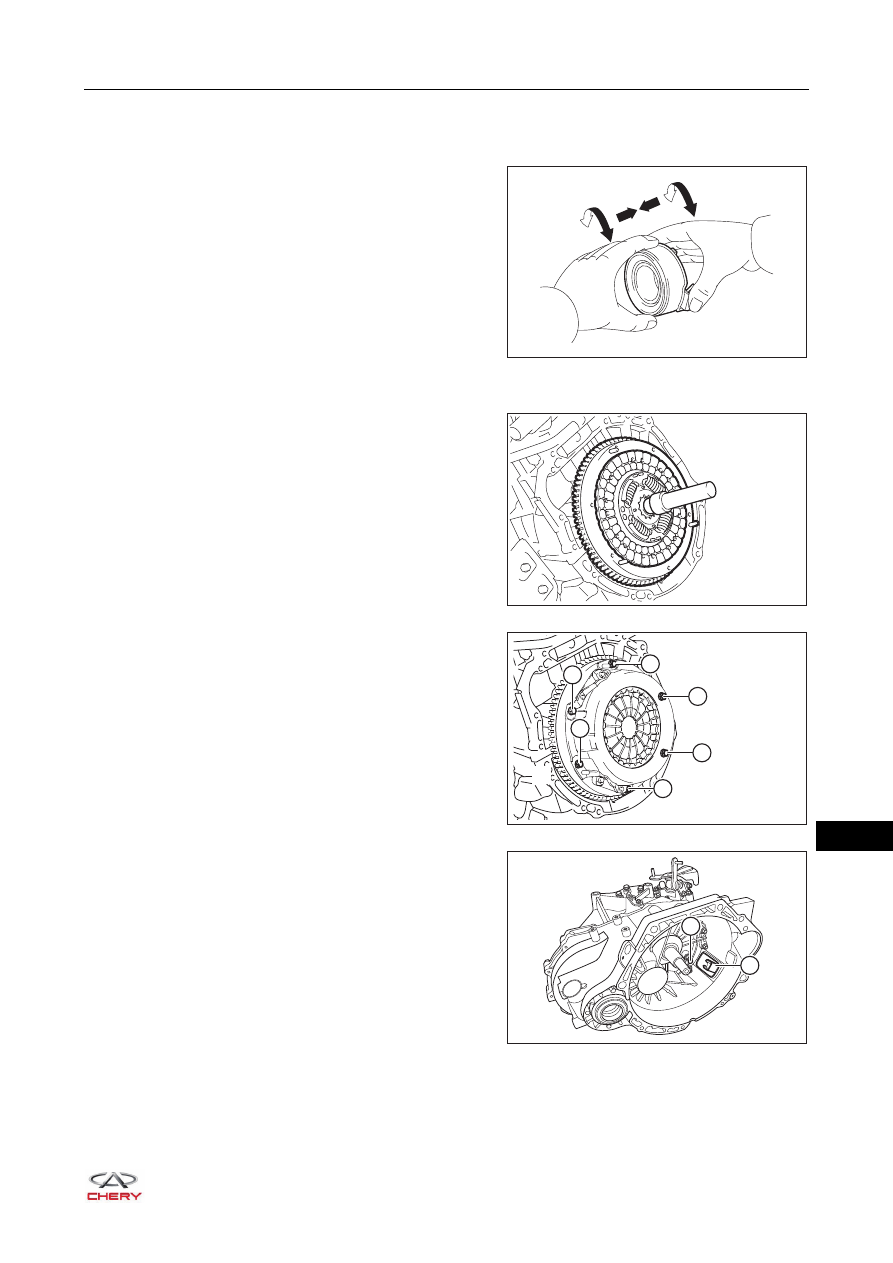
3. Check clutch release bearing assembly.

a. Visually check release bearing surface for dirt, glazing or damage. Clean or replace release bearing 

assembly as necessary.

b. Check that bearing operates smoothly by rotating the 

sliding part of bearing (the side contacting with clutch).
Replace release bearing assembly if necessary.

Installation

1. Insert a special tool into the clutch driven disc, and insert 

it into the flywheel.

2. Install the clutch pressure plate and tighten the bolts.

(Tightening torque: 25 ± 2 N·m)

3. Install the release fork ball seat (1).
4. Install the dust boot (2).

RT21190210

RT21190220

RT21190190

1

3

5

6

4

2

1

2

RT21190180

19–

16

19

5. Install the release fork (2).
6. Install the release bearing (1).

Bleeding Hydraulic Clutch

HINT:
An assistant will be required to assist when bleeding hydraulic clutch.

1. Turn off all the electrical equipment and ignition switch.
2. Check the fluid level in brake master cylinder, add DOT4 brake fluid as necessary, and keep the cap open.

3. Raise the vehicle with a lifter.
4. Remove the discharge port protective cap and connect a 

clear plastic hose to the bleeder screw, and submerge 
the end of hose into the clear container which is full of 
new brake fluid.

1

2

RT21190170

WARNING

 Brake fluid is harmful to your skin, be sure to wear protective gloves before operation.
 Once brake fluid contacts with your skin, wash it off with water immediately.

CAUTION

 Collect brake fluid with a container. 
 DO NOT allow brake fluid to spray onto body surface. Brake fluid may damage the painted surfaces. If 

any brake fluid is get onto the painted surfaces, wash it off with water immediately.

 Only use brake fluid recommended by Chery Automobile Co., Ltd, otherwise the lines may be subjected 

to a severe corrosion.

 Brake fluid type should be DOT4.

CAUTION

 Make sure that there is sufficient brake fluid in reservoir before bleeding.

RT21190260

19–

17

19

5. Release the discharge port (arrow).

6. Depress the clutch pedal until brake fluid is drained from discharge port.
7. Depress the clutch pedal and tighten the discharge port.
8. Depress the clutch pedal until there is pressure in the clutch system.
9. Depress the clutch pedal, then release the discharge port and bleed the fluid in brake master cylinder.
10.Repeat steps from 6 to 9 for several times, until there is no air in the hydraulic clutch system any more.

11.Tighten the discharge port, then remove the discharge hose and replace the discharge port dust cover.
12.Check the brake fluid level, add DOT4 brake fluid up to "MAX" as necessary, and then tighten the reservoir 

cap.

13.Check clutch pedal stroke. If clutch pedal stroke is excessive, or the condition does not improve, it 

indicates that some air is still kept in the system. Bleed the clutch again as necessary.

14.Test the vehicle again and make sure clutch operates normally and depressing feel is good.

RT21190270

CAUTION

 Never drain brake fluid when bleeding hydraulic clutch.
 Make sure brake level is always at "MAX" during bleeding.

19–

18


Content   ..  238  239  240  241   ..