Chery Tiggo. Manual - part 57
 

  Index      Chery     Chery Tiggo - service repair manual 2009 year


Search            


Content   ..  55  56  57  58   ..


Chery Tiggo. Manual - part 57


Timing Belt Automatic Tensioner

Removal & Installation

NOTE :
The following special tools are required to perform the repair procedure:
• MD-998767 - Automatic Tensioner Socket

1. Remove the engine timing belt (See Engine Timing Belt Removal & Installation in Section 02 Engine).

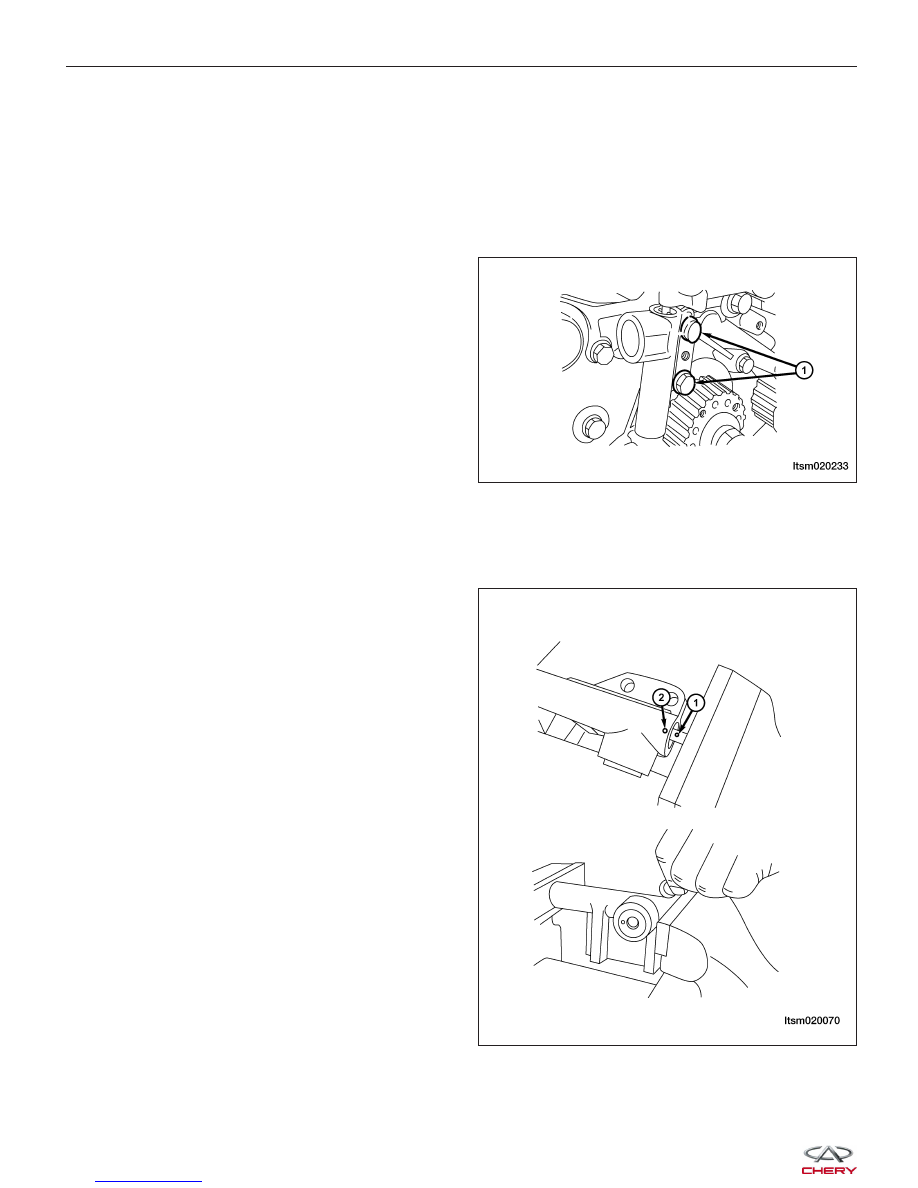
2. Remove the timing belt automatic tensioner bolts

(1).
(Tighten: Timing belt automatic tensioner bolts to
24 N·m)

3. Installation is in the reverse order of removal.

Installation Notes:
• Perform the following to prepare the automatic tensioner for installation:

− Slowly close the vise jaws until the rod hole

(1) and housing hole (2) are aligned.

− Insert a steel wire (1.4 mm diameter) into the

aligned hole.

− Remove the automatic tensioner from the

vise.

• The automatic tensioner is now ready to be installed on the engine.

ON-VEHICLE SERVICE

LTSM020233

LTSM020070


Inspection

1. Inspect the automatic tensioner for any leaks. Replace the tensioner if any leaks are found.

2. Inspect the automatic tensioner for signs of abra-

sion at the end of the rod. Replace the tensioner if
any abrasions are found.

3. Inspect the length of the rod. If the rod length does

not comply with the standard length, replace the
tensioner (standard rod length is 12 mm).

4. Using a calibrated force, press the end of the rod

using 98 - 196 N·m and measure the rod displace-
ment. If the rod displacement is 1 mm larger than
the standard, replace the tensioner (standard mea-
surement is

≤ 1 mm).

5. Assemble the automatic tensioner with a soft jawed

vise (1).
CAUTION: Use an appropriate pad (3) to protect
the tensioner bolt (2) from the jaws of the vise.

6. Rotate the handle of the vise to push the rod of the

automatic tensioner into the tensioner. If the rod is
easy to push in, replace the automatic tensioner.
The rod should have some resistance when you
push the rod into the tensioner.

ON-VEHICLE SERVICE

LTSM020061

LTSM020214

LTSM020062

02


Upper Balance Shaft Timing Belt

Removal & Installation

NOTE :
The following special tools are required to perform the repair procedure:
• MD-998778 - Crankshaft Pulley Puller

• MD-998781 - Flywheel Holder

• MD-998785 - Upper Balance Shaft Pulley Holder

1. Remove the engine timing belt (See Engine Timing Belt Removal & Installation in Section 02 Engine).

2. Using special tool MD-998781 (1), attach the tool

to the flywheel.

3. Remove the crankshaft pulley bolt.

(Tighten: Crankshaft pulley bolt to 120 N·m)

4. Using special tool MD-998778 (1), remove the

crankshaft pulley.

5. Remove the upper balance shaft timing belt.

NOTE: Remember the rotation direction of the timing belt in order to avoid any error when reassembling.

6. Installation is in the reverse order of removal.

ON-VEHICLE SERVICE

LTSM020051

LTSM020052

LTSM020053


Installation Notes:
• Align the timing marks on the crankshaft pulley (2) and the upper balance shaft pulley with the timing marks on

the front engine cover (1).

• Make sure all timing marks are aligned properly.

• Install the timing belt.

• Make sure that the belt tensioner position is as

shown (3 & 4).

• While applying finger pressure to the belt tensioner in the direction of the arrow, tighten the tensioner bolt to 35

N·m.

CAUTION:
Do not allow the belt tensioner to move while tightening the bolt, if the tensioner moves it could
cause the belt to be overtightened.

• Ensure that the timing marks (1) have not moved, and are still in alignment.

• Press the center of the timing belt with an index

finger and measure the belt deflection (standard
deflection is 5-7 mm).

• If the belt deflection is not within specifications,

adjust if necessary.

• Reinstall the engine timing belt (See Engine Timing Belt Removal & Installation in Section 02 Engine).

ON-VEHICLE SERVICE

LTSM020066

LTSM020067

LTSM020068

02


Content   ..  55  56  57  58   ..