Chery S11 / Chery QQ. Manual - part 188
 

  Index      Chery     Chery S11 / Chery QQ - service repair manual


Search            


Content   ..  186  187  188  189   ..


Chery S11 / Chery QQ. Manual - part 188


Chery    QQ    Maintenance Manual                                            Chassis System 


2)Brake scrape gasket replace 
Disassembly procedure 
It recommends to use lining or other 
pats produced by Chery to keep 
front/rear brake function. The brake 
parts produced by Chery are selected 
carefully to offer best brake 
function. 
1. Support and lift vehicle. 
2. Mark the wheel position to the hub. 
3. Remove tire and wheel. 
4. Remove brake drum. 
5.Remove park brake cable. 
6.Remove return spring with spring 
caliper. 
7.  Remove spring and spring support 
with screwdriver. 
8. Remove regulative lever. 
9. Remove spring and pins. 
10.Remove lining. 
11. Must remember to remove all linings 
on same shaft. 
Steps of installation 
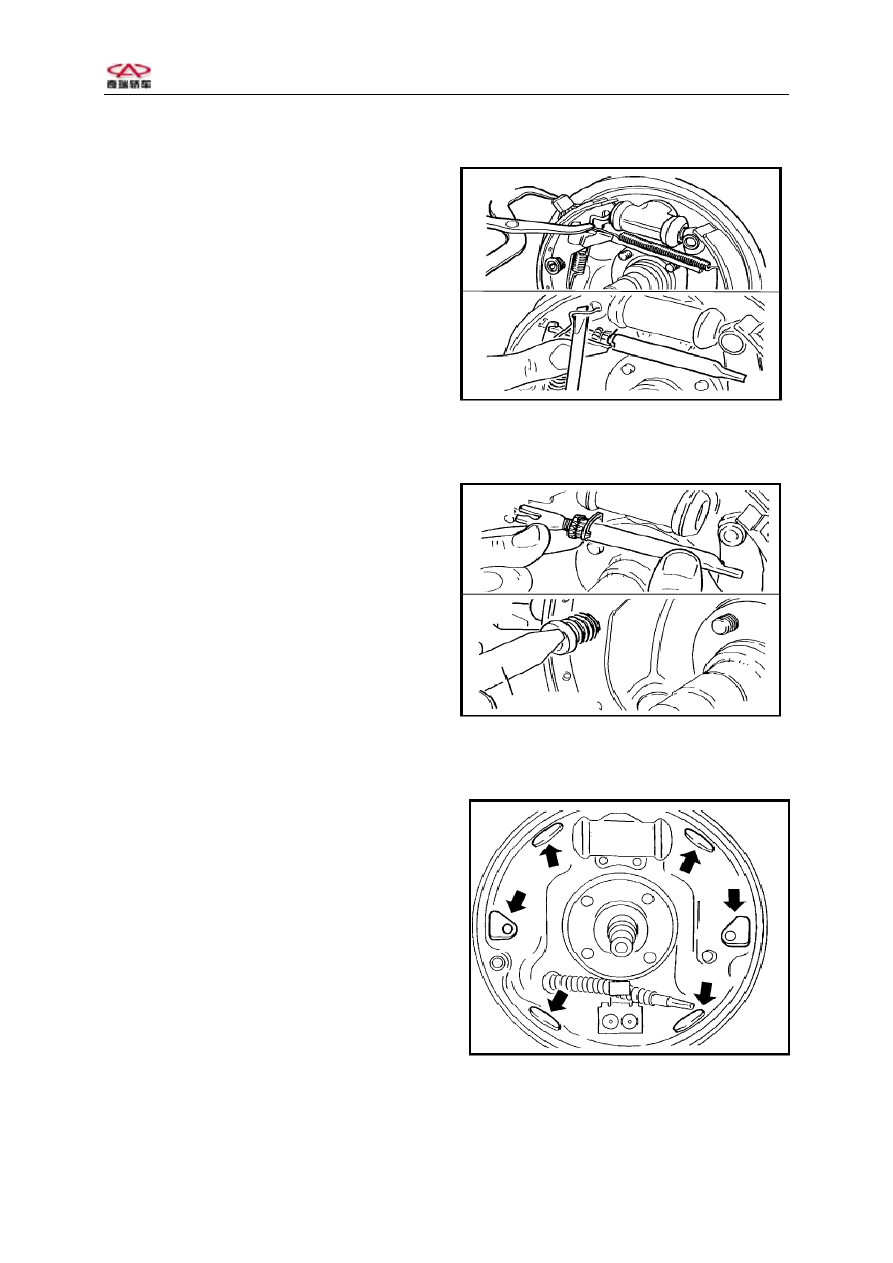
1. Clear surface of brake plate. 
2.  Use soft cloth as shown in the 
figure. 
3.  Connect park brake cable and park 
brake lever. 
4.  Install lining, spring and spring 
reed. 
5.  Install the returning spring and 
brake hoof. 
6.  Make sure the correct position of 
the cable as shown in figure. 
7.  Install slide lever regulator 
between two linings. 
8.  Install small washer on new lining 
as shown in figure. 
Points of attention:Make sure the 
small washer is mounted on lining, 
otherwise it will cause to damage brake 
or brake lini 


34


Chery    QQ    Maintenance Manual                                            Chassis System 


9. Mount regulating support with 

spring to pins. 


10.Install the support spring. 


11.Install return spring with spring 

caliper. 


12.Install brake drum. 


13.Adjust clearance of drum bearing. 


14. Adjust clearance of lining. Apply 
brake 10-15 times to make sure the 
clearances are correct. 


Attention:Stepping down brake pedal 
hard several times could adjust the 
clearance of lining automatically. 
15. Install tire and wheel. 
16. Mark the original labels on wheel 
and drum. 
17. Drop vehicle. 
18. Fill brake fluid to suitable level. 
19. Grind lining and drum. 
 
3)Gasket brake drum run in 

 Finish new surface of disc after 

replacing linings. 


 Run in the surface of new brake drum 

after finishing or replacing brake 
drum. 


 Brake 20 times at 48km/h to run in 

new braking surface. 

 Step down the pedal with the force 

gradually. Avoid over heat of 
brake. 

Attention: Avoid sharp brake in 
driving 200km after replacing new 
lining. 


35


Chery    QQ    Maintenance Manual                                            Chassis System 

4)Left brake replace 
Disassembly procedure 
1. Fill fluid to MAX level. 
2. Lift and support vehicle. 
3. Mark the position of wheel to the 

drum. 

4. Remove tire and wheel. 
5. Remove brake drum. 
6. Remove park brake cable. 
7. Remove brake cable 
8. Remove brake pipe on rear shaft. 
9. Remove sensor on rear ABS. 
10.Remove 4 bolts on rear brake. 
11.Remove rear brake. 
Steps of installation 
1.  Clear and check wheel shaft 
surface. 
2. Fix rear brake plate and rear brake 
with new bolts. 
Screw bolts with torque 50N.m. 
Caution: Don’t use old bolts. 
3. Install park brake cable 
4.  Mount brake pipe bolts on rear brake 
wheel cylinder 
Fixture 
Screw brake pipe bolts to 6 N.m. 
5.  Install rear vibration absorber 
bolts. 
Fixture 
Screw bolts to 65Nm. 
6. Install brake drum. 
7. Install rear sensor of ABS on rear 
brake. 
Install and adjust sensor 
Install sensor and screw bolts with 
hands. 
Push the sensor until cannot move. 
Screw bolts. 
Turn clockwise 30 degree to adjust the 
lever. 
Fixture 
Screw bolts to 6Nm. 
8. Fill clean fluid to suitable level 

8. Drain out air in the brake if rem- 
9. oving connector on inlet 
10. Step down the pedal with 220N after 
draining out air if necessary. 
11. Check if any leak of fluid in brake 
system. 
12. Install tire and wheel. 
13. Lower vehicle 
 
5)Brake wheel cylinder overhaul 
Disassembly procedure 
1. Remove brake cylinder. 
2. Remove cylinder hood. 
3.  Remove cylinder piston. Blow comp- 
4.  ressed air to inlet of cylinder, the 
piston will putout from hood. 
5.  Clear all parts with alcohol. 
Don’t use other liquid. 
6.  Check if cylinder and piston is cut, 
scratch, corrosion or wear. 
7.  Replace cylinder shell or piston if 
any above condition appears. 
8. Remove piston seal ring from cylind- 
er groove. 
Attention: Don’t use metal tool to 
remove seal ring, otherwise it will 
damage cylinder or groove. 
8. Check if scratch, nick, corrosion or 
wear appear on cylinder or groove. 
9. Use a fine sand paper to remove 
slight corrosion. 
10. If the corrosion cannot be removed, 
replace wheel cylinder. 
11. Check if cut, scratch or aging 
appear on protection cover. 
12. Replace damaged cover. 
13. Check if cut and scratch appear on 
groove. f the groove is damaged,replace 
wheel cylinder. 
14. Remove valve cover and valve from 
cylinder. 
15. Clean all parts with alcohol. 
16. Dry all parts with clean compressed  


36


Chery    QQ    Maintenance Manual                                            Chassis System 


Steps of installation 

air. 
 

1.  Install a new seal ring on groove 
and make sure there are no any bends on 
rings. 


2.  Put lubricated cover on piston. 
3.  Clean piston with fluid. 
4.  Install piston and cover in 
cylinder. Push the piston to the bottom 
of pump. 
5.  Install cover in the hole of 
cylinder. 
6. Install valve and valve cover on 
cylinder. 
Fixture 
Screw the valve to 8N.m. 


7. Install cylinder. 


37


Content   ..  186  187  188  189   ..