Chery S11 / Chery QQ. Manual - part 52
 

  Index      Chery     Chery S11 / Chery QQ - service repair manual


Search            


Content   ..  50  51  52  53   ..


Chery S11 / Chery QQ. Manual - part 52


Chery QQ Service Manual     

Charging System 


Note: 

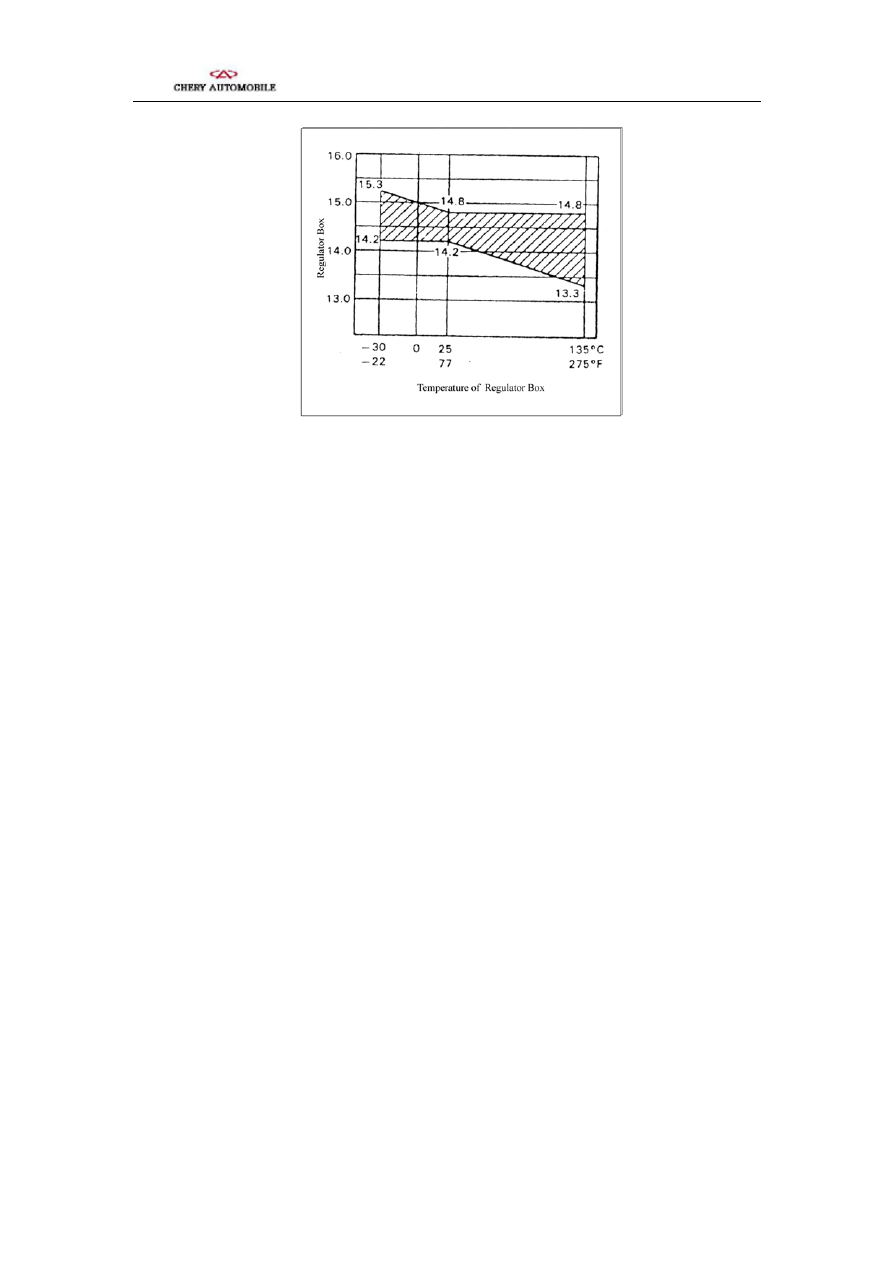
Take into consideration that the voltage varies with the temperature of the regulator 

case. 

Before this test, the discharged batte

ry must be fully charged. 

Note: When the engine runs, never remove the terminal post of the battery, otherwise, 

the electronic parts may be damaged. 

Standard current: 10A (max.) 

Standard voltage: 14.2-14.8V in 25°C 

Higher voltage 

If the voltage is higher than the standard value, replace the regulator of integrated 

circuit. 

Lower voltage 

If the voltage is lower than the standard value, conduct the following check. Connect 

the F terminal post to the ground connection, start the engine, and then measure the 

voltage of B terminal post. 

If the voltage goes up above the standard value, there is something wrong with the 

engine. 

Loading check 

Make the engine run at a rotation speed of 2000r/min, and switch on the head lights 

and the fan of heater system. And then measure the current. If the current is lower 

- 24 -   


Chery QQ Service Manual     

Charging System 

than 20A, repair or replace the generator.   

Overcharged battery 

1. Please see section “Battery” for ensuring the status of the battery. 

2. The excessively effusion of electrolyte is the obvious indication of being 

overcharged. Then remove the generator to repair, and check the exciting coil winding 

for ground connection or short circuit. If any trouble exists, replace the rotor and 

check to ensure the output voltage is within the specified range. 

.   Overhaul 


Removal and Installation 

1. Remove negative cable from battery; 

2. Disconnect the cable, which connects with terminal post B, and cable plugging 

device; 

3. Remove the bolt of engine cover (upside); 

4. Remove the adjusting bolt of driving belt of generator; 

- 25 -   


Chery QQ Service Manual     

Charging System 

5. Remove the bolt of engine cover (downside), and 

then remove the cover; 

6. Remove the construction bolt to take out the belt 

from the downside. 

7. Install them in the step contrary to that of 

removal, and adjust the driving belt to the specified 

output tightness. 

Tightening torque 

a): 18~28N·m  

b): 4~7 N·m   

c): 6~10 N·m 

Disassembly 

1.For convenience of installation, find out the alignment index line in the   

front cover and rear cover or make a fiducial mark. 

1)Alignment index line 

2)Front cover 

3)Rear cover 


2. Remove the bolt in the front cover from 

generator. 

1 Bolt 


3. Insert a flat-head screwdriver or similar tool between stator core and front cover to 

divide the generator into two parts, front part and 

rear part. 

1. Flat-head screwdriver   

2. Stator core 

3. Front cover 

- 26 -   


Chery QQ Service Manual     

Charging System 


4. Loosen the belt pulley nut with clamp and 

remove the belt pulley. 

Note: 

When the clamp is used, a piece of clean cotton 

cloth should be laid between rotor and clamp to 

avoid the damage to rotor. 

Always clamp the part “A” instead of part “B”, for 

the structural strength of part B doesn't suit firm 

clamping. 


1a: Belt pulley nut     2:  Clamp 

        3;  Belt pulley bolt 


4: Cotton cloth   

5: Rotor 


5. Remove the nut of B terminal post and isolator. 

6. Remove 3 bolts and take off the rear cover. 

7. Remove 3 bolts and pull out the brush carrier assembly. 

8. Remove 3 bolts and pull out the regulator of integrated 

circuit. 

9. Remove 3 bolts and stretch the stator coil lead, and then take out the rectifier. 

10. Remove the bolts and nuts in the rear frame, and then push out the rear frame with 

rotor. 


11. Remove the end housing bearing with 

bearing puller. 

Note:  When the bearing puller is used, it 

is subject to careful operation to avoid 

deforming the cooling fan blade. 


- 27 -   


Content   ..  50  51  52  53   ..