Chery S11 / Chery QQ. Manual - part 29
 

  Index      Chery     Chery S11 / Chery QQ - service repair manual


Search            


Content   ..  27  28  29  30   ..


Chery S11 / Chery QQ. Manual - part 29


Chery QQ Service Manual                                                                Chassis System 

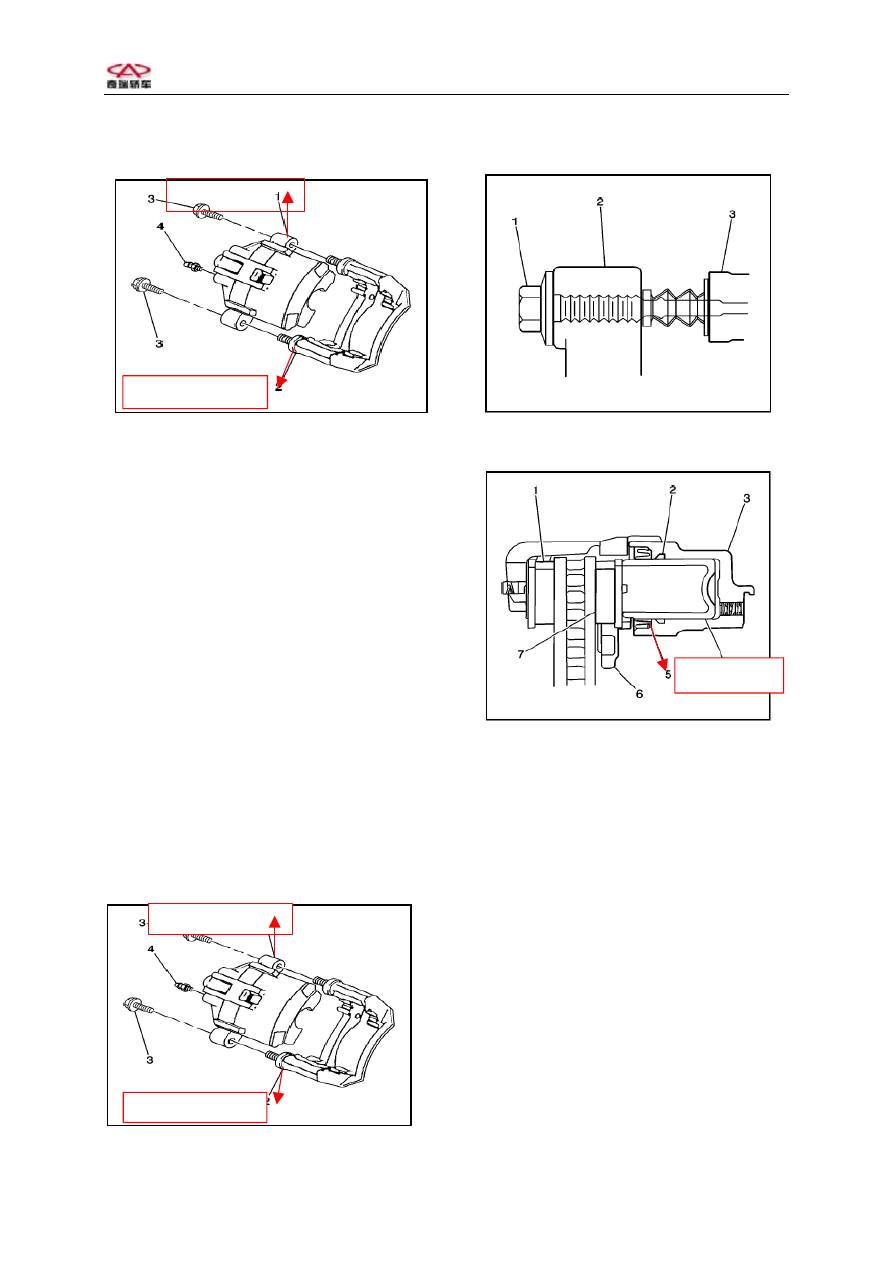
Caliper bracket 

Caliper casing 


Steps of installation 
1. Install caliper shell on the disc 
and caliper support to make sure bush 
is in correct position. 
2、Lubricate caliper bolt. 
3、Lubricate two bolt hoods. 
4、Install caliper bolt. 
Fixture 
Screw torque is 85N.m. 
5、Install hose bolts. 
Fixture 
The hose bolt screw torque is 85N.m. 
6. Remove wheel bolts 
7、Remove front tire and wheel assembly. 
See “ Remove and install tire and 
wheel”. 
8. Lower vehicle  
9、Fill brake fluid in master cylinder 
to correct level. 


10. When removing hose bolts, it needs 
to drain out air in caliper. 
11. Check if leaking fluid in hydraulic 
system. See “Check leaking fluid in 
hydraulic system”. 
 
5) Brake caliper overhaul 
Disassembly procedure 
Remove brake caliper. See“ Remove 
brake caliper” 
Warning: Don’t use fingers to hold 
piston, it will cause serious personal 
hurt. 
Attention: Take care to remove piston 
from cylinder. 
1、Remove piston. Clamp caliper. Use 
compressed air to remove piston from  

Caliper casing 

Caliper bracket 

Bolt protector


29


Chery QQ Service Manual                                                                Chassis System 


cylinder. 
Attention: If piston is damaged, it 
must replace whole caliper. 
Don’t scratch cylinder during 
replacing. 


3、Use small wooden tool or plastic tool 
to remove seal ring. 
Attention: Don’t use metal tool to 
remove. It will scratch cylinder or 
seal groove.  
4、Check if piston is cut, crack or wear. 
Replace any damaged piston. 
5、Check if cylinder or seal groove are 
cut, crack or wear. 
6、Use fine sands paper to polish slight 
corrosion. 
7、If the corrosion cannot be polished, 
replace caliper shell. 
8、Check if pin hood is cut, crack or 
aging. 


9、Replace old hood. 
10、Check if caliper pins are corrosion 
or damaged. Replace corrupt pins. 
11、Check if caliper seal groove is 
scratched. Replace new one. 
12、Remove valve cover and valve. 
13、Clean all parts with alcohol. 
14、Dry all parts with clean compressed 
air. 


30


Chery QQ Service Manual                                                                Chassis System 


6)Brake caliper bracket replace 
Disassembly procedure 
Points of attention: Don’t 
disconnect hose from caliper. Don’t 
suspend caliper on hose. 
1、Remove caliper. See“ Remove 
caliper”. 
Warning: Replace all fixture parts if 
they are loose or removed, otherwise it 
will cause personal hurt or vehicle 
damage. 
Points of attention: New caliper bolts 
have been smeared bolt seal glue. 
2、Remove caliper support bolts. 
3、Remove caliper support bolts. 
4、Remove hood bolts and bush from 
support. 
5、Check if support is broken. 
6、Replace new support if necessary. 
Steps of installation 
1、Use lubricant to lubricate parts. 
2、Install following parts on support. 

 Bolt protector 
 Bush 

3、Screw bolts to fix caliper support. 
Fixture 
Screw torque: 165N.m. 
4、Install caliper. See “Replace brake 
caliper”. 


 7) Brake disc replace 

Disassembly procedure 
1. Support and lift vehicle. 
2. Remove tire and wheel. 
3. Check the thickness of brake disc. 
4. Remove brake caliper. 
5. Remove caliper support. 
6.  Remove brake disc bolts and brake 
disc. 
7. Clear interface between the disc and 
the wheel hub flange. 
Steps of installation 
1. Install brake disc 
2、Install the disc bolts. 
Fixture 
Screw bolts to 6 N.m. 
3、Install caliper. 
4、Install caliper support. 
5、Install tire and wheel 
6. Lower vehicle 


31


Chery QQ Service Manual                                                                Chassis System 


8)Brake disc surface finishing 
Points of attention: Don’t finish 
disc to correct following process: 

 Brake noise. 
 Early wear of lining. 
 Surface corrosion. 
 Disc fade. 

Only finish surface on one of following 
conditions: 

 Serious scratch on surface of disc 

with depth of 0.4mm. 

 The hop caused by following 

reasons: 

——The deviation of disc depth 

exceeds 0.01mm. 

——Corrosion or scratch depth 

exceeds the surface of disc. 
Attention: Whenever to remove the disc 
from wheel flange, the corrosion or  


dirt on disc or flange face must be 
cleaned, otherwise it will cause 
serious hop. 
1、Clear the wheel bearing and hub. 
2、Use micrometer to measure the 
thinnest point on disc. If the 
thickness of the point exceeds the 
minimum thickness of disc, don’t 
finish surface of disc. Replace disc at 
once. 
3、Clear completely the corrosion on 
flange. 
4、Finish the disc. 
Points of attention: If the best 
surface finishing could not be reached, 
it will cause bad brake ability. 
5、After machining the disc, use alumna 
to get unidirectional surface. 
6、Clean surface with suitable cleaning 
fluid 
Attention: Loose wheel bolts will 
cause brake hop or damage. Screw wheel 
nuts to specified torque to avoid 
expensive service for brake system. 
 

4. Description and operation 

Disc braking system 
Points of attention: 

 Use clean fluid to lubricate all 

rubber parts for better 
installation. 

 Don’t use compressed air with 

lubricant. 

 Whenever to remove hydraulic parts, 

drain out all air in system. 

 Replace whole lining assembly. 
 Fix dry parts in specified torque. 

Operate on clean working desk. 
The caliper has a single cylinder. 
The caliper is mounted on the  


32


Content   ..  27  28  29  30   ..