Chery QQ6 (S21) / S12LHD. Manual - part 163
 

  Index      Chery     Chery QQ6 (S21) / S12LHD - service repair manual


Search            


Content   ..  161  162  163  164   ..


Chery QQ6 (S21) / S12LHD. Manual - part 163


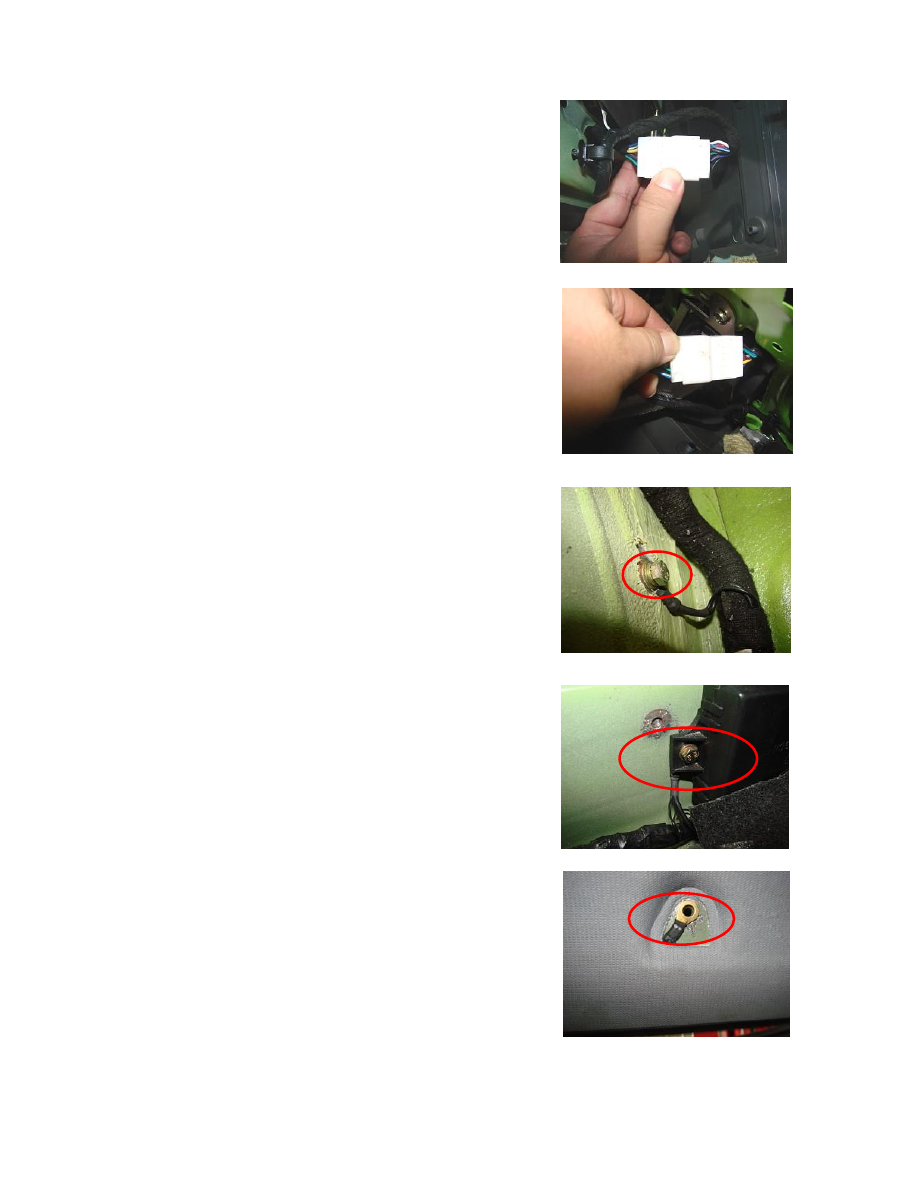
29.  Removal  of  the  harness  butt  jointed  with  the  left-rear  door 
harness.   
 
29.1.  Disassemble  the  left  B-pillar  inner  shield.  (See  Removal  and 
Installation of B-pillar Inner Shield) 
29.2.  Push  down  the  plastic  clips  that  fixes  the  harness  connector 
butt jointed left-rear  door harness, and then unplug the harness plug 
that butt joints the left-rear door harness.   


30. Removal of the Interior and right-rear door butt jointed harness   
 
30.1. Disassemble the right B-pillar inner shield. (See  Removal and 
Installation of B-pillar Inner Shield) 
30.2.  Unplug  the  harness  plug  butt  jointed  with  the  interior  and 
right-rear door. 


31. Disassemble the ground wire.   


32.  Disassemble  the  screws  that  fix  the  BCM  module,  and  then 
disassemble the ground wire.   


33.  Use  a  cross  head  screwdriver  to  remove  the  left  vehicle  ceiling 
handle, and then disassemble the ground wire.   


34. Removal of sunroof controller harness.   
 
34.1.  Disassemble  the  left  vehicle  ceiling.  (See  Removal  and 
Installation of Vehicle Ceiling) 
34.2. Remove the sunroof controller harness plug.   
(Note:  Optional  for  some  vehicle  types  and  the  sunroof  controller 
connectors are reserved for this vehicle type. ) 


35.  Installation  of  In-door  harness.  (The  steps  are  reverse  to  those 
for removal) 


Section V Removal and Installation of Instrument Panel Harness 

I. Harness sketch 


Wiper switch


Horn button


Diagnosis 
interface 

Cigarette lighter


Ground


Instrument 
to engine


Outgoing 

wire 

The  bracket  should  be 
fitted  together  with  the 
electric  box,  the  torque 
is:7±1NM   
 

To  instrument 
electric box


Wiper relay


The  bracket  should  be 
fitted  together  with  the 
electric  box,  the  torque 
is:7±1NM


Blower relay


Turning relay


Left loudspeaker


Cluster gauge


Fog light switch 

Nightlight switch


Brake switch


Antenna power


Blower relat


Blower power


Air 

conditioner 

speed resistor


Air 

bag 

connector


Ground


Blower switch


Air 

conditioner 

switch


Alarm 
switch


Instrument 
to engine


Instrument 
to interior


Dimmer 
turning switch


Instrument 
to interior


Rear 

wiper 

handle switch


Headlight 
switch


Ignition 
switch


Anti-theft 
module


Audio


Air 

conditioner 

thermostat


I/O 

circulation 

motor


Right loudspeaker


Instrument 

to 

front 

compartment


Instrument 

to 

front 

compartment


Wiper 

  switch 

Horn 

button 


II. Instructions on Main Connectors   

No 

Connector Name 

Pins 

Connection 

Instrument to interior   

Anti-sheft module  →instrument to 

engine 

Ground 

—— 

Ground   

Fog lights  →c200 (instrument to 

interior ) 

C200 (instrument to interior ) 

—— 

C209 (instrument to engine) 

10 

C209 (instrument to engine) 

11 

Instrument electric box 

12 

Instrument to interior (c200) 

13 

Ignition switch (IGN1) 

14 

C100 (instrument to front 

compartment ) 

15 

Trouble diagnosis socket 

16 

C209 (instrument to engine) 

17 

Air bag 

18 

C209 (instrument to engine) 

19 

C200 (instrument to interior ) 

20 

C209〔instrument to engine〕 

21 

C200  〔instrument to interior  〕 

22 

Headlight switch 

23 

C209 (instrument to engine) 

24 

Headlight switch 

25 

C100〔instrument to front 

compartment  〕 

26 

C100〔instrument to front compartment 

27 

C209〔instrument to engine〕 

28 

Instrument electric box 

29 

—— 

30 

C209〔instrument to engine〕 

31 

Air bag 

Combination instrument 

connector   

32 

Fog lights switch  →instrument to 

front compartment   

Audio system 

C200 (instrument to interior ) 

Left loudspeaker 

connector   


C200(instrument to interior ) 

Audio system 

Ground 

—— 

C100  〔instrument to front 

compartment〕 

C200(instrument to interior ) 

Fog light switch 

connector   

C200 (instrument to interior ) 

—— 

—— 

—— 


Headlight switch 

Instrument electric box 


Content   ..  161  162  163  164   ..