Chery IndiS (S18D) . Manual - part 2
 

  Index      Chery     Chery IndiS (S18D) - service manual


Search            


Content   ..  1  2  3   ..


Chery IndiS (S18D) . Manual - part 2


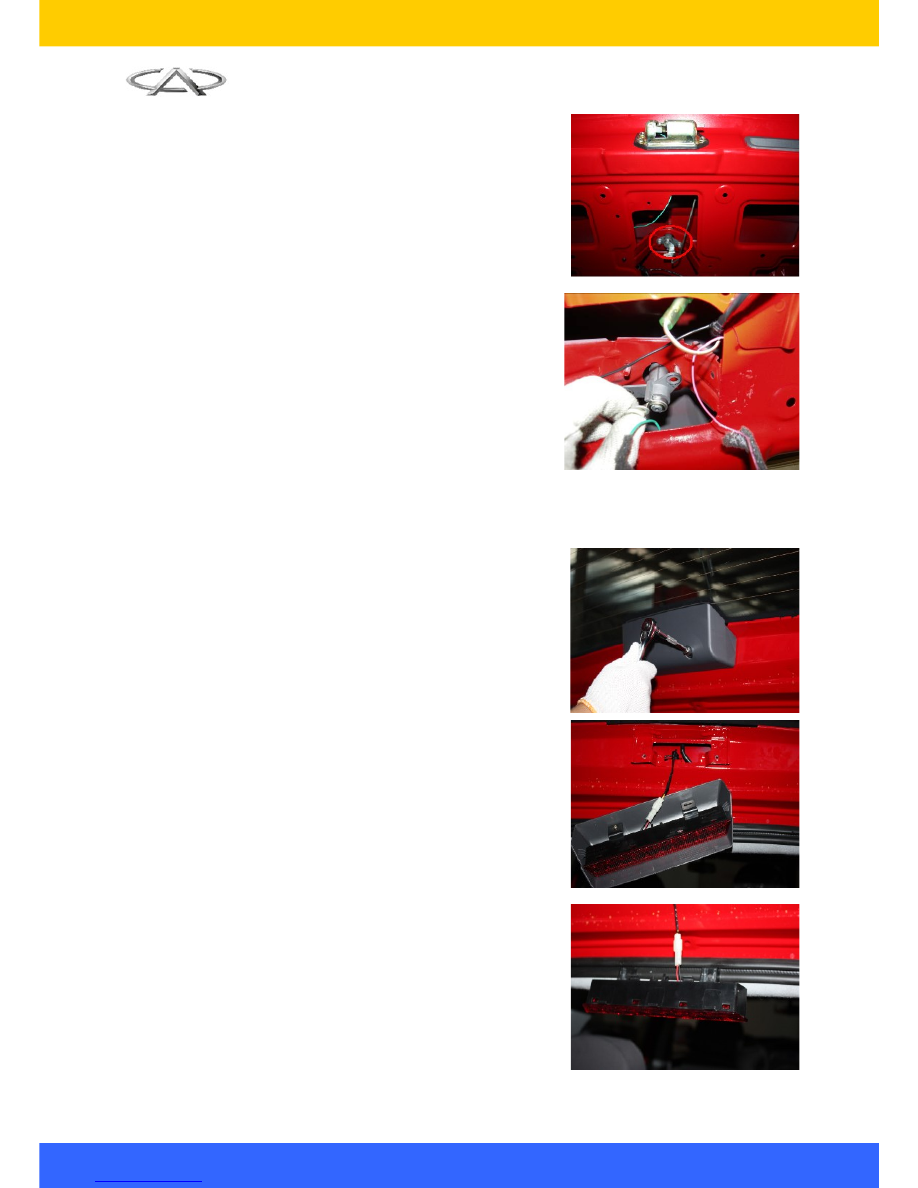
4.1.1.

Screw   off   the   two   fixing   bolts   of   lock 
cylinder with 10# socket wrench.

Installation torque: 7±1N.m

4.1.2.

Push the lock cylinder out and remove it.

Note:   the   lock   cylinder   washer   shall   not   be 
throwed away.

4.2. Installation Procedure

The installation procedures are  reverse to those 
for removal.

Note: the clearance between the lock cylinder and 
door sheet metal.

5. Removal of Rear Wiper Nozzle

5.1. Removal Procedure

5.1.1.

Remove   the   fixing   bolt   of   high   mount 
brake   lamp   cover   with   a   10#   socket 
wrench.

5.1.2. Remove   the   cover   and   disconnect   the 

connector;  remove the high mount brake 
lamp. 

5


5.1.3.

Pull   off   the   rear   water   nozzle   hose   to 
remove the rear water nozzle.

5.2. Installation Procedure

The installation procedures are  reverse to those 
for removal.

Note: water injection opening should be opposite 
to wiper motor steering shaft.

6. Removal of Rear Wiper Motor

6.1. Removal Procedure

6.1.1.

Remove   the   rear   wiper   blade   and   arm 
seat cover.

6.1.2.

Use a 10# socket wrench to loosen the 
nut above the motor, and remove the rear 
wiper blade. 

Installation torque: 7±1N.m

6.1.3.

Pull   the   wiper   motor   connector,   remove 
three fixing bolts of the rear wiper motor 
with 10# socket wrench; remove the motor 
assembly.

Installation torque: 12±1N.m

6


6.2. Installation Procedure

The installation procedures are  reverse to those 
for removal.

Notice to install the wiper seat sealing ring in place 
to avoid water leakage of rear windshield.

7


Chapter II Removal of Interior Trim Parts

I. Removal and Installation of Seat Belts

1. Preparations

Tools: plastic screwdriver, wrench, socket wrench and etc. 

Parts: disposable clip, expansion bolt.

2. Precautions

Keep the seat belts clean and free of oil, and check them for any damage.

3. Removal and Installation of the Seat belt of Front Seats

3.1. Remove the front and rear door weather strip.

3.2. Pry out the front doorsill pressure plate with 

plastic screwdriver.

3.3. Remove the fixing bolts of rear doorsill with 

cross   screwdriver   and   remove   the   rear 
doorsill pressure plate.

3.4. Remove   the   seat   belt   lower   fixing   bolt   with 

17# socket wrench.

Torque: 50±10N.m

8


Content   ..  1  2  3   ..