Chery Fora (Elara A520). Manual - part 136
 

  Index      Chery     Chery Fora (Elara A520) - service repair manual


Search            


Content   ..  134  135  136  137   ..


Chery Fora (Elara A520). Manual - part 136


36 


II. MAINTENANCE 

1. Replacement of Oil Pan 

1.1


Needed  tools  and  auxiliary  materials 
10#  open  end  wrench,  10#,  15#,  17# 
sleeves,  ratchet  wheel,  ratchet  rod,  Le 
Tai 5901 Glue and engine oil. 

1.2

  Process of 

Replacement   

1.2.1


Process of removal 

1)


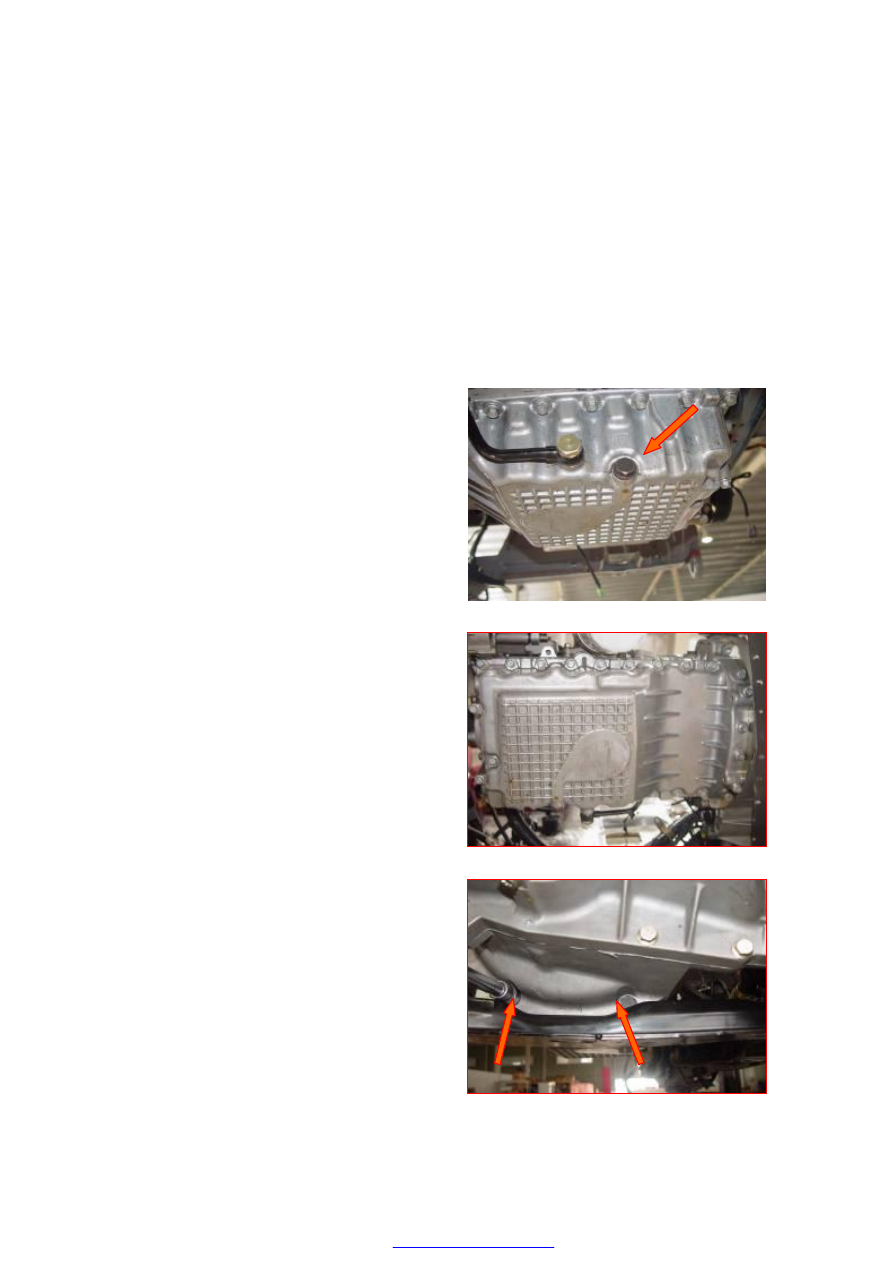
Loosen  the  oil  discharge  bolt  of  oil  pan 
to discharge the engine oil.   

Note:  Engine  oil  should  be  stored  in  special 
container.  And  Pay  attention  to  environment 
protection. 


2)


Use  10#open  end  wrench  and  10  # 
sleeve  to  dismantle  the  fixed  bolt  of  oil 
pan (18 M7×25, 3 7×40 and 4 M7×95). 


3)


Use  17#  sleeve  wrench  to  dismantle  the 
bolts (2 pieces, black) connecting the oil 
pan and transmission housing. 


37 


4)


Use  15#  sleeve  wrench  to  dismantle the 
bolts  connecting  the  oil  return  pipe  of 
PVC valve and oil pan   


5)


Use  rubber  pestle  to  knock  the  edge  of 
oil pan, and dismantle the oil pan. 

Note: 

Pay 

more 

attention 

to 

safety 

precaution,  since  the  oil  pan  may  fall  down 
during the knocking process. 


6)


Use  right-angled  tools  to  clean  up  the 
old  Le  Tai  Glue  stained  onto the engine 
frame.   

Note: Do not scuff the frame surface.


1.2.2


Installation 

1)


Apply  Le  Tai  5910  Glue  onto  the 
connection  surface  of  engine  frame 
edges and oil pan to close up the oil pan, 
and then mount fixed bolts for oil pan. 

Note:  Spread  glue  to  the  inner  of  hole  for 
installing bolt on the oil pan! 

2)


Fasten  the  bolt.  Firstly  fasten  it  slightly 
to  press  fit,  and  then  fasten  it  up  to  the 
specified torque.   

Fastening method for bolt: 

a:


Firstly  screw  in the oil pan  bolt, and  let 
it not be pre-fastened. 

b:


Pre-fasten  the  bolt  from  the  central  part 


38 

clockwise. 

c:


Fasten  the  bolt  up  to  specified  torque 
from  the  central  part  to  both  sides 
clockwise.  (As the figure illustrated). 

Torque: 15±3NM 

3)


Fill engine oil up to specified volume. 

2 Replacement of Oil Strainer 

2.1


Needed tools and auxiliary materials   

10#open  end  wrench,  10#,  15#,  17#  sleeves, 
ratchet  wheel,  ratchet  rod  Le  Tai  5901 
Glue,engine oil. 

2.2


Process of replacement 

2.2.1


Process of removal 

1)


Dismantle  oil  pan  (removal  method  is 
shown in the “replacement of oil pan” ). 

2)


Use  10#  sleeve  wrench  to  dismantle the 
bolts  (8  pieces)  connecting  the  oil 
strainer and engine frame.   


3)


Pull out the oil strainer carefully. 

2.2.2


Installation 

1)


Spin  the  nozzle  of  engine  oil  strainer 
into the frame carefully. 

2)


Mount  the  8  bolts  for  the  strainer  and 
fasten them. 

Note:  All  bolts  should  be  pasted  with Le Tai 
243 Glue.   

Torque: 8±3Nm 

3)


Installation of  oil pan (detailed  methods 
are shown in the installation of oil pan).   


39 


3


Replacement  of  Piston,  Piston  Ring, 
Piston Pin and Connecting Rod Bearing 

3.1


Needed tools and auxiliary materials   

10#open  end  wrench,  10#,15#,17#  sleeves, 
ratchet  wheel  ,  ratchet  rod,  Le  Tai  5901 
Glue,engine  oil,  torque  wrench,  special 
piston 

mounting 

tools, 

feeler 

gauge, 

clearance gauge,    micrometer caliper 

3.2


Process of replacement 

3.2.1


Process of removal 

1)


Dismantle  the  timing  belt  (detailed 
methods  are  shown  in  the  section  of 
timing 

belt 

assembly 

in 

the 

“ replacement of timing belt”).   

2)


Dismantle  the  oil  pan  (detailed  methods 
are 

shown 

in 

the 

section 

of 

“ replacement of oil pan ”).   

3)


Dismantle  the  cylinder  head(detailed 
methods  are  shown  in  the“  removal  of 
cylinder head”). 

4)


Dismantle 

the 

oil 

strainer(detailed 

methods  are  shown  in  the  “replacement 
of oil strainer”. 


5)


Loosen  the  bolts  of  connecting  rod  big 
end. 


6)


Dismantle the lower cover of connecting 
rod journal. 


Content   ..  134  135  136  137   ..