Chery A15. Manual - part 128


  Index      Chery     Chery A15 - service repair manual


Search            


Content   ..  126  127  128  129   ..


Chery A15. Manual - part 128


SOUND SYSTEM 

VDO INTERFACE FUNCTION 
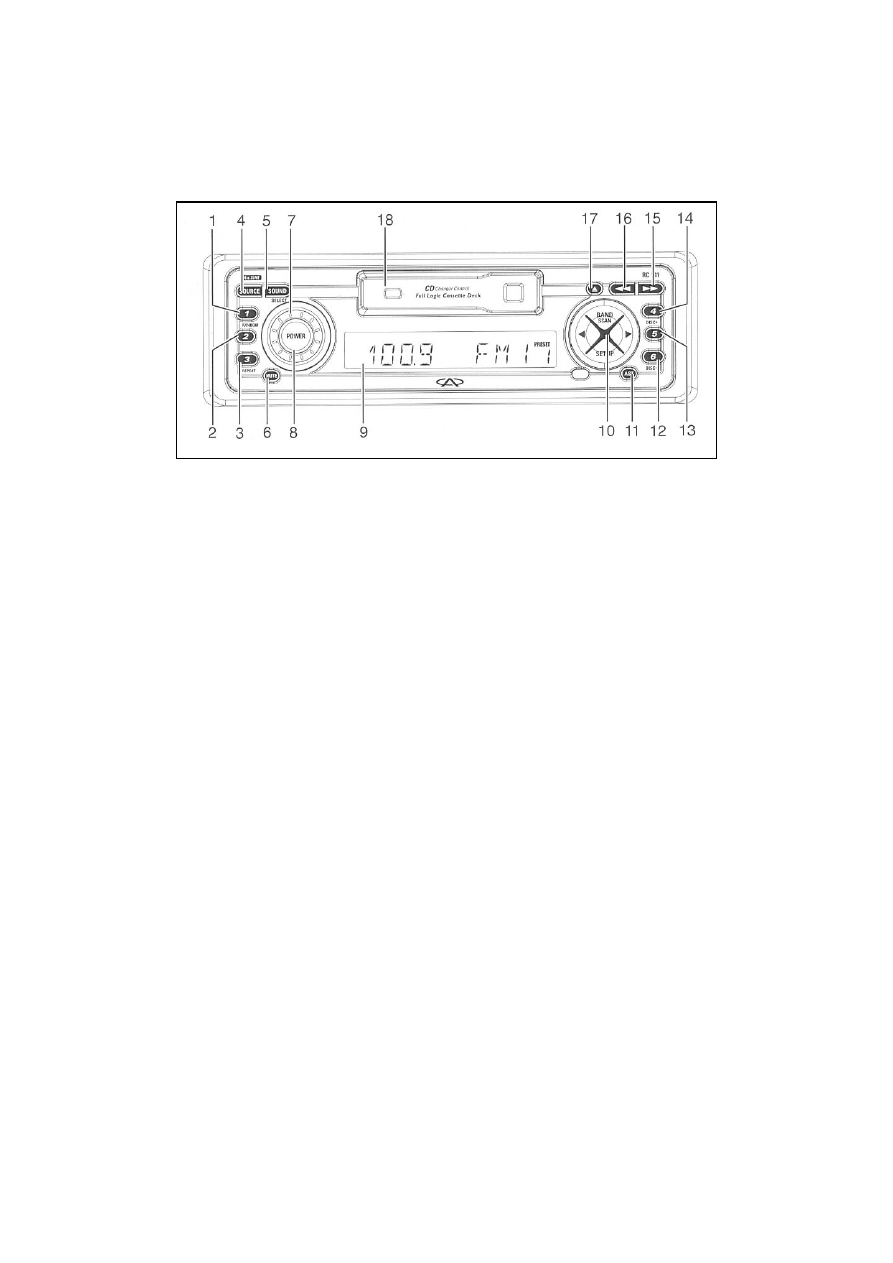


1. Preset key 1 

RANDOM Start/stop of CD   

2. Preset key 2   

3. Preset key 3   

REPEAT CD player repeat start/stop      

4. SOURCE Sound source                

5. SOUND Short press: sound effect mode       

Long press: sound setup mode 

6. MUTE                                                           

7. Volume adjustment                                       

8. POWER:      Power switch                     

9. Display   

15. Fast forward   

17. Tape eject   

Short press: Tape reverse 

Long press: Tape eject 

10. BAND     

      Radio frequency scan/ CD songs list scan 

      High end/low end search (radio) 

   Forward/backward songs list (CD) 

   Music searching system 

      SETUP          Enter setup mode 

11. AST      Auto storage 

12. Preset button 6 

      DISC-      Select forward 

13. Preset button 5 

14. Preset button 5 

      DISC+        Backward selection 

16. Fast backward 

18. Tape exit 


T-69


OPERATION INSTRUCTION 

Tape playing


1. Press POWER button to switch on the power, and rotate to the right to increase the 
volume. 

2. Face the tape open side to the right. Push it into the cassette door No.18 to lock position, 

and the player begins to work. At this moment, the display No.9 shows the tape is playing.   

3. If there is already a tape in the cassette player, press the SOURCE button selecting the tape 

as the source, and start to play the tape. 

4. The tape will automatically reverse and continuously to play when it comes to the end, or 

you can press button No.17 to manually reverse it. 

5. In order to quickly select the song that you want, press fast forward button   or fast 

backward button   for quick play forward or backward, and then press another fast 

backward button or fast forward button slightly, the tape will enter into the play mode. 

6. If you want to stop the play or change the tape, press the tape eject button No.17, the tape 

will eject from the cassette player. 

Radio 

1. Power switch, volume control, tone adjustment and playback mode. 

2. Press BAND button to select the desired band. The display No.9 will show the band to 

receive. You can select the one of following bands as you wish: FM1, FM2, FM3, FM AST, 
MW (AM) AST, MW (AM) 2, and MW (AM) 1. 

Note: You can cancel the MW (AM) band if you do not want to listen to it. 

If you do not want to listen to the excessively preset FM or MW (AM) stations, you can 
cancel some of them correspondingly. 

3. Manual and automatic tuning (selecting stations): 

(1) If you want to enter manual tuning mode, please press the SETUP button to enter into the 

set mode and select “TUN” item, after that set it in “MAN” Mode. The radio will 
maintain the manual tuning mode. 

(2) Press the tuning button   continuously to tune to the lower frequency end station, or 

press the tuning button 

  to the high frequency end station. 

(3) Press the button continuously   or 

 for more than 0.5 second, the player will 

complete its automatic tuning till the broadcasting station is received. Repeat step〈1〉or

2〉, you will receive the broadcasting program that you want. 

4. Automatic scanning: 

If you press the SCAN button for 2 seconds, you can initiate the start/stop automatic scan 
function of the player. The player will automatically scan the stations from low to high end 


T-70


starting from the initial frequency point. When one station is locked in, the player will pause 
the scanning. The frequency of the station will flash for 10 seconds while broadcasting the 
program of the tuned station. After that it will continue to scan the higher frequency end till it 
reaches the highest end and return automatically. It will then scan from the lowest to the 
higher end again. 

If you want to listen to any program of a particular station, you just need to press the SCAN 
button when the frequency of the station is flashing, the scanning will stop at the position of 
the station immediately. If you press the SCAN button again, it will go back to the automatic 
scanning mode.   

Memory of the station frequency 

You can store up to 6 station frequencies in advance with 1 to 6 preset buttons under each 
mode of FM1, FM2, FM3 and AM. 

1. Manual storing 

When you want to use automatic searching mode to search for a particular station, press 
anyone of the 1-6 preset buttons for more than 2 seconds, and after hearing the voice from 
strong to weak and from weak to strong again, it means that this station frequency has been 
stored in the preset button that you have pressed.     

When storing the stations of FM, the related RDS information and AF mode (on/off) are also 
been stored together. 

2. Automatic storing 

You can automatically store 6 strongest FM stations in the FM AST band or 6 stations in the 
MW(AM)AST band. 

Press button AST to enter into the automatic storing mode, the player will make a voice of 
“hua”, and then becomes mute. 

After storing, you will hear the voice of “hua” again, and you start to listen to the station of 
the preset button 1.   

CD player 

1. This player can be connected to VDO CD player, -CDC 401 A or CDC 601 A or CDC 603 

A or CDC1001 A. 

2. Press button SOURCE selecting CD player as voice source. 

3. Press button DISC+ or DISC- to select the disc you want. After finishing one disc, the 

player will automatically turn to the next one to continue playing. If the empty disc is 
encountered, it will skip automatically. 

4. Press button   or    to select the song that you want, and start to play from the selected 
song. 


T-71


OTHER FUNCTIONS 
Sound setting


1. Press the SOUND button for at least 2 seconds to enter into the SOUND setting mode. 

2. Press the SOUND button to select the desired sound effect mode. 

-BASS (bass, under the BASS-TREB mode) 

-TREBLE (treble, under the BASS-TREB mode) 

-BALANCE: The left and right volume balancing 

-FADER: Front and back speaker control 

-LOUDNESS (off, bass, mediant, treble, under the BASS-TREB mode) 

3. The sound effect mode which could be selected by rotating the volume button. After 5 

seconds, the display will return to the last operation mode automatically. 

Sound effect setting 

Short press the SOUND button to select a sound effect preset by the manufacturer. 

-BASS-TREB: You may set the bass or treble of the player by yourself. 

-JAZZ: Jazz music 

-VOCAL: Voice 

-POP: Pop music 

-CLASSIC: Classic music 

-ROCK: Rock and roll 

Clock setting (manual) 

1. Short press the SETUP button to enter into the SETUP menu. 

2. Press button 

  turning to the “TIME” item. 

3. Press the SETUP button to select the “12H” or “24H”. 

4. Press button 

  to select the hour position. 

5. Press the SETUP button to adjust the hour position. 

6. Press button 

  to select the minute position, and the minute position will start to flash. 

7. Press the SETUP button to adjust the minute. The time will start from the setting time.   

8. Press the SETUP button for at least 2 seconds to exit the SETUP menu. 

- If the clock mode has been activated, the display will show the time after operating any 

button for 10 seconds. 


T-72


Content   ..  126  127  128  129   ..