BMW 325xi Sports Wagon (2006 year). Instruction - part 6
 

  Index      BMW     BMW 325xi Sports Wagon - instruction 2006 year in english


Search            


Content   ..  4  5  6  7   ..


BMW 325xi Sports Wagon (2006 year). Instruction - part 6


Co

n

tr

o

ls

 93

Re

fe

re

n

c

e

At

 a

 g

la

n

c

e

D

riv

in

g ti

ps

C

o

m

m

uni

ca

ti

o

n

s

Na

v

iga

ti

on

En

te

rt

a

in

m

e

n

t

M

o

bi

lity

Depending on your vehicle's equipment ver-
sion, the fog lamps are switched off when you 
activate the headlamp flasher or switch on the 
high beams

*

.

If the automatic headlamp control is acti-
vated, the low beams will come on auto-

matically when you switch on the fog lamps.

<

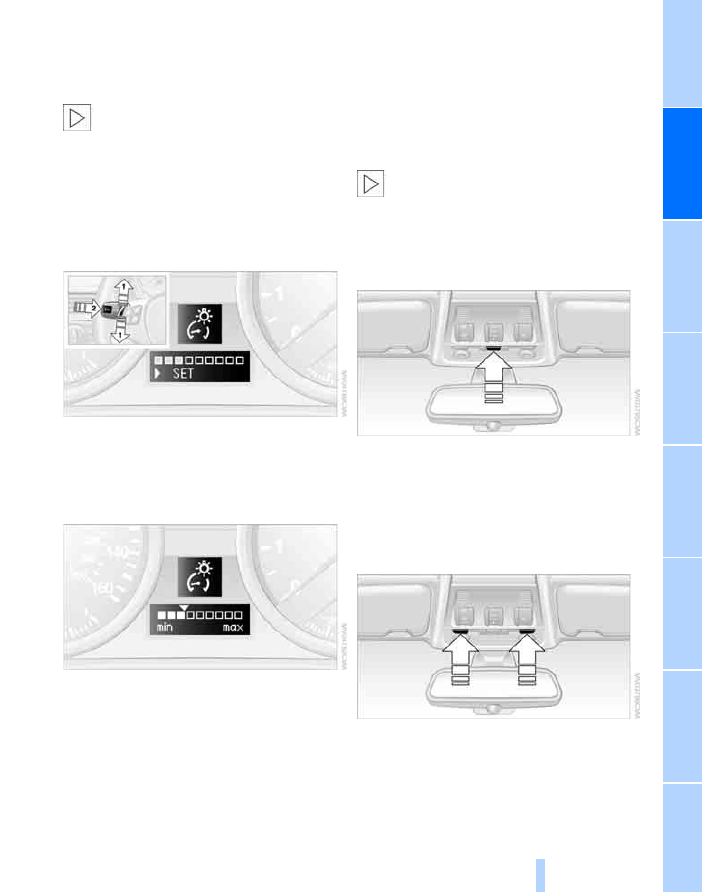
Instrument lighting

You can adjust the brightness of the instrument 
lighting only when the parking lamps or the low 
beams are switched on.

1.

Lightly push button 

1 up or down repeat-

edly until the appropriate symbol appears in 
the display, accompanied by the brightness 
and the word "SET".

2.

Press button 

2.

3.

Lightly push button 

1 up or down to select 

the brightness; the setting is stored imme-
diately.

4.

Press button 

2 in the turn indicator stalk.

The display again shows the outside tem-
perature and the time.

Interior lamps

The interior lamps, the footwell lamps

*

, the 

cargo area lamp and the courtesy lamps

are 

controlled automatically.
The LEDs for the courtesy lamps


are set in the 

door handles and illuminate the ground in front 
of the doors.

To avoid draining the battery, all lamps 
inside the car are switched off about 

15 minutes after the ignition is switched off, 
refer to Start/stop button on page

53

.

<

Switching interior lamps on/off 

manually

Interior lamps, front and rear

*

:

To switch on and off, press the button.
To switch off the lamp permanently, press the 
button for the front interior lamp for about 
3 seconds.

Reading lamps

There are reading lamps at the front and rear

*

next to the interior lamps. To switch on and off, 
press the button.

Climate

94

Climate

Airflow directed toward the windshield and 

side windows

Air to the upper body area 

Draft-free ventilation

97

Air to the footwell
Air distribution, manual
Temperature adjustment, left-hand side of 

passenger compartment

Maximum cooling
AUTO program
Air flow rate, manual
AUC Automatic recirculated-air control/

Recirculated-air mode

10 Temperature adjustment, right-hand side 

of passenger compartment

11 Residual heat
12 Defrosting windows and removing conden-

sation

13 Switching cooling function on/off manually
14 Rear window defroster
15 Air grill for interior temperature sensor – 

please keep clear and unobstructed

The current setting for the air distribution is dis-
played on the Control Display, refer to page

95

.

Co

n

tr

o

ls

 95

Re

fe

re

n

c

e

At

 a

 g

la

n

c

e

D

riv

in

g ti

ps

C

o

m

m

uni

ca

ti

o

n

s

Na

v

iga

ti

on

En

te

rt

a

in

m

e

n

t

M

o

bi

lity

Automatic climate control

Comfortable interior climate

AUTO program

7 offers the ideal air distribution 

and air flow rate for almost all conditions, refer 
to AUTO program below. All you need to do is 
select an interior temperature which is comfort-
able for you.
The following sections inform you in detail 
about how to adjust the settings.
Most settings are stored for the remote control 
currently in use, refer also to Personal Profile 
settings on page

29

.

Switching manual air distribution on/
off

The emerging air is directed to the 
windows, to the upper body area or 
to the footwell.
You can switch the automatic air 

distribution back on by pressing the AUTO but-
ton.

Fine adjustments to manual air 
distribution

You can set the rate of incoming airflow for 
manual air distribution.
iDrive concept, refer to page

16

.

1.

Press the 

 button.

This opens the start menu.

2.

Move the controller to the left to call up "Cli-
mate".

3.

Select "Vent settings" and press the con-
troller.

4.

Select the desired field.

5.

Turn the controller to set the air distribution 
individually.

Airflow directed toward the windshield and 

side windows

Air to the upper body area
Air to the footwell

Temperature

Set the desired temperatures indi-
vidually for the driver's and front 
passenger's sides.
The automatic climate control 

achieves this temperature as quickly as possi-
ble regardless of the season, using maximum 
cooling or heating power if necessary, and then 
maintains it.

When you switch between different tem-
perature settings in quick succession, the 

automatic climate control does not have 
enough time to achieve the set temperature.

<

Maximum cooling

At outside temperatures above 
32

7/0 6 and when the engine is 

running, you obtain a maximum 
cooling effect as soon as possible.

The automatic climate control switches to the 
lowest temperature and operates in recircu-
lated-air mode. Air flows at maximum rate only 
from the vents for the upper body area. You 
should therefore open them for maximum cool-
ing.

AUTO program

The AUTO program adjusts the air 
distribution to the windshield and 

Climate

96

side windows, towards the upper body area and 
into the footwell for you. The air flow rate and 
your temperature specifications will be adapted 
to outside influences as a result of seasonal 
changes, e.g. sunlight or window condensation.
The cooling is switched on automatically with 
the AUTO program.

Intensity of the AUTO program

You can set the intensity of the air supply in the 
AUTO program. This changes the duration of 
time during which the vehicle interior is heated 
or cooled.

1.

Open the start menu.

2.

Call up "Climate".

3.

Select "Automatic programs" and press the 
controller.

4.

Select the desired field.

5.

Press the controller to set the desired inten-
sity.

 The selected intensity level of the auto-

matic program is switched on.

Adjusting air flow rate manually

Press the left side of the button to 
reduce airflow. Press the right side 
of the button to increase it.

You can reactivate the automatic mode for the 
air flow rate with the AUTO button.

Switching the system on/off

With the blower at its lowest setting, press the 
left side of the button to switch off the auto-
matic climate control. All indicators go out.
Press any button except REST to reactivate the 
automatic climate control.

AUC Automatic recirculated-air 
control/Recirculated-air mode

Switch on the desired operating 
mode by pressing this button 
repeatedly:

>

LEDs off: outside air flows in continuously.

>

Left-hand LED on, AUC mode: a sensor 
detects pollutants in the outside air. If nec-
essary, the system blocks the supply of out-
side air and recirculates the inside air. As 
soon as the concentration of pollutants in 
the outside air has decreased sufficiently, 
the system automatically switches back to 
outside air supply.

>

Right-hand LED on, recirculated-air mode: 
the supply of outside air is permanently 
shut off. The system then recirculates the 
air currently within the vehicle.

If condensation starts to form on the 
inside window surfaces during operation 

in the recirculated-air mode, you should switch 
it off while also increasing the air flow rate as 
required. 
The recirculated-air mode should not be used 
over an extended period of time, otherwise the 
air quality inside the car will deteriorate contin-
uously.

<

Via the button* on the steering wheel

You can switch between operating modes via 
an individually programmable button


on the 

steering wheel, refer to page

11

:

>

When outside air is coming in, you can use 
the button on the steering wheel to switch 
between outside air and recirculated-air 
mode.

>

When recirculated-air mode or AUC mode 
is switched on, you can use the button on 
the steering wheel to switch between recir-
culated-air mode and AUC mode.

Residual heat

The heat stored in the engine is 
used to heat the passenger com-
partment, e.g. while stopped at a 
school to pick up a child.

Co

n

tr

o

ls

 97

Re

fe

re

n

c

e

At

 a

 g

la

n

c

e

D

riv

in

g ti

ps

C

o

m

m

uni

ca

ti

o

n

s

Na

v

iga

ti

on

En

te

rt

a

in

m

e

n

t

M

o

bi

lity

The function can be switched on when the fol-
lowing conditions are met:

>

Up to 15 minutes after the engine has been 
switched off

>

While the engine is at operating tempera-
ture

>

As long as battery voltage is sufficient

>

At an outside temperature below 77

7/

25

6

The LED is lit when the function is on.
As of radio readiness, you can set the interior 
temperature, the air flow rate and the air distri-
bution.

Defrosting windows and removing 
condensation

Quickly removes ice and conden-
sation from the windshield and 
front side windows.

Switching cooling function on/off

The cooling function cools and 
dehumidifies the incoming air 
before also reheating it as 

required, according to the temperature setting. 
Depending on the weather, the windshield may 
fog over briefly when the engine is started.
The cooling function is automatically switched 
on along with the AUTO program. The passen-
ger compartment can only be cooled while the 
engine is running.

Rear window defroster

The defroster switches off auto-
matically after a certain time.

Ventilation

Use the knurled wheels to smoothly open 

and close the air vents

Use the lever to change the direction of the 

airflow

Knurled wheel for more or less cool air from 

the vents for the upper body area

Ventilation for cooling

Adjust the vent outlets to direct the flow of cool 
air in your direction, for instance if it has become 
too hot in the car.

Draft-free ventilation

Set the vent outlets so that the air flows past 
you and not straight at you.

Ventilation in the rear

Use the knurled wheel to smoothly open 

and close the air vents

Use the knurled wheel to adjust the temper-

ature:

>

Turn toward blue: colder

>

Turn toward red: warmer

Use the lever to change the direction of the 

airflow

Climate

98

Microfilter/activated-charcoal filter

The microfilter traps dust and pollen in the 
incoming air. The activated-charcoal filter pro-
vides additional protection by filtering gaseous 
pollutants from the outside air. Your BMW Cen-
ter replaces this combined filter during routine 
maintenance. 
You can call up further information in the service 
requirements display, refer to page

72

.

Parked car ventilation

Concept

The parked car ventilation/heating provides 
ventilation to the passenger compartment and 
lowers its temperature, if necessary. It is ready 
for use at any outside temperature, as of radio 
readiness.
The parked car ventilation/heating remains 
switched on for 30 minutes. Two different 
switch-on times can be preselected. The sys-
tem can also be switched on and off directly. 
Due to its high power consumption, it should 
not be switched on twice in a row without driv-
ing in between to allow the battery to recharge.
The air emerges from the air vents for the upper 
body area in the instrument panel. The air vents 
must therefore be open.
The parked car ventilation system is operated 
via iDrive.

Switching on/off directly

iDrive concept, refer to page

16

.

1.

Open the start menu.

2.

Move the controller to the left to call up "Cli-
mate".

3.

Select "Parked car operation" and press the 
controller.

4.

Select "Automatic ventilation" and press 
the controller.

5.

Select "Parked car ventilation" and press 
the controller.

 The parked car ventilation/heating is 

switched on.

 The symbol on the automatic climate control 

display flashes.

Preselecting switch-on times

iDrive concept, refer to page

16

.

1.

Open the start menu.

2.

Move the controller to the left to call up "Cli-
mate".

3.

Select "Parked car operation" and press the 
controller.

4.

Select "Activation time" and press the con-
troller.

5.

Move the controller to the left or right to 
select "Timer 1" or "Timer 2".

Co

n

tr

o

ls

 99

Re

fe

re

n

c

e

At

 a

 g

la

n

c

e

D

riv

in

g ti

ps

C

o

m

m

uni

ca

ti

o

n

s

Na

v

iga

ti

on

En

te

rt

a

in

m

e

n

t

M

o

bi

lity

6.

Select the time and press the controller. 
The first time setting is selected.

7.

Turn the controller to make the adjustment.

8.

Press the controller to apply the setting. 
The next setting is highlighted.

9.

Make the remaining adjustments. After the 
last adjustment, the time is stored.

Activating switch-on times

Move the controller to the left or right to select 
"Timer 1" or "Timer 2" and then press the con-
troller.

 The switch-on time is activated.

 The symbol on the automatic climate control 

display lights up.

 The symbol on the automatic climate control 

display flashes when the system has switched 
on.

The respective system only switches on 
within the next 24 hours. After these have 

elapsed, it must be reactivated.

<

Practical interior

 accessories

100

Practical interior accessories

Integrated universal remote 

control*

The concept

The integrated universal remote control can 
replace as many as three hand-held transmit-
ters for various remote-controlled devices, 
such as door openers and house alarm sys-
tems. The integrated universal remote control 
registers and stores signals from the original 
hand-held transmitters.
The signal of an original hand-held transmitter 
can be programmed on one of the three mem-
ory buttons

1. After this, the programmed 

memory button

1 will operate the system in 

question. The LED

2 flashes to confirm trans-

mission of the signal.
Should you sell your vehicle one day, be sure to 
delete the stored programs beforehand for your 
safety, refer to page

101

.

To prevent possible damage or injury, 
before programming or using the inte-

grated universal remote control, always inspect 
the immediate area to make certain that no peo-
ple, animals or objects are within the pivoting or 
travel range of the device being operated. Com-
ply also with the safety instructions supplied 
with the original hand-held transmitter.

<

Checking compatibility

If this symbol appears on the package 
or in the instructions supplied with the 
original hand-held transmitter, you can 

assume that the radio remote control device will 
be compatible with the integrated universal 
remote control.
For additional information, please contact your 
BMW Center or call: 1-800-355-3515.
You can also obtain information on the Internet 
at: 
www.bmwusa.com or 
www.homelink.com. 

HomeLink is a registered trademark of Johnson 
Controls, Inc.

<

Programming

Memory buttons
LED

Fixed-code hand-held transmitters

1.

Switch on the ignition, refer to page

53

.

2.

When starting operation for the first time: 
Press both outer memory buttons

1 for 

approx. 20 seconds until the LED

2 flashes. 

all stored programs are cleared.

3.

Hold the original hand-held transmitter at a 
distance of approx. 2 to 8 in/5 to 20 cm from 
the memory buttons

1.

The required distance between the 
hand-held transmitter and the mem-

ory buttons

1 depends on the system of the 

respective original hand-held transmitter 
used.

<

4.

Simultaneously press the transmit key on 
the original hand-held transmitter and the 
desired memory button 

1 on the integrated 

universal remote control. The LED 

2 flashes 

slowly at first. As soon as the LED

2 flashes 

rapidly, release both buttons. If the LED

2 

does not flash rapidly after approx. 15 sec-
onds, alter the distance.

5.

To program other original hand-held trans-
mitters, repeat steps 3 and 4.

Co

n

tr

o

ls

 101

Re

fe

re

n

c

e

At

 a

 g

la

n

c

e

D

riv

in

g ti

ps

C

o

m

m

uni

ca

ti

o

n

s

Na

v

iga

ti

on

En

te

rt

a

in

m

e

n

t

M

o

bi

lity

The corresponding memory button 

1 is now 

programmed with the signal of the original 
hand-held transmitter.
You can operate the system when the engine is 
running or when the ignition is switched on.

If the system fails to function even after 
repeated programming, check whether 

the original hand-held transmitter uses an alter-
nating-code system. To do so, either read the 
instructions for the original hand-held transmit-
ter or hold down the programmed memory 
button

1 of the integrated universal remote 

control. If the LED

2 on the integrated universal 

remote control flashes rapidly for a short while 
and then remains lit for about two seconds, the 
original hand-held transmitter uses an alternat-
ing-code system. If it uses an alternating-code 
system, program the memory buttons

1 as 

described under Alternating-code hand-held 
transmitters.

<

Alternating-code hand-held 
transmitters

To program the integrated universal remote 
control, consult the operating instructions for 
the device to be set. You will find information 
there on the possibilities for synchronization.
When programming hand-held transmitters 

that employ an alternating code, please observe 
the following supplementary instructions:

Programming will be easier with the aid of 
a second person.

<

1.

Park your vehicle within the range of the 
remote-controlled device.

2.

Program the integrated universal remote 
control as described above in the section 
Fixed-code hand-held transmitters.

3.

Locate the button on the receiver of the 
device to be set, e.g. on the drive unit.

4.

Press the button on the receiver of the 
device to be set. After step 4, you have 
approx. 30 seconds for step 5.

5.

Press the programmed memory button

1 of 

the integrated universal remote control 
three times.

The corresponding memory button 

1 is now 

programmed with the signal of the original 
hand-held transmitter.

If you have any questions, please contact 
your BMW Center.

<

Deleting stored programs

Press both outer memory buttons

1 for approx. 

20 seconds until the LED

2 flashes: all stored 

programs are cleared.
It is not possible to clear individual programs.

Interior rearview mirror with digital compass*

Adjustment button
Display
The display shows you the main or secondary 
direction in which you are driving.

Setting compass zones

Depending on the vehicle's geographic loca-
tion, the relevant compass zone must be set. 

Practical interior

 accessories

102

Refer to the world map with compass zones 
below.

To set a compass zone, press the adjustment 
button on the bottom of the interior rearview 
mirror with a pointed object, such as a pen, for 
approx. 3-4 seconds. The number of the com-
pass zone set is shown in the display.
To change the zone setting, press the adjust-
ment button repeatedly until the display shows 
the number of the compass zone in which you 
are currently driving:
The compass is operational again after approx. 
10 seconds.

Calibrating the digital compass

The digital compass must be calibrated in the 
following situations:

>

C or CAL is displayed.

>

The compass shows the wrong cardinal 
direction.

>

The cardinal direction shown does not 
change although the direction of travel 
does.

>

Not all cardinal directions are shown.

Procedure

1.

Make sure that no large metal objects or 
overhead power lines are in the vicinity of 
your vehicle and that you have enough 
space to drive in a circle.

2.

Set the currently valid compass zone.

3.

Press the adjustment button to call up C or 
CAL. Then drive in one full circle at a speed 
of no more than 4 mph or 7 km/h.
If calibration is successful, the C or CAL dis-
play is replaced by the cardinal directions.

Roller sun blinds*

Roller sun blinds for rear side windows

Pull loop of roller sun blind and hook onto 
bracket.

Co

n

tr

o

ls

 103

Re

fe

re

n

c

e

At

 a

 g

la

n

c

e

D

riv

in

g ti

ps

C

o

m

m

uni

ca

ti

o

n

s

Na

v

iga

ti

on

En

te

rt

a

in

m

e

n

t

M

o

bi

lity

Glove compartment

Opening

Pull the handle. 
The light in the glove compartment switches 
on.

Closing

Fold the cover up.

To prevent injury in the event of an acci-
dent while the vehicle is being driven, 

close the glove compartment immediately after 
use.

<

Locking

To lock the glove compartment, use the inte-
grated key of the remote control or the spare 
key, refer to page

28

.

Rechargeable flashlight*

It is on the left-hand side of the glove compart-
ment. The flashlight can remain plugged in. 
Whenever required, pull the flashlight out of its 
socket.

Only insert the flashlight back into the 
socket when it is switched off, otherwise 

there is a risk of damage.

<

Center armrest

Storage compartment

The center armrest between the front seats 
contains either a compartment or the cover for 
the snap-in adapter

*

, depending on the equip-

ment version.

Opening

Press the button, see arrow. 
The lid opens.

Ventilated storage compartment

The storage compartment in the center armrest 
can be ventilated: slide the switch backwards.
The temperature is controlled via the knurled 
wheel for adjusting the temperature of air venti-
lating the rear of the passenger compartment, 
refer to page

97

.

Connection for external audio device

You can connect an external audio device such 
as a CD or MP3 player and play audio tracks 
over the car's loudspeaker system, refer to 
page

158

.

Practical interior

 accessories

104

Storage compartments inside 

the vehicle

Depending on your vehicle's equipment, you 
will find compartments beside the steering col-
umn

*

, in the front doors and in the center con-

sole

*

There are nets

on the front-seat backrests.

Clothes hooks

There are clothes hooks on the grab handles in 
the rear passenger compartment.

Items of clothing hung from the hooks 
must not obstruct the driver's view. Do 

not hang heavy objects from the hooks, other-
wise they could endanger the car's occupants, 
e.g. in case of heavy braking or sudden swerv-
ing.

<

Cup holders

Do not place glassware in a cup holder; 
otherwise there is an increased risk of 

injury in the event of an accident.

<

Front

Opening

Briefly press the center of the cover.

Closing

Briefly press the cover in the center and push in 
the cup holder.

Rear

There are two additional cup holders in the rear 
center armrest.

Ashtray, front

Opening

Push the ridge on the cover.

Emptying

Lift out the insert.

Lighter

With the engine running or the ignition switched 
on, press in the cigarette lighter.
The lighter can be removed as soon as it pops 
back out.

Hold or touch the hot cigarette lighter by 
the knob only. Holding or touching it in 

other areas could result in burns. 
When leaving the car, always remove the 
remote control so that children cannot operate 

Co

n

tr

o

ls

 105

Re

fe

re

n

c

e

At

 a

 g

la

n

c

e

D

riv

in

g ti

ps

C

o

m

m

uni

ca

ti

o

n

s

Na

v

iga

ti

on

En

te

rt

a

in

m

e

n

t

M

o

bi

lity

the cigarette lighter and possibly burn them-
selves.

<

Ashtray, rear

Opening

Push the ridge on the cover.

Emptying

Lift out the insert.

Connecting electrical 

appliances

In your BMW, you can use electrical devices 
such as a flashlight, car vacuum cleaner, etc., up 
to approx. 200 watts at 12 volts, as long as one 
of the following sockets is available. Avoid dam-
aging the sockets by attempting to insert plugs 
of unsuitable shape or size.

Cigarette lighter socket*

Pull the cigarette lighter out of the socket, refer 
to page

104

.

Socket in the center armrest

External audio device, refer to page

103

.

Sockets in the rear center console*

Remove corresponding cover.

Socket in the cargo area

Open the cap.

Cargo area

Cargo area cover

Pull out the cover and hook it into the retaining 
fixtures.

Do not place objects on the cover, other-
wise they could endanger the car's occu-

pants, e.g. in the case of braking or sudden 
swerving. 
Do not let the cover retract, otherwise it could 
be damaged.

<

Practical interior

 accessories

106

The cargo area cover is raised when the 
rear window or tailgate is opened

*

Before closing the rear window or tailgate, 
press the cover downward until it engages.

<

Expanding the cargo area

The rear seat back is divided. You can fold down 
both sides separately in order to expand the 
cargo area.

Reach into the recess and pull forwards.

When folding the rear seat back up, make 
sure that the catch engages properly. If 

you cannot see a red warning area in the recess, 
the catch is properly engaged. Otherwise, 
cargo can be thrown around inside the passen-
ger compartment and endanger the car's occu-
pants, e.g. in the case of braking or sudden 
swerving.

<

Observe the instructions concerning the 
safety belt on page

41

 to ensure the best 

possible personal protection.

<

Cargo area net

Do not let the cargo area net retract, oth-
erwise there is a risk of danger and the 

cargo area net could be damaged.

<

Use the loop strap to pull the cargo area net out 
of the casing. Grip the bar on both ends and 

insert it into the retaining fixtures, arrow 

1. This 

can best be done from the rear seat.
When you no longer require the cargo area net, 
grip both ends of the bar and take it out of the 
retaining fixtures, arrow 

2. Let the cargo area 

net slide into the casing slowly.

With an expanded cargo area

1.

Fold down both rear seat backs, refer to 
Expanding the cargo area.

2.

Use the buttons to unlatch the casing on 
both sides, arrow 

1.

3.

Pull the casing out backwards, arrow 

2

without tilting it.

4.

Slide the casing into the guides on the 
backs of the seat backrests.

5.

Carefully pull out the cargo area net and 
insert it into the front retaining fixtures, refer 
to Cargo area net above. This can best be 
done from the front seat.

Follow the same steps in reverse order to return 
the cargo area net and seats to their original 
positions. Finally, slide the casing into both 
retaining fixtures on the sides until it engages. 
Tug on the casing to check if it is properly 
locked in place.

Co

n

tr

o

ls

 107

Re

fe

re

n

c

e

At

 a

 g

la

n

c

e

D

riv

in

g ti

ps

C

o

m

m

uni

ca

ti

o

n

s

Na

v

iga

ti

on

En

te

rt

a

in

m

e

n

t

M

o

bi

lity

Storage compartments in the 

cargo area

The following storage spaces can be found in 
the cargo area:

>

Umbrella holder on the bottom of the cargo 
area net casing

>

Rubber strap on the left and right trim panel 
for securing small objects such as a folding 
umbrella

>

Hooks for hanging up shopping bags or tote 
bags, for example, on the left and right-hand 
sides of the cargo area

>

Net for small objects on the right trim panel 
of the cargo area

>

Storage compartment under the floor panel

Depending on your vehicle's equipment, the 
following additional storage spaces can be 
found in the cargo area:

>

Net

for securing smaller objects, to be 

attached to the fixtures on the floor panel

>

Net

on the left side trim of the cargo area 

instead of the rubber strap

>

Reversible cargo area floor panel with inte-
grated plastic cover

for cargo area or 

bumper

>

Folding, removable box

under the floor 

panel, e.g. for wet or dirty items

>

Insertable dividers

and removable storage 

tray for the storage compartment under the 
floor panel

Folding up the cargo area floor panel

Fold up the cargo area floor panel and take it out 
or lean it forward.

Do not exceed the maximum permissible 
load of 55 lbs/25 kg for the storage com-

partment under the floor panel, otherwise dam-
age could result.

<

Lashing eyes

You will find lashing eyes in the cargo area for 
securing luggage items with nets or tensioning 
straps, refer to page

115

.

Ski bag*

Designed for safe, clean transport of up to 
4 pairs of standard skis or up to 2 snowboards.
With the ski bag you can stow skis with a length 
of  up  to  6 ft  10 in/2.10 m.  When  skis  of  6 ft  10 in/
2.10 m length are loaded, the overall capacity of 
the ski bag is reduced due to its tapered design.

Loading

1.

Fold down the center armrest.

2.

Press the button, reach into the recess and 
fold down the cover.

Practical interior

 accessories

108

3.

Open the Velcro fastener, spread the ski 
bag between the front seats and insert the 
skis or snowboards. 
The zip fastener makes objects in the ski 
bag easier to reach.

4.

Insert the latch plate of the ski bag's retain-
ing strap in the center belt buckle.

Make sure to load only clean skis into the ski 
bag. Wrap sharp edges to prevent damage.

Securing cargo

After loading, secure the ski bag and its con-
tents. Tighten the retaining strap on the ten-
sioning buckle for this purpose.

Secure the ski bag in the manner 
described, otherwise it could endanger 

the car's occupants, e.g. in case of heavy brak-
ing or sudden swerving.

<

To store the ski bag, perform the steps 
described for loading in reverse order.

Removing the ski bag

The ski bag can be completely removed, e.g. for 
faster drying or to allow you to use other inserts.

1.

Fold down the center panel in the rear seat 
backrest.

2.

Pull the handle, arrow

1.

3.

Pull out the insert, arrow 

2.

For more information on the various 
inserts available, contact your BMW Cen-

ter.

<


Content   ..  4  5  6  7   ..