Alfa Romeo 4C (2018 year). Manual - part 10


  Index      Alfa Romeo     Alfa Romeo 4C (2018 year) - manual in english


Search            copyright infringement  


Content      ..     8      9      10      11     ..


Alfa Romeo 4C (2018 year). Manual - part 10


WARNING! (Continued)

and must continue to pay attention while backing
up. Failure to do so can result in serious injury or
death.

CAUTION!

• The Parking Sensor system is only a parking aid

and it is unable to recognize every obstacle,
including small obstacles. Parking curbs might be
temporarily detected or not detected at all. Ob-
stacles located above or below the sensors will
not be detected when they are in close proximity.

• The vehicle must be driven slowly when using

the Parking Sensor system in order to be able to
stop in time when an obstacle is detected. It is
recommended that the driver looks over his/her
shoulder when using the Parking Sensor system.

ADDING FUEL/SMART FUEL

NOTE:
• The ⬙Smart Fuel⬙ is a device placed on the top of the

filler pipe; it opens and closes automatically when

the fuel nozzle is inserted or extracted.

• Only the correct nozzle size diameter allows the flap

door to open when the nozzle is inserted.

Refueling Procedure

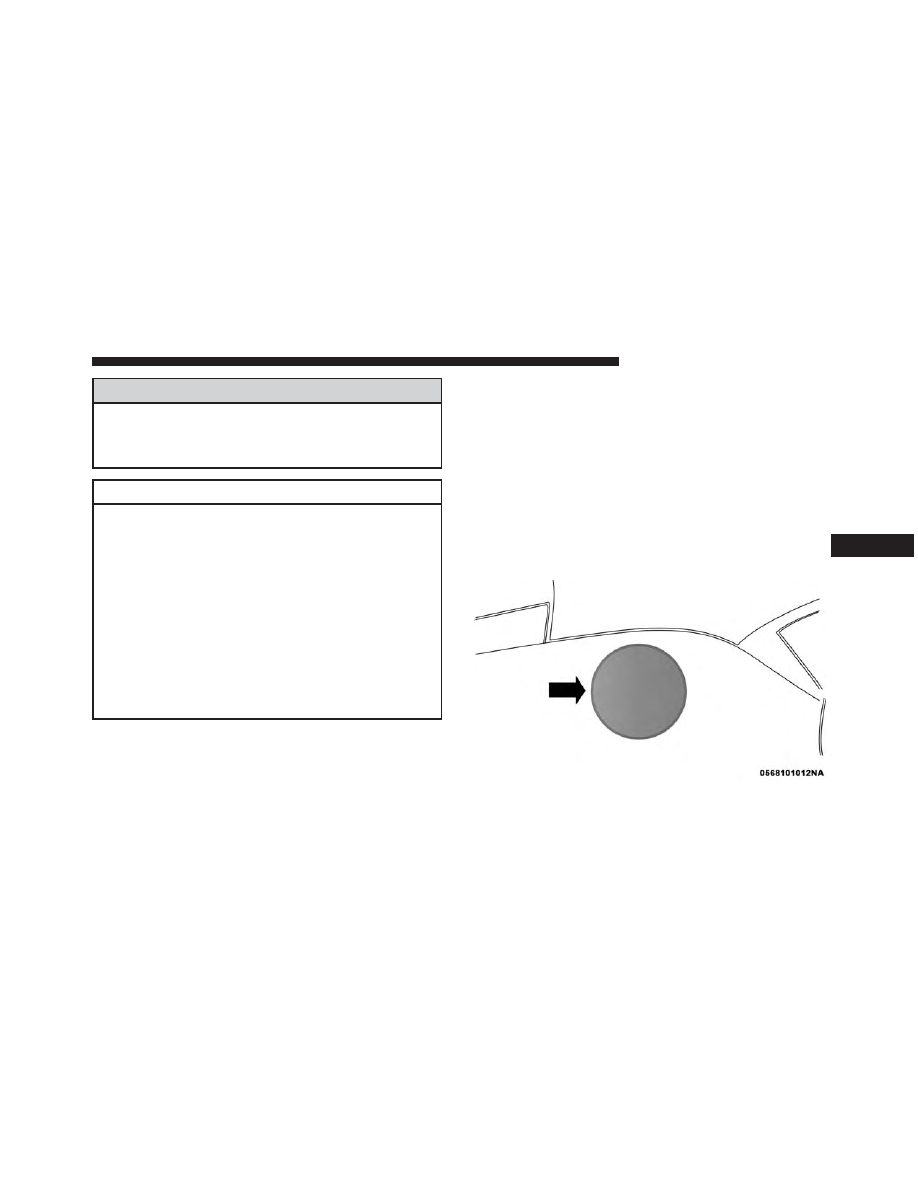
1. Open the fuel filler door pulling towards outside.

Fuel Filler Door Location

6

STARTING AND OPERATING 149

-------------------------------------------------------------------------------------------------------------------------------------------------------------

2. There is no fuel filler cap. A flap door inside the pipe

seals the system.

3. Insert the fuel nozzle into the filler pipe (the nozzle

opens and holds the flap door while refueling) and

start refueling. When the fuel nozzle “clicks” or shuts

off, the fuel tank is full.

4. At the end of refueling, before removing the nozzle,

wait at least 10 seconds to allow the fuel to flow

within the tank.

5. Remove the fuel nozzle from the filler pipe and then

close the fuel door.

Emergency Gas Can Refueling:

Most gas cans will not open the flapper door.
A funnel is provided to open the flapper door to allow

emergency refueling with a gas can.
1. Retrieve the appropriate funnel from the storage area

in the luggage compartment.

2. Insert funnel into same filler pipe opening as the fuel

nozzle.

3. Ensure funnel is inserted fully to hold flapper door

open.

Fuel Nozzle Location

Emergency Fuel Fill Location

150 STARTING AND OPERATING

-------------------------------------------------------------------------------------------------------------------------------------------------------------

4. Pour fuel into funnel opening.
5. Remove funnel from filler pipe, clean off prior to

putting back in the storage area.

WARNING!

• Never have any smoking materials lit in or near

the vehicle when the fuel door is open or the tank
is being filled.

• Never add fuel when the engine is running. This

is in violation of most state and federal fire
regulations and may cause the “Malfunction In-
dicator Light” to turn on.

• A fire may result if fuel is pumped into a portable

container that is inside of a vehicle. You could be
burned. Always place fuel containers on the
ground while filling.

CAUTION!

To avoid fuel spillage and overfilling, do not “top
off” the fuel tank after filling.

TRAILER TOWING
Trailer towing with this vehicle is not recommended.

RECREATIONAL TOWING (BEHIND
MOTORHOME, ETC.)

Towing This Vehicle Behind Another Vehicle
This vehicle may be recreationally towed (flat towed) at

any legal highway speed, for any distance, if the

transmission is in NEUTRAL. This vehicle may also be

towed on a flatbed or vehicle trailer, provided all four

wheels are OFF the ground.

CAUTION!

• Do not dolly tow this vehicle. Use of a towing

dolly can cause significant damage to your ve-
hicle. Damage from improper towing is not cov-
ered under the New Vehicle Limited Warranty.

• Towing this vehicle in violation of the above

requirements can cause severe transmission dam-
age. Damage from improper towing is not cov-
ered.

6

STARTING AND OPERATING 151

-------------------------------------------------------------------------------------------------------------------------------------------------------------

Towing Condition

Wheels OFF The Ground

Alfa Twin Clutch Transmis-

sion

Flat Tow

None

Transmission in NEUTRAL

Dolly Tow

Front

NOT ALLOWED

Rear

NOT ALLOWED

On Trailer

All

OK

DRIVING TIPS

Driving On Slippery Surfaces
Information in this section will aid in safe controlled

launches in adverse conditions.
Acceleration
Rapid acceleration on snow covered, wet, or other

slippery surfaces may cause the driving wheels to pull

erratically to the right or left. This phenomenon occurs

when there is a difference in the surface traction under

the rear (driving) wheels.

WARNING!

Rapid acceleration on slippery surfaces is danger-
ous. Unequal traction can cause sudden pulling of

(Continued)

WARNING! (Continued)

the rear wheels. You could lose control of the
vehicle and possibly have a collision. Accelerate
slowly and carefully whenever there is likely to be
poor traction (ice, snow, wet, mud, loose sand, etc.).

Traction
When driving on wet or slushy roads, it is possible for

a wedge of water to build up between the tire and road

surface. This is known as hydroplaning and may cause

partial or complete loss of vehicle control and stopping

ability. To reduce this possibility, the following precau-

tions should be observed:
• Slow down during rainstorms or when the roads are

slushy.

• Slow down if the road has standing water or puddles.

152 STARTING AND OPERATING

-------------------------------------------------------------------------------------------------------------------------------------------------------------

• Replace tires when tread wear indicators first become

visible.

• Keep tires properly inflated.
• Maintain sufficient distance between your vehicle

and the vehicle in front of you to avoid a collision in

a sudden stop.

Your vehicle may be equipped with a Limited Slip

Differential (LSD) that reduces, but does not eliminate,

the amount of wheel slip across a given axle for

improved handling.
Driving Through Water
Driving through water more than a few inches/

centimeters deep will require extra caution to ensure

safety and prevent damage to your vehicle.
Flowing/Rising Water

WARNING!

Do not drive on or across a road or path where water
is flowing and/or rising (as in storm run-off). Flowing
water can wear away the road or path’s surface and

(Continued)

WARNING! (Continued)

cause your vehicle to sink into deeper water. Further-
more, flowing and/or rising water can carry your
vehicle away swiftly. Failure to follow this warning
may result in injuries that are serious or fatal to you,
your passengers, and others around you.

Shallow Standing Water
Although your vehicle is capable of driving through

shallow standing water, consider the following Cau-

tions and Warnings before doing so.

WARNING!

• Driving through standing water limits your vehi-

cle’s traction capabilities. Do not exceed 5 mph
(8 km/h) when driving through standing water.

• Driving through standing water limits your vehi-

cle’s braking capabilities, which increases stop-
ping distances. Therefore, after driving through
standing water, drive slowly and lightly press on
the brake pedal several times to dry the brakes.

(Continued)

6

STARTING AND OPERATING 153

-------------------------------------------------------------------------------------------------------------------------------------------------------------

WARNING! (Continued)

• Failure to follow these warnings may result in

injuries that are serious or fatal to you, your
passengers, and others around you.

CAUTION!

• Always check the depth of the standing water

before driving through it. Never drive through
standing water that is deeper than the bottom of
the tire rims mounted on the vehicle.

• Determine the condition of the road or the path

that is under water and if there are any obstacles
in the way before driving through the standing
water.

• Do not exceed 5 mph (8 km/h) when driving

through standing water. This will minimize wave
effects.

• Driving through standing water may cause dam-

age to your vehicle’s drivetrain components. Al-
ways inspect your vehicle’s fluids (i.e., engine oil,
transmission, axle, etc.) for signs of contamination
(i.e., fluid that is milky or foamy in appearance)

(Continued)

CAUTION! (Continued)

after driving through standing water. Do not
continue to operate the vehicle if any fluid ap-
pears contaminated, as this may result in further
damage. Such damage is not covered by the New
Vehicle Limited Warranty.

• Getting water inside your vehicle’s engine can

cause it to lock up and stall out, and cause serious
internal damage to the engine. Such damage is
not covered by the New Vehicle Limited War-
ranty.

154 STARTING AND OPERATING

-------------------------------------------------------------------------------------------------------------------------------------------------------------

IN CASE OF EMERGENCY

CONTENTS

䡵 HAZARD WARNING FLASHER . . . . . . . . . .156
䡵 BULB REPLACEMENT . . . . . . . . . . . . . . . . .156

▫ Replacement Bulbs . . . . . . . . . . . . . . . . . . .156
▫ Replacing Exterior Bulbs . . . . . . . . . . . . . . .157

䡵 FUSES . . . . . . . . . . . . . . . . . . . . . . . . . . . . .167

▫ General Information. . . . . . . . . . . . . . . . . . .167
▫ Engine Compartment Fuses . . . . . . . . . . . . .168
▫ Dashboard Fuse Box . . . . . . . . . . . . . . . . . .170

䡵 TIRE SERVICE KIT . . . . . . . . . . . . . . . . . . . . .171

▫ Tire Service Kit Storage Location. . . . . . . . . .171
▫ Tire Service Kit Components And Operation .172
▫ Tire Service Kit Usage Precautions. . . . . . . . .176

䡵 JUMP STARTING . . . . . . . . . . . . . . . . . . . . .176

▫ Preparations For Jump Start . . . . . . . . . . . . .177
▫ Jump Starting Procedure . . . . . . . . . . . . . . .178

䡵 IF YOUR ENGINE OVERHEATS . . . . . . . . . .180
䡵 TOWING A DISABLED VEHICLE . . . . . . . . . .181

▫ Front Tow Eye Usage . . . . . . . . . . . . . . . . .181

䡵 FIRE EXTINGUISHER — IF EQUIPPED . . . . . .184
䡵 ENHANCED ACCIDENT RESPONSE SYSTEM

(EARS) . . . . . . . . . . . . . . . . . . . . . . . . . . . . .184

䡵 EVENT DATA RECORDER (EDR) . . . . . . . . . .184

7

-------------------------------------------------------------------------------------------------------------------------------------------------------------

HAZARD WARNING FLASHER
The Hazard Warning flasher switch is located on the

center console.

Push the switch to turn on the Hazard Warn-

ing flasher. When the switch is activated, all

directional turn signals will flash on and off to

warn oncoming traffic of an emergency. Push

the switch a second time to turn off the Hazard Warning

flasher.
This is an emergency warning system and it should not

be used when the vehicle is in motion. Use it when your

vehicle is disabled and it is creating a safety hazard for

other motorists.
When you must leave the vehicle to seek assistance, the

Hazard Warning flasher will continue to operate even

though the ignition is placed in the OFF position.
NOTE:

With extended use the Hazard Warning flasher

may wear down your battery.

BULB REPLACEMENT

Replacement Bulbs

Interior Bulbs

Bulb Number

Overhead Lamp

C10W

Luggage Compartment

W5W

Exterior Bulbs

Bulb Number

Parking Lights/Daytime

Running Lights (DRL)

LED (See Authorized

Dealer)

Rear Tail Lights

LED (See Authorized

Dealer)

Font and Rear Side

Lights

W3W

Dipped/Main Beam

Headlights (Versions

With Bi-Halogen Head-

lights) — If Equipped

HIR2

156 IN CASE OF EMERGENCY

-------------------------------------------------------------------------------------------------------------------------------------------------------------

Bulb Number

Dipped/Main Beam

Headlights (Versions

With Bi-Xenon Head-

lights) — If Equipped

D5S (See Authorized

Dealer)

Dipped/Main Beam

Headlights (Versions

With Bi-Led Headlights)

— If Equipped

LED (See Authorized

Dealer)

Front Direction Indica-

tors

PY24W

Rear Direction Indicators

P21W

Side Direction Indicators

WY5W

Brake Lights

LED (See Authorized

Dealer)

Third Brake Light

LED (See Authorized

Dealer)

Bulb Number

License Plate Lamps

W5W

Reversing light

W16W

NOTE:

Numbers refer to commercial bulb types

that can be purchased from your authorized dealer.
If a bulb needs to be replaced, visit your authorized

dealer or refer to the applicable Service Manual.

Replacing Exterior Bulbs

NOTE:

Lens fogging can occur under certain atmo-

spheric conditions. This will usually clear as atmo-

spheric conditions change to allow the condensation to

change back into a vapor. Turning the lamps on will

usually accelerate the clearing process.

7

IN CASE OF EMERGENCY 157

-------------------------------------------------------------------------------------------------------------------------------------------------------------

Front Light Clusters
The front head lamp contains bulbs for the parking

lights/daytime running lights (DRL), low beam head-

lights, high beam headlights and direction indicators.

If bulb replacement is required, please see an autho-

rized dealer.

Side Lights/Daytime Running Lights (DRL)

These are LEDs. For the replacement, contact an autho-

rized dealer.

Low/High Beam Bi-Halogen Headlights

To change the bulb, proceed as follows:
1. Turn the steering wheel completely.
2. Open the protective flap by rotating the screw.

Headlight

1 — Daytime Running Lights
2 — Direction Indicator
3 — High/Low Beam Lights

Front Fender Liner

1 — Direction Indicator Bulb Protective Flap
2 — Headlamp Bulb Protective Flap

158 IN CASE OF EMERGENCY

-------------------------------------------------------------------------------------------------------------------------------------------------------------

3. Remove protective cover from headlamp assembly.

4. Remove the electric connector (1) and then rotate the

bulb holder (2) clockwise and remove it.

5. Extract the bulb and replace it.
6. Refit the new bulb, making sure that it is locked

correctly, and reconnect the electrical connector.

7. Reinstall protective cover in the headlamp assembly

and close the protective flap.

Protective Cover

Bulb Holder

1 — Electrical Connector
2 — Bulb Holder

7

IN CASE OF EMERGENCY 159

-------------------------------------------------------------------------------------------------------------------------------------------------------------

Low/High Beam HID & LED Headlights

For the replacement, contact an authorized dealer.

Direction Indicators

Front:
1. Turn the steering wheel completely.
2. Open the protective flap by rotating the screw.

3. Remove protective cover from headlamp assembly.

4. Rotate the bulb holder counterclockwise and remove

it.

5. Rotate the bulb assembly counter clockwise to re-

move from bulb holder.

6. Install the new bulb, making sure that it is locked in

correctly, and reinstall into headlamp assembly.

7. Reinstall protective cover in the headlamp assembly

and close the protective flap.

Front Fender Liner

1 — Direction Indicator Bulb Protective Flap
2 — Headlamp Bulb Protective Flap

Protective Cover

160 IN CASE OF EMERGENCY

-------------------------------------------------------------------------------------------------------------------------------------------------------------

Side:
1. Compress the retaining clip, then pull the side

marker assembly outwards.

2. Turn the bulb holder counterclockwise, remove the

bulb and replace it.

3. Install the bulb holder in the lens and turn it clock-

wise.

4. Install the cluster making sure that the internal clip

clicks into position.

Front Side Marker
To change the bulb, proceed as follows:
1. Turn the front wheels to gain access and then remove

the fastener from the inner wheel liner.

2. Fold back wheel liner door to access bulb housing.

Side Direction Indicator

1 — Lens
2 — Bulb Holder

Bulb Housing Location

7

IN CASE OF EMERGENCY 161

-------------------------------------------------------------------------------------------------------------------------------------------------------------

3. Remove bulb from bulb housing then remove and

replace bulb and reinstall.

Rear Light Clusters
These contain the bulbs for the side lights, direction

indicators and brake lights.

Direction Indicators
To change the bulb, proceed as follows:
1. Remove the protective cap (one for each side) on the

side cover of the luggage compartment.

Front Side Marker Bulb

First Protective Cap

162 IN CASE OF EMERGENCY

-------------------------------------------------------------------------------------------------------------------------------------------------------------

2. Remove the second protective cap insert a hand

inside the opening.

3. Rotate clockwise to remove the bulb holder remove

the bulb from the bulb holder.

4. Install the bulb by pressing it into bulb holder then

turn install the bulb holder and turn it counterclock-

wise.

5. Install the previously removed protective caps.
Tail Lights/Brake Lights
These are LEDs. For the replacement, contact an autho-

rized dealer.

Reversing Light

WARNING!

The reverse lights are located close to the exhaust
pipes; take the utmost care not to get burnt during
the bulb replacement.

To replace the reversing lights, turn the bulb holder

counterclockwise, remove the bulb and replace it.

Second Protective Cap

Rear Of Vehicle

1 — Reverse Light Location
2 — Reverse Light Location

7

IN CASE OF EMERGENCY 163

-------------------------------------------------------------------------------------------------------------------------------------------------------------

Third Brake Lights
These are LEDs. For the replacement, contact an autho-

rized dealer.

License Plate Lights
To replace the bulbs proceed as follows:
1. Compress the retaining clip, then pull the license

plate light cluster out.

Reversing Light Bulb Holder

License Plate Lamp Removal

164 IN CASE OF EMERGENCY

-------------------------------------------------------------------------------------------------------------------------------------------------------------


Content      ..     8      9      10      11     ..