RAM ProMaster (2023 year). Manual in english - page 2
 

  Index      Manuals     RAM ProMaster (2023 year). Manual in english


Search            copyright infringement  


Content      ..      1      2      3      ..


RAM ProMaster (2023 year). Manual in english - page 2


GETTING TO KNOW YOUR VEHICLE

25

(Continued)

Recliner Adjustment

Without Swivel Seat
The recliner knob is on the rear outboard side of the 

seat. To recline the seatback, lean back and rotate 

the knob rearward to position the seatback as desired. 

To return the seatback to its normal upright position, 

lean forward and rotate the knob forward until the 

seatback is in the upright position.
With Swivel Seat
The recliner lever is located at the lower front outboard 

side of the seat. To recline the seatback, lean forward 

slightly, pull the lever outward, lean back to the desired 

position and release the lever. To return the seatback 

to its normal upright position, lean forward and pull the 

lever outward. Release the lever once the seatback is 

in the upright position.

Lumbar Support — If Equipped

This feature allows you to increase or decrease the 

amount of lumbar support. The lumbar control 

knob is located on the rear upper outboard side of 

the driver's seatback. Rotate the control forward to 

increase and rearward to decrease the desired 

amount of lumbar support.

Suspension Seat — If Equipped

The seat is equipped with a mechanical spring 

system and hydraulic shock absorber to ensure 

maximum comfort and safety. The system of 

springs also effectively absorbs impact from 

uneven road surfaces.

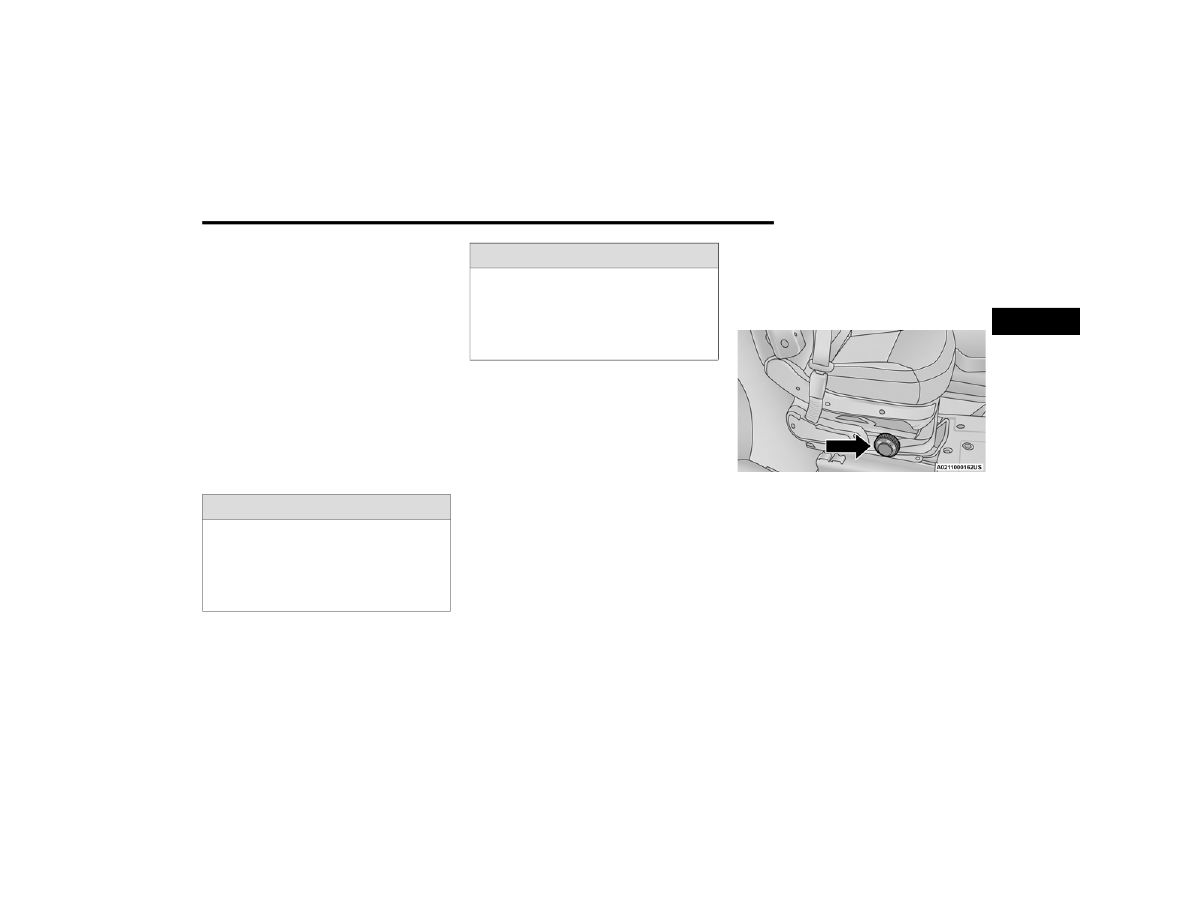
Damper Weight Adjustment
Use the weight adjustment knob, located on the 

inboard side of the seat, to set the required setting 

based on body weight, with settings between 88 lb 

(40 kg) and 286 lb (130 kg).

Weight Adjustment Knob

WARNING!

Adjusting a seat while the vehicle is moving is 

dangerous. The sudden movement of the seat 

could cause you to lose control. The seat belt 

might not be adjusted properly and you could 

be injured. Adjust the seat only while the 

vehicle is parked.

Do not ride with the seatback reclined so that 

the shoulder belt is no longer resting against 

your chest. In a collision, you could slide under 

the seat belt and be seriously or even fatally 

injured. Use the recliner only when the vehicle 

is parked.

WARNING!

2

-------------------------------------------------------------------------------------------------------------------------------------------------------------

26

GETTING TO KNOW YOUR VEHICLE


Swivel Seat — If Equipped

The swivel seat lever is located at the lower front 

inboard side of the seat. The seat may be turned 

through 180° toward the seat on the opposite side 

and approximately 35° toward the door. The seat 

may be locked in the driving position or at the 

180° position. To swivel the seat, pull the swivel 

seat inboard lever outward, turn the seat to the 

desired position and release the lever.

Swivel Seat Lever

If the vehicle is equipped with interlocking swivel 

seats, the seats must be locked in the facing 

forward position while driving. If the seats are not 

in the correct position, a warning will appear in the 

instrument cluster display.

If the driver or the passenger seats are not locked 

in the facing forward position before the first 

vehicle movement, shifting out of park is not 

allowed until the seats are both locked in the 

facing forward position. When the seats are not in 

the right position and the first vehicle movement 

after ignition START is attempted, a chime and a 

message will appear in the instrument cluster 

display. Rotate and lock the swivel seats in the 

correct position before trying again.
If the driver or the passenger seats are not locked 

in the facing forward position during movement 

of the vehicle, a message will appear in the 

instrument cluster display and an intermittent 

chime will sound until key-off or until the swivel 

seats are locked in the facing forward position. 

Stop and move the swivel seats in the correct 

position before proceeding.
If a fault is present in the system and it is not 

possible to check the correct position of the swivel 

seats, a message and the generic warning light 

appears in the instrument cluster display to inform 

about the failure. In these conditions, check the 

status of the swivel seats and do not drive the 

vehicle until the swivel seats are locked in the 

facing forward position.

H

EATED

 S

EATS

 — I

F

 E

QUIPPED

On some models, the front driver and 

passenger seats may be equipped with 

heaters in both the seat cushions and 

seatbacks. The controls for the front 

heated seats are located on the lower outboard 

side of the seat.

Heated Seat Switch

Push the switch once to turn on the heated seats. 

Push the switch a second time to shut the heating 

elements off.

-------------------------------------------------------------------------------------------------------------------------------------------------------------

GETTING TO KNOW YOUR VEHICLE

27

NOTE:

Once a heat setting is selected, heat will be felt 

within two to five minutes.

F

OLD

 D

OWN

 T

RAY

 — I

F

 E

QUIPPED

If your vehicle is equipped with a bench seat, the 

seat is equipped with a fold-down tray that can be 

used as a document support surface. To use the 

fold-down tray, grab the pull tab and lower the tray.

Lowering The Fold-Down Tray

The fold-down tray is equipped with two cup holders 

and a support surface with a paper holder clip.

Closing The Fold-Down Tray

A

DJUSTABLE

 A

RMRESTS

 — I

F

 E

QUIPPED

The seat adjustable armrest can be raised and 

adjusted for height. Underneath the front of the 

armrest is the adjuster wheel which will adjust the 

height of the armrest up or down.

Adjuster Wheel Location

WARNING!

Persons who are unable to feel pain to the 

skin because of advanced age, chronic illness, 

diabetes, spinal cord injury, medication, 

alcohol use, exhaustion or other physical 

condition must exercise care when using the 

seat heater. It may cause burns even at low 

temperatures, especially if used for long 

periods of time.

Do not place anything on the seat or seatback 

that insulates against heat, such as a blanket 

or cushion. This may cause the seat heater to 

overheat. Sitting in a seat that has been over

-

heated could cause serious burns due to the 

increased surface temperature of the seat.

2

-------------------------------------------------------------------------------------------------------------------------------------------------------------

28

GETTING TO KNOW YOUR VEHICLE


(Continued)

Turn the adjuster wheel to the right or left to adjust 

the height of the armrest up or down.

Adjuster Wheel

H

EAD

 R

ESTRAINTS


Head restraints are designed to reduce the risk of 

injury by restricting head movement in the event of 

a rear impact. Head restraints should be adjusted 

so that the top of the head restraint is located 

above the top of your ear.

Front Head Restraint Adjustment

To raise the head restraint, pull upward on the 

head restraint. To lower the head restraint, push 

the adjustment button located on the base of the 

head restraint and push downward on the head 

restraint.

Adjustment Buttons

NOTE:

Do not reposition the head restraint 180 degrees 

to the incorrect position in an attempt to gain addi

-

tional clearance to the back of the head.

Front Head Restraint Removal

To remove the head restraint, raise it up as far as 

it can go. Then, push the adjustment button and 

the release button at the base of each post while 

pulling the head restraint up. To reinstall the head 

restraint, push the adjustment button and the 

release button at the base of each post and put the 

head restraint posts into the holes. Then, adjust it 

to the appropriate height.

NOTE:

Do not reposition the head restraint 180 degrees 

to the incorrect position in an attempt to gain addi

-

tional clearance to the back of the head.

WARNING!

All occupants, including the driver, should not 

operate a vehicle or sit in a vehicle’s seat until 

the head restraints are placed in their proper 

positions in order to minimize the risk of neck 

injury in the event of a crash.

Head restraints should never be adjusted 

while the vehicle is in motion. Driving a vehicle 

with the head restraints improperly adjusted 

or removed could cause serious injury or 

death in the event of a collision.

1 — Release Button
2 — Adjustment Button

WARNING!

WARNING!

A loose head restraint thrown forward in a collision 

or hard stop could cause serious injury or death to 

occupants of the vehicle. Always securely stow 

removed head restraints in a location outside the 

occupant compartment.

ALL the head restraints MUST be reinstalled in 

the vehicle to properly protect the occupants. 

Follow the preceding reinstallation instruc

-

tions prior to operating the vehicle or occu

-

pying a seat.

-------------------------------------------------------------------------------------------------------------------------------------------------------------

GETTING TO KNOW YOUR VEHICLE

29

UCONNECT VOICE RECOGNITION — 

IF EQUIPPED

I

NTRODUCING

 V

OICE

 R

ECOGNITION

Start using Uconnect Voice Recognition with 

these helpful quick tips. It provides the key Voice 

Commands and tips you need to know to control 

your vehicle’s Voice Recognition (VR) system.

NOTE:

Voice Recognition is only available on the 

Uconnect 5 NAV With 10.1-inch Display.

B

ASIC

 V

OICE

 C

OMMANDS

The following can be given at any point while using 

your Uconnect system.
Push the VR button   and after the beep, say a 

command. You can also say the system “Wake Up” 

word, “Hey Uconnect” or “Hey Ram”, and then say 

a command. The factory default Wake Up word is 

set to “Hey Uconnect” and can be reprogrammed 

through the Uconnect Settings. After the beep, say:

“Cancel” to stop a current voice session.

“Help” to hear a list of suggested Voice 

Commands.

“Repeat” to listen to the system prompts again.

Notice the visual cues that inform you of your Voice 

Recognition system’s status.

G

ET

 S

TARTED

The   VR button is used to activate/deactivate 

your Voice Recognition system. You can also use 

the system’s “Wake Up” word to activate voice 

recognition. The “Wake Up” word can be set 

through the Uconnect Settings  

Ú

page 134.

Helpful hints for using Voice Recognition:

Reduce background noise. Wind noise and 

passenger conversations are examples of noise 

that may impact recognition.

Speak clearly at a normal pace and volume 

while facing straight ahead.

Each time you give a Voice Command, first push the 

VR button, wait until after the beep, then say your 

Voice Command. Also, you can say the vehicle 

“Wake Up” word to issue a Voice Command. 

The available “Wake Up” words are “Hey Uconnect” 

and “Hey Ram”.

You can interrupt the help message or system 

prompts by pushing the VR button and saying a 

Voice Command from the current category.

Uconnect Voice Command Buttons

1 — Push To Answer a Phone Call
2 — For Vehicles Equipped With Navigation: Push 

The Voice Recognition Button To Begin Radio, 

Media, Navigation, Climate, Start Or Answer A 

Phone Call, And Send Or Receive A Text

2 — For Vehicles Not Equipped With Navigation: 

Push The Phone Button To Answer An Incoming 

Phone Call
3 — Push To End A Phone Call

2

-------------------------------------------------------------------------------------------------------------------------------------------------------------

30

GETTING TO KNOW YOUR VEHICLE


A

DDITIONAL

 I

NFORMATION

Uconnect are registered trademarks and Mopar 

Owner Connect is a trademark of FCA US LLC. 

SiriusXM® and all related marks and logos are 

trademarks of SiriusXM® Radio Inc.  

Ú

page 280.

For Uconnect system support, call 

1-877-855-8400 (24 hours a day 7 days a week) 

or visit 

DriveUconnect.com

 (US) or 

DriveUconnect.ca

 (Canada).

MIRRORS 

I

NSIDE

 R

EARVIEW

 M

IRROR

Manual Mirror — If Equipped   

The rearview mirror can be adjusted up, down, left, 

and right. The mirror should be adjusted to center 

on the view through the rear window.
Headlight glare can be reduced by moving the 

small control under the mirror to the night position 

(toward the rear of the vehicle). The mirror should 

be adjusted while set in the day position (toward 

the windshield).

Adjusting Rearview Mirror

Digital Rearview Mirror — If Equipped

The Digital Rearview Mirror provides a high 

definition, wide and unobstructed view of the

road behind while driving.
Position the mirror in the regular Automatic 

Dimming Mirror mode, then activate the Digital 

Rearview Mirror mode.
To activate the Digital Rearview Mirror, pull the

on/off control lever on the bottom of the mirror 

rearward toward the driver.

Digital Rearview Mirror

Push the menu button next to the on/off control to 

access the following mirror options:

Brightness

Tilt

Use the left and right buttons to scroll through 

menu options.
When not in use, push the on/off forward toward 

the windshield to return the mirror to the regular 

Automatic Dimming Mirror.

1 — On/Off Control
2 — Menu Button
3 — Left Scroll Button
4 — Right Scroll Button

-------------------------------------------------------------------------------------------------------------------------------------------------------------

GETTING TO KNOW YOUR VEHICLE

31

NOTE:

The Digital Rearview Mirror is not as effective when 

driving in the following conditions: 

Nighttime in low light applications

Bad weather conditions (e.g. extreme haze, 

snow/slush)

If it becomes difficult to see clearly in the display, 

the camera may need to be cleaned. If snow, ice, 

mud, or any foreign substance builds up on the 

camera lens, clean the lens, rinse with water, and 

dry with a soft cloth. Do not cover the lens.

Camera Location

O

UTSIDE

 M

IRRORS


To receive maximum benefit, adjust the outside 

mirror(s) to center on the adjacent lane of traffic 

with a slight overlap of the view obtained on the 

inside mirror.

Outside Mirrors Folding Feature

All outside mirrors are hinged and may be folded 

forward or rearward to avoid damage. The hinges 

have three detent positions:

Full forward position

Full rearward position

Normal position

O

UTSIDE

 M

IRRORS

 W

ITH

 T

URN

 S

IGNAL


A

ND

 A

PPROACH

 L

IGHTING

 — 

I

F

 E

QUIPPED

Driver and passenger outside mirrors with turn 

signal and approach lighting contain four LEDs, 

which are located in the upper outer corner of each 

mirror.
Three of the LEDs are turn signal indicators, which flash 

with the corresponding turn signal lights in the front 

and rear of the vehicle. Turning on the Hazard Warning 

flashers will also activate these LEDs.
The fourth LED supplies illuminated entry lighting, 

which turns on in both mirrors when you use the 

key fob or open any door. This LED shines outward 

to illuminate the front and rear door handles.

It also shines downward to illuminate the area in 

front of the doors.
The illuminated entry lighting fades to off after about 

30 seconds or it will fade to off immediately once the 

ignition is placed into the ON/RUN position.

NOTE:

The approach lighting will not function when the 

gear selector is moved out of the PARK position.

WARNING!

Vehicles and other objects seen in an outside 

convex mirror will look smaller and farther away 

than they really are. Relying too much on side 

convex mirrors could cause you to collide with 

another vehicle or other object. Use your inside 

mirror when judging the size or distance of a 

vehicle seen in a side convex mirror.

2

-------------------------------------------------------------------------------------------------------------------------------------------------------------

32

GETTING TO KNOW YOUR VEHICLE


P

OWER

 M

IRRORS

 — I

F

 E

QUIPPED


The power mirror controls are located on the 

driver’s side door trim panel.

Power Mirror Controls

To adjust a mirror, turn the control knob toward the left 

upper, left lower, right upper or right lower mirror 

positions indicated by one of the four arrows on the 

switch. Tilt the control knob in the direction you want 

the mirror to move. When you are finished adjusting the 

mirror, turn the control to the center O (off) position to 

prevent accidentally moving a mirror.

NOTE:

If your vehicle is equipped with additional 

spotter mirrors, you can adjust them when the 

control knob is positioned to the lower arrows.

The vehicle must be in ON/RUN to adjust the 

mirrors.

P

OWER

 F

OLDING

 O

UTSIDE

 M

IRRORS

 — 

I

F

 E

QUIPPED

The power folding mirrors can be folded rearward 

and unfolded into the normal driving position.
The switch for the power folding mirrors is located on 

the driver’s door panel below the power mirror controls. 

Push the switch to the right and the mirrors will fold in, 

push the switch to the left and the mirrors will return to 

the normal driving position.

Power Folding Mirror Switch

The power folding mirrors are designed to be 

folded and unfolded using the power folding 

switch. If the mirrors are manually folded, the 

mirror head may appear loose.
If the mirror head or pivot exhibits a slight amount 

of play, the mirror should be power folded closed, 

then power folded open (this may require multiple 

button pushes).

NOTE:

The intended use of the power folding mirrors is by 

pushing the buttons to fold and unfold the mirrors. 

Only manually fold the mirrors when necessary.
Forward Folding
Mirrors can be folded forward manually or by 

accidental impact. In this case it is possible to 

restore to position both ways, manually and 

electrically (as previously described).

1 — Power Folding Mirror (Normal Driving Position)
2 — Power Folding Mirror (Fold In Position)

-------------------------------------------------------------------------------------------------------------------------------------------------------------

GETTING TO KNOW YOUR VEHICLE

33

Power/Manual Folding Mirror Positions

H

EATED

 M

IRRORS

 — I

F

 E

QUIPPED


These mirrors are heated to melt frost 

or ice. This feature will be activated 

whenever you turn on the rear window 

defroster (if equipped)  

Ú

page 40.

EXTERIOR LIGHTS  

M

ULTIFUNCTION

 L

EVER


The multifunction lever controls the operation

of the headlights, parking lights, turn signals, 

headlight beam selection and the passing lights. 

The multifunction lever is located on the left side of 

the steering column.

Multifunction Lever

H

EADLIGHTS


To turn on the headlights, turn the end of the 

multifunction lever to the headlight position. 

When the headlight switch is on, the parking lights, 

taillights, license plate light, clearance lights

and instrument panel lights are also turned on. 

To turn off the headlights, turn the end of the 

multifunction lever back to the O (off) position.

NOTE:

On vehicles sold in Canada, the rear parking lights, 

clearance lights, and Daytime Running Lights 

(DRLs) will turn on when the headlight switch is 

rotated to the O (off) position.

D

AYTIME

 R

UNNING

 L

IGHTS

 (DRL

S

) — 

I

F

 E

QUIPPED


The Daytime Running Lights (DRLs) will come on 

when the ignition is in the ON position and the 

vehicle is in DRIVE or NEUTRAL.
To activate the DRLs, rotate the end of the 

multifunction lever to the O (off) position or the 

AUTO position.

NOTE:

For vehicles sold in Canada, the Daytime 

Running Lights will automatically deactivate 

when the front fog lights are turned on.

The low beams and side/taillights will not be on 

with DRLs.

On some vehicles, the Daytime Running Lights 

may deactivate, or reduce intensity, on one side 

of the vehicle (when a turn signal is activated on 

that side), or on both sides of the vehicle (when 

the hazard warning lights are activated).

1 — Normal Driving Position
2 — Fold In Position
3 — Fold Forward Position

CAUTION!

Leaving the mirror in a non-powered position, 

accidental impact or manual fold, may cause 

permanent damage to the mirror. Electrically 

restore the mirror to its normal position, as soon 

as practical.

2

-------------------------------------------------------------------------------------------------------------------------------------------------------------

34

GETTING TO KNOW YOUR VEHICLE


H

IGH

/L

OW

 B

EAM

 S

WITCH


With the low beams activated, push the multifunction 

lever toward the instrument panel to turn on the high 

beams. The High Beam Indicator Light will illuminate in 

the instrument cluster to indicated that the high beams 

are on. Push the multifunction lever a second time to 

switch the headlights back to low beam. When the 

ignition is placed in the OFF position, both the high and 

low beams will turn off.

A

UTOMATIC

 H

IGH

 B

EAM

 H

EADLAMP


C

ONTROL

 — I

F

 E

QUIPPED

The Automatic High Beam Headlamp Control 

system provides increased forward lighting at night 

by automating high beam control through the use 

of a digital camera mounted on the windshield. 

This camera detects vehicle specific light and 

automatically switches from high beams to low 

beams until the approaching vehicle is out of view.

NOTE:

The multifunction lever must be in the high 

beam position in order for the Automatic High 

Beam Headlamp Control to activate.

The Automatic High Beam Headlamp Control 

can be turned on or off through Uconnect 

Settings  

Ú

page 134.

Broken, muddy, or obstructed headlights and 

taillights of vehicles in the field of view will 

cause headlights to remain on longer (closer to 

the vehicle). Also, dirt, film, and other obstruc

-

tions on the windshield or camera lens will 

cause the system to function improperly.

When set to AUTO, the system automatically 

turns the headlights on or off based on ambient 

light levels.

F

LASH

-T

O

-P

ASS


You can signal another vehicle with your headlights 

by lightly pulling the multifunction lever toward you. 

This will cause the high beam headlights to turn on, 

and remain on, until the lever is released.

A

UTOMATIC

 H

EADLIGHTS

 — I

F

 E

QUIPPED


To turn on the automatic headlights, turn the end 

of the multifunction lever to the AUTO position. To 

turn off the automatic headlights, turn the end of 

the multifunction lever back to the O (off) position.

P

ARKING

 L

IGHTS


These lights can be turned on, with the ignition

in the OFF position, by moving the end of the 

multifunction lever to O (off) position and then to 

the headlight position.
The indicator light in the instrument panel comes 

on. The lights stay on until the next ignition cycle is 

performed.

H

EADLIGHT

 D

ELAY

When this feature is selected, the driver can 

choose to have the headlights remain on for a 

preset period of time after the engine is turned off.
Activation
To activate the delay feature, place the ignition in 

the OFF position while the headlights are still on. 

Then, rotate the multifunction lever to the O (off) 

position within two minutes. The delay interval 

begins when the headlight switch is turned from 

O (off) to the low beam position. If the headlight 

switch is in AUTO position and headlights were on 

before the ignition is OFF, the delay interval begins 

automatically.
Deactivation
The feature is disabled by turning on the 

headlights, the parking lights or by placing the 

ignition in the RUN position. If you shut off the 

lights before the ignition is turned on, they will 

turn off in the normal manner.

-------------------------------------------------------------------------------------------------------------------------------------------------------------

GETTING TO KNOW YOUR VEHICLE

35

Headlights with ignition in the OFF position.
With the ignition in the OFF position, the headlights 

can be switched on for a maximum time of 

8 minutes. To turn on the headlights with the 

ignition in the OFF position, turn the end of the 

multifunction lever to the headlight position.

NOTE:

If the headlight delay function is disabled in the 

Uconnect Setting, when you put the ignition in the 

OFF position with the multifunction lever already 

set in the headlight position, the headlights remain 

on for 8 minutes.

F

OG

 L

IGHTS

 — I

F

 E

QUIPPED


The fog light switch is located on the 

instrument panel to the left of the 

steering column.

To activate the front fog lights, turn on the parking 

lights or the low beam headlights and push the

fog light button. To turn off the front fog lights, 

push the fog light button a second time or turn 

off the headlight switch. An indicator light in the 

instrument cluster illuminates when the fog lights 

are turned on.

NOTE:

The fog lights will operate with the low beam head

-

lights or parking lights on. Selecting the high beam 

headlights will turn off the fog lights. 
If the vehicle’s ignition is turned off, the fog lights 

will also turn off.
Cornering Lights
The cornering lights are a feature to improve visibility at 

night while turning the vehicle. When activated, a light 

incorporated in the front fog light will illuminate on the 

side of the vehicle the steering wheel is rotated or the 

turn signal indicator is on. It can be activated through 

the Uconnect system  

Ú

page 134.

T

URN

 S

IGNALS

Move the multifunction lever up or down and the 

arrows on each side of the instrument cluster will 

flash to show proper operation of the front and rear 

turn signals.

NOTE:

When the Daytime Running Lights are on and a 

turn signal is activated, the Daytime Running Lamp 

will turn off on the side of the vehicle in which the 

turn signal is flashing. The Daytime Running Lamp 

will turn back on when the turn signal is turned off. 

If either light remains on and does not flash, or 

there is a very fast flash rate, check for a defective 

outside light bulb.

L

ANE

 C

HANGE

 A

SSIST

Lightly push the multifunction lever up or down, without 

moving beyond the detent, and the turn signal will flash 

five times then automatically turn off.

B

ATTERY

 S

AVER

To protect the life of your vehicle’s battery, when 

the ignition is OFF and any door is left ajar for 

15 minutes, the interior lights will automatically 

turn off.

NOTE:

Battery saver mode is canceled if the ignition is 

placed in the ON/RUN position.

2

-------------------------------------------------------------------------------------------------------------------------------------------------------------

36

GETTING TO KNOW YOUR VEHICLE


INTERIOR LIGHTS 

C

OURTESY

 L

IGHTS

These lights are mounted between the sun visors 

on the overhead console. Each light is turned on by 

pushing the corresponding switch.

Courtesy Lights

Dome Lights
The interior lights can be set to three different 

positions (off/left position, center position, 

on/right position). Using the switch on the bottom 

of the overhead console:

Push the switch to the on/right position from its 

center position and the lights are always on.

Push the switch to the off/left position from its 

center position and the lights are always off.

Leave the switch in the center position, and the 

lights are turned on and off when the doors are 

opened or closed.

Map Lights
The switches on the left and right sides of the 

overhead console control the map or reading 

function of the lights. Push the switch on the right 

to turn the right light on; push again to turn off. 

Push the switch on the left to turn the left light on; 

push again to turn off.

Rear Lights

Your vehicle may be equipped with a Rear Cargo 

Lamp located at the upper rear cargo area above 

the rear doors.

Rear Cargo Lamp Location

Your vehicle may also be equipped with a Side 

Cargo Lamp located at the upper rear area of the 

passenger side sliding door opening.

1 — Ambient Light
2 — Left Map Light
3 — Off/Left Position
4 — Center Position
5 — Right Map Light
6 — On/Right Position

CAUTION!

Before getting out of the vehicle be sure that the 

switch is in the center position or that the lights 

are off to avoid draining the battery.

-------------------------------------------------------------------------------------------------------------------------------------------------------------

GETTING TO KNOW YOUR VEHICLE

37

Side Cargo Lamp Location

The Rear and Side Cargo Lamps can be set to three 

different positions by pushing the lens to the right, 

left, or center positions. 

Push the lens to the right from its center posi

-

tion and the lamp is always off.

Leave the lens in the center position, and the 

lamp is turned on and off when the sliding doors 

or rear doors are opened or closed.

Push the lens to the left from its center position 

and the lamp is always on.

Your vehicle may also be equipped with a cargo 

lamp on the center of the ceiling of the cargo area.

Ceiling Cargo Lamp

The Ceiling Cargo Lamp can be set to three 

different positions (off position, center position, 

and on position).

Push the switch to the off position from its 

center position and the light is always off.

Leave the switch in the center position, and the 

light is turned on and off when the sliding doors 

or rear doors are opened or closed. The Ceiling 

Cargo Lamp is also equipped with a movement 

sensor that will switch the light on when move

-

ment is detected.

Push the switch to the on position from its 

center position and the light is always on.

NOTE:

If the ignition is placed in the OFF position, the light will 

stay on for about 15 minutes and then time out.

Dimmer Controls 

The dimmer controls are located on the left side of 

the instrument panel below the instrument cluster 

display.

Dimmer Controls

Pushing the “+” or “–” button will increase or 

decrease the brightness of the instrument panel 

lights, cupholder lights, and footwell lights, as long 

as the headlights or parking lights are on.
Dimming Of The Uconnect Touchscreen
The brightness of the Uconnect touchscreen can be 

dimmed using the instrument panel dimmer control 

when the parking lights or headlights are on.

2

-------------------------------------------------------------------------------------------------------------------------------------------------------------

38

GETTING TO KNOW YOUR VEHICLE


When Display Mode is set to Auto within the 

Uconnect system, the brightness will automatically 

adjust from daytime intensity to nighttime intensity 

(and vice versa) based on ambient light levels 

outside of the vehicle.

NOTE:

The brightness of the Uconnect touchscreen 

cannot be adjusted when the dimmer control is 

at the maximum setting (interior lights on), even 

when Display Mode is set to Auto within the 

Uconnect Settings.
When Display Mode is set to Manual, the 

brightness of the Uconnect touchscreen will adjust 

to the set brightness (1 - 6) when the headlights 

are either on or off. For more information on these 

Uconnect Settings, see  

Ú

page 134.

Ambient Light

The vehicle is equipped with ambient light on the 

dome lamp. The ambient light will be on all the 

time, with the option of dimming it with the dimmer 

controls as long as the headlights are turned on.

Ambient LED Lighting — If Equipped

Your vehicle may be equipped with LED lighting

in the front footwells and center cup holders. 

The brightness of the lights can be adjusted using 

the dimmer controls, located on the left side of the 

instrument panel, as long as the headlights are 

turned on.

I

LLUMINATED

 E

NTRY

 — I

F

 E

QUIPPED


The courtesy lights will turn on when you use the 

key fob to unlock the doors or open any door. 

They also turn on when unlocking or opening 

manually from the driver door cylinder.
The lights will fade to off after approximately 

30 seconds, or they will immediately fade to off 

once the ignition switch is changed to the ON/RUN 

position from the OFF position.
The dome lights illuminate in the following ways: 

When the doors are unlocked, the dome light 

will illuminate for approximately 27 seconds.

When one of the front doors is opened, the front 

dome light will illuminate for approximately 

three minutes.

When one of the rear doors is opened, the rear 

dome light will illuminate for approximately 

three minutes.

When the front doors are closed, the front dome 

light will automatically shut off after approxi

-

mately 27 seconds.

When the rear doors are closed, the rear dome 

light will automatically shut off after approxi

-

mately 27 seconds. The timing stops once the 

ignition is placed in the RUN or ON position.

The dome light will turn off under any of the 

following conditions: 

The dome light is disabled when the ignition is 

placed in the RUN or ON position.

The dome lights will turn off automatically when 

the doors are locked.

NOTE:

The front courtesy overhead console and door 

courtesy lights will not turn off if the switch on 

the overhead console is in the on position.

The illuminated entry system will not operate if 

the switch on the overhead console is in the OFF 

position.

WIPERS AND WASHERS  

The windshield wiper/washer lever is located on 

the right side of the steering column. There are

five different modes of operation for the front 

windshield wipers. The windshield wiper lever 

can be raised or lowered to access the modes.

NOTE:

The windshield wipers/washers will only operate 

with the ignition in the ON/RUN position.

-------------------------------------------------------------------------------------------------------------------------------------------------------------

GETTING TO KNOW YOUR VEHICLE

39

Windshield Wiper/Washer Lever

W

INDSHIELD

 W

IPER

 O

PERATION


Rotate the windshield wiper knob to one of the first 

two detent positions for intermittent settings, the 

third detent for low wiper operation and the fourth 

for high wiper operation.
Windshield Washers
To use the washer, pull the windshield wiper/washer 

lever toward the steering wheel to activate. The wipers 

will activate automatically for three cycles after the 

lever is released, and then resume the intermittent 

interval previously selected.

If the lever is pulled while in the off position, the wipers 

will operate for three cycles and then turn off.

Mist
Use the Mist feature when weather conditions 

make occasional usage of the wipers necessary. 

Push the lever upward to the MIST position and 

release for a single wiping cycle.

NOTE:

The mist feature does not activate the washer 

pump; therefore, no washer fluid will be sprayed on 

the windshield. The washer function must be used 

in order to spray the windshield with washer fluid.
For information on wiper care and replacement, 

see  

Ú

page 231.

R

AIN

 S

ENSING

 W

IPERS

 — I

F

 E

QUIPPED


This feature senses moisture on the windshield and 

automatically activates the wipers. Rotate the end of 

the multifunction lever to one of two detent positions 

for intermittent settings to activate this feature.

NOTE:

If the windshield wiper lever is rotated from the 

O (off) position to the first intermittent setting or 

from the first intermittent setting to the second 

intermittent setting, the wipers will perform an 

immediate wipe cycle to clean the windshield.
The sensitivity of the system can be adjusted with 

the windshield wiper lever. Wiper delay position 

one is the least sensitive, and wiper delay position 

two is the most sensitive. Place the wiper switch in 

the O (off) position when not using the system.

NOTE:

The Rain Sensing feature will not operate when the 

wiper switch is in the low or high-speed position.

The Rain Sensing feature may not function prop

-

erly when ice, or dried salt water is present on 

the windshield.

Use of products containing wax or silicone may 

reduce Rain Sensing performance.

The Rain Sensing feature can be turned on and 

off using the Uconnect system  

Ú

page 134.

1 — Pull Back For Front Washer
2 — Rotate For Intermittent Settings
3 — Push Upward For Mist

WARNING!

Sudden loss of visibility through the windshield 

could lead to a collision. You might not see other 

vehicles or other obstacles. To avoid sudden 

icing of the windshield during freezing weather, 

warm the windshield with the defroster before 

and during windshield washer use.

2

-------------------------------------------------------------------------------------------------------------------------------------------------------------

40

GETTING TO KNOW YOUR VEHICLE


The Rain Sensing system has protection features 

for the wiper blades and arms, and will not operate 

under the following conditions:

Low Ambient Temperature — When the ignition is 

first placed in the ON position, the Rain Sensing 

system will not operate until the wiper switch is 

moved, vehicle speed is greater than 3 mph 

(5 km/h), or the outside temperature is greater

than 32°F (0°C).

Transmission In NEUTRAL Position — When the 

ignition is ON, and the automatic transmission 

is in the NEUTRAL position, the Rain Sensing 

system will not operate until the wiper switch is 

moved, vehicle speed is greater than 3 mph 

(5 km/h), or the gear selector is moved out of 

the NEUTRAL position.

Remote Start Mode Inhibit — On vehicles 

equipped with a Remote Start system, 

Rain Sensing wipers are not operational when 

the vehicle is in the Remote Start mode.

The user can activate the Rain Sensing Wipers in 

three ways:

Moving the lever from the O (off) position to the 

intermittent positions.

One Mist command actuation.

The vehicle speed exceeds 3 mph (5 km/h) and 

the rain sensor detects the presence of rain.

NOTE:

In the event of a rain sensor failure, a dedicated 

telltale on the instrument cluster will appear to 

warn the customer (if equipped).

CLIMATE CONTROLS 

The Climate Control system allows you to regulate 

the temperature, air flow, and direction of air 

circulating throughout the vehicle. The controls are 

located on the touchscreen and on the instrument 

panel below the radio.

M

ANUAL

 C

LIMATE

 C

ONTROL


D

ESCRIPTIONS

 A

ND

 F

UNCTIONS

Uconnect 5 NAV With 10.1-inch Display With Manual 

Climate Controls

Uconnect 5 With 7-inch Display With Manual Climate 

Controls

MAX A/C Button — If Equipped

Press and release the MAX A/C button on 

the touchscreen to change the current 

setting to the coldest output of air. 

The MAX A/C indicator illuminates when 

MAX A/C is on. Pressing the button again will cause 

the MAX A/C operation to exit.

A/C Button — If Equipped

Push the A/C button to engage the Air 

Conditioning (A/C). The A/C indicator 

illuminates when A/C is on.

-------------------------------------------------------------------------------------------------------------------------------------------------------------


Content      ..      1      2      3      ..