RAM 3500 Chassis Cab (2021 year). Manual in english - page 6
 

  Index      Manuals     RAM 3500 Chassis Cab (2021 year). Manual in english


Search            copyright infringement  


Content      ..     4      5      6      7     ..


RAM 3500 Chassis Cab (2021 year). Manual in english - page 6


90

GETTING TO KNOW YOUR INSTRUMENT PANEL


INSTRUMENT CLUSTER DISPLAY

Your vehicle is equipped with an instrument 

cluster display, which offers useful information to 

the driver. With the ignition in the OFF mode, 

opening/closing of a door will activate the display 

for viewing, and display the total miles, or 

kilometers, in the odometer. Your instrument 

cluster display is designed to display important 

information about your vehicle’s systems and 

features. Using a driver interactive display 

located on the instrument panel, your instrument 

cluster display can show you how systems are 

working and give you warnings when they are not. 

The steering wheel mounted controls allow you to 

scroll through the main menus and submenus. 

You can access the specific information you want 

and make selections and adjustments.

I

NSTRUMENT

 C

LUSTER

 D

ISPLAY


C

ONTROLS

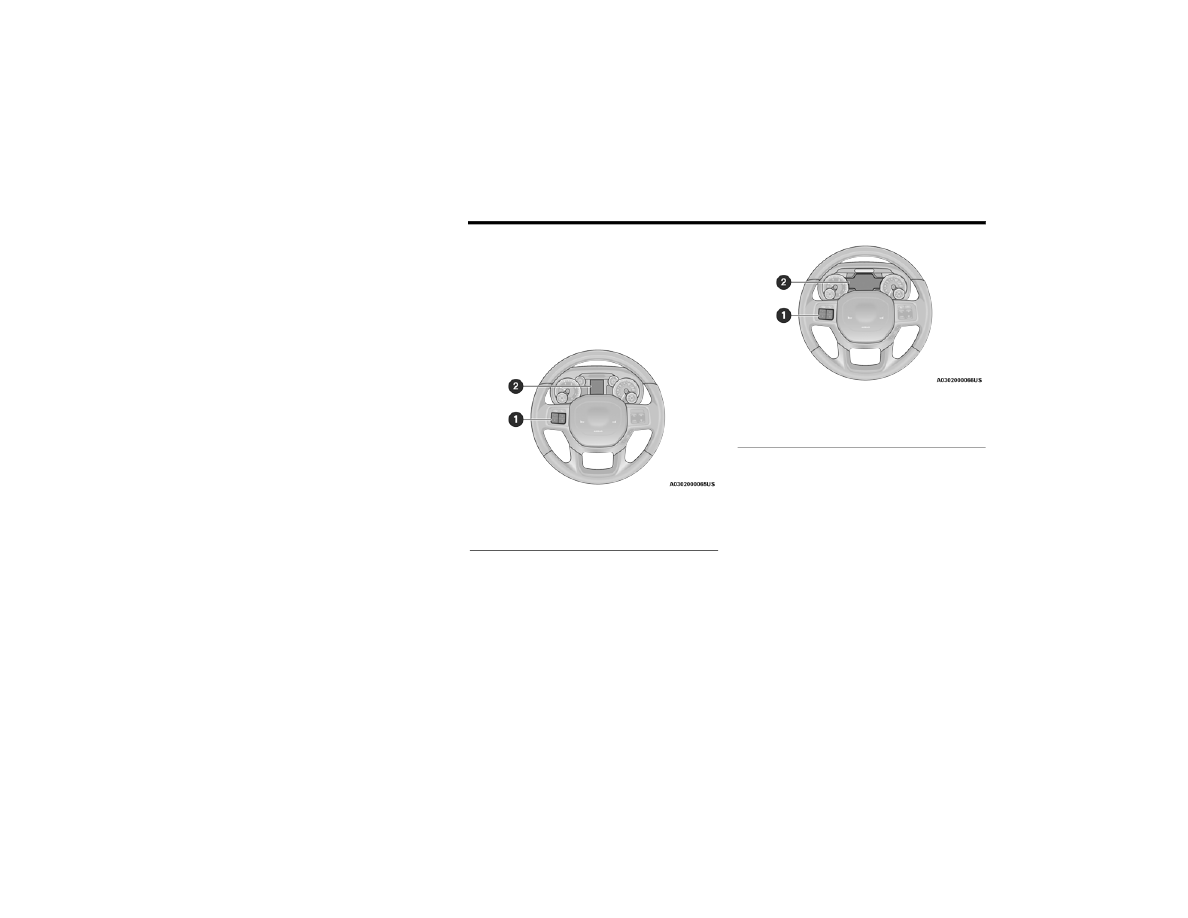
The instrument cluster display features a driver 

interactive display that is located in the 

instrument cluster.

Base Instrument Cluster Display

Premium Instrument Cluster Display

The instrument cluster display menu items may 

consist of the following:

Speedometer

Vehicle Info

Off-Road — If Equipped

Driver Assist — If Equipped

Fuel Economy

Trip Info

1 – Instrument Cluster Display Controls
2 – Instrument Cluster Display Screen

1 – Instrument Cluster Display Controls
2 – Instrument Cluster Display Screen

-------------------------------------------------------------------------------------------------------------------------------------------------------------

GETTING TO KNOW YOUR INSTRUMENT PANEL

91

Trailer Tow

Audio

Messages

Screen Set Up

Vehicle Settings — If Equipped

Commercial Settings — If Equipped

The system allows the driver to select 

information by pushing the following instrument 

cluster display control buttons located on the 

left side of the steering wheel:

Instrument Cluster Display Control Buttons

Up Arrow Button

Push and release the up   arrow button to 

scroll upward through the main menu items, 

submenu screen, and vehicle settings.

Down Arrow Button

Push and release the down   arrow button 

to scroll downward through the main menu 

items, submenu screen, and vehicle settings.

Right Arrow Button

Push and release the right   arrow button to 

access/select the information screens or 

submenu screens of a main menu item. 
Push and hold the right   arrow button for 

two seconds to reset displayed/selected 

features that can be reset.

Left Arrow Button

Push and release the left   arrow button

to access/select the information screens, 

submenu screens of a main menu item, or to 

return to the main menu.

O

IL

 L

IFE

 R

ESET


Your vehicle is equipped with an engine oil 

change indicator system. The “Oil Change 

Required” message will display in the instrument 

cluster display after a single chime has sounded, 

to indicate the next scheduled oil change 

interval. The engine oil change indicator system 

is duty cycle based, which means the engine oil 

change interval may fluctuate, dependent upon 

your personal driving style.

NOTE:

Use the steering wheel instrument cluster 

display controls for the following procedure.

Oil Life Reset Procedure

1. Without pushing the brake pedal, push the 

ENGINE START/STOP button and place the 

ignition to the ON/RUN position (do not 

start the engine).

2. Push and release the down   arrow button 

to scroll downward through the main menu 

to “Vehicle Info.”

3. Push and release the right   arrow button 

to access the ”Vehicle Info” screen, then 

scroll up or down to select “Oil Life.”

3

-------------------------------------------------------------------------------------------------------------------------------------------------------------

92

GETTING TO KNOW YOUR INSTRUMENT PANEL


4. Push and hold the right   arrow button to 

select “Reset”.

5. Push and release the down   arrow button 

to select “Yes,” then push and release the 
right   arrow button to reset the Oil Life to 

100%.

6. Push and release the up   arrow button to 

exit the instrument cluster display screen.

Secondary Method Of Resetting Engine Oil Life

1. Without pressing the brake pedal, push the 

ENGINE START/STOP button and place the 

ignition to the ON/RUN position (do not 

start the engine).

2. Fully press the accelerator pedal, slowly, 

three times within ten seconds.

3. Without pushing the brake pedal, push the 

ENGINE START/STOP button once to return 

the ignition to the OFF/LOCK position.

NOTE:

If the indicator message illuminates when 

you start the vehicle, the oil change indicator 

system did not reset. If necessary, repeat this 

procedure.

D

ISPLAY

 M

ENU

 I

TEMS

Push and release the up   or down   arrow 

button until the desired selectable menu icon is 

highlighted in the instrument cluster display.

Speedometer

Push and release the up   or down   arrow 

button until the speedometer menu item is 

highlighted in the instrument cluster display. 
Push and release the right   arrow button to 

cycle the display between mph and km/h.

Vehicle Info

Push and release the up   or down   arrow 

button until the Vehicle Info menu item is 

highlighted in the instrument cluster display. 
Push and release the right   arrow button to 

enter the submenus items of Vehicle Info. 

Follow the directional prompts to access or 

reset any of the following Vehicle Info submenu 

items:

Tire Pressure

Coolant Temperature

Transmission Temperature — If Equipped

Oil Temperature

Oil Pressure

Exhaust Brake — If Equipped

Boost Pressure — If Equipped

Diesel Particulate Filter (DPF) — If Equipped

Oil Life

Fuel Filter Life — If Equipped

Battery Voltage

Gauge Summary

Engine Hours

Off-Road

Push and release the up   or down   arrow 

button until the Off-Road menu icon is displayed 

in the instrument cluster display. Push and 
release the left   or right   arrow button to 

scroll through the information submenus.

Drivetrain

Front Wheel Angle: displays the graphical 

and numerical value of calculated 

average front wheel angle from the 

steering wheel orientation.

-------------------------------------------------------------------------------------------------------------------------------------------------------------

GETTING TO KNOW YOUR INSTRUMENT PANEL

93

Transfer Case Lock Status: displays 

“Lock” graphic only during 4WD High, 

4WD High Part Time, 4WD Low status.

Axle Lock And Sway Bar Status (If Equipped): 

displays front and rear or rear only axle 

locker graphic, and sway bar connection 

graphic with text message (connected or 

disconnected).

Pitch And Roll

Displays the pitch and roll of the vehicle 

in the graphic with the angle number on 

the screen.

NOTE:

When vehicle speed becomes too high to 

display the pitch and roll, “- -” will display in 

place of the numbers, and the graphic will be 

greyed out. A message indicating the necessary 

speed for the feature to become available will 

also display.

Driver Assist — If Equipped

The Driver Assist menu displays the status of 

the ACC system.

Push and release the up   or down   arrow 

button until the Driver Assist menu is displayed 

in the instrument cluster display.

Adaptive Cruise Control (ACC) Feature
The instrument cluster display displays the 

current ACC system settings. The information 

displayed depends on ACC system status.
Push the ACC on/off button (located on the 

steering wheel) until one of the following 

displays in the instrument cluster display:
Adaptive Cruise Control Off
When ACC is deactivated, the display will read 

“Adaptive Cruise Control Off.”
Adaptive Cruise Control Ready
When ACC is activated but the vehicle speed 

setting has not been selected, the display will 

read “Adaptive Cruise Control Ready.”
Push the SET + or the SET- button (located on 

the steering wheel) and the following will display 

in the instrument cluster display:
ACC SET
When ACC is set, the set speed will display in 

the instrument cluster.

The ACC screen may display once again if any 

ACC activity occurs, which may include any of 

the following:

Distance Setting Change

System Cancel

Driver Override

System Off

ACC Proximity Warning

ACC Unavailable Warning

NOTE:

The instrument cluster display will return to the 

last display selected after five seconds of no 

ACC display activity  

Ú

page 166.

LaneSense — If Equipped
The instrument cluster display displays

the current LaneSense system settings.

The information displayed depends on 

LaneSense system status and the conditions 

that need to be met  

Ú

page 183.

3

-------------------------------------------------------------------------------------------------------------------------------------------------------------

94

GETTING TO KNOW YOUR INSTRUMENT PANEL


Fuel Economy

Push and release the up   or down   arrow 

button until the Fuel Economy menu item is 

highlighted in the instrument cluster display. 
Push and Hold the right   arrow button to reset 

Average Fuel Economy.

Current Fuel Economy Gauge

Average Fuel Economy Value

Range To Empty

Fuel Tank Levels — If Equipped

Trip A/Trip B

Push and release the up   or down   arrow 

button until the Trip menu item is highlighted

in the instrument cluster display. Push and 
release the right   arrow button to enter the 

submenus of Trip A and Trip B. The Trip A or Trip 

B information will display the following:

Distance

Average Fuel Economy

Elapsed Time

Push and hold right   arrow button to reset all 

information.

Trailer Tow

Push and release the up   or down   arrow 

button until the Trailer Tow menu item is 

highlighted in the instrument cluster display. 
Push and release the right   or left   arrow 

button to cycle through the following trailer tow 

information:

Trip (trailer specific) Distance: Push and hold 

the OK button to reset the distance.

Integrated Trailer Brake Module (ITBM):

Braking Output

Trailer Type

ITBM Gain

Trailer Light Check: Push and hold the 

OK button to begin the Trailer Light Test 

sequence  

Ú

page 209.

Trailer Tire Pressure Monitoring: The Instru

-

ment Cluster Display will display the Trailer 

Tire Pressure for a connected trailer with 

sensors that match the active trailer profile. 

When a low tire is present, the low tire value 

will be displayed in red, and the affected low 

tire will have a red glow. “Trailer Tire Low“ will 

be displayed on the center bottom of the 

Instrument Cluster Display screen.

Audio

Push and release the up   or down   arrow 

button until the Audio Menu icon/title is 

highlighted in the instrument cluster display. 

This menu will display the audio source 

information, including the Song name, Artist 

name, and audio source with an accompanying 

graphic.
Phone Call Status
When a call is incoming, a Phone Call Status 

pop-up will display on the screen. The pop-up 

will remain until the phone is answered or 

ignored.

NOTE:

The call status will temporarily replace the 

previous media source information displayed 

on the screen. When the pop-up is no longer 

displayed, the display will return to the last used 

screen.

-------------------------------------------------------------------------------------------------------------------------------------------------------------

GETTING TO KNOW YOUR INSTRUMENT PANEL

95

Stored Messages

Push and release the up   or down   arrow 

button until the Messages Menu item is 

highlighted. This feature shows the number of 

stored warning messages. Push and release the 
right   or left   arrow button to cycle through 

stored messages.

Screen Setup Menu Item

Push and release the up   or down   arrow 

button until the Screen Setup menu item is 

highlighted in the instrument cluster display. 
Push and release the right   arrow button to 

enter the Screen Setup submenu. The Screen 

Setup feature allows you to change what 

information is displayed in the instrument 

cluster as well as the location that information 

is displayed.
Current Gear — If Equipped

Off

On

Odometer

Unit Without Decimal

Unit With Decimal

Favorite Menu

Speedometer

Vehicle Info

Driver Assist (Show/Hide) — If Equipped

Fuel Economy (Show/Hide)

Trip Info (Show/Hide)

Trailer Tow (Show/Hide)

Audio (Show/Hide)

Messages

Screen Setup

Vehicle Settings — If Equipped

Commercial Settings — If Equipped

NOTE:
Menus with (Show/Hide) can push the right   

arrow button to choose whether to show or hide 

this menu in the instrument cluster display.

Upper Left — If Equipped

None

Compass — If Equipped

Outside Temp — If Equipped

Time

Range To Empty

Average Econ

Current Econ

Trip A Distance

Trip B Distance

Trailer Trip — If Equipped

Trailer Brake — If Equipped

Oil Pressure — If Equipped

Coolant Temperature — If Equipped

Oil Temperature — If Equipped

Battery Voltage — If Equipped

Transmission Temperature — If Equipped

3

-------------------------------------------------------------------------------------------------------------------------------------------------------------

96

GETTING TO KNOW YOUR INSTRUMENT PANEL


Oil Life — If Equipped

Exhaust Brake — If Equipped

Turbo Boost — If Equipped

Fuel Filter Life — If Equipped

Center

None

Compass

Outside Temp

Time

Range To Empty

Average Econ

Current Econ

Trip A Distance

Trip B Distance

Trailer Trip — If Equipped

Audio

Speedometer

Menu Title

Upper Right

None

Compass — If Equipped

Outside Temp

Time

Range To Empty

Average Econ

Current Econ

Trip A Distance

Trip B Distance

Trailer Trip — If Equipped

Trailer Brake — If Equipped

Oil Pressure — If Equipped

Coolant Temperature — If Equipped

Oil Temperature — If Equipped

Battery Voltage — If Equipped

Transmission Temperature — If Equipped

Oil Life — If Equipped

Exhaust Brake — If Equipped

Turbo Boost — If Equipped

Fuel Filter Life — If Equipped

Left Side — If Equipped

None

Range

Average Econ

Menu Icon

Coolant Temperature

Oil Temperature

Transmission Temperature

Oil Life

Fuel Filter Life — If Equipped

-------------------------------------------------------------------------------------------------------------------------------------------------------------

GETTING TO KNOW YOUR INSTRUMENT PANEL

97

Right Side — If Equipped

None

Range

Average Econ

Menu Icon

Coolant Temperature

Oil Temperature

Transmission Temperature

Oil Life

Fuel Filter Life — If Equipped

Lower Left — If Equipped

None

Compass

Outside Temp

Time

Range To Empty

Average Econ

Current Econ

Trip A Distance

Trip B Distance

Trailer Trip

Trailer Brake

Oil Pressure

Coolant Temperature

Oil Temperature

Battery Voltage

Transmission Temperature

Oil Life

Exhaust Brake — If Equipped

Turbo Boost — If Equipped

Fuel Filter Life — If Equipped

Lower Right — If Equipped

None

Compass

Outside Temp

Time

Range To Empty

Average Econ

Current Econ

Trip A Distance

Trip B Distance

Trailer Trip

Trailer Brake

Oil Pressure

Coolant Temperature

Oil Temperature

Battery Voltage

Transmission Temperature

Oil Life

Exhaust Brake — If Equipped

Turbo Boost — If Equipped

Fuel Filter Life — If Equipped

Restore Defaults

Cancel

Restore

3

-------------------------------------------------------------------------------------------------------------------------------------------------------------

98

GETTING TO KNOW YOUR INSTRUMENT PANEL


Settings — If Equipped

Personal Settings allows the driver to set and 

recall features when the transmission is in 

PARK.

Push and release the up   or down   arrow 

button until Settings displays in the instrument 

cluster display.
Follow the prompts to display and set any of the 

following Vehicle Settings.

NOTE:

Your vehicle may be equipped with the following 

settings. 

If equipped with a base radio (Non-Touch

-

screen) Vehicle Settings will be included in 

the instrument cluster display.

If equipped with a Touchscreen radio, the 

Vehicle Settings will be included in the radio 

head unit.

Setting Names

Setting Names Abbreviated 

(Left Submenu Layer)

Submenus (Right Submenu Layer)

Language Select

Language

English, Spanish, French, Arabic

Units

Units

U.S.; Metric

ParkSense

ParkSense

Front Volume — Low; Medium; High

Rear Volume — Low; Medium; High

Tilt Mirror in Reverse

Tilt Mirror in R

On; Off

Rain Sensing Wipers

Auto Wipers

On; Off

Hill Start Assist

Hill Start Assist

On; Off

Headlights Off Delay

Lights Off Delay

0 seconds; 30 seconds; 60 seconds; 90 seconds

Illuminated Approach

Lights w/ Unlock

0 seconds; 30 seconds; 60 seconds; 90 seconds

Headlights On with Wipers

Lights w/ Wipers

On; Off

Automatic High beams

Auto High beams

On; Off

-------------------------------------------------------------------------------------------------------------------------------------------------------------

GETTING TO KNOW YOUR INSTRUMENT PANEL

99

Daytime Running Lights

Daytime Lights

On; Off

Flash Lights with Lock

Lights w/ Lock

On; Off

Auto Lock Doors

Auto Lock Doors

On; Off

Auto Unlock Doors

Auto Unlock Doors

On; Off

Sound Horn with Remote Start

Horn w/ Rmt Start

On; Off

Sound Horn with Remote Lock

Horn w/ Rmt Lock

Off; 1st Press; 2nd Press

Remote Unlock Sequence

Remote Unlock

Driver Door; All Doors

Key Fob Linked to Memory

Key in Memory

On; Off

Passive Entry

Passive Entry

On; Off

Remote Start Comfort System

Rmt Start Comfort

Off; Remote Start; All starts

Easy Exit Seat

Easy Exit Seat

On; Off

Key-off Power Delay

Power Off Delay

Off; 45 seconds; 5 minutes; 10 minutes

Commercial Settings

Commercial

Aux Switches

Power Take-Off

PIN Setup

NOTE:

If the vehicle’s PIN is forgotten or not known, see an authorized dealer to have 

the PIN reset.

Trailer Select

Trailer Select

Trailer 1; Trailer 2; Trailer 3; Trailer 4

Setting Names

Setting Names Abbreviated 

(Left Submenu Layer)

Submenus (Right Submenu Layer)

3

-------------------------------------------------------------------------------------------------------------------------------------------------------------

100

GETTING TO KNOW YOUR INSTRUMENT PANEL


Brake Type

Brake Type

Light Electric; Heavy Electric; Light EOH; Heavy EOH

Trailer Name

Trailer Name

Trailer # (# is equal to slot position)

Boat

Car

Cargo

Dump

Equipment

Flatbed

Gooseneck

Horse

Livestock

Motorcycle

Snowmobile

Travel

Utility

5th Wheel

Compass Variance

Compass Var

1-15 increments of 1

Setting Names

Setting Names Abbreviated 

(Left Submenu Layer)

Submenus (Right Submenu Layer)

-------------------------------------------------------------------------------------------------------------------------------------------------------------

GETTING TO KNOW YOUR INSTRUMENT PANEL

101

Commercial Settings — If Equipped

Commercial Settings allows the driver to set 

and recall additional features when the 

transmission is in PARK.

Push and release the up   or down   arrow 

button until Commercial Settings displays in the 

instrument cluster display.
Follow the prompts to enter the required PIN 

and enter the Commercial Settings submenu.

NOTE:

If your vehicle is equipped with a touchscreen 

radio, “Commercial Settings” will replace 

“Vehicle Settings” in the instrument cluster 

display. The Commercial Settings menu will only 

include the settings below  

Ú

page 228.

Commercial Settings allows you to access the 

following features (if equipped):

Power Take Off (PTO)

Remote Ignition

Idle Control

Backup Alarm

ParkSense

Aux Switches

PIN Setup

NOTE:

If the vehicle’s PIN is forgotten or not known, 

see an authorized dealer to have the PIN reset.

D

IESEL

 M

ESSAGES

 A

ND

 W

ARNINGS

Diesel Particulate Filter (DPF) Messages 

The Cummins diesel engine meets all diesel 

emissions standards, resulting in one of the 

lowest emitting diesel engines ever produced. 

To achieve these emissions standards, your 

vehicle is equipped with a state-of-the-art 

engine and exhaust system. These systems are 

seamlessly integrated into your vehicle and 

managed by the Powertrain Control Module 

(PCM). The PCM manages engine combustion 

to allow the exhaust system’s catalyst to trap 

and burn Particulate Matter (PM) pollutants, 

with no input or interaction on your part.

Calibrate Compass

Compass Cal

Cancel; Calibrate

Fuel Saver Display

Fuel Saver

On; Off

Setting Names

Setting Names Abbreviated 

(Left Submenu Layer)

Submenus (Right Submenu Layer)

3

-------------------------------------------------------------------------------------------------------------------------------------------------------------

102

GETTING TO KNOW YOUR INSTRUMENT PANEL


Your vehicle has the ability to alert you to 

additional maintenance required on your 

vehicle or engine. The following messages may 

display in your instrument cluster display:

Perform Service — Your vehicle will require 

emissions maintenance at a set interval. 

To help remind you when this maintenance

is due, the instrument cluster display will 

display “Perform Service”. When the “Perform 

Service” message is displayed in the instru

-

ment cluster display it is necessary to have the 

emissions maintenance performed. Emissions 

maintenance may include replacing the 

Closed Crankcase Ventilation (CCV) filter 

element. The procedure for clearing and reset

-

ting the "Perform Service" indicator message is 

located in the appropriate Service Information.

Exhaust System — Regeneration Required 

Now — "Exhaust Filter XX% Full Safely Drive at 

Highway Speeds to Remedy" will be displayed 

in the instrument cluster display if the exhaust 

particulate filter reaches 80% of its maximum 

storage capacity. Under conditions of exclu

-

sive short duration and low speed driving 

cycles, your Cummins diesel engine and 

exhaust after-treatment system may never 

reach the conditions required to remove the 

trapped PM. If this occurs, the “Exhaust Filter 

XX% Full Safely Drive at Highway Speeds to 

Remedy” message will be displayed in the 

instrument cluster display. If this message is 

displayed, you will hear one chime to assist in 

alerting you of this condition
By simply driving your vehicle at highway 

speeds for as little as 45 minutes, you can 

remedy the condition in the particulate filter 

system and allow your Cummins diesel 

engine and exhaust after-treatment system 

to remove the trapped PM and restore the 

system to normal operating condition.

Exhaust System — Regeneration In Process 

Exhaust Filter XX% Full — Indicates that the 

DPF is self-cleaning. Maintain your current 

driving condition until regeneration is 

completed.

Exhaust System — Regeneration Completed — 

This message indicates that the DPF 

self-cleaning is completed. If this message is 

displayed, you will hear one chime to assist in 

alerting you of this condition.

Exhaust Service Required — See Dealer 

Now — This message indicates regeneration 

has been disabled due to a system malfunc

-

tion. At this point the engine Powertrain 

Control Module (PCM) will register a fault code, 

the instrument panel will display a MIL light.

WARNING!

A hot exhaust system can start a fire if you 

park over materials that can burn. Such 

materials might be grass or leaves coming 

into contact with your exhaust system. Do not 

park or operate your vehicle in areas where 

your exhaust system can contact anything 

that can burn.

CAUTION!

See an authorized dealer, as damage to 

the exhaust system could occur soon with 

continued operation.

-------------------------------------------------------------------------------------------------------------------------------------------------------------

GETTING TO KNOW YOUR INSTRUMENT PANEL

103

Exhaust Filter Full — Power Reduced See 

Dealer — This message indicates the PCM 

has derated the engine to limit the likelihood 

of permanent damage to the after-treatment 

system. If this condition is not corrected and 

a dealer service is not performed, extensive 

exhaust after-treatment damage can occur. 

To correct this condition it will be necessary 

to have your vehicle serviced by an autho

-

rized dealer.

NOTE:

Failing to follow the oil change indicator, 

changing your oil and resetting the oil change 

indicator by 0 miles remaining will prevent

the diesel exhaust filter from performing it's 

cleaning routine. This will shortly result in a 

Malfunction Indicator Light (MIL) and reduced 

engine power. Only an authorized dealer will be 

able to correct this condition.

Cold Ambient Derate Mode Messages

The vehicle will display messages when a 

derate (engine power reduction) is activated

to protect the engine during start up in cold 

ambient temperatures.

Engine Power Reduced During Warm up — 

This message will display during start up 

when the ambient temperature is between 

10°F (-12°C) and -10°F (-23°C).

Engine Power Reduced Up To 30 Sec 

(Seconds) During Warm up — This message 

will display during start up when the ambient 

temperature is between -10°F (-23°C) and 

-25°F (-32°C).

Engine Power Reduced Up To 2 Min 

(Minutes) During Warm up — This message 

will display during start up when the ambient 

temperature is -25°F (-32°C) and below.
Your vehicle is equipped with an engine 

warm up protection feature that may limit 

engine performance after cold starting at low 

ambient temperatures. The length of time 

engine speed is limited is dependent upon 

engine coolant temperature. Engine speed 

may be briefly limited to 1,000 RPM after 

starting with coolant temperature below 

freezing conditions, and may be limited to 

1,000 RPM for up to approximately two 

minutes under more severe cold conditions.

Coolant Low — This telltale will turn on to indi

-

cate the vehicle coolant level is low. Refer to 

“Dealer Service” in “Servicing And Mainte

-

nance” for more information.

Diesel Exhaust Fluid (DEF) Warning 

Messages

There are four different messages which are 

displayed if the vehicle detects that the DEF 

system has been filled with a fluid other than 

DEF, has experienced component failures, or 

when tampering has been detected. The vehicle 

may be limited to a maximum speed of 5 mph 

(8 km/h) if the DEF system is not serviced 

within less than 200 miles (322 km) of the fault 

being detected.
When the DEF system needs to be serviced the 

following warnings will display:

DEF Low Refill Soon — This message will 

display when the low level is reached, during 

vehicle start up, and with increased frequency 

during vehicle operation. It will be accompa

-

nied by a single chime. Approximately 

5 gallons (19 Liters) of DEF is required to 

CAUTION!

See an authorized dealer, as damage to 

the exhaust system could occur soon with 

continued operation.

3

-------------------------------------------------------------------------------------------------------------------------------------------------------------

104

GETTING TO KNOW YOUR INSTRUMENT PANEL


refill the tank when this message is initially 

displayed on pickup applications, and approxi

-

mately 7 gallons (26 Liters) are required on 

chassis-cab applications.

Speed Limited to 5 MPH in XXX mi Refill DEF — 

This message will continuously display if the 

“DEF Low Refill Soon” message is ignored, and 

the frequency of occurrence of the chime will 

increase unless up to 2 gallons (7.5 Liters) of 

DEF is added to the tank.

5 MPH Max Speed on Restart, Long Idle or 

Refuel Refill DEF — This message will continu

-

ously display when the counter reaches zero, 

and will be accompanied by a periodic chime.
The vehicle will only be capable of a 

maximum speed of 5 mph upon the first of 

the following conditions to occur:

If the vehicle is shutoff and restarted.

If the vehicle is idled for an extended period 

of time, approximately one hour or greater.

If the system detects that the level of fuel 

in the tank has increased.

Add a minimum of 2 gallons (7.5 Liters) of DEF 

to the tank in order to avoid vehicle operation 

at a maximum speed of 5 mph (8 km/h).

NOTE:

A minimum of 2 gallons (7.5 Liters) may be 

required to restore normal vehicle operation. 

Although the vehicle will start normally and can 

be placed in gear after this message has been 

initially displayed, extreme caution should be 

utilized since the vehicle will only be capable of 

maneuvering at a maximum speed of 5 mph 

(8 km/h).

Diesel Exhaust Fluid (DEF) Fault Warning 

Messages

There are five different messages which are 

displayed if the vehicle detects that the DEF 

system has been filled with a fluid other than 

DEF, has experienced component failures, or 

when tampering has been detected. The vehicle 

may be limited to a maximum speed of 5 mph 

(8 km/h) if the DEF system is not serviced 

within less than 200 miles (322 km) of the fault 

being detected.
When the DEF system needs to be serviced the 

following warnings will display:

Service DEF System See Dealer — This 

message will display when the fault is initially 

detected, each time the vehicle is started, 

and periodically during driving. The message 

will be accompanied by a single chime. We 

recommend you drive to the nearest autho

-

rized dealer and have your vehicle serviced 

as soon as possible.

5 MPH Max Speed in 150 mi Service DEF 

System See Dealer — This message will display 

if the DEF system has not been serviced after 

the “Service DEF System – See Dealer” 

message is displayed. This message will 

continuously display until the mileage counter 

reaches zero, and will be accompanied by a 

periodic chime. The message will continue to 

countdown until it reaches zero unless the 

vehicle is serviced. We recommend you drive 

to your nearest authorized dealer and have 

your vehicle serviced immediately.

NOTE:

Under some circumstances this mileage 

counter may start with a value of less than 

150 miles (241 km). For example, if recurring 

faults are detected in a time interval of less 

than 40 hours, the counter may restart at the 

value where it stopped when a previous fault 

was temporarily remedied, or at a minimum of 

50 miles (80 km).

-------------------------------------------------------------------------------------------------------------------------------------------------------------

GETTING TO KNOW YOUR INSTRUMENT PANEL

105

5 MPH Max Speed on Restart, Long Idle

or Refuel Service DEF See Dealer — This 

message will continuously display when the 

mileage counter reaches zero, and will be 

accompanied by a periodic chime.
The vehicle will only be capable of a 

maximum speed of 5 mph upon the first of 

the following conditions to occur:

If the vehicle is shutoff and restarted.

If the vehicle is idled for an extended 

period of time, approximately one hour 

or greater.

If the system detects that the level of fuel 

in the tank has increased.

5 MPH Max Speed Service DEF System See 

Dealer — This message will continuously 

display, and will be accompanied by a peri

-

odic chime. Although the vehicle can be 

started and placed in gear, the vehicle will 

only operate at a maximum speed of 5 mph. 

Your vehicle will require towing, see an 

authorized dealer for service.

NOTE:

When this message is displayed, the engine can 

still be started. However, the vehicle will only 

operate at a maximum speed of 5 mph.

Incorrect DEF Detected See Dealer — This 

message will display when the fault is initially 

detected, each time the vehicle is started, 

and periodically during driving. The message 

will be accompanied by a single chime. 

We recommend you drive to the nearest 

authorized dealer and have your vehicle 

serviced as soon as possible.

RAM Active Air System

Your vehicle is equipped with an advanced

Ram Active Air system that provides enhanced 

performance, especially when towing under 

demanding hot or high altitude conditions. If the 

instrument cluster display displays the message 

“Active Airbox Service Required See Dealer”, vehicle 

performance may be reduced until service is 

performed by an authorized RAM dealer.

B

ATTERY

 S

AVER

 O

N

/B

ATTERY

 S

AVER


M

ODE

 M

ESSAGE

 — E

LECTRICAL

 L

OAD


R

EDUCTION

 A

CTIONS

 — I

F

 E

QUIPPED


This vehicle is equipped with an Intelligent 

Battery Sensor (IBS) to perform additional 

monitoring of the electrical system and status 

of the vehicle battery.

In cases when the IBS detects charging system 

failure, or the vehicle battery conditions are 

deteriorating, electrical load reduction actions 

will take place to extend the driving time and 

distance of the vehicle. This is done by reducing 

power to or turning off non-essential electrical 

loads.
Load reduction is only active when the engine is 

running. It will display a message if there is a 

risk of battery depletion to the point where the 

vehicle may stall due to lack of electrical supply, 

or will not restart after the current drive cycle.
When load reduction is activated, the message 

“Battery Saver On Some Systems May Have 

Reduced Power” will appear in the instrument 

cluster.
These messages indicate the vehicle battery 

has a low state of charge and continues to lose 

electrical charge at a rate that the charging 

system cannot sustain.

3

-------------------------------------------------------------------------------------------------------------------------------------------------------------


Content      ..     4      5      6      7     ..