Acura RL (2011 year). Manual - part 28


  Index      Acura     Acura RL (2011 year) - manual in english


Search            copyright infringement  


Content      ..     26      27      28      29     ..


Acura RL (2011 year). Manual - part 28


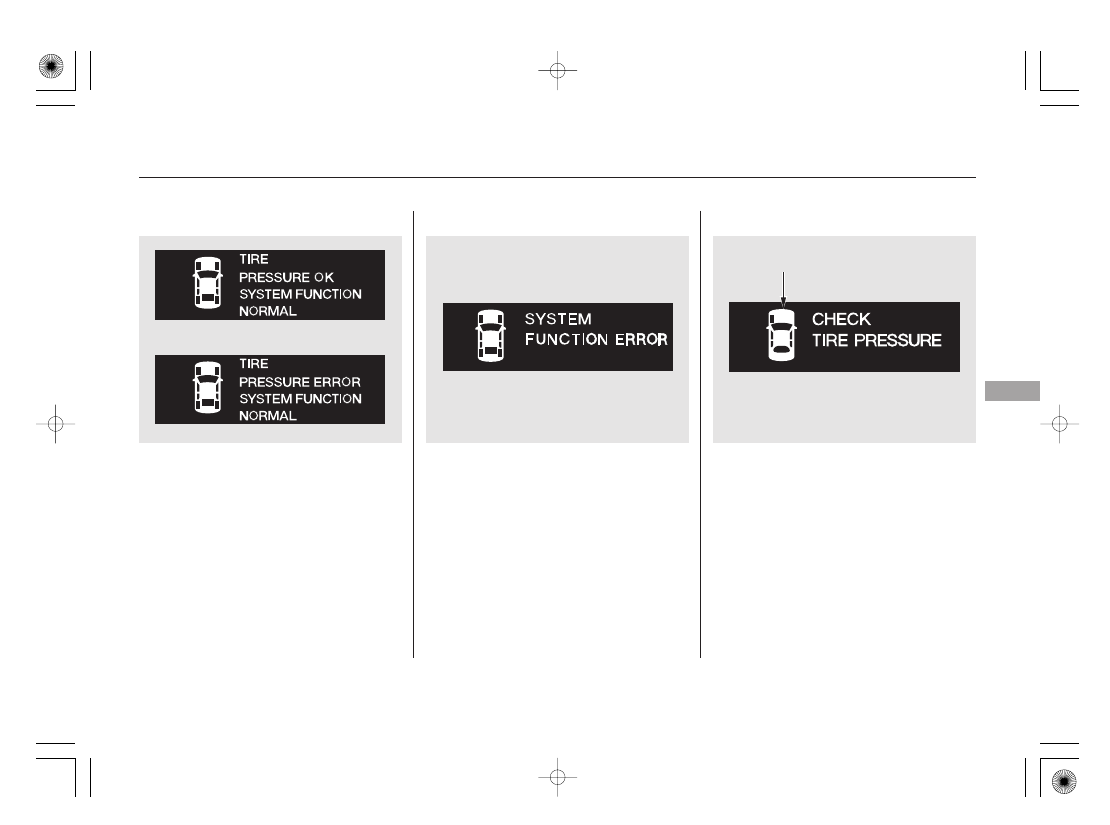
If any of the tires have low pressure,
the multi-information display will
show a ‘‘CHECK TIRE PRESSURE’’
message. You will also see one or
more low pressure tire positions
blinking in the display (see page

).

If there is a system error with the
TPMS, the multi-information display
shows a ‘‘SYSTEM FUNCTION
ERROR’’ message (see page

),

and the tire pressure readings will
not be displayed. You will also see a
‘‘CHECK TPMS SYSTEM’’ message
on the multi-information display (see
page

).

When all tire pressures are normal,
the multi-information display will
show ‘‘TIRE PRESSURE OK
SYSTEM FUNCTION NORMAL.’’

When any of the tires has low
pressure, the multi-information
display shows a ‘‘TIRE PRESSURE
ERROR SYSTEM FUNCTION
NORMAL’’ message (see page

).

76

433

67

433

CONTINUED

Tire Pressure Monitor

Tire Pressure Monitoring System (TPMS)

D

riv

ing

431

VEHICLE ICON

10/08/04 19:57:27 31SJA660_436

-------------------------------------------------------------------------------------------------------------------------------------------------------------

When cruise control is on while
driving, the pressure reading cannot
be checked by the tire pressure
monitor on the multi-information
display.

When the TPMS is functioning
normally, you can see the tire
pressure readings of each tire in psi
(U.S. models) or kPa (Canadian
models) by pressing the SEL/
RESET button while the multi-
information display shows the tire
pressure monitor.

If the low tire pressure/TPMS
indicator and the low tire position on
the low tire pressure monitor do not
go out after inflating the tires to the
specified values, have your dealer
check the system as soon as possible.

If one or more tires have low
pressure, the low tire pressure/
TPMS indicator on the instrument
panel also comes on (see page

).

429

Tire Pressure Readings

Tire Pressure Monitoring System (TPMS)

432

U.S.

Canada

10/08/04 19:57:34 31SJA660_437

-------------------------------------------------------------------------------------------------------------------------------------------------------------

If there is a problem with the TPMS,
the multi-information display shows
a ‘‘CHECK TPMS SYSTEM’’
message.

If you see this message, the tire
pressure monitor shows a ‘‘SYSTEM
FUNCTION ERROR’’ message. The
system may not be able to detect or
signal low tire pressure as intended.
Also, the tire pressure readings will
not be displayed. Have your vehicle
checked by a dealer as soon as
possible.

Also, the low tire pressure/TPMS
indicator begins to flash (see page

).

It is possible that the pressures
shown on the multi-information
display and the pressures you
manually measure are slightly
different.

If the difference is significant or you
cannot make the low tire pressure/
TPMS indicator and message on the
multi-information display go out after
inflating the tires to the specified
values, have your dealer check the
system as soon as possible.

67

CONTINUED

Check TPMS System Message

Tire Pressure Monitoring System (TPMS)

D

riv

ing

433

10/08/04 19:57:43 31SJA660_438

-------------------------------------------------------------------------------------------------------------------------------------------------------------

As required by the FCC:
This device complies with Part 15 of the
FCC rules. Operation is subject to the
following two conditions: (1) This device
may not cause harmful interference, and
(2) this device must accept any
interference received, including
interference that may cause undesired
operation.

Changes or modifications not expressly
approved by the party responsible for
compliance could void the user’s
authority to operate the equipment.

This device complies with Industry
Canada Standard RSS-210.
Operation is subject to the following two
conditions: (1) this device may not cause
interference, and (2) this device must
accept any interference that may cause
undesired operation of the device.

If the low tire pressure/TPMS
indicator comes on, or the multi-
information display shows a
‘‘CHECK TPMS SYSTEM’’ message,
the VSA system automatically turns
on even when the VSA system is
turned off by pressing the VSA OFF
switch (see page

). If this

happens, you cannot turn the VSA
system off by pressing the VSA OFF
switch again.

When you restart the vehicle with
the compact spare tire, the TPMS
system message will also be
displayed on the multi-information
display after several miles
(kilometers) driving.

436

Tire Pressure Monitoring System (TPMS)

434

10/08/04 19:57:50 31SJA660_439

-------------------------------------------------------------------------------------------------------------------------------------------------------------

The vehicle stability assist (VSA)
system helps to stabilize the vehicle
during cornering if the vehicle turns
more or less than desired. It also
assists you in maintaining traction
while accelerating on loose or
slippery road surfaces. It does this
by regulating the engine’s output and
by selectively applying the brakes.

The VSA system cannot enhance the
vehicle’s driving stability in all
situations and does not control your
vehicle’s entire braking system. It is
still your responsibility to drive and
corner at reasonable speeds and to
leave a sufficient margin of safety.

When VSA activates, you may notice
that the engine does not respond to
the accelerator in the same way it
does at other times. There may also
be some noise from the VSA
hydraulic system. You will also see
the VSA system indicator blink.

When VSA is off, the VSA OFF
indicator comes on as a reminder.

When the VSA system indicator
comes on, you will also see a
‘‘CHECK VSA SYSTEM’’ message
on the multi-information display.

Without VSA, your vehicle still has
normal braking and cornering ability,
but it does not have VSA traction and
stability enhancement.

If the low tire pressure/TPMS
indicator comes on (see page

),

or the multi-information display
shows a ‘‘CHECK TPMS SYSTEM’’
message with the indicator flashing
(see page

), the VSA system

automatically turns on even if the
VSA system is turned off with the
VSA OFF switch. In this case, you
cannot turn the VSA system off by
pressing the VSA OFF switch again.

When VSA activates, you will see the
VSA system indicator blink.

If this indicator comes on while
driving, pull to the side of the road
when it is safe, and turn off the
engine. Reset the system by
restarting the engine. If the VSA
system indicator stays on or comes
back on while driving, have the VSA
system inspected by your dealer.

The main function of the

VSA system is generally known as
Electronic Stability Control (ESC).
The system also includes a traction
control function.

429

433

Vehicle Stability Assist (VSA ), aka Electronic Stability Control (ESC), System

VSA OFF Indicator

Vehicle Stability Assist
(VSA) System Indicator

D

riv

ing

435

NOTE:

10/08/04 19:58:05 31SJA660_440

-------------------------------------------------------------------------------------------------------------------------------------------------------------

This switch is at the right side of the
left vent. To turn the VSA system on
and off, press and hold it until you
hear a beep.

VSA is turned on every time you
start the engine, even if you turned it
off the last time you drove the
vehicle.

In certain unusual conditions when
your vehicle gets stuck in shallow
mud or fresh snow, it may be easier
to free it with the VSA temporarily
switched off. When the VSA system
is off, the traction control system is
also off. You should only attempt to
free your vehicle with the VSA off if
you are not able to free it when the
VSA is on.

Immediately after freeing your
vehicle, be sure to switch the VSA on
again. We do not recommend driving
your vehicle with the VSA and
traction control systems switched off.

When VSA is off, the VSA OFF
indicator comes on as a reminder.
Press and hold the switch again. It
turns the system back on.

Driving with varying tire or wheel
sizes may cause the VSA to
malfunction. When replacing tires,
make sure they are of the same size
and type as your original tires (see
page

).

If you install winter tires, make sure
they are the same size as those that
were originally supplied with your
vehicle. Exercise the same caution
during winter driving as you would if
your vehicle was not equipped with
VSA.

486

Vehicle Stability Assist (VSA ), aka Electronic Stability Control (ESC), System

VSA OFF Switch

VSA and Tire Sizes

436

VSA OFF SWITCH

10/08/04 19:58:17 31SJA660_441

-------------------------------------------------------------------------------------------------------------------------------------------------------------

Your vehicle has been designed
primarily to carry passengers and
their cargo. You can also use it to
tow a trailer if you carefully observe
the load limits, use the proper
equipment, and follow the guidelines
in this section.

The weight that

the tongue of a fully-loaded trailer
puts on the hitch should be
approximately 10 percent of the
trailer weight. Too much tongue
load reduces front-tire traction and
steering control. Too little tongue
load can make the trailer unstable
and cause it to sway.

The

maximum allowable weight of the
trailer and everything in or on it
must not exceed 1,000 lbs (450 kg).
Towing a load that is too heavy
can seriously affect your vehicle’s
handling and performance. It can
also damage the engine and
drivetrain.

Avoid towing a trailer during your
vehicle’s first 600 miles (1,000 km)
(see page

).

382

CONTINUED

Load Limits

Tongue Load:

Total Trailer Weight:

Towing a Trailer

Break-In Period

D

riv

ing

437

Exceeding any load limit or
improperly loading your vehicle
and trailer can cause a crash in
which you can be seriously hurt
or killed.

Check the loading of your
vehicle and trailer carefully
before starting to drive.

10/08/04 19:58:28 31SJA660_442

-------------------------------------------------------------------------------------------------------------------------------------------------------------

To achieve a proper tongue load,
start by loading 60% of the load
toward the front of the trailer and
40% toward the rear, then re-adjust
the load as needed.

The best way to confirm that all
loads are within limits is to check
them at a public scale. For public
scales in your area, check your local
phone book, or contact your trailer
dealer or rental agency for
assistance.

If you cannot get to a public scale,
you can estimate the total trailer
weight by adding the weight of your
trailer (as quoted by the
manufacturer) with everything in or
on the trailer.

If you normally pull the same load
each time you tow a trailer, you can
use a suitable scale or a special
tongue load gauge to check the
tongue load the first time you set up
a towing combination (a fully loaded
vehicle and trailer), then recheck the
tongue load whenever the conditions
change.

The maximum allowable weight at
the vehicle axles is:

The maximum allowable weight of
the vehicle, all occupants, all
accessories, all cargo, and the
tongue load is:

on the front axle

on the rear axle

on the front axle

on the rear axle

Towing a Trailer

Checking Loads

Gross Axle Weight Rating
(GAWR):

Gross Vehicle Weight Rating
(GVWR):

U.S. models

U.S. models

Canadian models

Canadian models

438

2,690 lbs (1,220 kg)

5,050 lbs (2,290 kg)

2,400 lbs (1,089 kg)

2,290 kg

1,225 kg

1,085 kg

10/08/04 19:58:38 31SJA660_443

-------------------------------------------------------------------------------------------------------------------------------------------------------------

CONTINUED

See your trailer dealer or rental
agency for more information on
installing electric brakes.

Trailer lights and equipment must
comply with federal, state, province,
territory, and local regulations.
Check with your local trailer sales or
rental agencies for the requirements
in the area where you plan to tow,
and use only equipment designed for
your vehicle.

Since lighting and wiring vary by
trailer type and brand, you should
have a qualified technician install a
suitable connector between the
vehicle and the trailer. Improper
equipment or installation can cause
damage to your vehicle’s electrical
system and affect your vehicle
warranty.

If you choose electric brakes, be
sure they are electronically actuated.
Do not attempt to tap into your
vehicle’s hydraulic system. No
matter how successful it may seem,
any attempt to attach trailer brakes
to your vehicle’s hydraulic system
will lower braking effectiveness and
create a potential hazard.

There are two common types of
trailer brakes: surge and electric.
Surge brakes are common for boat
trailers, since the brakes will get wet.

Always use safety chains when you
tow a trailer. Make sure the chains
are secured to the trailer and hitch,
and that they cross under the tongue
and can catch the trailer if it
becomes unhitched. Leave enough
slack to allow the trailer to turn
corners easily, but do not let the
chains drag on the ground.

Towing can require a variety of
equipment, depending on the size of
your trailer, how it will be used, how
much load you are towing, and
where you tow.

To ensure the best quality, we
recommend that you purchase Acura
equipment whenever possible.

Discuss your needs with your trailer
sales or rental agency, and follow the
guidelines in this section. Also make
sure that all equipment is properly
installed and maintained, and that it
meets federal, state, province,
territory, and local regulations.

Any hitch used on your vehicle must
be properly bolted to the underbody.

Towing a Trailer

Trailer Lights

Trailer Brakes

Saf ety Chains

Hitches

Towing Equipment and
Accessories

D

riv

ing

439

10/08/04 19:58:53 31SJA660_444

-------------------------------------------------------------------------------------------------------------------------------------------------------------

Many states and Canadian
provinces/territories require special
outside mirrors when towing a trailer.
Even if they don’t, you should install
special mirrors if you cannot clearly
see behind you, or if the trailer
creates a blind spot.

When preparing to tow, and before
driving away, be sure to check the
following:

The vehicle has been properly
serviced, and the suspension and
the cooling system are in good
operating condition.

Ask your trailer sales or rental
agency if any other items are
recommended or required for your
towing situation.

The trailer has been properly
serviced and is in good condition.

The lights and brakes on your
vehicle and the trailer are working
properly.

Your vehicle tires and spare are
properly inflated, and the trailer
tires and spare are inflated as
recommended by the trailer
maker.

All weights and loads are within
limits.

The hitch, safety chains, and any
other attachments are secure.

All items in or on the trailer are
properly secured and cannot shift
while you drive.

Pre-Tow Checklist

Additional Towing Equipment

Towing a Trailer

440

10/08/04 19:59:05 31SJA660_445

-------------------------------------------------------------------------------------------------------------------------------------------------------------

The added weight, length, and
height of a trailer will affect your
vehicle’s handling and performance,
so driving with a trailer requires
some special driving skills and
techniques.

For your safety and the safety of
others, take time to practice driving
maneuvers before heading for the
open road, and follow the guidelines
below.

Drive slower than normal in all
driving situations, and obey posted
speed limits for vehicles with trailers.
Use the D position when towing a
trailer on level roads. See ‘‘

’’ in the next column for

additional gear information. Do not
exceed 55 mph (88 km/h). At higher
speeds, the trailer may sway or
affect vehicle handling.

Make turns more slowly and wider
than normal. The trailer tracks a
smaller arc than your vehicle, and it
can hit or run over something the
vehicle misses. Allow more time and
distance for braking. Do not brake or
turn suddenly as this could cause the
trailer to jackknife or turn over.

When climbing hills, closely watch
your temperature gauge. If it nears
the red (Hot) mark, turn the air
conditioning off, reduce speed and, if
necessary, pull to the side of the
road to let the engine cool.

If you must stop when facing uphill,
use the foot brake or parking brake.
Do not try to hold the vehicle in
place by pressing on the accelerator,
as this can cause the automatic
transmission to overheat.

When driving down hills, reduce
your speed, and shift down to S
position, or use the paddle shifters to
the lower gear (3, 2 or 1) in the S
position. When towing a trailer, do
not ‘‘ride’’ the brakes, and remember,
it will take longer to slow down and
stop when towing a trailer.

CONTINUED

Driving Saf ely With a Trailer

Towing a Trailer

Driving on

Hills

Towing Speeds and Gears

Making Turns and Braking

Driving on Hills

D

riv

ing

441

10/08/04 19:59:18 31SJA660_446

-------------------------------------------------------------------------------------------------------------------------------------------------------------

Your vehicle is not designed to be
towed behind a motor home. If your
vehicle needs to be towed in an
emergency, see page

.

Crosswinds and air turbulence
caused by passing trucks can disrupt
your steering and cause the trailer to
sway. When being passed by a large
vehicle, keep a constant speed, and
steer straight ahead. Do not try to
make quick steering or braking
corrections.

Always drive slowly and have
someone guide you when backing up.
Grip the

of the steering

wheel; turn the wheel to the left to
get the trailer to move to the left,
and turn the wheel right to move the
trailer to the right.

Follow all normal precautions when
parking, including firmly setting the
parking brake and putting the
transmission in Park. Also, place
wheel chocks at each of the trailer’s
tires.

521

bottom

Towing Your Vehicle

Towing a Trailer, Towing Your Vehicle

Handling Crosswinds and Buf f eting

Backing Up

Parking

442

10/08/04 19:59:28 31SJA660_447

-------------------------------------------------------------------------------------------------------------------------------------------------------------

This section explains why it is
important to keep your vehicle well
maintained and how to follow basic
maintenance safety precautions.

This section also includes
instructions on how to read the
Maintenance Minder messages on
the multi-information display, and
instructions for simple maintenance
tasks you may want to take care of
yourself.

If you have the skills and tools to
perform more complex maintenance
tasks on your vehicle, you may want
to purchase the service manual. See
page

for information on how to

obtain a copy, or see your dealer.

U.S. Vehicles:

......................

Maintenance Safety

. 444

.................

Maintenance Minder

. 445

..............................

Fluid Locations

. 455

......

Engine Compartment Covers

. 456

........................

Adding Engine Oil

. 458

Changing the Engine Oil and

...........................................

Filter

. 459

..............................

Engine Coolant

. 461

....................

Windshield Washers

. 463

....

Automatic Transmission Fluid

. 464

....................................

Brake Fluid

. 466

....................

Power Steering Fluid

. 467

....................................

Timing Belt

. 467

.............................................

Lights

. 468

..................

Dust and Pollen Filter

. 476

................

Cleaning the Seat Belts

. 476

.....................................

Floor Mats

. 477

.................................

Wiper Blades

. 478

.................................

Exterior Care

. 480

...........................................

Wheels

. 480

...............................................

Tires

. 481

...................

Checking the Battery

. 490

.............................

Vehicle Storage

. 493

..................................

Interior Care

. 494

543

Maintenance

Maintenance, replacement, or
repair of emissions control
devices and systems may be done
by any automotive repair
establishment or individual using
parts that are ‘‘certif ied’’ to EPA
standards.

Ma

int
e

na
nce

443

TM

10/08/04 19:59:36 31SJA660_448

-------------------------------------------------------------------------------------------------------------------------------------------------------------

To eliminate potential hazards, read
the instructions before you begin,
and make sure you have the tools
and skills required.

To clean parts, use a commercially
available degreaser or parts
cleaner, not gasoline.

Be sure there is

adequate ventilation whenever you
operate the engine.

Let the

engine and exhaust system cool
down before touching any parts.

Do

not run the engine unless
instructed to do so.

Some of the most important safety
precautions are given here. However,
we cannot warn you of every
conceivable hazard that can arise in
performing maintenance. Only you
can decide whether or not you
should perform a given task.

Make sure your vehicle is parked
on level ground, the parking brake
is set, and the engine is off.

To reduce the possibility of fire or
explosion, keep cigarettes, sparks,
and flames away from the battery
and all fuel-related parts.

Wear eye protection and
protective clothing when working
with the battery or compressed air.

All service items not detailed in this
section should be performed by a
certified technician or other qualified
mechanic.

Maintenance Safety

Important Saf ety Precautions

Potential Vehicle Hazards

Carbon Monoxide poison f rom
engine exhaust.

Burns f rom hot parts.

Injury f rom moving parts.

444

Improperly maintaining this
vehicle, or failing to correct a
problem before driving can
cause a crash in which you can
be seriously hurt or killed.

Always follow the inspection
and maintenance
recommendations and
schedules in this owner’s
manual.

Failure to properly follow
maintenance instructions and
precautions can cause you to
be seriously hurt or killed.

Always follow the procedures
and precautions in this owner’s
manual.

10/08/04 19:59:50 31SJA660_449

-------------------------------------------------------------------------------------------------------------------------------------------------------------


CONTINUED

Displayed

Engine Oil Life (%)

100%

90%
80%
70%
60%
50%
40%
30%
20%
15%
10%

5%
0%

Calculated Engine

Oil Life (%)

100%

91%

90%

81%

80%

71%

70%

61%

60%

51%

50%

41%

40%

31%

30%

21%

20%

16%

15%

11%

10%

6%

5%

1%

0%

To see the remaining engine oil life
displayed on the lower right corner
on the multi-information display as a
percentage, turn the ignition switch
to the ON (II) position, and press the
SEL/RESET button on the steering
wheel repeatedly until the engine oil
life appears (see page

).

Your vehicle displays engine oil life
and maintenance service items on
the multi-information display to show
you when you should have your
dealer perform engine oil
replacement and indicated
maintenance service.

Based on engine operating
conditions and accumulated engine
revolutions, the onboard computer in
your vehicle calculates the remaining
engine oil life.

The remaining engine oil life is
shown on the multi-information
display according to this table:

73

Maintenance Minder

Engine Oil Lif e Display

Ma

int
e

na
nce

445

REMAINING ENGINE OIL LIFE

TM

10/08/04 20:00:01 31SJA660_450

-------------------------------------------------------------------------------------------------------------------------------------------------------------

▲ ▼

When the remaining engine oil life is
15 to 6 percent, the multi-information
display shows a ‘‘SERVICE DUE
SOON’’ message along with the
maintenance schedule code(s)
indicating the main and sub items
required at the time of the oil change.
Refer to pages

and

for a

complete list of the maintenance
main items and sub items.

Press the SEL/RESET button on the
steering wheel repeatedly to select
the engine oil life. The message
‘‘OIL LIFE’’ along with the
percentage of oil life remaining and
the maintenance item code(s),
appear on the lower part of the multi-
information display.

Pressing either INFO button (

/

)

switches the display from the
message to another display. Once
you switch the display, this message
will go off.

Along with the message, the system
message indicator comes on (see
page

).

The message appears on the multi-
information display each time you
turn the ignition switch to the ON
(II) position.

This message reminds you that your
vehicle will soon be due for
scheduled maintenance.

68

453

454

Maintenance Minder

446

MESSAGE

MAINTENANCE
MAIN ITEM

REMAINING
ENGINE OIL LIFE

MAINTENANCE
SUB ITEM(S)

MAINTENANCE
ITEM CODE(S)

TM

10/08/04 20:00:11 31SJA660_451

-------------------------------------------------------------------------------------------------------------------------------------------------------------


Content      ..     26      27      28      29     ..