Acura CL (2003 year). Manual - part 8


  Index      Acura     Acura CL (2003 year) - manual in english


Search            copyright infringement  


Content      ..     6      7      8      9     ..


Acura CL (2003 year). Manual - part 8


CONTINUED

Be careful when you are using the
beverage holder. A spilled liquid that
is very hot can scald you or your
passengers. Spilled liquids can also
damage the upholstery, carpeting,
and electrical components in the
interior.

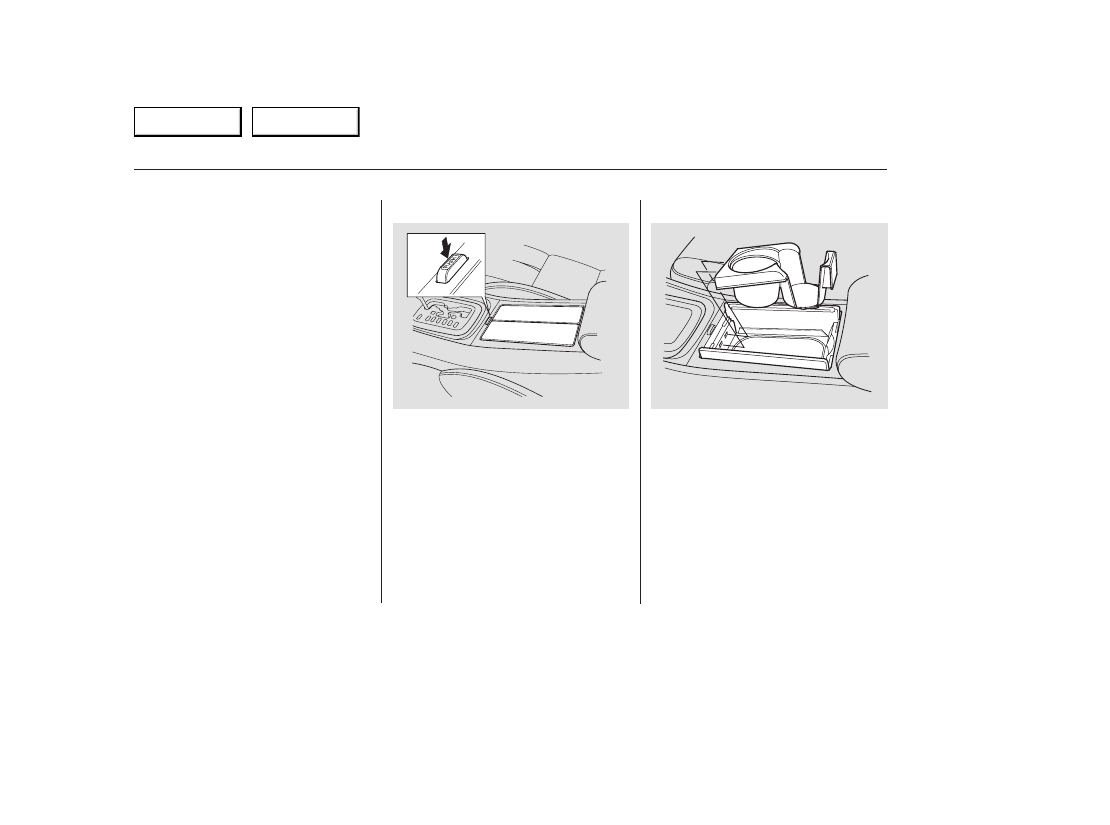
To open the beverage holder, push
on the button. The beverage holder
lid is spring-loaded and will swing
open. To close it, push either half of
the lid closed.

The beverage holder can be
removed. To remove it, grasp the
holder in the middle, and pull up the
front. To reinstall it, position the
back of the holder, align the front
tabs in the slots, and push down the
front of the holder.

With A/T

Beverage Holder

Instruments and Controls

111

Main Menu

Table of Contents

-------------------------------------------------------------------------------------------------------------------------------------------------------------

To open the beverage holder, slide
the lid towards the armrest.

The rear seat also has a beverage
holder in the center armrest. To use
it, pivot the armrest down.

With M/T

Beverage Holder

Instruments and Controls

112

Main Menu

Table of Contents

-------------------------------------------------------------------------------------------------------------------------------------------------------------

To open the console compartment,
pull up on the left lever and lift the
lid.

To close, lower the lid and push it
down until it latches.

You can put small items in the tray
located in the console compartment
lid. To use the tray, pull up on the
right lever and lift up the armrest
pad.

The coin box is located under the
audio system. To open the coin box,
pull the bottom edge. Close it with a
firm push.

The console compartment light
comes on only when the parking
lights are on.

Coin Box

Console Compartment

Instruments and Controls

Console Compartment, Coin Box

113

L

L

E

E

V

V

E

E

R

R

C

C

O

O

I

I

N

N

B

B

O

O

X

X

C

C

O

O

N

N

S

S

O

O

L

L

E

E

C

C

O

O

M

M

P

P

A

A

R

R

T

T

M

M

E

E

N

N

T

T

L

L

E

E

V

V

E

E

R

R

Main Menu

Table of Contents

-------------------------------------------------------------------------------------------------------------------------------------------------------------

To open the console pocket, swing
the upper edge of the lid down.

To remove the pocket, open it, then
take it out of its hinges by lifting it
up and out. Do not try to pull the
pocket out forcibly. You could
damage it.

Console Pocket

Instruments and Controls

114

C

C

O

O

N

N

S

S

O

O

L

L

E

E

P

P

O

O

C

C

K

K

E

E

T

T

Main Menu

Table of Contents

-------------------------------------------------------------------------------------------------------------------------------------------------------------

The storage tray is located above the
audio system. Push on the center of
the tray to get it to pop out. Then
remove it by pulling it straight out.

You can put a writing pad, pen, and
small items in the inner box in the
storage tray. Lift the lid to use the
tray.

To use a coat hook, push on the lid.
Close it with a firm push.

Make sure the coat hook is closed
when you are not using it. This hook
is not designed for large or heavy
items.

To reinstall the storage tray into the
dashboard, close the lid, then push
the storage tray in until it latches.

3.2 CL without Navigation System

Storage Tray, Coat Hook

Storage Tray

Coat Hook

Instruments and Controls

115

S

S

T

T

O

O

R

R

A

A

G

G

E

E

T

T

R

R

A

A

Y

Y

L

L

I

I

D

D

Main Menu

Table of Contents

-------------------------------------------------------------------------------------------------------------------------------------------------------------

To use the sun visor, pull it down.
You can also use the sun visor at the
side window. Remove the support
rod from the clip and swing the sun
visor toward the side window. In this
position, the sun visor can be
extended by sliding out the
extension.

To use a vanity mirror on the back of
the sun visor, pull up the cover.

Make sure you put the sun visor
back in place when you are getting
into or out of the car. Do not use the
sun visor extension over the rear
view mirror.

The lights beside the mirror come
on only when the parking lights are
on.

Sun Visor

Vanity Mirror

Sun Visor, Vanity Mirror

Instruments and Controls

116

E

E

X

X

T

T

E

E

N

N

S

S

I

I

O

O

N

N

Main Menu

Table of Contents

-------------------------------------------------------------------------------------------------------------------------------------------------------------

Your car has two accessory power
sockets. One is located on the front
panel next to the coin box, and the
other is in the console compartment.
To use an accessory power socket,
the ignition switch must be in
ACCESSORY (I) or ON (II).

To open the socket on the front
panel, pull the cover down.

To use the socket in the console
compartment, pull the cover up.

These sockets are intended to supply
power for 12 volt DC accessories
that are rated 120 watts or less (10
amps).

They will not power an automotive
type cigarette lighter element.

Accessory Power Sockets

Instruments and Controls

117

A

A

C

C

C

C

E

E

S

S

S

S

O

O

R

R

Y

Y

P

P

O

O

W

W

E

E

R

R

S

S

O

O

C

C

K

K

E

E

T

T

A

A

C

C

C

C

E

E

S

S

S

S

O

O

R

R

Y

Y

P

P

O

O

W

W

E

E

R

R

S

S

O

O

C

C

K

K

E

E

T

T

C

C

O

O

V

V

E

E

R

R

Main Menu

Table of Contents

-------------------------------------------------------------------------------------------------------------------------------------------------------------

The ceiling light (with the switch in
the center position) comes on when
you remove the key from the ignition
switch. If you do not open a door, the
light stays on, then fades out in
about 10 seconds.

The ceiling light (with the switch in
the center position) also comes on
when you unlock the door with the
remote transmitter (see page

). If

you relock the door, the light turns
off immediately. Otherwise, it
remains on, then fades out in about
10 seconds.

The ceiling light has a three-position
switch. In the OFF position, the light
does not come on. In the center
position, the ceiling light comes on
when you open either door. The light
fades out after both doors are closed.
In the ON position, the ceiling light
stays on continuously.

Turn on the spotlights by pushing
the button next to each light. Push
the button again to turn it off. You
can use the spotlights at all times.

83

Instruments and Controls

Interior Lights

Ceiling Light

Spotlights

118

D

D

O

O

O

O

R

R

A

A

C

C

T

T

I

I

V

V

A

A

T

T

E

E

D

D

O

O

N

N

O

O

F

F

F

F

Main Menu

Table of Contents

-------------------------------------------------------------------------------------------------------------------------------------------------------------

The courtesy light in each door
comes on when the door is opened,
and goes out when the door is closed.

Your car also has a courtesy light in
the ignition switch. This light comes
on when you open the driver’s door.
It remains on for several seconds
after the door is closed.

Interior Lights

Instruments and Controls

Courtesy Lights

119

Main Menu

Table of Contents

-------------------------------------------------------------------------------------------------------------------------------------------------------------

120

Main Menu

-------------------------------------------------------------------------------------------------------------------------------------------------------------

...............

Climate Control System

.

122

.......

Fully-automatic Operation

.

124

.......

Semi-automatic Operation

.

125

.......

Fully-automatic Operation

.

129

.......

Semi-automatic Operation

.

130

Sunlight Sensor/

............

Temperature Sensor

.

134

................................

Audio System

.

135

.................

Operating the Radio

.

136

.................

Adjusting the Sound

.

139

............

Audio System Lighting

.

140

....................

Radio Frequencies

.

140

........................

Radio Reception

.

140

Operating the Cassette

.....................................

Player

.

142

............

Tape Search Functions

.

143

Caring for the Cassette

.....................................

Player

.

146

.....

Operating the CD Changer

.

147

..

Loading CDs in the Changer .

148

...................................

Operation

.

150

Removing CDs from the

.................................

Changer

.

152

.......

Protecting Compact Discs

.

154

CD Changer Error

.............................

Indications

.

155

...........

Remote Audio Controls

.

156

.......................

Theft Protection

.

157

............................

Security System

.

158

...............................

Cruise Control

.

159

HomeLink Universal

................................

Transceiver

.

163

............................................

OnStar

.

168

3.2 CL without Navigation System

3.2 CL with Navigation System

Comfort and Convenience Features

Comf ort and Convenience Features

121

Main Menu

-------------------------------------------------------------------------------------------------------------------------------------------------------------

The automatic climate control
system in your Acura picks the
proper combination of air condi-
tioning, heating, and ventilation to
maintain the interior temperature
you select. The system also adjusts
the fan speed and air flow levels.

The direction of air flow from the
vents in the center and each side of
the dashboard is adjustable. Move
the tab in the center of each vent up-
and-down and side-to-side.

The climate control system draws air
through the exterior vents at the
bottom of the windshield. Keep
these vents clear of leaves and other
debris.

For the climate control system to
provide heating and cooling, the
engine must be running.

The side vents can be opened and
closed with the dials underneath
them.

Comf ort and Convenience Features

Climate Control System

122

O

O

p

p

e

e

n

n

C

C

l

l

o

o

s

s

e

e

C

C

E

E

N

N

T

T

E

E

R

R

V

V

E

E

N

N

T

T

D

D

R

R

I

I

V

V

E

E

R

R

S

S

-

-

S

S

I

I

D

D

E

E

V

V

E

E

N

N

T

T

Main Menu

Table of Contents

-------------------------------------------------------------------------------------------------------------------------------------------------------------

Climate Control System

Comf ort and Convenience Features

123

P

P

A

A

S

S

S

S

E

E

N

N

G

G

E

E

R

R

S

S

-

-

S

S

I

I

D

D

E

E

V

V

E

E

N

N

T

T

O

O

p

p

e

e

n

n

C

C

l

l

o

o

s

s

e

e

Main Menu

Table of Contents

-------------------------------------------------------------------------------------------------------------------------------------------------------------

Pressing the OFF button shuts the
climate control system completely
off. Keep the system completely off
only for short periods. To keep stale
air and mustiness from collecting,
you should have the fan running at
all times.

To put the Automatic Climate
Control in fully-automatic mode,
press the AUTO button and set the
fan control dial to AUTO, then set
the desired temperature by turning
the temperature control dial. You will
see FULL AUTO in the system’s
display. The light in the

button also shows you which

mode, Recirculation or Fresh Air, is
selected.

When you set the temperature to its
lower limit (60°F/18°C) or its upper
limit (90°F/32°C), the system runs
at full cooling or heating only. It does
not regulate the interior temperature.

When the temperature is set
between the lower and upper limits,
the system regulates the interior
temperature to the set value.

The system automatically selects the
proper mix of conditioned and/or
heated air that will, as quickly as
possible, raise or lower the interior
temperature from its current level to
the set temperature.

Climate Control System

Comf ort and Convenience Features

Fully-automatic Operation

3.2 CL without Navigation System

124

T

T

E

E

M

M

P

P

E

E

R

R

A

A

T

T

U

U

R

R

E

E

C

C

O

O

N

N

T

T

R

R

O

O

L

L

D

D

I

I

A

A

L

L

O

O

F

F

F

F

B

B

U

U

T

T

T

T

O

O

N

N

A

A

U

U

T

T

O

O

B

B

U

U

T

T

T

T

O

O

N

N

F

F

U

U

L

L

L

L

A

A

U

U

T

T

O

O

D

D

I

I

S

S

P

P

L

L

A

A

Y

Y

F

F

A

A

N

N

C

C

O

O

N

N

T

T

R

R

O

O

L

L

D

D

I

I

A

A

L

L

Main Menu

Table of Contents

-------------------------------------------------------------------------------------------------------------------------------------------------------------

CONTINUED

You can manually select various
functions of the Climate Control
system when it is in FULL AUTO.
All other features remain auto-
matically controlled. Making any
manual selection causes the word
FULL to go out.

Press the A/C button to turn the air
conditioning on and off. You will see
A/C ON or A/C OFF in the display.

When you turn the A/C off, the sys-
tem cannot regulate the inside tem-
perature if you set the dial below the
outside temperature. With the A/C
on, use the temperature control dial
to adjust the temperature of the air
flow to a comfortable setting.

This button controls the source of
the air going into the system. When
the indicator in this button is lit, air
from the car’s interior is sent
through the system again
(Recirculation mode). When the
indicator is off, air is brought in from
outside the car (Fresh Air mode).

You can, for example, manually put
the system in recirculation mode
when driving through an area of
smoke or fumes.

Climate Control System

Comf ort and Convenience Features

Semi-automatic Operation

Air Conditioning (A/C) Button

Recirculation Button

125

R

R

E

E

C

C

I

I

R

R

C

C

U

U

L

L

A

A

T

T

I

I

O

O

N

N

B

B

U

U

T

T

T

T

O

O

N

N

A

A

I

I

R

R

C

C

O

O

N

N

D

D

I

I

T

T

I

I

O

O

N

N

I

I

N

N

G

G

B

B

U

U

T

T

T

T

O

O

N

N

T

T

E

E

M

M

P

P

E

E

R

R

A

A

T

T

U

U

R

R

E

E

C

C

O

O

N

N

T

T

R

R

O

O

L

L

D

D

I

I

A

A

L

L

Main Menu

Table of Contents

-------------------------------------------------------------------------------------------------------------------------------------------------------------

You can manually select the fan
speed by turning the fan control dial.
When you turn the dial clockwise,
the fan is taken out of automatic
mode and starts to run at its lowest
speed. Turning the dial fully
clockwise increases the fan’s speed,
which increases air flow.

Use the MODE button to select the
vents the air flows from. Some air
will flow from the side vents and the
dashboard corner vents in all modes.
Each time you press the MODE
button, the display shows the mode
selected. Press the button four times
to see all the modes.

Climate Control System

Comf ort and Convenience Features

Fan Control Dial

Mode Button

126

F

F

A

A

N

N

C

C

O

O

N

N

T

T

R

R

O

O

L

L

D

D

I

I

A

A

L

L

M

M

O

O

D

D

E

E

B

B

U

U

T

T

T

T

O

O

N

N

R

R

E

E

C

C

I

I

R

R

C

C

U

U

L

L

A

A

T

T

I

I

O

O

N

N

B

B

U

U

T

T

T

T

O

O

N

N

Main Menu

Table of Contents

-------------------------------------------------------------------------------------------------------------------------------------------------------------


Content      ..     6      7      8      9     ..