Acura RL (1996-2004 year). Manual - part 717


  Index      Acura     Acura RL 1996-2004 year - service repair manual


Search            


Content   ..  715  716  717  718   ..


Acura RL (1996-2004 year). Manual - part 717


Seat Belt Tensioner

Replacement

CAUTION:
• Always disconnect the seat belt tensioner connec-

tor(s) when the harness is disconnected.

• Carefully inspect the seat belt tensioner before

installing it. Do not install a tensioner that shows
signs of being dropped or improperly handled, such
as dents, cracks or deformation.

• The shoulder harness anchor bolt must be removed

before you remove the tensioner.

1. Make sure you have the anti-theft code for the radio,

then write down the frequencies for the radio's pre-
set buttons.

2. Disconnect the battery negative cable, then discon-

nect the positive cable from the battery, and wait at
least 3 minutes.

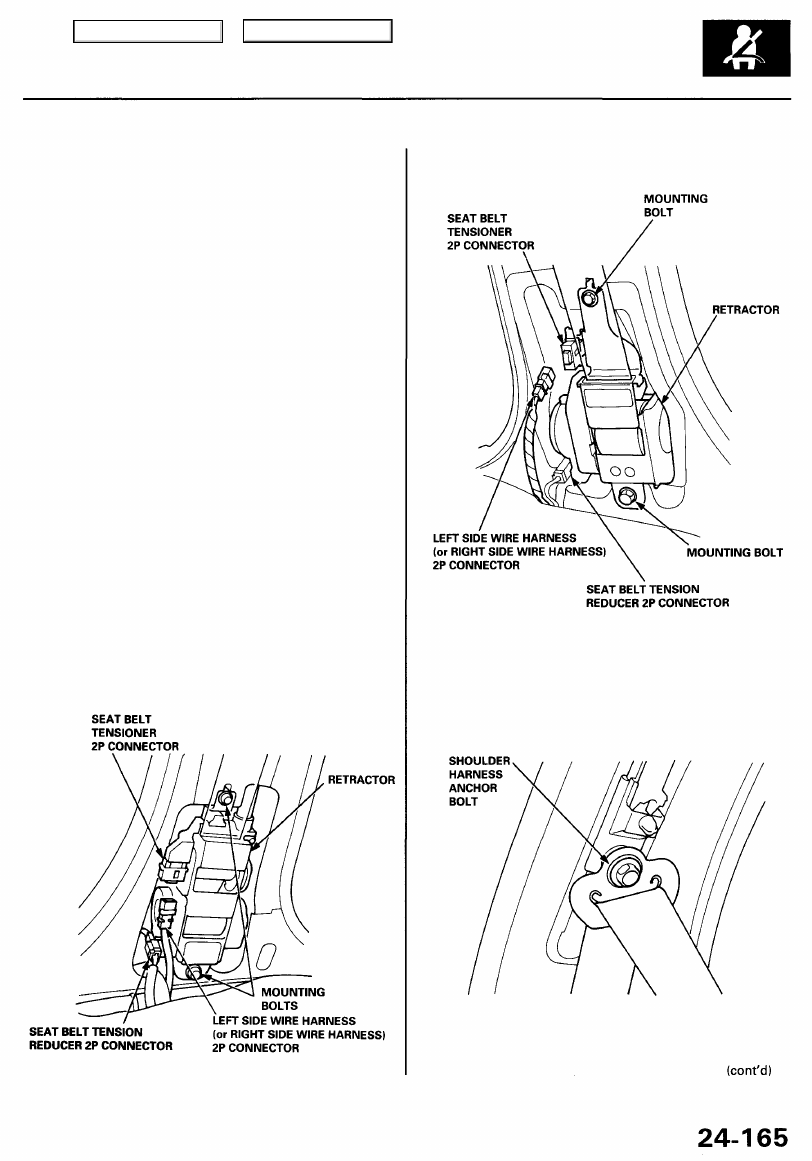
3. Remove the left and (or) right B-pillar trim panels

(see 

section 20

).

4. Disconnect the seat belt tensioner 2P connector(s)

from the left side wire harness (driver's side) and

(or) the right wire harness (front passenger's side).

NOTE: When disconnected, the tensioner connec-

tor is automatically shorted.

5. Disconnect the 2P connector from the tension

reducer connector.

'96-98 Models

'99 - 01 Models

6. Remove the shoulder harness anchor bolt, then

remove the two seat belt tensioner mounting bolts
and retractor.

Main Menu

Table of Contents

Seat Belt Tensioner

Replacement (cont'd)

CAUTION: Be sure to install the harness wires so that
they are not pinched or interfering with other parts.

7. Install the new seat belt.

'96 - 98 Models

'99 - 01 Models

9. Reconnect the left side wire harness 2P connector

to the driver's seat belt tensioner and (or) the right
side wire harness 2P connector to the front passen-
ger's seat belt tensioner.

10. Reconnect the left side wire harness or the right

side harness 2P connector to the tension reducer
connector.

11. Reinstall the B-pillar lower panel, door opening

trim, and door sill molding.

8. Reinstall the shoulder harness anchor bolt.

Main Menu

Table of Contents

12. Reconnect the battery positive cable, then the nega-

tive cable.

13. After installing the seat belt, confirm proper system

operation: Turn the ignition switch ON (II); the SRS
indicator light should come on for about 6 seconds
and then go off.

14. Enter the anti-theft code for the radio, then enter the

customer's radio station presets.

Main Menu

Table of Contents

Disposal

Before scrapping any airbags or seat belt tensioners
(including those in a whole vehicle to be scrapped), the

airbags must be deployed and the seat belt tensioners
must be triggered. If the vehicle is still within the war-
ranty period, before deploying the airbags or triggering

the seat belt tensioners, the Acura Parts and Service

Manager must give approval and/or special instruction.
Only after the airbags have been deployed or a seat belt

tensioner is triggered (as the result of vehicle collision,
for example), can they be scrapped.

If the airbags or the seat belt tensioners appear intact
(not deployed or triggered), treat them with extreme

caution. Follow the procedure.

Deploying the Airbags: In-vehicle

NOTE: If an SRS vehicle is to be entirely scrapped, its

airbags should be deployed while still in the vehicle. The
airbags should not be considered as salvageable parts
and should never be installed in another vehicle.

Confirm that each airbag is securely mount-

ed; otherwise, severe personal injury could result from
deployment.

1. Disconnect both the negative cable and positive

cable from the battery.

2. Confirm that the special tool is functioning properly

by following the check procedure on the tool label
or the procedure on page 

24-171

.

Driver's Airbag:
3. Remove the access panel, then disconnect the 2P

connector between the airbag and the cable reel.

Airbag and Seat Belt Tensioner - '96 - 98 Models

Front Passenger's Airbag:
4. Remove the glove box, then disconnect the 2P con-

nector between the front passenger's airbag and

SRS main harness.

5. Cut off the airbag connector, then strip the ends of

the wires, and connect the special tool alligator
clips to them. Place the special tool approximately
30 feet (10 m) away from the airbag.

DEPLOYMENT
TOOL

07HAZ-SG00500

Main Menu

Table of Contents


Content   ..  715  716  717  718   ..