Acura RL (1996-2004 year). Manual - part 483


  Index      Acura     Acura RL 1996-2004 year - service repair manual


Search            


Content   ..  481  482  483  484   ..


Acura RL (1996-2004 year). Manual - part 483


Power Steering Gearbox

Removal (cont'd)

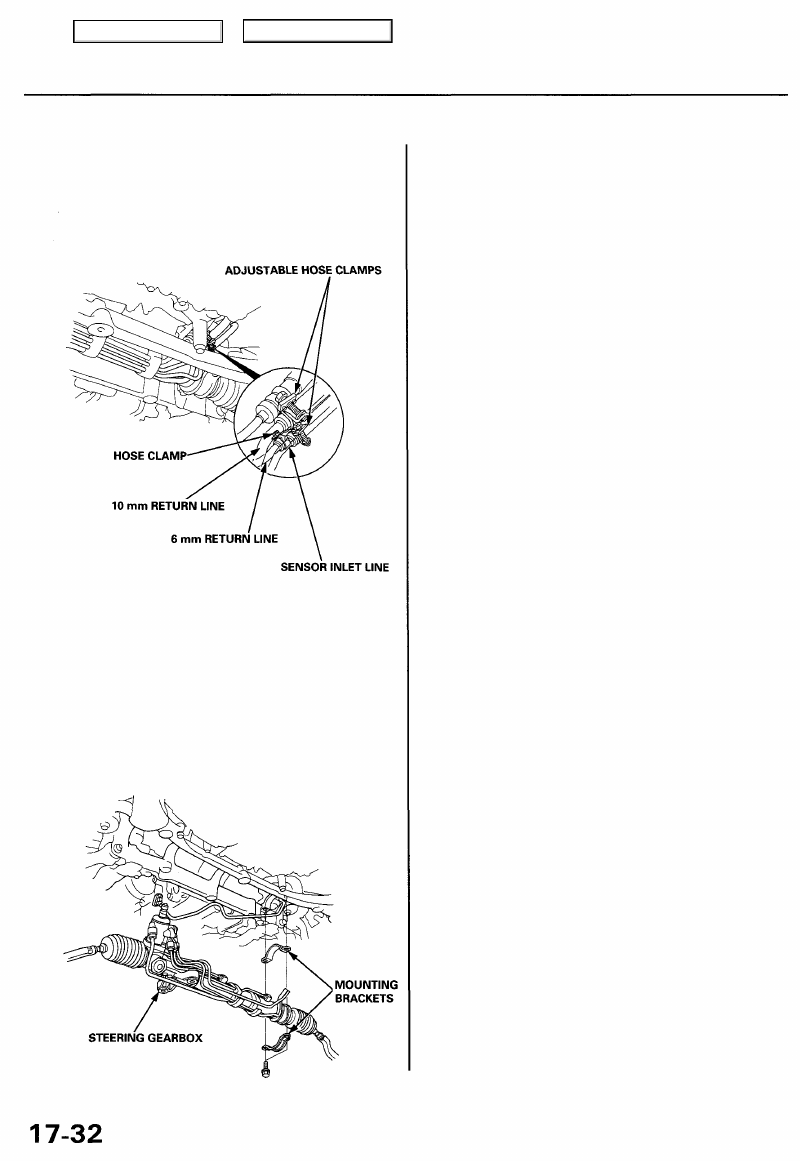
12. Disconnect the three lines (sensor inlet line, 10 mm

return line and 6 mm return line) from the hoses.

CAUTION: After disconnecting the line, plug or
seal the line with a piece of tape or equivalent.

13. Remove the mounting brackets and steering gear-

box.

NOTE: Before removing the steering gearbox, place

a jack stand under the gearbox to support it.

CAUTION: Be careful not to bend or damage fluid

lines when removing the steering gearbox.

Main Menu

Table of Contents

Disassembly

Steering Rack Disassembly

NOTE:
• Before disassembling the gearbox, wash it off with

solvent and a brush.

• Do not dip seals and 0-rings in solvent.

1. Remove the steering gearbox (see page 

17-30

).

2. Remove the both tie-rod ends.

3. Remove the three lines (sensor inlet line, 10 mm

return line and 6 mm return line) from the valve body
unit.

4. Remove the line mounting cushions.

Power Steering Gearbox

Main Menu

Table of Contents

5. Remove the boot bands and tie-rod clips. Pull the

boots away from the ends of the gearbox.

6. Hold the steering rack with one wrench ('99 - 01

models: left end only), and unscrew the rack end with
another wrench.

NOTE: '96 - 98 models shown.

CAUTION: Be careful not to damage the rack sur-

face with the wrench.

7. Loosen the locknut, then remove the rack guide

screw and O-ring ('96 - 98 models only).

8. Remove the spring and rack guide from the gearbox

housing.

9. Remove cylinder lines A and B from the gearbox.

10. Drain the fluid from the cylinder fittings by slowly

moving the steering rack back and forth.

Main Menu

Table of Contents

Disassembly (cont'd)

11. Remove the two flange bolts, then remove the valve

body unit from the gearbox (see page 

17-36

 for valve

body unit disassembly).

13. Install the special tool on the gearbox housing.

CAUTION: Do not clamp the cylinder housing.

Power Steering Gearbox

12. Drill a 3 mm (0.12 in) diameter hole approximately

2.5 - 3.0 mm (0.10 - 0.12 in) in depth in the staked-
point on the cylinder.

NOTE:
• Do not allow metal shavings to enter the cylinder.
• After removing the cylinder end, remove any

burrs at the stake point.

14. Clamp the tool in a vise with soft jaws as shown,

then loosen and remove the cylinder end.

15. Remove the gearbox housing from the vise, and set

it in a press so the gearbox points upward.

16. Insert a 6" long, 3/8" drive extension into the spe-

cial tool.

17. Press the cylinder end seal and steering rack out of

the gearbox housing.

NOTE: Hold the steering rack to keep it from falling

when pressed clear.

CAUTION: Be careful not to damage to inner sur-
face of the cylinder wall with the tool.

CYLINDER END SEAL
REMOVER ATTACHMENT

07NAD-SR3020A

Main Menu

Table of Contents


Content   ..  481  482  483  484   ..