Acura RL. Manual - part 805
 

  Index      Acura     Acura RL - service repair manual 2005-2008 year


Search            


Content   ..  803  804  805  806   ..


Acura RL. Manual - part 805


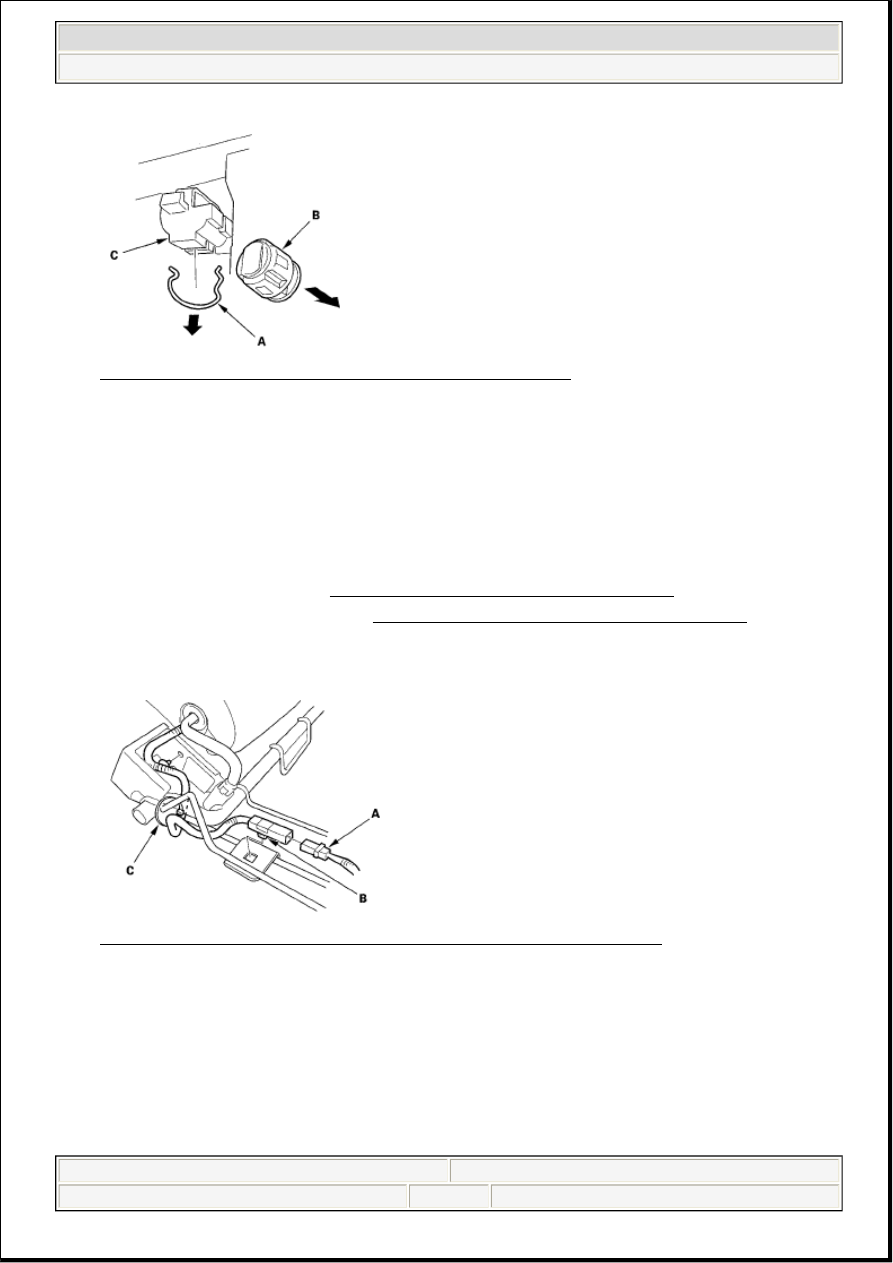
Fig. 70: Removing Retainer Clip, Lid And Lid Lock Cylinder 
Courtesy of AMERICAN HONDA MOTOR CO., INC. 

5. Install the lock cylinder in the reverse order of removal, and make sure the trunk pass-through lid 

opens properly and locks securely.  

REAR SEAT HEAD RESTRAINT REPLACEMENT 

1. Remove the rear seat-back (see REAR SEAT REMOVAL/INSTALLATION ).  

2. Remove the seat-back cover/pad (see REAR SEAT-BACK COVER REPLACEMENT ).  

3. Disconnect the connector (A), and detach it from the seat-back frame. Detach the wire harness clip 

(B), and remove the harness band (C) (right side head restraint only). 

Fig. 71: Identifying Connector, Seat-Back Frame And Wire Harness Clip 
Courtesy of AMERICAN HONDA MOTOR CO., INC. 

4. Remove the retainers (A) from both head restraint guides (B), then remove the head restraint (C). 

Remove both head restraint guides. 

NOTE:

Take care not to tear the seams or damage the seat covers.


2007 Acura RL 

2005-08 ACCESSORIES AND EQUIPMENT Seats - RL


me 


Friday, June 05, 2009 3:27:17 PM

Page 42 

© 2005 Mitchell Repair Information Company, LLC. 

Fig. 72: Identifying Retainers, Head Restraint Guides And Head Restraint 
Courtesy of AMERICAN HONDA MOTOR CO., INC. 

5. Install the head restraint in the reverse order of removal.  

REAR SEAT HEAD RESTRAINT ACTUATOR/WIRE HARNESS 
REPLACEMENT 

1. Remove the rear seat-back (see REAR SEAT REMOVAL/INSTALLATION ).  

2. Detach the hooks (A), and release the hooks (B), then remove the head restraint case (C) from the 

head restraint (D). 

Fig. 73: Identifying Hooks, Head Restraint Case And Head Restraint 
Courtesy of AMERICAN HONDA MOTOR CO., INC. 

3. Remove the actuator wire harness (A). 

1. Detach the hooks (B), then remove the guide (C).  

2. Remove the connector clip (D) from the connector (E).  

3. Remove the head restraint pillar trim (F). 

NOTE:

Take care not to tear the seams or damage the seat covers.


2007 Acura RL 

2005-08 ACCESSORIES AND EQUIPMENT Seats - RL


me 


Friday, June 05, 2009 3:27:17 PM

Page 43 

© 2005 Mitchell Repair Information Company, LLC. 

4. Disconnect the actuator connector (G), and detach the harness clip (H) from the head restraint 

base (I). 

Fig. 74: Identifying Actuator Connector, Harness Clip And Restraint Base 
Courtesy of AMERICAN HONDA MOTOR CO., INC. 

4. Carefully remove the foam as needed from the frame. Remove the screws, and release the arm (A) 

from the hook (B), then remove the actuator (C). 

Fig. 75: Identifying Arm, Hook And Actuator 
Courtesy of AMERICAN HONDA MOTOR CO., INC. 

5. Install the actuator and wire harness in the reverse order of removal.  

REAR SEAT-BACK UPPER FLAP REPLACEMENT 

1. Remove the rear seat-back (see REAR SEAT REMOVAL/INSTALLATION ).  

2. Release the Velcro fastener (A), then pull back the upper flap (B). Detach the clips, then remove the 

upper flap from the head restraint lid. 

NOTE:

Take care not to tear the seams or damage the seat covers.


2007 Acura RL 

2005-08 ACCESSORIES AND EQUIPMENT Seats - RL


me 


Friday, June 05, 2009 3:27:17 PM

Page 44 

© 2005 Mitchell Repair Information Company, LLC. 

Fig. 76: Identifying Velcro Fastener And Upper Flap 
Courtesy of AMERICAN HONDA MOTOR CO., INC. 

3. Install the upper flap in the reverse order of removal.  

REAR SEAT-BACK COVER REPLACEMENT 

1. Remove the seat-back (see REAR SEAT REMOVAL/INSTALLATION ).  

2. Remove the armrest (see REAR SEAT ARMREST REPLACEMENT ).  

3. Release the hooks (A), fasteners (B), and clips (C). 

Fig. 77: Identifying Hooks, Fasteners And Clips

NOTE:

Take care not to tear the seams or damage the seat covers. 

Put on gloves to protect your hands.  


2007 Acura RL 

2005-08 ACCESSORIES AND EQUIPMENT Seats - RL


me 


Friday, June 05, 2009 3:27:17 PM

Page 45 

© 2005 Mitchell Repair Information Company, LLC. 


Content   ..  803  804  805  806   ..