Acura RL. Manual - part 632
 

  Index      Acura     Acura RL - service repair manual 2005-2008 year


Search            


Content   ..  630  631  632  633   ..


Acura RL. Manual - part 632


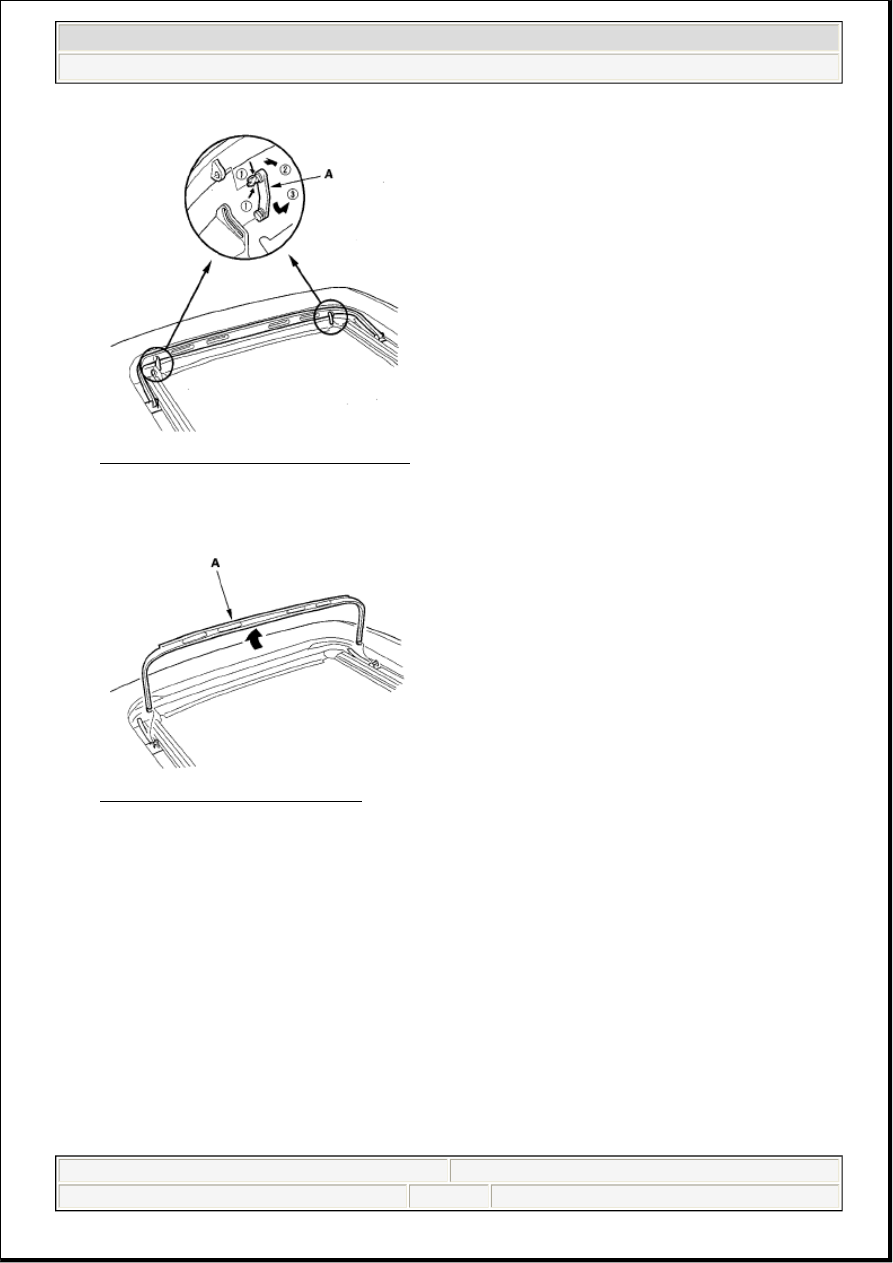
Fig. 6: Identifying Wind Deflector Links 
Courtesy of AMERICAN HONDA MOTOR CO., INC. 

3. Remove the wind deflector (A). A 

Fig. 7: Identifying Wind Deflector 
Courtesy of AMERICAN HONDA MOTOR CO., INC. 

4. Pry up on the deflector bases (A) and release the hooks (B), then remove the bases with springs (C) 

from both sides. 


2007 Acura RL 

2005-08 ACCESSORIES AND EQUIPMENT Moonroof (Body) - RL


me 


Friday, June 05, 2009 3:23:22 PM

Page 5 

© 2005 Mitchell Repair Information Company, LLC. 

Fig. 8: Identifying Deflector Bases, Hooks And Springs 
Courtesy of AMERICAN HONDA MOTOR CO., INC. 

5. Install the deflector in the reverse order of removal.  

6. Do the moonroof calibration (see RESETTING THE MOONROOF CONTROL UNIT ).  

DRAIN CHANNEL REPLACEMENT 

1. Remove the glass (see GLASS REPLACEMENT ).  

2. With the moonroof wrench, move both glass brackets (A) to the position where the moonroof 

normally tilts up and disconnect the drain channel rods (B) from the joint bushings (C) on both sides. 

Fig. 9: Identifying Glass Brackets And Drain Channel Rods 
Courtesy of AMERICAN HONDA MOTOR CO., INC. 

3. Slide the drain channel (A) forward. 

NOTE:

Check the bushing for damage, and replace if necessary.


2007 Acura RL 

2005-08 ACCESSORIES AND EQUIPMENT Moonroof (Body) - RL


me 


Friday, June 05, 2009 3:23:22 PM

Page 6 

© 2005 Mitchell Repair Information Company, LLC. 

Fig. 10: Sliding Drain Channel Forward 
Courtesy of AMERICAN HONDA MOTOR CO., INC. 

4. Pull the rear edge of the drain channel (A) up while pushing both clips (B), and release the channel 

from both hooks (C) of the drain channel slider by pulling it rearward. 

Fig. 11: Removing Drain Channel 
Courtesy of AMERICAN HONDA MOTOR CO., INC. 

5. Remove the drain channel.  

6. Install the channel in the reverse order of removal, and note these items: 

Push the clips into place securely.  

Check the glass position adjustment (see GLASS POSITION ADJUSTMENT ).  

7. Do the moonroof calibration (see RESETTING THE MOONROOF CONTROL UNIT ).  

8. Check for water leaks. Let the water run freely from a hose without a nozzle. Do not use a high-

pressure spray.  

SUNSHADE REPLACEMENT 


2007 Acura RL 

2005-08 ACCESSORIES AND EQUIPMENT Moonroof (Body) - RL


me 


Friday, June 05, 2009 3:23:22 PM

Page 7 

© 2005 Mitchell Repair Information Company, LLC. 

1. Remove the drain channel (see DRAIN CHANNEL REPLACEMENT ).  

2. Slide the sunshade (A) until you can see both sunshade slider spacers (B). 

Fig. 12: Identifying Sunshade And Sunshade Slider Spacers 
Courtesy of AMERICAN HONDA MOTOR CO., INC. 

3. Remove the screws, then remove both spacers.  

4. While lifting the front portion of the sunshade (A), move the sunshade forward until you can see both 

sunshade rear hooks (B). Do not damage the sunshade and hooks. 

Fig. 13: Identifying Sunshade And Sunshade Rear Hooks 
Courtesy of AMERICAN HONDA MOTOR CO., INC. 

5. Remove the screws, then remove both hooks. 


2007 Acura RL 

2005-08 ACCESSORIES AND EQUIPMENT Moonroof (Body) - RL


me 


Friday, June 05, 2009 3:23:22 PM

Page 8 

© 2005 Mitchell Repair Information Company, LLC. 


Content   ..  630  631  632  633   ..