Acura RL. Manual - part 578


  Index      Acura     Acura RL - service repair manual 2005-2008 year


Search            


Content   ..  576  577  578  579   ..


Acura RL. Manual - part 578


If the linkage or doors stick or bind, repair them as needed.  

MODE CONTROL MOTOR REPLACEMENT 

1. Remove the driver's dashboard undercover (see DRIVER'S DASHBOARD UNDERCOVER 

REMOVAL/INSTALLATION ).  

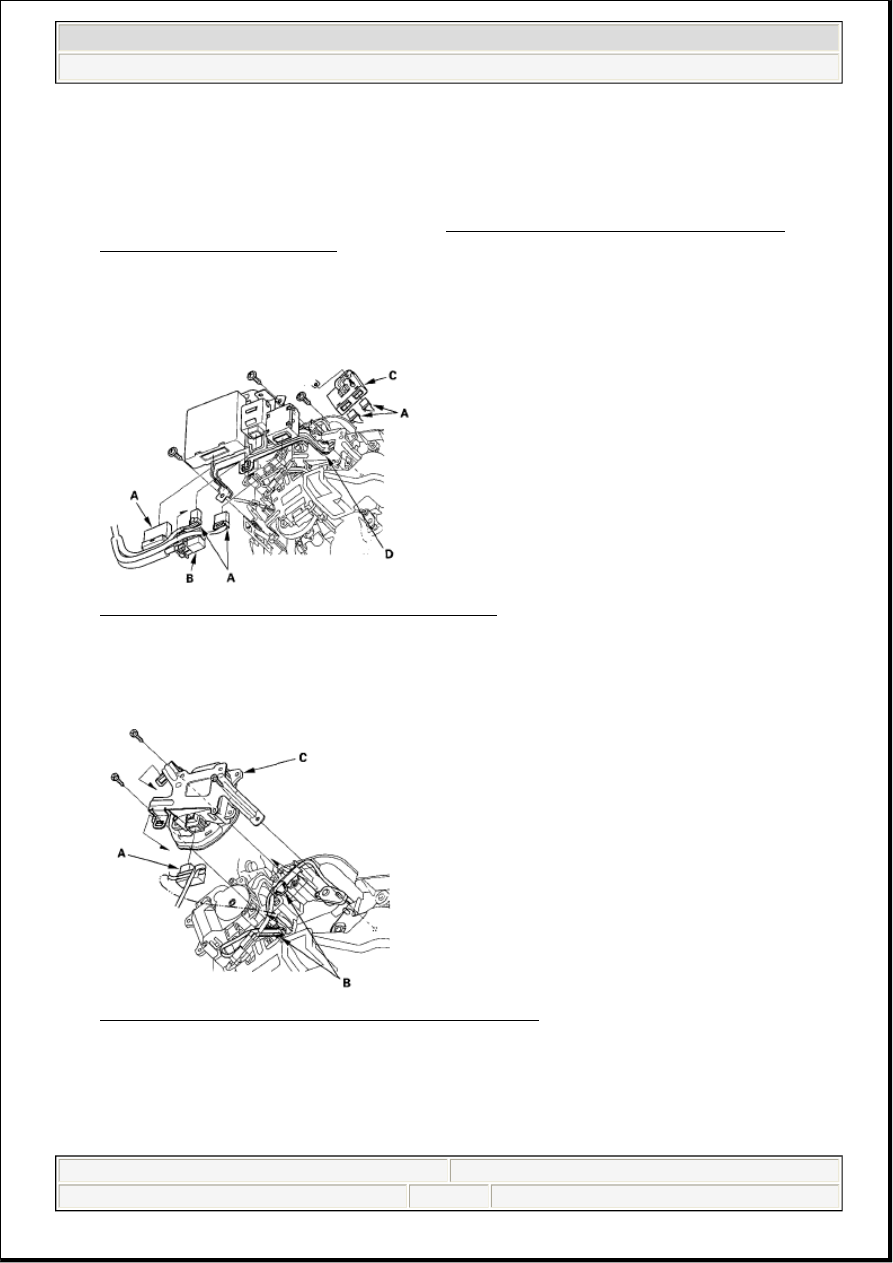
2. Disconnect the connectors (A) from the power tilt/ telescopic steering control unit, the adaptive front 

lighting control unit, the electronically controlled power steering control unit, and the daytime running 
lights control unit. Remove the relay (B) and the power tilt/telescopic steering control unit (C), then 
remove the self-tapping screws and the bracket (D). 

Fig. 109: Identifying Control Units And Connectors 
Courtesy of AMERICAN HONDA MOTOR CO., INC. 

3. Disconnect the 5P connector (A) from the mode control motor. Remove the harness clips (B). 

Remove the self-tapping screws and the mode control motor (C). 

Fig. 110: Identifying Mode Control Motor And Fasteners 
Courtesy of AMERICAN HONDA MOTOR CO., INC. 

4. Install the motor in the reverse order of removal. Make sure the pin on the motor is properly engaged 

with the linkage. After installation, make sure the motor runs smoothly.  

RECIRCULATION CONTROL MOTOR TEST 


2007 Acura RL 

2005-08 HVAC HVAC - RL


me 


Friday, June 05, 2009 2:25:43 PM

Page 95 

© 2005 Mitchell Repair Information Company, LLC. 

1. Disconnect the 5P connector from the recirculation control motor. 

2. Connect battery power to the No. 1 terminal of the recirculation control motor, and ground the No. 2 

terminal; the recirculation control motor should run, and stop at Recirculate. If it doesn't, reverse the 
connections; the recirculation control motor should run, and stop at Fresh. 

Fig. 111: Identifying Recirculation Control Motor Terminals 
Courtesy of AMERICAN HONDA MOTOR CO., INC. 

3. If the recirculation control motor did not run in step 2, remove it, then check the recirculation control 

linkage and door for smooth movement. 

If the linkage and door move smoothly, replace the recirculation control motor (see 
RECIRCULATION CONTROL MOTOR REPLACEMENT ).  

If the linkage or door stick or bind, repair them as needed.  

RECIRCULATION CONTROL MOTOR REPLACEMENT 

1. Remove the glove box (see GLOVE BOX REMOVAL/INSTALLATION ).  

2. Disconnect the 5P connector (A) from the recirculation control motor (B). Remove the self-tapping 

screws and the recirculation control motor from the blower unit. 

Fig. 112: Identifying Recirculation Control Motor And Fasteners 
Courtesy of AMERICAN HONDA MOTOR CO., INC.

NOTE:

Before testing, check for HVAC DTCs (see GENERAL TROUBLESHOOTING 
INFORMATION ).

NOTE:

Incorrectly applying power and ground to the recirculation control 
motor will damage it. Follow the instructions carefully.


2007 Acura RL 

2005-08 HVAC HVAC - RL


me 


Friday, June 05, 2009 2:25:43 PM

Page 96 

© 2005 Mitchell Repair Information Company, LLC. 

3. Install the motor in the reverse order of removal. Make sure the pin on the motor is properly engaged 

with the linkage. After installation, make sure the motor runs smoothly.  

REAR VENT CONTROL MOTOR TEST 

1. Disconnect the 5P connector from the rear vent control motor. 

2. Connect battery power to the No. 1 terminal of the rear vent control motor, and ground the No. 2 

terminal; the rear vent control motor should run, and stop at Shut. If it doesn't, reverse the 
connections; the rear vent control motor should run, and stop at Rear Vent. 

Fig. 113: Identifying Rear Vent Control Motor Terminals 
Courtesy of AMERICAN HONDA MOTOR CO., INC. 

3. If the rear vent control motor did not run in step 2, remove it, then check the rear vent control linkage 

and door for smooth movement. 

If the linkage and door move smoothly, replace the rear vent control motor (see REAR VENT 
CONTROL MOTOR REPLACEMENT
 ).  

If the linkage or door sticks or binds, repair them as needed.  

REAR VENT CONTROL MOTOR REPLACEMENT 

1. Remove the utility pocket (see CENTER TRIM REMOVAL/INSTALLATION ).  

2. Remove the center console (see CENTER CONSOLE REMOVAL/INSTALLATION ). Remove 

the rear vent duct (see step 6 under DASHBOARD/STEERING HANGER BEAM 
REMOVAL/INSTALLATION
 ).  

3. Disconnect the 5P connector (A) and duct (B). 

NOTE:

Before testing, check for HVAC DTCs (see GENERAL TROUBLESHOOTING 
INFORMATION ).

NOTE:

Incorrectly applying power and ground to the rear vent control motor 
will damage it. Follow the instructions carefully.


2007 Acura RL 

2005-08 HVAC HVAC - RL


me 


Friday, June 05, 2009 2:25:43 PM

Page 97 

© 2005 Mitchell Repair Information Company, LLC. 

Fig. 114: Identifying Duct And Rear Vent Control Motor 
Courtesy of AMERICAN HONDA MOTOR CO., INC. 

4. Remove the self-tapping screws and the rear vent control motor (A). 

Fig. 115: Identifying Rear Vent Control Motor And Fasteners 
Courtesy of AMERICAN HONDA MOTOR CO., INC. 

5. Install the motor in the reverse order of removal. Make sure the pin on the motor is properly engaged 

with the linkage. After installation, make sure the motor runs smoothly.  

CLIMATE CONTROL UNIT REMOVAL/INSTALLATION 

1. Remove the audio unit (see AUDIO UNIT REMOVAL/INSTALLATION ).  

2. Remove the self-tapping screws and the climate control unit (A). 

Fig. 116: Identifying Climate Control Unit And Fasteners 
Courtesy of AMERICAN HONDA MOTOR CO., INC. 

3. Discharge the static electricity (which accumulated on you when you removed the climate control 

unit) by touching the door striker or other body parts. 


2007 Acura RL 

2005-08 HVAC HVAC - RL


me 


Friday, June 05, 2009 2:25:43 PM

Page 98 

© 2005 Mitchell Repair Information Company, LLC. 


Content   ..  576  577  578  579   ..