Acura RL. Manual - part 488
 

  Index      Acura     Acura RL - service repair manual 2005-2008 year


Search            


Content   ..  486  487  488  489   ..


Acura RL. Manual - part 488


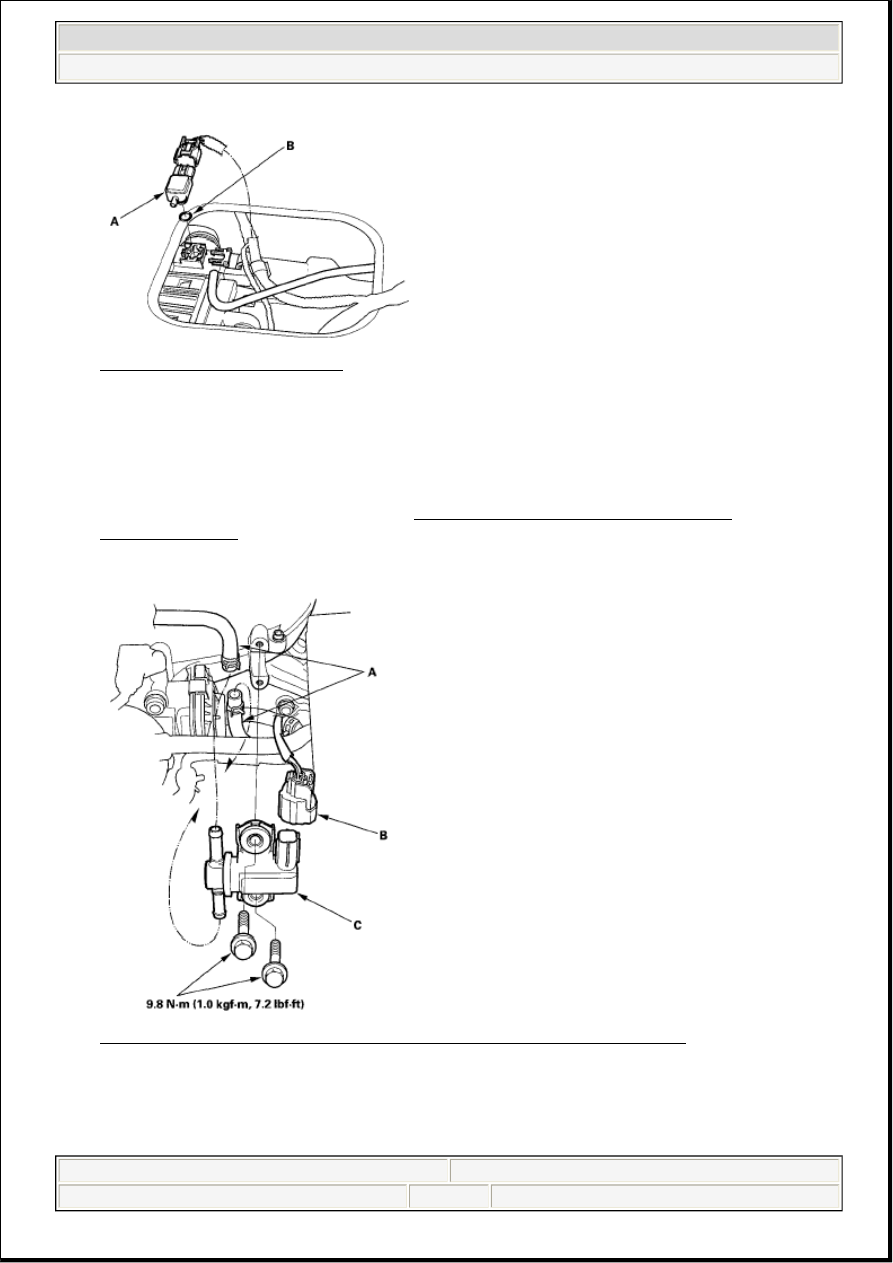
Fig. 38: Identifying FTP Sensor 
Courtesy of AMERICAN HONDA MOTOR CO., INC. 

4. Install the parts in the reverse order of removal with a new O-ring (B).  

EVAP CANISTER PURGE VALVE REPLACEMENT 

1. Remove the engine cover (see step 1 under INTAKE MANIFOLD REMOVAL AND 

INSTALLATION ).  

2. Disconnect the hoses (A) and the EVAP canister purge valve 2P connector (B). 

Fig. 39: Identifying EVAP Canister Purge Valve With Torque Specifications 
Courtesy of AMERICAN HONDA MOTOR CO., INC. 

3. Remove the EVAP canister purge valve (C).  

4. Install the parts in the reverse order of removal. 


2007 Acura RL 

2005-08 ENGINE PERFORMANCE EVAP System - RL


me 


Friday, June 05, 2009 2:30:48 PM

Page 37 

© 2005 Mitchell Repair Information Company, LLC. 

EVAP CANISTER VENT SHUT VALVE REPLACEMENT

1. Remove the trunk floor.  

2. Remove the access panel (A) from the floor. 

Fig. 40: Identifying Access Panel 
Courtesy of AMERICAN HONDA MOTOR CO., INC. 

3. Disconnect the EVAP canister vent shut valve 2P connector (A), FTP sensor 3P connector (B), and 

the hose (C). 

Fig. 41: Identifying EVAP Canister Vent Shut Valve 2P Connector And FTP Sensor 3P 
Connector
 
Courtesy of AMERICAN HONDA MOTOR CO., INC. 

4. Pry the lock tabs (D) outward, and remove the EVAP canister vent shut valve (E). 

5. Install the parts in the reverse order of removal with a new O-ring (F). 

NOTE:

Be careful not to damage the lock tabs.


2007 Acura RL 

2005-08 ENGINE PERFORMANCE EVAP System - RL


me 


Friday, June 05, 2009 2:30:48 PM

Page 38 

© 2005 Mitchell Repair Information Company, LLC. 

NOTE:

Do not coat the new O-ring with oil or other lubricants.


2007 Acura RL 

2005-08 ENGINE PERFORMANCE EVAP System - RL


me 


Friday, June 05, 2009 2:30:48 PM

Page 39 

© 2005 Mitchell Repair Information Company, LLC. 

2005-08 ACCESSORIES AND EQUIPMENT

Exterior Trim - RL 

HOOD MOLDING REPLACEMENT 

Special Tools Required  

KTC trim tool set SOJATP2014 * 

* Available through the American Honda Tool and Equipment Program; call 888-424-6857 

1. Using a 6 mm socket wrench, remove the special nuts (A), and detach the clip (B) by pushing it, then 

remove the hood molding (C). Take care not to scratch the hood. 

Fig. 1: Identifying Hood Molding With Torque Specifications 
Courtesy of AMERICAN HONDA MOTOR CO., INC. 

2. Install the molding in the reverse order of removal. 

UPPER GRILLE REPLACEMENT 

Special Tools Required  

NOTE:

Use the appropriate tool from the KTC trim tool set to avoid damage 
when prying components.  

Take care not to scratch the hood.  

NOTE:

Check if the clip is damaged or stress-whitened, and if necessary, 
replace it with a new one.


2007 Acura RL 

2005-08 ACCESSORIES AND EQUIPMENT Exterior Trim - RL


2007 Acura RL 

2005-08 ACCESSORIES AND EQUIPMENT Exterior Trim - RL


me 


Friday, June 05, 2009 3:52:02 PM

Page 1 

© 2005 Mitchell Repair Information Company, LLC. 

me 


Friday, June 05, 2009 3:52:07 PM

Page 1 

© 2005 Mitchell Repair Information Company, LLC. 


Content   ..  486  487  488  489   ..