Acura RL. Manual - part 377
 

  Index      Acura     Acura RL - service repair manual 2005-2008 year


Search            


Content   ..  375  376  377  378   ..


Acura RL. Manual - part 377


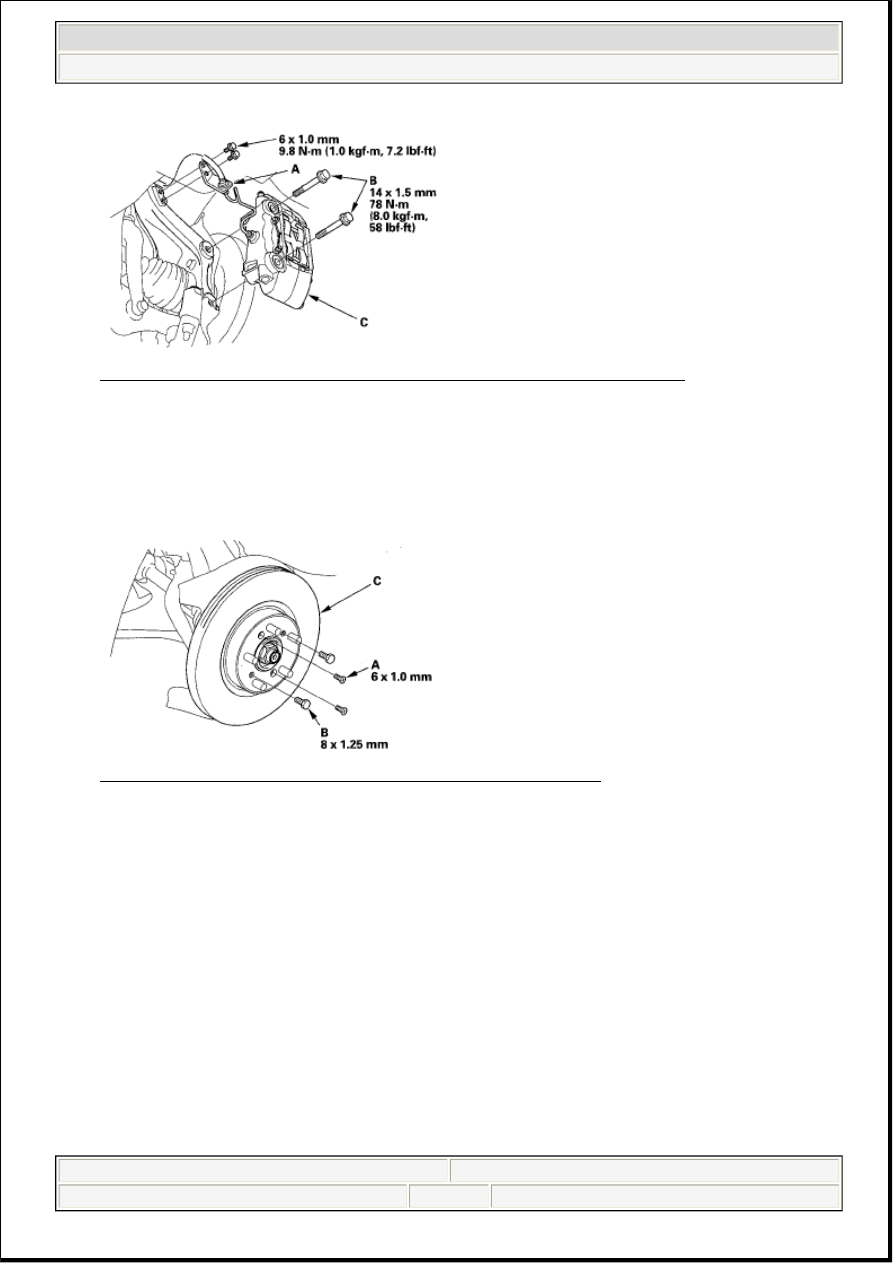
Fig. 31: Identifying Mounting Caliper Assembly With Torque Specifications 
Courtesy of AMERICAN HONDA MOTOR CO., INC. 

4. Remove the brake caliper bracket mounting bolts (B), and remove the caliper assembly (C) from the 

knuckle. To prevent damage to the caliper assembly or brake hose, use a short piece of wire to hang 
the caliper assembly from the undercarriage. Do not twist the brake hose with force.  

5. Remove the 6 mm brake disc retaining screws (A). 

Fig. 32: Identifying Brake Disc And Brake Disc Retaining Screws 
Courtesy of AMERICAN HONDA MOTOR CO., INC. 

6. Thread two 8 x 1.25 mm bolts (B) into the disc to push it away from the hub. Turn each bolt 90 

degrees to prevent the brake disc from binding.  

7. Remove the brake disc (C) from the hub.  

8. Install the brake disc in the reverse order of removal, and note these items: 

Before installing the brake disc, clean the mating surface of the front hub and the inside of the 
brake disc.  

Before installing the wheel, clean the mating surface of the brake disc and the inside of the 
wheel.  

FRONT BRAKE CALIPER OVERHAUL 

CAUTION: Frequent inhalation of brake pad dust, regardless of material 

composition, could be hazardous to your health. 


2007 Acura RL 

2005-08 BRAKES Conventional Brake Components - RL


me 


Friday, June 05, 2009 3:00:06 PM

Page 21 

© 2005 Mitchell Repair Information Company, LLC. 

Remove, disassemble, inspect, reassemble, and install the caliper, and note these items: 

Do not spill brake fluid on the vehicle; it may damage the paint; if brake fluid gets on the paint, wash 
it off immediately with water.  

To prevent dripping brake fluid, cover disconnected hose joints with rags or shop towels.  

Clean all parts in brake fluid and air dry; blow out all passages with compressed air.  

Before reassembling, check that all parts are free of dirt and other foreign particles.  

Replace parts with new ones as specified in the illustration.  

Make sure no dirt or other foreign matter gets in the brake fluid.  

Make sure no grease or oil gets on the brake discs or pads.  

When reusing pads, always reinstall them in their original positions to prevent loss of braking 
efficiency.  

Do not reuse drained brake fluid. Use only clean Acura DOT 3 Brake Fluid from an unopened 
container. Using a non-Acura brake fluid can cause corrosion and shorten the life of the system.  

Do not mix different brands of brake fluid as they may not be compatible.  

Coat the piston, piston seal groove, and caliper bore with clean brake fluid.  

Replace all rubber parts with new ones whenever disassembled.  

After installing the caliper, check the brake hose and line for leaks, interference, and twisting. 

Fig. 33: Identifying Caliper Components Grease Applying Area With Torque Specifications 
Courtesy of AMERICAN HONDA MOTOR CO., INC.

Avoid breathing dust particles.  

Never use an air hose or brush to clean brake assemblies. Use an 
OSHA-approved vacuum cleaner.  


2007 Acura RL 

2005-08 BRAKES Conventional Brake Components - RL


me 


Friday, June 05, 2009 3:00:06 PM

Page 22 

© 2005 Mitchell Repair Information Company, LLC. 

MASTER CYLINDER REPLACEMENT

1. Lower the vehicle to the ground.  

2. Remove the covers (A) in the engine compartment. 

Fig. 34: Identifying Engine Compartment Covers 
Courtesy of AMERICAN HONDA MOTOR CO., INC. 

3. Remove the under-hood fuse/relay box, and move it aside (see REMOVAL AND 

INSTALLATION ).  

4. Remove the strut brace (see FRAME BRACE REPLACEMENT ).  

5. Remove the reservoir cap and brake fluid from the master cylinder reservoir with a syringe.  

6. Disconnect the brake fluid level switch connector (A). 

NOTE:

Do not spill brake fluid on the vehicle; it may damage the paint; if brake 
fluid gets on the paint, wash it off immediately with water.  

Be careful not to damage or deform the brake lines during removal and 
inspection.  

To prevent the brake fluid from flowing, plug and cover the hose ends 
and joints with a shop towel or equivalent.  


2007 Acura RL 

2005-08 BRAKES Conventional Brake Components - RL


me 


Friday, June 05, 2009 3:00:06 PM

Page 23 

© 2005 Mitchell Repair Information Company, LLC. 

Fig. 35: Identifying Brake Fluid Level Switch Connector And Brake Lines With Torque 
Specifications
 
Courtesy of AMERICAN HONDA MOTOR CO., INC. 

7. Disconnect the brake lines (B) from the master cylinder (C). To prevent spills, cover the line joints 

with rags or shop towels. 

8. Remove the master cylinder mounting nuts (D) and washers.  

9. Remove the master cylinder from the brake booster (E). Be careful not to bend or damage the brake 

lines when removing the master cylinder.  

10. Remove the O-ring (F) from the master cylinder.  

11. Install the master cylinder in the reverse order of removal, and note these items: 

Before installing master cylinder, check the brake booster pushrod clearance (see BRAKE 
BOOSTER PUSHROD CLEARANCE ADJUSTMENT
 ).  

Replace the O-ring whenever the master cylinder is removed.  

Coat the O-ring with clean brake fluid.  

Bleed the brake system (see BRAKE SYSTEM BLEEDING ).  

Check the brake pedal height and free play after installing the master cylinder, and adjust it if 
necessary.  

12. Bleed the brake system (see BRAKE SYSTEM BLEEDING ).  

13. Spin the wheels to check for brake drag.  

MASTER CYLINDER INSPECTION 

NOTE:

Do not spill brake fluid on the vehicle; it may damage the paint; if brake 
fluid does contact the paint, wash it off immediately with water.

NOTE:

Before reassembling, check that all parts are free of dirt and other 
foreign particles.  

Do not try to disassemble the master cylinder assembly. Replace the 
master cylinder assembly with a new part if necessary.  

Do not allow dirt or foreign matter to contaminate the brake fluid. 


2007 Acura RL 

2005-08 BRAKES Conventional Brake Components - RL


me 


Friday, June 05, 2009 3:00:06 PM

Page 24 

© 2005 Mitchell Repair Information Company, LLC. 


Content   ..  375  376  377  378   ..