Acura RL. Manual - part 313
 

  Index      Acura     Acura RL - service repair manual 2005-2008 year


Search            


Content   ..  311  312  313  314   ..


Acura RL. Manual - part 313


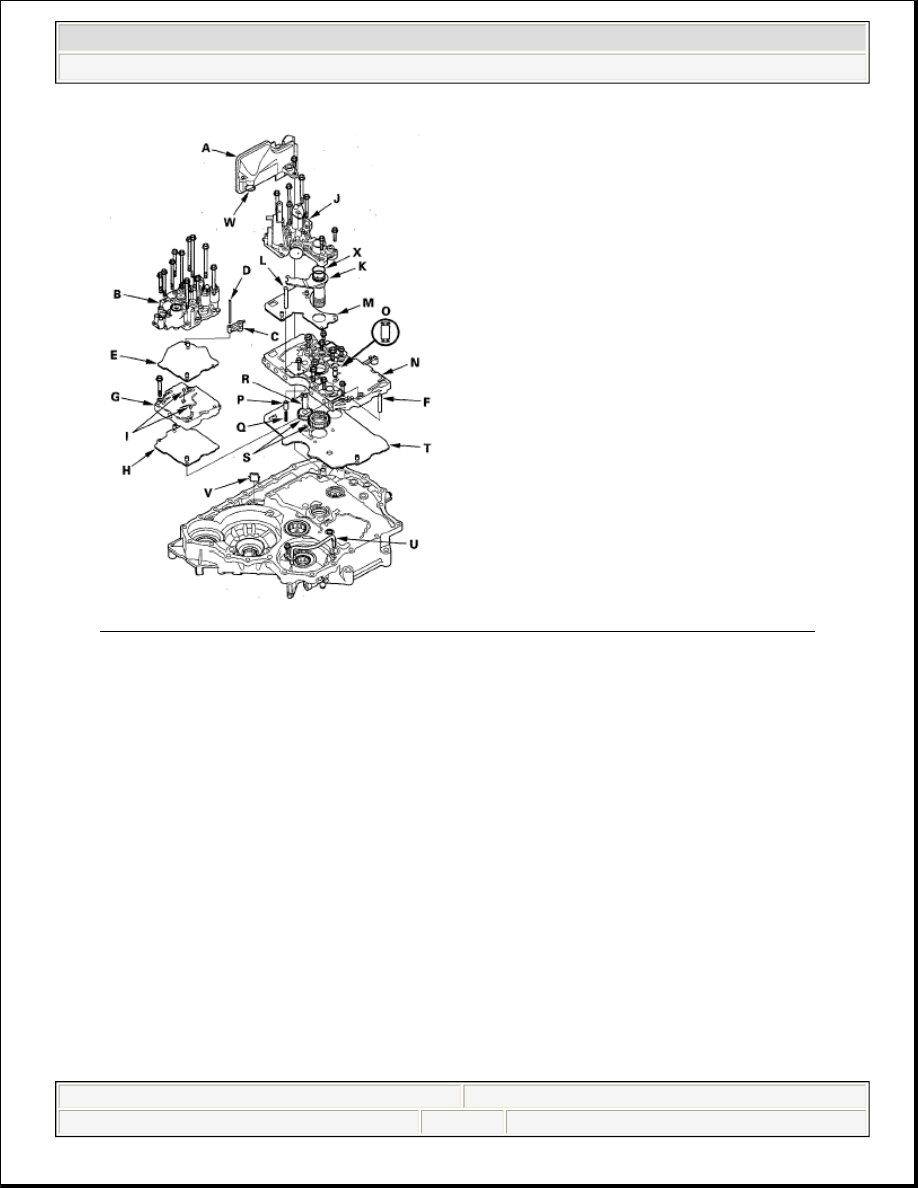
Fig. 440: Identifying ATF Strainer, Accumulator Body And Main Valve Body (06-08 Models) 
Courtesy of AMERICAN HONDA MOTOR CO., INC. 

37. Remove the accumulator body (B) (11 bolts), dowel pins (two), detent arm (C), arm shaft (D), and 

separator plate (E).  

38. Remove the ATF feed pipe (F) from the main valve body.  

39. Remove the secondary valve body (G) (one bolt), dowel pins (two), and separator plate (H). Do not let 

the check balls (I) (two) fall out.  

40. Remove the regulator valve body (J) (seven bolts), stator shaft (K), stator shaft stop (L), dowel pins (two), 

and separator plate (M).  

41. Remove the main valve body (N) (8 mm: three bolts, 6 mm: seven bolts). Do not let the lubrication check 

valve (0) fall out; and for '05 model, do not let the cooler check valve (ball) (Z) and valve spring (Y) fall 
out. 

42. Remove the torque converter check valve (P) and valve spring (Q).  

43. Remove the ATF pump driven gear shaft (R), then remove the ATF pump gears (S).  

44. Remove the dowel pins (two) and main separator plate (T).  

45. Remove the ATF passage pipe (U).  

NOTE:

The cooler check valve and valve spring are located in the regulator valve 
body on '06-08 models.


2007 Acura RL 

2005-08 TRANSMISSION Automatic Transmission - RL


me 


Friday, June 05, 2009 1:18:16 PM

Page 423 

© 2005 Mitchell Repair Information Company, LLC. 

46. Remove the ATF magnet (V), clean it, then reinstall it.  

47. Remove the O-ring (W) from the ATF strainer, and replace it with a new O-ring when reassembling the 

transmission.  

48. Remove the O-ring (X) from the stator shaft, and replace it with a new O-ring when reassembling the 

transmission.  

49. Clean the inlet opening (A) of the ATF strainer (B) thoroughly with compressed air, then check that it is 

in good condition and that the inlet opening is not clogged. 

Fig. 441: Identifying Strainer Inlet Opening 
Courtesy of AMERICAN HONDA MOTOR CO., INC. 

50. Test the ATF strainer by pouring clean ATF through the inlet opening, and replace if it is clogged or 

damaged.  

TRANSMISSION HOUSING 

REVERSE IDLER GEAR REMOVAL/INSTALLATION 

1. Remove the reverse idler gear assembly (A) from the transmission housing. 


2007 Acura RL 

2005-08 TRANSMISSION Automatic Transmission - RL


me 


Friday, June 05, 2009 1:18:16 PM

Page 424 

© 2005 Mitchell Repair Information Company, LLC. 

Fig. 442: Identifying Reverse Idler Gear Assembly And Dowel Pins With Torque Specifications 
Courtesy of AMERICAN HONDA MOTOR CO., INC. 

2. Install the reverse idler gear assembly with the two dowel pins (B) in the transmission housing.  

REVERSE IDLER GEAR DISASSEMBLY/INSPECTION/REASSEMBLY 

1. Remove the snap ring (A), then remove the thrust washer (B), reverse idler gear (C), needle bearings (D), 

and thrust washer (E) from the reverse idler gear shaft/holder (F). 

Fig. 443: Identifying Thrust Washer, Reverse Idler Gear, Needle Bearings And Thrust Washer 
Courtesy of AMERICAN HONDA MOTOR CO., INC. 

2. Inspect the reverse idler gear and gear shaft for excessive wear and damage.  

3. Inspect the needle bearings for galling and rough movement. 


2007 Acura RL 

2005-08 TRANSMISSION Automatic Transmission - RL


me 


Friday, June 05, 2009 1:18:16 PM

Page 425 

© 2005 Mitchell Repair Information Company, LLC. 

4. Install the thrust washer and needle bearings over the gear shaft.  

5. Install the reverse idler gear in the direction shown.  

6. Install the thrust washer, then install the snap ring to secure the idler gear.  

ATF FILTER REMOVAL/INSPECTION/INSTALLATION 

1. Remove the three 6.0 mm bolts securing the ATF filter cover (A) and ATF pipe (B). 

Fig. 444: Identifying ATF Filter Cover And ATF Pipe With Torque Specifications 
Courtesy of AMERICAN HONDA MOTOR CO., INC. 

2. Remove the ATF pipe from the ATF filter cover, and remove the ATF filter (C) from the cover.  

3. Clean the ATF filter, then check that it is in good condition and not clogged. Replace the ATF filter if it is 

clogged or damaged.  

4. Install the ATF filter with the new O-ring (D) in the filter cover, and install the ATF pipe in the cover, 

then install them in the transmission housing.  

5. Secure the ATF filter cover with the two bolts (E), then secure the ATF pipe with the bolt (F).  

SECONDARY SHAFT ATF FEED PIPE CAP REMOVAL 

1. Cover the tip of the 1st-hold clutch ATF feed pipe with a shop rag.  

2. Apply air pressure to the ATF feed pipe hole of the 1st-hold clutch pressure circuit, and remove the ATF 

feed pipe cap from the transmission housing. 


2007 Acura RL 

2005-08 TRANSMISSION Automatic Transmission - RL


me 


Friday, June 05, 2009 1:18:16 PM

Page 426 

© 2005 Mitchell Repair Information Company, LLC. 


Content   ..  311  312  313  314   ..