Acura CSX. Manual - part 311
 

  Index      Acura     Acura CSX - P/NO. 61SNR03 - service repair manual 2006-2009 year


Search            


Content   ..  309  310  311  312   ..


Acura CSX. Manual - part 311


*01

SNR9AA1E10411300000MEAT00

14-319

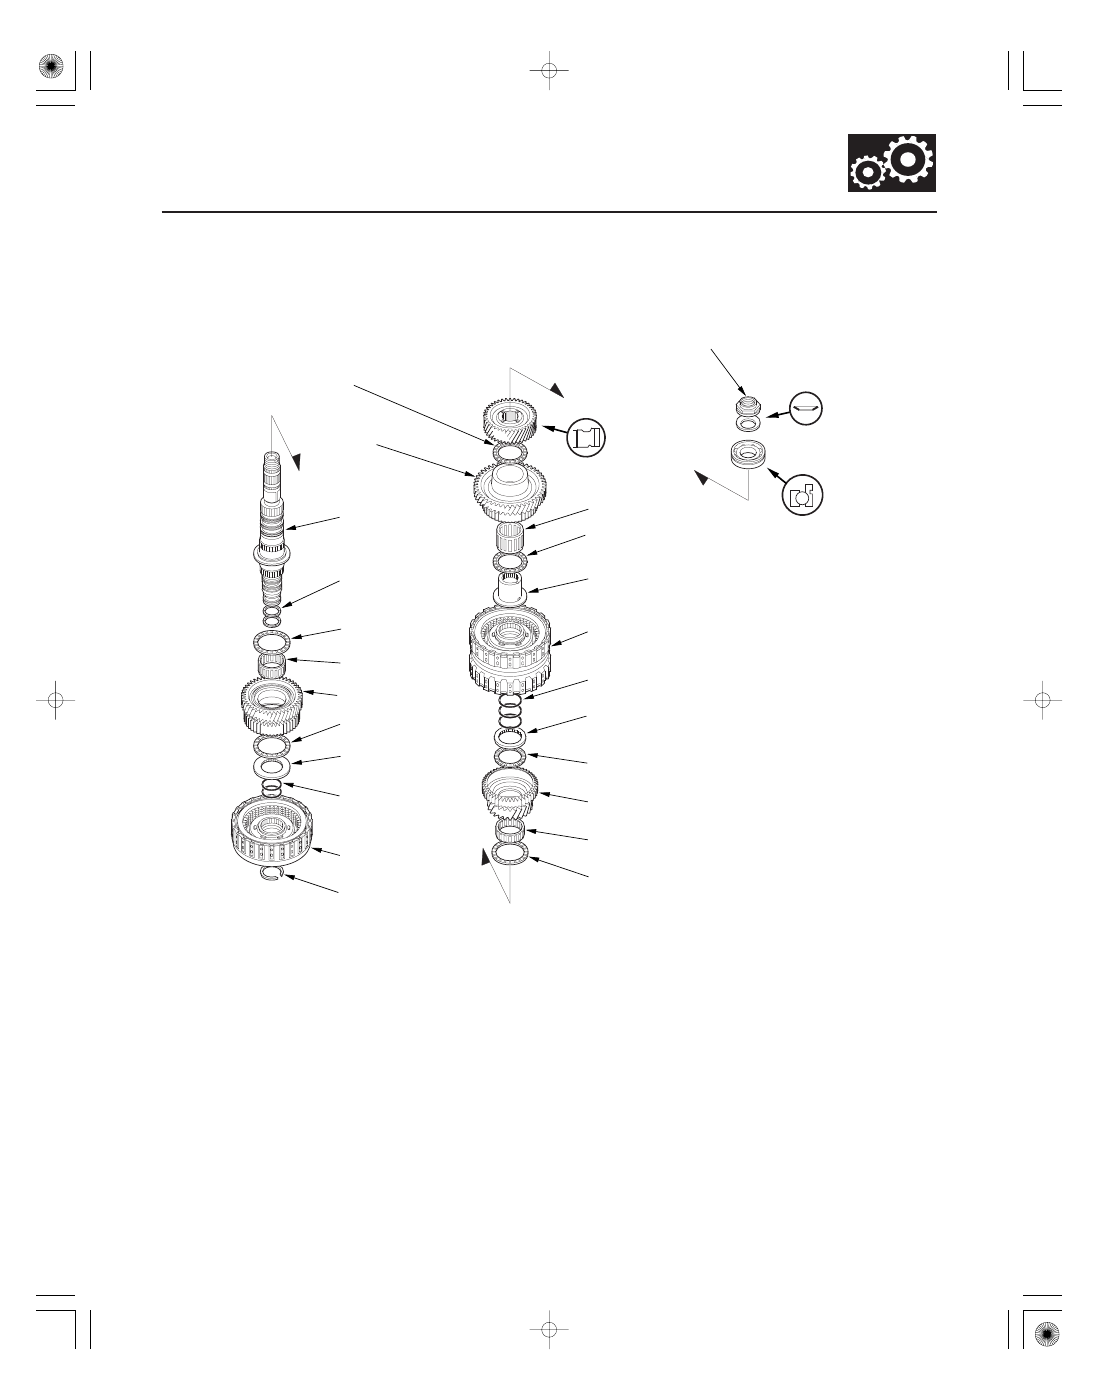
Secondary Shaft Disassembly, Inspection, and Reassembly

CONICAL
SPRING
WASHER

THRUST NEEDLE
BEARING

1ST GEAR

TRANSMISSION
HOUSING BEARING

1ST/3RD CLUTCH

O-RINGS

THRUST WASHER,
40 x 51.5 mm

THRUST NEEDLE BEARING

2ND GEAR

NEEDLE BEARING

THRUST NEEDLE BEARING

IDLER GEAR

THRUST NEEDLE BEARING

SEALING RINGS,
29 mm

SET RING

3RD GEAR

SECONDARY SHAFT

THRUST NEEDLE
BEARING

NEEDLE BEARING

THRUST NEEDLE
BEARING

THRUST WASHER,
37 x 58 mm

O-RINGS

2ND CLUTCH

NEEDLE BEARING

3RD GEAR COLLAR

LOCKNUT (FLANGE NUT)
24 x 1.25 mm
Left-hand threads

1. Inspect the thrust needle bearing and the needle bearing for galling and rough movement.

2. Inspect the splines for excessive wear and damage.

3. Check the shaft bearing surface for scoring and excessive wear.

4. Before installing new O-rings, wrap the shaft splines with tape to prevent O-ring damage.

5. Lubricate all parts with ATF during assembly.

6. Install the conical spring washer and the idler gear in the direction shown.

7. Replace the locknut and the conical spring washer with new ones when assembling the transmission. The locknut

has left-hand threads.

8. Check the clearance of 2nd gear (see page 14-321) and 1st gear (see page 14-322).

Replace.

Replace.

Selective part

Replace.

Replace.

Selective part

Replace.

Replace.

08/08/21 14:51:22 61SNR030_140_0321

01

02

SNR9AA1E10411354203KDAT10

Special Tools Required

Removal

Installation

14-320

Shafts and Clutches

Secondary Shaft Ball Bearing, Idler Gear Removal and Installation

C

A

B

E

D

B

C

A

07QAD-P0A0100

Attachment, 42 mm I.D. 07QAD-P0A0100

Place a spacer (A) on the secondary shaft (B), and set
the puller (C) under the idler gear (D), then remove the
idler gear and the ball bearing (E).

Install the idler gear (A) on the secondary shaft (B), and
install the ball bearing (C) over the idler gear using the
42 mm I.D. attachment and a press.

08/08/21 14:51:23 61SNR030_140_0322

01

02

*01

SNR9AA1E10411354181MAAT00

Standard: 0.04

0.12 mm (0.002

0.005 in.)

14-321

Secondary Shaft 2nd Gear Axial Clearance Inspection

G

A

B

C

D

E

F

H

C

A

B

C

37 x 58 mm
THRUST WASHER

1. Install the thrust needle bearing (A), the needle

bearing (B), 2nd gear (C), the thrust needle bearing
(D), the 37 x 58 mm thrust washer (E), and the 2nd
clutch (F) on the secondary shaft (G), then secure
them with the set ring (H).

2. Measure the clearance between the snap ring (A)

and the 2nd clutch guide (B) using a feeler gauge
(C), in at least three places. Use the average as the
actual clearance.

08/08/21 14:51:24 61SNR030_140_0323

01

SNR9AA1E10411354171MAAT00

THRUST WASHER, 37 x 58 mm

No.

Part Number

Thickness

Special Tools Required

14-322

14-322

Shafts and Clutches

Secondary Shaft 1st Gear Axial
Clearance Inspection

L
24 x 1.25 mm
29 N·m (3.0 kgf·m, 22 lbf·ft)

K

J

I

G

F

E

D

C

B

A

H

3. If the clearance is out of standard, remove the

37 x 58 mm thrust washer and measure its
thickness.

4. Select and install a new thrust washer, then

recheck.

1

90511-PRP-010

3.900 mm (0.154 in.)

2

90512-PRP-010

3.925 mm (0.155 in.)

3

90513-PRP-010

3.950 mm (0.156 in.)

4

90514-PRP-010

3.975 mm (0.156 in.)

5

90515-PRP-010

4.000 mm (0.157 in.)

6

90516-PRP-010

4.025 mm (0.158 in.)

7

90517-PRP-010

4.050 mm (0.159 in.)

8

90518-PRP-010

4.075 mm (0.160 in.)

9

90519-PRP-010

4.100 mm (0.161 in.)

10

90520-PRP-010

4.125 mm (0.162 in.)

11

90521-PRP-010

4.150 mm (0.163 in.)

12

90522-PRP-010

4.175 mm (0.164 in.)

13

90523-PRP-000

4.200 mm (0.165 in.)

14

90524-PRP-000

4.225 mm (0.166 in.)

15

90525-PRP-000

4.250 mm (0.167 in.)

16

90526-PRP-000

4.275 mm (0.168 in.)

17

90527-PRP-000

4.300 mm (0.169 in.)

18

90528-PRP-000

4.325 mm (0.170 in.)

19

90529-PRP-000

4.350 mm (0.171 in.)

20

90530-PRP-000

4.375 mm (0.172 in.)

5. After replacing the thrust washer, make sure the

clearance is within standard.

6. Disassemble the installed parts from the secondary

shaft.

Attachment, 42 mm I.D. 07QAD-P0A0100

1. Install the thrust needle bearing (A), the needle

bearing (B), 1st gear (C), the thrust needle bearing
(D), the 40 x 51.5 mm thrust washer (E), the 1st/3rd
clutch (F), and the 3rd gear collar (G) on the
secondary shaft (H). Do not install the O-rings
during inspection.

08/08/21 14:51:24 61SNR030_140_0324


Content   ..  309  310  311  312   ..