Kia Soul (2024 year). Manual in english - page 15
 

  Index      Kia     Kia Soul (2024 year). Manual in english


Search            copyright infringement  


Content      ..     13      14      15     


Kia Soul (2024 year). Manual in english - page 15


Maintenance

58

8

Light bulbs

2. Remove the socket from the assembly 

by turning the socket counterclock

-

wise until the tabs on the socket align 
with the slots on the assembly.

3. Remove the bulb from bulb-socket by 

pulling it out.

4. Insert a new bulb by inserting it into 

the bulb-socket.

5. Install the socket in the assembly by 

aligning the tabs on the socket with 
the slots in the assembly. Push the 
socket into the assembly and turn the 
socket clockwise.

6. Install the lamp assembly to the body 

of the vehicle.

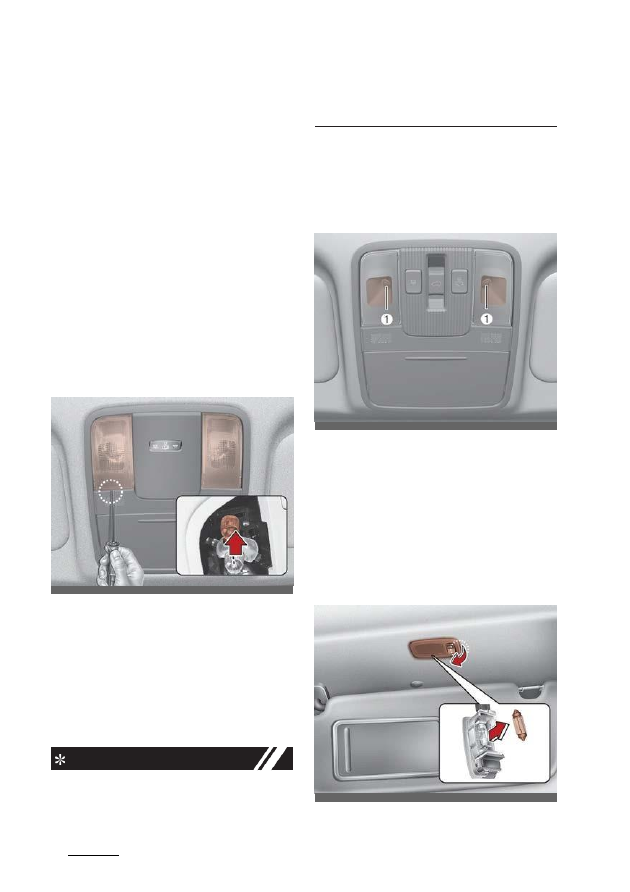
Replacing map lamp (bulb type) 
bulb

1. Using a flat-blade screwdriver, gently 

pry the lens cover from lamp housing.

2. Remove the bulb by pulling it straight 

out.

3. Install a new bulb in the socket.
4. Align the lens cover tabs with the 

lamp housing notches and snap the 
lens into place.

NOTICE

Be careful not to dirty or damage the 
lens, lens tab, and plastic housings.

Allow the bulb to cool down before han

-

dling it.

Replacing map lamp (LED type) 
bulb

If the map lamp (LED) does not operate, 
have the vehicle checked by an autho

-

rized Kia dealer.

The LED lamps cannot be replaced as a
single component because they are part 
of an integrated unit. The LED lamps 
have to be replaced with the unit.

A skilled technician should check or 
repair the map lamp (LED), for it may 
damage related parts of the vehicle.

Replacing vanity mirror lamp 
bulb

OSK3078084NR

OSK3078085NR

ODEEV098065NR

59

8

8

Maintenance

Light bulbs

W ARNING

Interior lamps
Prior to working on the Interior lamps, 
ensure that the "OFF" button is 
depressed to avoid burning your fingers 
or receiving an electric shock.

1. Using a flat-blade screwdriver, gently 

pry the lamp assembly from interior.

2. Remove the bulb by pulling it straight 

out.

3. Install a new bulb in the socket.

4. Install the lamp assembly to interior.

NOTICE

Be careful not to dirty or damage the 
lens, lens tab, and plastic housings.

Replacing room lamp (bulb type) 
bulb

W ARNING

Interior lamps
Prior to working on the Interior lamps, 
ensure that the "OFF" button is 
depressed to avoid burning your fingers 
or receiving an electric shock.

1. Using a flat-blade screwdriver, gently 

pry the lens cover from lamp housing.

2. Remove the bulb by pulling it straight 

out.

3. Install a new bulb in the socket.
4. Align the lens cover tabs with the 

lamp housing notches and snap the 
lens into place.

NOTICE

Be careful not to dirty or damage the 
ODE076049 lens, lens tab, and plastic 
housings.

Replacing room lamp (LED type) 
bulb

If the Room lamp (LED) does not oper

-

ate, have the vehicle checked by an 
authorized Kia dealer.

The LED lamps cannot be replaced as a
single component because they are part 
of an integrated unit. The LED lamps 
have to be replaced with the unit.

A skilled technician should check or 
repair the Room lamp (LED), for it may 
damage related parts of the vehicle.

ODEEV098066NR

ODEEV098067NR

Maintenance

60

8

Light bulbs

Replacing glove box lamp

1. Using a flat-blade screwdriver, gently 

pry the lamp assembly from interior.

2. Remove the bulb by pulling it straight 

out.

3. Install a new bulb in the socket.

4. Install the lamp assembly to interior.

Be careful not to dirty or damage the 
lens, lens tab, and plastic housings.

CAUTION

Be careful not to dirty or damage the 
lens, lens tab, and plastic housings.

Replacing liftgate room lamp 
bulb

1. Using a flat-blade screwdriver, gently 

pry the lens cover from lamp housing.

2. Remove the bulb by pulling it straight 

out.

3. Install a new bulb in the socket.
4. Align the lens cover tabs with the 

lamp housing notches and snap the 
lens into place.

If the Liftgate room lamp (LED) does not
operate, have the vehicle checked by an
authorized Kia dealer.

The LED lamps cannot be replaced as a
single component because they are part 
of an integrated unit. The LED lamps 
have to be replaced with the unit.

A skilled technician should check or 
repair the Liftgate room lamp (LED), for it
may damage related parts of the vehi

-

cle.

NOTICE

OSK3078044NR

OSK3072045N

61

8

8

Maintenance

Appearance care

Appearance care

Use the information in the following sec

-

tions to keep the exterior and interior of
your vehicle clean.

Exterior care

Use the information in the following sec

-

tions to maintain the exterior of your 
vehicle. Keeping the exterior clean is not 
only aesthetically pleasing, but it also 
helps to prolong the life of the vehicle.

NOTICE

If you park the vehicle around a stainless 
signboard or windshield building etc.,
the plastic exterior trim (bumper, spoiler, 
garnish, lamp, outside mirror etc.) may be
damaged by reflected sunlight from the 
external structure. To avoid damag

-

ing

the plastic exterior trim, park the vehicle
away from the areas where the reflected
light may occur or use a vehi

-

cle cover

(Depending on the vehicle, the type of
exterior trim applied such as spoiler may 
differ).

Exterior general caution

It is very important to follow the label 
directions when using any chemical 
cleaner or polish. Read all warning and 
caution statements that appear on the 
label.

Finish maintenance

Washing

To help protect your vehicle's finish from 
rust and deterioration, wash it thor

-

oughly and frequently at least once a
month with lukewarm or cold water.

If you use your vehicle for off-road driv

-

ing, you should wash it after each off-

road trip. Pay special attention to the 
removal of any accumulation of salt, dirt, 
mud, and other foreign materials. Make 
sure the drain holes in the lower edges of
the doors and rocker panels are kept 
clear and clean.

Insects, tar, tree sap, bird droppings, 
industrial pollution and similar deposits 
can damage your vehicle's finish if not 
removed immediately.

Even prompt washing with plain water 
may not completely remove all these 
deposits. A mild soap, safe for use on 
painted surfaces, may be used.

After washing, rinse the vehicle thor

-

oughly with lukewarm or cold water. Do 
not allow soap to dry on the finish.

After washing the vehicle, test the brakes
while driving slowly to see if they have
been affected by water. If braking 
performance is impaired, dry the brakes 
by applying them lightly while maintain

-

ing a slow forward speed.

CAUTION

• Do not use strong soap, chemical 

detergents or hot water, and do not 
wash the vehicle in direct sunlight or 
when the body of the vehicle is warm.

• Be careful when washing the side win

-

dows of your vehicle, especially with 
high-pressure water. Water may leak 
through the windows and wet the 
interior.

• To prevent damage to the plastic 

parts and lamps, do not clean with 
chemical solvents or strong deter

-

gents.

Maintenance

62

8

Appearance care

High-pressure washing

When using high-pressure washers, 
make sure to maintain sufficient dis

-

tance from the vehicle.

Insufficient clearance or excessive pres

-

sure can lead to component damage or
water penetration.

Do not spray the camera, sensors or its 
surrounding area directly with a high 
pressure washer. Shock applied from 
high pressure water may cause the 
device to not operate normally.

Do not bring the nozzle tip close to boots 
(rubber or plastic covers) or connectors 
as they may be damaged if they come 
into contact with high pressure water.

W ARNING

After washing the vehicle, test the brakes
while driving slowly to see if they have
been affected by water. If braking 
performance is impaired, dry the brakes 
by applying them lightly while maintain

-

ing a slow forward speed.

CAUTION

Wetting engine compartment

• Water washing in the engine compart

-

ment including high pressure water 
washing may cause the failure of elec

-

trical circuits located in the engine
compartment.

• Never allow water or other liquids to

come in contact with electrical/elec

-

tronic components inside the vehicle
as this may damage them.

• To prevent damage to the charging 

door, make sure to close and lock the 
vehicle doors when washing (high-
pressure washing, automatic car 
washing, etc.) the vehicle.

Waxing

Wax the vehicle when water will no lon

-

ger bead on the paint.

Always wash and dry the vehicle before 
waxing. Use a good quality liquid or 
paste wax, and follow the manufac

-

turer's instructions. Wax all metal trim to 
protect it and to maintain its luster.

Removing oil, tar, and similar materials 
with a spot remover will usually strip the 
wax from the finish. Be sure to re-wax 
these areas even if the rest of the vehicle 
does not yet need waxing.

CAUTION

Drying vehicle
• Wiping dust or dirt off the body with a

dry cloth will scratch the finish.

• Do not use steel wool, abrasive clean

-

ers, acid detergents or strong deter

-

gents containing high alkaline or 
caustic agents on chrome-plated or 
anodized aluminum parts. This may 
result in damage to the protective 
coating and cause discoloration or 
paint deterioration.

OSK3072047N

63

8

8

Maintenance

Appearance care

Finish damage repair

Deep scratches or stone chips in the 
painted surface must be repaired 
promptly. Exposed metal will quickly rust 
and may develop into a major repair 
expense.

NOTICE

If your vehicle is damaged and requires 
any metal repair or replacement, be sure 
the body shop applies anti-corrosion 
materials to the parts repaired or 
replaced.

Bright-metal maintenance

To remove road tar and insects, use a tar 
remover, not a scraper or other sharp 
object.

To protect the surfaces of bright metal 
parts from corrosion, apply a coating of 
wax or chrome preservative and rub to a
high luster.

During winter weather or in coastal areas,
cover the bright metal parts with a
heavier coating of wax or preservative. If
necessary, coat the parts with non-cor

-

rosive petroleum jelly or other protective 
compound.

Underbody maintenance

Road salt and other corrosive chemicals 
are used in cold weather states to melt 
snow and prevent ice accumulation. If 
these chemicals are not regularly 
removed, they will corrode the vehicle 
underbody and over time damage fuel 
lines, the fuel tank retention system, the 
vehicle suspension, the exhaust system, 
and even the body frame.

The National Highway Traffic Safety 
Administration has warned all vehicle

owners of all brands of the need to take 
the following steps:
• Wash the undercarriage of your vehi

-

cle regularly during the winter and 
whenever your vehicle has been 
exposed to such salts or chemicals.

• Do a thorough washing of the under

-

carriage at the end of the winter.

• Use professional service technicians

or governmental inspection stations
to annually inspect for corrosion.

• Immediately seek an inspection of 

your vehicle if you become visually 
aware of corrosion flaking or scaling or
if you become aware of a change in 
vehicle performance, such as soft or 
spongy brakes, fluids leaking, impair

-

ment of directional control, suspen

-

sion noises or rattling metal straps.

Aluminum wheel maintenance

The

aluminum wheels are coated with a clear
protective finish.
• Do not use any abrasive cleaner, pol

-

ishing compound, solvent, or wire 
brushes on aluminum wheels. They 
may scratch or damage the finish.

• Clean the wheel when it has cooled.
• Use only a mild soap or neutral deter

-

gent, and rinse thoroughly with water. 
Also, be sure to clean the wheels after 
driving on salted roads. This helps 
prevent corrosion.

• Avoid washing the wheels with high 

speed vehicle wash brushes.

• Do not use any alkaline or acid deter

-

gents It may damage and corrode the
aluminum wheels coated with a clear
protective finish.

Maintenance

Moisture breeds corrosion

Moisture creates the conditions in which 
corrosion is most likely to occur. For 
example, corrosion is accelerated by 
high humidity, particularly when tem

-

peratures are just above freezing. In 
such conditions, the corrosive material is 
kept in contact with the vehicle's surface 
by moisture that evaporates slowly.

8

64

Appearance care

Corrosion protection

Protecting your vehicle from cor

-

rosion

By using the most advanced design and 
construction practices to combat corro

-

sion, we produce vehicles of the highest 
quality. However, this is only part of the 
job. To achieve the long-term corrosion 
resistance your vehicle can deliver, the 
owner's cooperation and assistance is 
also required.

Common causes of corrosion

The

most common causes of corrosion on
your vehicle are:
• Road salt, dirt and moisture that is

allowed to accumulate underneath
the vehicle.

• Removal of paint or protective coat

-

ings by stones, gravel, abrasion or 
minor scrapes and dents which leave 
unprotected metal exposed to corro

-

sion.

High-corrosion areas

If you live in an area where your vehicle 
is regularly exposed to corrosive materi

-

als, corrosion protection is particularly 
important. Some of the common causes 
of accelerated corrosion are road salts, 
dust control chemicals, ocean air and 
industrial pollution.

Mud is particularly corrosive because it 
dries slowly and holds moisture in con

-

tact with the vehicle. Although the mud 
appears to be dry, it can still retain the 
moisture and promote corrosion.

High temperatures can also accelerate 
corrosion of parts that are not properly 
ventilated so the moisture can be dis

-

persed. For all these reasons, it is partic

-

ularly important to keep your vehicle 
clean and free of mud or accumulations 
of other materials. This applies not only 
to the visible surfaces but particularly to 
the underside of the vehicle.

To help prevent corrosion

You can help prevent corrosion from 
beginning by observing the following:

Keep your vehicle clean

The best way to prevent corrosion is to 
keep your vehicle clean and free of cor

-

rosive materials. Attention to the under

-

side of the vehicle is particularly 
important.

If you live in a high-corrosion area

where road salts are used, near the 
ocean, areas with industrial pollution, 
acid rain, etc.

—, you should take extra 

care to prevent corrosion. In winter, hose 
off the underside of your vehicle at least 
once a month and be sure to clean the 
underside thoroughly when winter is over.

When cleaning underneath the vehicle, 
give particular attention to the compo

-

nents under the fenders and other areas 
that are hidden from view. Do a thor

-

ough job; just dampening the accumu

-

lated mud rather than washing it away will
accelerate corrosion rather than pre

-

vent

it. Water under high pressure and steam
are particularly effective in

65

8

8

Maintenance

Appearance care

removing accumulated mud and corro

-

sive materials.

When cleaning lower door panels, rocker 
panels and frame members, be sure that 
drain holes are kept open so that mois

-

ture can escape and not be trapped 
inside to accelerate corrosion.

Keep your garage dry

Don't park your vehicle in a damp, 
poorly ventilated garage. This creates a
favorable environment for corrosion.
This is particularly true if you wash your 
vehicle in the garage or drive it into the 
garage when it is still wet or covered
with snow, ice or mud. Even a heated 
garage can contribute to corrosion 
unless it is well ventilated so moisture is 
dispersed.

Keep paint and trim in good con

-

dition

Scratches or chips in the finish should be 
covered with "touch-up" paint as soon as 
possible to reduce the possibility of cor

-

rosion. If bare metal is showing through, 
the attention of a qualified body and paint
shop is recommended.

Bird droppings: Bird droppings are 
highly corrosive and may damage 
painted surfaces in just a few hours. 
Always remove bird droppings as soon 
as possible.

Don't neglect the interior

Moisture can collect under the floor mats
and carpeting and cause corrosion. 
Check under the mats periodically to be 
sure the carpeting is dry. Use particular 
care if you carry fertilizers, cleaning 
materials or chemicals in the vehicle.

These should be carried only in proper 
containers and any spills or leaks should 
be cleaned up, flushed with clean water 
and thoroughly dried.

Interior care

Use the information in the following sec

-

tions to maintain the interior of your 
vehicle.

Interior general precautions

NOTICE

Prevent chemicals such as perfume, cos

-

metic oil, sun cream, hand cleaner, and 
air freshener from contacting the interior 
parts because they may cause damage 
or discoloration. If they do contact the 
interior parts, wipe them off immedi

-

ately.

If necessary, use a mixture of warm
water and mild non-detergent cleaner
(test all cleaners on a concealed area
before use). Use proper car cleaner to
clean interior parts.

CAUTION

Electrical components
Never allow water or other liquids to 
come in contact with electrical/electronic
components inside the vehicle as this 
may damage them.

CAUTION

Leather
When cleaning leather products (steer

-

ing wheel, seats etc.), use neutral deter

-

gents or low alcohol content solutions. If 
you use high alcohol content solutions or 
acid/alkaline detergents, the color of the 
leather may fade or the surface may get 
stripped off.

Maintenance

66

8

Appearance care

Taking care of leather seats

• Vacuum the seat periodically to 

remove dust and sand on the seat. It 
will prevent abrasion or damage of 
the leather and maintain its quality.

• Wipe the leather seat cover often with 

dry or soft cloth.

• Sufficient use of a leather protective 

may prevent abrasion of the cover 
and helps maintain the color. Be sure 
to read the instructions and consult a
specialist when using leather coating 
or protective agents.

• Leather with bright colors (beige, 

cream beige) is easily contaminated 
and clear in appearance. Clean the 
seats frequently.

• Avoid wiping with wet cloth. It may 

cause the surface to crack.

Cleaning the leather seats

Remove all contaminations instantly. 
Refer to instructions below for removal 
of each contaminant.
• Cosmetic products (sunscreen, foun

-

dation, etc.)

- Apply cleansing cream on a cloth 

and wipe the contaminated point. 
Wipe off the cream with a wet cloth 
and remove water with a dry cloth.

• Beverages (coffee, soft drink, etc.)

- Apply a small amount of neutral 

detergent and wipe until contami

-

nations do not smear.

• Oil

- Remove oil instantly with absorb

-

able cloth and wipe with stain 
remover for leather only.

• Chewing gum

- Harden the gum with ice and 

remove gradually.

Fabric seat cover (if equipped)

Please clean the fabric seats regularly 
with a vacuum cleaner in consideration 
of fabric material characteristics. If they 
are heavily soiled with beverage stains, 
etc., use a suitable interior cleaner. To 
prevent damage to seat covers, wipe off 
the seat covers down to the seams with 
a large wiping motion and moderate 
pressure using a soft sponge or microfi

-

ber cloth.

Velcro closures on clothing or sharp 
objects may cause snagging or 
scratches on the surface of the seats.

Make sure not to rub such objects 
against the surface.

Cleaning the upholstery and inte

-

rior trim

Car interior surfaces

Remove dust and loose dirt from interior 
surfaces with a whisk broom or a vac

-

uum cleaner. If necessary, clean interior 
surfaces with a mixture of warm water 
and mild non-detergent cleaner (test all 
cleaners on a concealed area before 
use).

Fabric

Remove dust and loose dirt from fabric
with a whisk broom or vacuum cleaner.
Clean with a mild soap solution recom

-

mended for upholstery or carpets.
Remove fresh spots immediately with a
fabric spot cleaner. If fresh spots do not
receive immediate attention, the fabric
can be stained and its color can be 
affected. Also, its fire-resistant proper

-

ties can be reduced if the material is not 
properly maintained.

67

8

8

Maintenance

Emission control system

Using anything but recommended 
cleaners and procedures may affect the 
fabric's appearance and fire-resistant 
properties.

Cleaning the lap/shoulder belt 
webbing

Clean the belt webbing with any mild 
soap solution recommended for clean

-

ing upholstery or carpet. Follow the 
instructions provided with the soap. Do 
not bleach or re-dye the webbing 
because this may weaken it.

Cleaning the interior window 
glass

If the interior glass surfaces of the vehi

-

cle become fogged (that is, covered with 
an oily, greasy or waxy film), they should 
be cleaned with a glass cleaner. Follow 
the directions on the glass cleaner con

-

tainer.

CAUTION

Rear window
Do not scrape or scratch the inside of
the rear window. This may result in dam

-

age of the rear window defroster grid.

Emission control system

The emission control system of your 
vehicle is covered by a written limited 
warranty. Please see the warranty infor

-

mation contained in the Warranty &
Consumer Information manual in your 
vehicle.

Your vehicle is equipped with an emis

-

sion control system to meet all applica

-

ble emission regulations. There are three 
emission control systems, as follows.

1. Crankcase emission control system

2. Evaporative emission control system

3. Exhaust emission control system
In order to assure the proper function of 
the emission control systems, it is rec

-

ommended that you have your vehicle 
inspected and maintained by an autho

-

rized Kia dealer in accordance with the 
maintenance schedule in this manual..

Caution for the Inspection and
Maintenance Test (With Elec

-

tronic Stability Control (ESC) sys

-

tem)

• To prevent the vehicle from misfir

-

ing during dynamometer testing,
turn the Electronic Stability Control
(ESC) system off by pressing the
ESC switch.

• After dynamometer testing is com

-

pleted, turn the ESC system back on
by pressing the ESC switch again.

1. Crankcase emission control 
system

The positive crankcase ventilation sys

-

tem is employed to prevent air pollution 
caused by blow-by gases being emitted 
from the crankcase. This system sup

-

plies fresh filtered air to the crankcase

Maintenance

68

8

Emission control system

through the air intake hose. Inside the 
crankcase, the fresh air mixes with blow-
by gases, which then pass through the 
PCV valve into the induction system.

2. Evaporative emission control 
(including ORVR: Onboard Refu

-

eling Vapor Recovery) system

The Evaporative Emission Control Sys

-

tem is designed to prevent fuel vapors 
from escaping into the atmosphere. (The 
ORVR system is designed to allow the 
vapors from the fuel tank to be loaded 
into a canister while refueling at the gas 
station, preventing the escape of fuel 
vapors into the atmosphere.)

Canister

Fuel vapors generated inside the fuel 
tank are absorbed and stored in the 
onboard canister. When the engine is 
running, the fuel vapors absorbed in the 
canister are drawn into the surge tank 
through the purge control solenoid valve.

Purge Control Solenoid Valve 
(PCSV)

The purge control solenoid valve is con

-

trolled by the Engine Control Module 
(ECM); when the engine coolant tem

-

perature is low during idling, the PCSV 
closes so that evaporated fuel is not 
taken into the engine. After the engine 
warms up during ordinary driving, the 
PCSV opens to introduce evaporated 
fuel to the engine.

3. Exhaust emission control sys

-

tem

The Exhaust Emission Control System
is a highly effective system which
controls

exhaust emissions while maintaining 
good vehicle performance.

Engine exhaust gas precautions 
(carbon monoxide)

• Carbon monoxide can be present with 

other exhaust fumes. Therefore, if you 
smell exhaust fumes of any kind
inside your vehicle, have it inspected 
and repaired immediately. If you ever 
suspect exhaust fumes are coming 
into your vehicle, drive it only with all 
the windows fully open. Have your 
vehicle checked and repaired immedi

-

ately.

W ARNING

Exhaust
Engine exhaust gases contain carbon 
monoxide (CO). Though colorless and 
odorless, it is dangerous and could be 
lethal if inhaled. Follow the instructions 
on this page to avoid CO poisoning.

• Do not operate the engine in confined

or closed areas (such as garages) any
more than what is necessary to move
the vehicle in or out of the area.

• When the vehicle is stopped in an 

open area for more than a short time 
with the engine running, adjust the 
ventilation system (as needed) to 
draw outside air into the vehicle.

• Never sit in a parked or stopped vehi

-

cle for any extended time with the 
engine running.

• When the engine stalls or fails to start, 

excessive attempts to restart the 
engine may cause damage to the 
emission control system.

69

8

8

Maintenance

Emission control system

Operating precautions for cata

-

lytic converters

W ARNING

Catalytic converter
Keep away from the catalytic converter
and exhaust system while the vehicle is
running or immediately thereafter. The
exhaust and catalytic systems are very
hot and may burn you.

W ARNING

Fire
• Do not park, idle or drive the vehicle 

over or near flammable objects, such 
as grass, vegetation, paper, leaves, 
etc. A hot exhaust system can ignite 
flammable items under your vehicle.

• Also, do not remove the heat sink 

around the exhaust system, do not 
seal the bottom of the vehicle or do not
coat the vehicle for corrosion con

-

trol. It

may present a fire risk under certain
conditions.

Your vehicle is equipped with a catalytic 
converter emission control device.

Therefore, the following precautions 
must be observed:
• Use only UNLEADED FUEL for

gaso

-

line engines.

• Do not operate the vehicle when there 

are signs of engine malfunction, such 
as misfire or a noticeable loss of per

-

formance.

• Do not misuse or abuse the engine. 

Examples of misuse are coasting with 
the ignition off and descending steep 
grades in gear with the ignition off.

• Do not operate the engine at high idle 

speed for extended periods (5 min

-

utes or more).

• Do not modify or tamper with any part

of the engine or emission control 
system. All inspections and adjust

-

ments must be made by an autho

-

rized Kia dealer.

• Avoid driving with an extremely low 

fuel level. Running out of fuel could 
cause the engine to misfire, damaging 
the catalytic converter.

Failure to observe these precautions 
could result in damage to the catalytic 
converter and to your vehicle. Addition

-

ally, such actions could void your war

-

ranties.

Maintenance

70

8

California perchlorate notice

California

perchlorate

notice

Perchlorate Material-special handling
may apply, See

https://dtsc.ca.gov/perchlorate
Notice to California Vehicle Dismantlers: 
Perchlorate containing materials, such
as air bag inflators, seatbelt pre-tension

-

ers and keyless remote entry batteries, 
must be disposed of according to Title
22 California Code of Regulations Sec

-

tion 67384.10 (a).

9

Specifications, Consumer information 

and Reporting safety defects

Dimensions ..................................................................................... 9-2

Engine

............................................................................................. 9-3

Bulb wattage ..................................................................................9-4

Tires and wheels ............................................................................9-5

Gross vehicle weight .....................................................................9-6

Luggage

volume ............................................................................ 9-7

Air conditioning system................................................................9-8

Recommended lubricants and capacities ..................................9-9

Recommended SAE viscosity number ......................................9-10

Vehicle identification number (VIN) ..........................................9-11

Vehicle certification label............................................................9-11
Tire specification and pressure label........................................ 9-12

Engine number............................................................................. 9-12

Air conditioner compressor label .............................................. 9-13

Refrigerant

label..........................................................................

9-13

Consumer Assistance (U.S. only)............................................... 9-14

Electrical Equipment (U.S. only) ................................................ 9-16

Reporting Safety Defects (U.S. only) ........................................ 9-17

Reporting Safety Defects............................................................................ 9-
17

Online factory authorized manuals (U.S. only) ....................... 9-17

Specifications, Consumer information
and Reporting safety defects

2

9

Dimensions

Specifications, Consumer information and Reporting safety 
defects

Dimensions

Item

Size: in (mm)

Overall length

165.2 (4,195)

Overall width

70.9 (1,800)

Overall height

Without Roof rack

205/60R16

63.0 (1,600)

215/55R17

63.5 (1,613)

235/45R18

63.6 (1,615)

With Roof rack

205/60R16

63.0 (1,600)

215/55R17

63.5 (1,613)

235/45R18

63.6 (1,615)

Tread

Front

(Gasoline) 2.0 MPI

205/60R16

62.0 (1,575)

215/55R17

61.5 (1,563)

235/45R18

61.4 (1,559)

Rear

205/60R16

62.4 (1,584)

215/55R17

61.9 (1,572)

235/45R18

61.7 (1,568)

Wheelbase

102.4 (2,600)

3

9

9

Specifications, Consumer information
and Reporting safety defects

Engine

Engine

Item

(Gasoline) 2.0 MPI

Displacement: cu in (cc)

121.9 (1999)

Bore x Stroke: in (mm)

3.18 x 3.81 (81 x 97.0)

Firing order

1-3-4-2

No. of cylinders

4, In-line

Specifications, Consumer information
and Reporting safety defects

4

9

Bulb wattage

Bulb wattage

*If equipped

Light Bulb

Wattage

Bulb type

Front

Type A

Headlamp (Low/High)

55/60

H19

Type B

Headlamp (Low/High)

LED

LED

Type A

Front turn signal lamps

28W

PY28/8W

Front position lamps

8W

PY28/8W

Daytime running lamps*

21W

P21W

Type B

Front turn signal lamps

LED

LED

Front position lamps

LED

LED

Side repeater lamps (Outside Mirror)*

5

WY5W

Rear

Bulb Type

Rear tail/stop lamps

8/28

2357

Rear tail lamps

5

W5W

LED Type

Rear stop lamps

LED

LED

Rear tail lamps

LED

LED

Rear turn signal lamps

27

1156NA

Back-up lamps

16

W16W

High mounted stop lamps

5 (LED*)

W5W (LED*)

License plate lamps

5

W5W

Interior

Map lamps

10 (LED*)

W10W (LED*)

Room lamps

10 (LED*)

FESTOO

N
(LED*)

Vanity mirror lamps

5

FESTOON

Luggage lamp

10

FESTOON

5

9

9

Specifications, Consumer information
and Reporting safety defects

Tires and wheels

Tires and wheels

CAUTION

When replacing tires, make sure they are
the same type, size, brand, construction
and tread pattern all four wheels.

Using tires of a different size can dam

-

age the related parts or make them work 
irregularly.

NOTICE

• It is permissible to add 3 psi (21 kPa) 

to the standard tire pressure specifi

-

cation if colder temperatures are 
expected soon.

Tires typically loose 1 psi (7 kPa) for 
every 12

°F (-11 °C) temperature drop. 

If extreme temperature variations are 
expected, recheck your tire pressure 
as necessary to keep them properly 
inflated.

• We recommend that when replacing 

tires, use the same originally supplied 
with the vehicles. If not, that affects 
driving performance.

• When driving in high altitude grades,

it is natural for the atmospheric pres

-

sure to decrease. Therefore, please

check the tire pressure and add more 
air when necessary.

Additionally required tire air pressure 
per km above sea level: 1.5 psi(10.5 
kPa)/km

Item

Tire size

Wheel

size

Load

Capacity

Speed

capacity

Inflation pressure [bar (psi, kPa)]

Wheel lug nut

torque

lbf·ft (kgf·m, N·m)

Normal load

*1

Maximum load

LI

*2

kg

SS

*3

km/h

Front

Rear

Front

Rear

Full size tire

205/

60R16

6.5J

×16 92 630

H

210

2.3

(33/230)

2.3

(33/230)

2.5

(36/260)

2.5

(36/260)

79~94

(11~13, 107~127)

215/

55R17

7.0JX17

94

670

V

240

235/

45R18

7.5J

×18 94 670

V

240

Compact
spare tire

T125/

80D16

4.0T

×16 97 730

M

130

4.2

(60, 420)

4.2

(60, 420)

4.2

(60, 420)

4.2

(60, 420)

*1. Normalload: Up to 3 persons

*2. Load Index

*3. Speed Symbol

Specifications, Consumer information
and Reporting safety defects

6

9

Gross vehicle weight

Gross vehicle weight

Item

(Gasoline) 2.0 MPI

Gross vehicle weight

IVT

lbs. (kg)

4,023 (1,825)

7

9

9

Specifications, Consumer information
and Reporting safety defects

Luggage volume

Luggage volume

MIN: Behind seat upright with out luggage under tray 

MAX: Behind seat folded with out luggage under tray

Item

(Gasoline) 2.0 MPI

Luggage volume (SAE)

Min: 24.2 cu ft (686 l)

MAX: 62 cu ft (1,758 l)

cu ft (l)

Specifications, Consumer information
and Reporting safety defects

8

9

Air conditioning system

Air conditioning system

Have your vehicle inspected by an authorized Kia dealer.

Items

Weight of Volume oz (g)

Classification

Refrigerant

15.87

±0.88 (450±25)

R-1234yf

Compressor lubricant

4.23

±0.35 (120±10)

PAG

9

9

9

Specifications,C o ns um e r information 
a n d Reporting safety defects

R e c o m m e n d e d lubricants a nd capacities

R e c o m m e n d e d lubricantsa n d capacities

To help achieve proper engine and powertrain performance and durability, use only 
lubricants of the proper quality.

The correct lubricants also help promote engine efficiency that results in improved 
fuel economy.

These lubricants and fluids are recommended for use in your vehicle.

Lubricant

Volume

Classification

Engine oil

*1

(drain and refill)

Recommends

4.23 US qt.

(4.0 l)

Full synthetic SAE 0W-20, API SN PLUS/SP or ILSAC GF-
6

Intelligent Variable Transmis

-

sion (IVT) fluid

7.1 US qt. (6.7 l)

MICHANG SP-CVT1, Kia Genuine ATF SP-CVT1

*2

Coolant

*3

5.8 US qt.

(5.5 l)

An Phosphate based ethylene glycol based coolant

Brake fluid

*4

As required

SAE J1703, FMVSS 116 DOT-3 or DOT-4

Fuel

14.27 US gal.

(54 l)

Gasoline

*1. Refer to "Recommended SAE viscosity number" on page 9-10.

*2. Use only specified genuine Continuously variable Transmission fluid. The use of non-specified fluid

(even marked as compatible with genuine) could result in shift quality deterioration and vibrations,
eventually, the transmission failure.

*3. Different type of coolant or water may damage the electrical component.

*4. To maintain your

vehicle’s best brake and ABS/ESC performance, use Kia genuine brake fluid or

those of an equivalent standard brake fluid as in the specification.

Specifications, Consumer information
and Reporting safety defects

10

9

Recommended SAE viscosity number

Recommended SAE viscosity number

CAUTION

Always be sure to clean the area around any filler plug, drain plug, or dipstick before 
checking or draining any lubricant. This is especially important in dusty or sandy areas
and when the vehicle is used on unpaved roads. Cleaning the plug and dipstick areas
will prevent dirt and grit from entering the engine and other mechanisms that could be
damaged.

Engine oil viscosity (thickness) has an effect on fuel economy and cold weather oper

-

ating (engine start and engine oil flowability). Lower viscosity engine oils can provide
better fuel economy and cold weather performance, however, higher viscosity engine
oils are required for satisfactory lubrication in hot weather.

Using oils of any viscosity other than those recommended could result in engine
damage.

When choosing an oil, consider the range of temperature your vehicle will be oper

-

ated in before the next oil change. Proceed to select the recommended oil viscosity
from the chart.

NOTICE

Never add any additives to the engine oil. Engine oil additives can change the proper

-

ties of engine oil and may cause serious engine failure.

An engine oil displaying this API Certification Mark conforms to the inter

-

national Lubricant Specification Advisory Committee (ILSAC). It is recom

-

mended to only use engine oils that uphold this API Certification Mark.

Temperature Range for SAE Viscosity Numbers

Temperature

°C

°F

Gasoline Engine
Oil

(Gasoline) 2.0
MPI

0W-20

11

9

9

Specifications, Consumer information
and Reporting safety defects

Vehicle identification number (VIN)

Vehicle identification number 
(VIN)

The vehicle identification number (VIN) 
is the number used in registering your 
vehicle and in all legal matters pertain

-

ing to its ownership, etc.

Frame number

The VIN is also on a plate attached to the 
top of the dashboard. The number on the
plate can easily be seen through the 
windshield from outside.

VIN label

Vehicle certification label

The vehicle certification label attached 
on the driver's side center pillar gives the 
vehicle identification number (VIN).

OSK3088008NR

OSK3088002NR

OSK3082003N

Specifications, Consumer information
and Reporting safety defects

12

9

Tire specification and pressure label

Tire specification and pressure
label

The tire label located on the driver's side
center pillar gives the tire pressures rec

-

ommended for your vehicle.

The tires supplied on your new vehicle
are chosen to provide the best perfor

-

mance for normal driving.

Engine number

The engine number is stamped on the 
engine block as shown in the drawing.

(Gasoline) 2.0 MPI

OSK3088003NR

OSK3088007NR

13

9

9

Specifications, Consumer information
and Reporting safety defects

Air conditioner compressor label

Air conditioner compressor 
label

A compressor label informs you the type 
of compressor your vehicle is equipped 
with such as model, supplier part num

-

ber, production number, refrigerant (1) 
and refrigerant oil (2).

Refrigerant label

The refrigerant label is located on the 
front body trim.

OSK3068047NR

OSK3082005N

Specifications, Consumer information
and Reporting safety defects

14

9

Consumer Assistance (U.S. only)

Consumer Assistance (U.S. 
only)

Roadside Assistance is provided on all 
new current model year Kia Vehicles 
from the date the vehicle is delivered to 
the first retail buyer or otherwise put into 
use (inservice date), whichever is earlier, 
for a period of 60 months or 60,000 
miles, whichever is earlier, subject to the 
terms, conditions and exclusions set forth
in the Kia Warranty and Consumer 
Information Manual applicable to your 
model year vehicle.

KMA reserves the right to limit or deny 
services or other benefits to any owner or
driver when, in KMA's judgment, the 
claims and/or service requests are 
excessive in frequency or type of occur

-

rence.

Toll free consumer assistance

from 5:00 AM to 6:00 PM PST, Monday
through Friday and is accessible by dial

-

ing 1-800-333-4Kia (4542).

For more information regarding assis

-

tance available, please refer to your Kia 
Warranty & Consumer Information Man

-

ual.

Emergency roadside assistance

hours a day, 365 days a year and is 
accessible by dialing 1-800-333-4Kia 
(4542).

Please note that you must provide your 
Vehicle Identification Number (VIN) to 
verify coverage at the time of your call. 
The VIN can be found on the dash of 
your vehicle on the driver's side, on the 
door jamb of the driver's door, your vehi

-

cle's registration or proof of insurance 
card.

Kia utilizes a network of over 30,000 
roadside assistance providers. Should 
you accidentally run out of fuel, require
a battery jump, or need help changing a
tire, a Kia Roadside Assistance Repre

-

sentative will dispatch someone to
deliver a small quantity of gas, change a
flat tire with your inflated spare, or 
arrange a battery jump to allow you to 
proceed to your destination. We have 
access to a network of over 10,000 lock

-

smiths to help you should you become 
locked out of your Kia.

In the event that mechanical difficulty 
renders your vehicle undriveable due to 
a warranty-related concern, Kia's Road

-

side Assistance Representative will 
arrange to transport your vehicle to the 
nearest Kia dealer or to an authorized 
Kia alternative service location.

Your vehicle must be accessible to our 
dispatch transport vehicle, as deter

-

mined by our driver, to receive this ser

-

vice.

NOTICE

Roadside Assistance benefits are not 
available for any Kia vehicle that has 
ever been or should have been issued a
"salvage" title or similar "branded" title 
under any state's law, or has been 
declared a "total loss" or equivalent by a
financial institution or insurance com

-

pany.

Trip interruption

Trip interruption expense benefits are 
provided in the event that a warranty-
related disablement occurs more than 
150 miles from your home, and the 
repairs require more than 24 hours to 
complete. Reasonable reimbursement is 
included for meals, lodging, or rental

15

9

9

Specifications, Consumer information
and Reporting safety defects

Consumer Assistance (U.S. only)

vehicle expenses. Trip interruption cov

-

erage is limited to $100 per day subject 
to a three day maximum limit per inci

-

dent. You must contact the Kia Roadside 
Assistance Center to obtain pre-authori

-

zation of expenses. Once the Kia Road

-

side Assistance Center gives 
authorization for trip interruption bene

-

fits, they will assist you in making the 
necessary arrangements. Insurance 
deductibles, expenses, and claims paid 
by your insurance company or other 
providers are not eligible for reimburse

-

ment.

Fleet vehicles are excluded from reim

-

bursement under Kia's Trip Interruption 
Policy.

Registering your vehicle in a for

-

eign country

If you plan to register your vehicle in a
foreign country, you should confirm that it
conforms to the regulations in that 
country. Even if you successfully register 
the vehicle in a foreign country, you may 
experience the following problems and 
should therefore consider the possibility 
of having to deal with them:

1. The fuel specified for your vehicle 

may be unavailable. If other than the 
specified fuel is used, it could cause 
damage to the engine, the fuel injec

-

tion system, and other fuel-related 
parts which may not be covered 
under your New Vehicle Emissions 
Limited Warranty.

2. We must, therefore, clearly state that 

when you leave the country in which 
you purchased your Kia new and reg

-

ister it in another country, problems 
arising from the use of fuel other than 
the specified fuel are not subject to 
manufacturer's warranty. Because

vehicles like yours may not be mar

-

keted in the new country of registra

-

tion, parts, servicing techniques and 
tools necessary to maintain and repair 
your vehicle may be unavailable.

Even if vehicles like yours are sold 
there, mechanical specifications 
required by the government may vary 
enough from the country of purchase 
to cause additional problems.

3. There may not be an Authorized Kia 

Dealer in the area in which you plan to 
register your vehicle. You may addi

-

tionally experience difficulty in obtain

-

ing services in a foreign country for 
any number of reasons.

Further, we cannot assume any respon

-

sibility for problems that result from 
unsatisfactory service or lack of service 
outside of the United States.

Specifications, Consumer information
and Reporting safety defects

16

9

Electrical Equipment (U.S. only)

Electrical Equipment (U.S. 
only)

The electrical system of your vehicle is
designed to perform under all reason

-

ably expected operating conditions.

However, before any additional electrical 
equipment is installed in your vehicle, 
consult an Authorized Kia Dealer, in 
order to ensure that you do not void your
warranty.

Certain electrical equipment, or the way 
in which it is installed, may adversely 
affect the operation of your vehicle, 
including such systems as the engine 
control system, the audio system and the
electrical charging system and thus 
potentially void all or part of your war

-

ranty.

We assume no responsibility for any 
expense you may incur or for any mal

-

function of your vehicle or any of its 
components or systems that may result 
from the installation of additional electri

-

cal equipment that is not supplied, or 
recommended for installation by, Kia.

Installation of a mobile two-way
radio system

If a mobile two-way radio system is 
installed improperly, or if an excessively 
powerful type of system is used, other 
electronic systems may be adversely 
affected. To avoid damage to your vehi

-

cle, consult an Authorized Kia Dealer 
concerning the proper equipment and 
installation.

Kia vehicles are designed and manufac

-

tured to meet or exceed all applicable 
safety standards.

For your safety, however, we strongly 
urge you to read and follow all directions 
in this Owner's Manual, particularly the

information under the headings 
"NOTICE", "CAUTION" and
"WARNING".

If, after reading this manual, you have 
any questions regarding the operation of
your vehicle, safety issues and defects 
please contact your Kia's toll-free Con

-

sumer Assistance hot line as below:

National Consumer Affairs Manager 

Kia America, Inc.

P.O. Box 52410

Irvine, CA 92619-2410

1-800-333-4Kia (4542)

17

9

9

Specifications, Consumer information
and Reporting safety defects

Reporting Safety Defects (U.S. only)

Reporting Safety Defects (U.S. 
only)

Reporting Safety Defects.

If you believe that your vehicle has a
defect which could cause a crash or 
could cause injury or death, you should 
immediately inform the National High

-

way Traffic Safety Administration 
(NHTSA) in addition to notifying Kia 
America, Inc..

If NHTSA receives similar complaints, it 
may open an investigation, and if it finds 
that a safety defect exists in a group of 
vehicles, it may order a recall and rem

-

edy campaign. However, NHTSA cannot 
become involved in individual problems 
between you, your dealer, or Kia Amer

-

ica, Inc..

To contact NHTSA, you may call the 
Vehicle Safety Hotline toll-free at 1-888-
327-4236 (TTY: 1-800-424-9153); go to
http://www.safercar.gov; download the 
SaferCar mobile application; or write to: 
Administrator, NHTSA, 1200 New Jersey
Ave. SE., Washington, DC 20590. You 
can also obtain other information about 
motor vehicle safety from http:// 
www.safercar.gov.

Online factory authorized 
manuals (U.S. only)

The following publications are available 
on www.KiaTechinfo.com.

Service manual

This manual covers maintenance and 
recommended procedures for repair to 
engine and chassis components. It is 
written for the Journeyman mechanic, 
but is simple enough for most mechani

-

cally inclined owners to understand.

Electrical troubleshooting manual

This manual complements the Service 
Manual by providing indepth trouble

-

shooting information for each electrical 
circuit in your vehicle.

Owner's manual

This manual describes the overall fea

-

tures and operating procedures for the 
vehicle.

Abbreviation

2

A

Abbreviation

ABS

Anti-lock Brake System

AGM

Absorbent Glass Mat

AKI

Anti Knock Index

BCW

Blind-Spot Collision Warning

CRS

Child Restraint System

DAW

Driver Attention Warning

DRL

Daytime Running Light

DTC

Diagnostic Trouble Code

EBD

Electronic Brake force Distribution

ECM

Electric Chromic Mirror

EDR

Event Data Recorder

EFD

Emergency Fastening Device

EPA

Environmental Protection Agency

EPS

Electronic Power Steering

ESC

Electronic Stability Control

FCA

Forward Collision-Avoidance Assist

FCC

Federal Communications Commission

FMVSS

Federal Motor Vehicle Safety Stan

-

dards

FRT

Front

GAW

Gross Axle Weight

GAW R

Gross Axle Weight Rating

GVW

Gross Vehicle Weight

GVW R

Gross Vehicle Weight Rating

HAC

Hill-start Assist Control

HBA

High Beam Assist

HMSL

High Mounted Stop Lamp

HUD

Head-Up Display

ILSAC

International Lubricant Specification 

Advisory Committee

IPS

Intelligent Power Switch

3

A

Abbreviation

ISG

Idle Stop and Go

IVT

Intelligent Variable Transmission

KMA

Kia Motors America

LATCH

Lower Anchors and Tether for CHil

-

dren

LDW

Lane Departure Warning

LH

Left Hand

LI

Load Index

LKA

Lane Keeping Assist

LT

Light Truck

MDPS

Motor Driven Power Steering

MIL

Malfunction Indicator Lamp

MMT

Manganese, Mn

NHTSA

National Highway Traffic Safety 

Administration

ODS

Occupant Detection System

ORVR

Onboard Refueling Vapor Recovery

PCB

Printed Circuit Board

PCM

Power train Control Module

PCSV

Purge Control Solenoid Valve

PCV

Positive Crankcase Ventilation

RCCA

Rear Cross-Traffic Collision-Avoid

-

ance Assist

RCCW

Rear Cross-Traffic Collision Warning

RH

Right Hand

RR

Rear

SCC

Smart Cruise Control

SRS

Supplemental Restraint System

SRSCM

SRS Control Module

SS

Speed Symbol

TBT

Turn By Turn

TCM

Transmission Control Module

TCS


Content      ..     13      14      15