Lotus Exige. Manual - part 3
 

  Index      Lotus     Lotus Exige - service repair manual 2000 year


Search            


Content   ..  1  2  3  4  ..


Lotus Exige. Manual - part 3


Page 9


Lotus Service Notes   


       Exige S/C

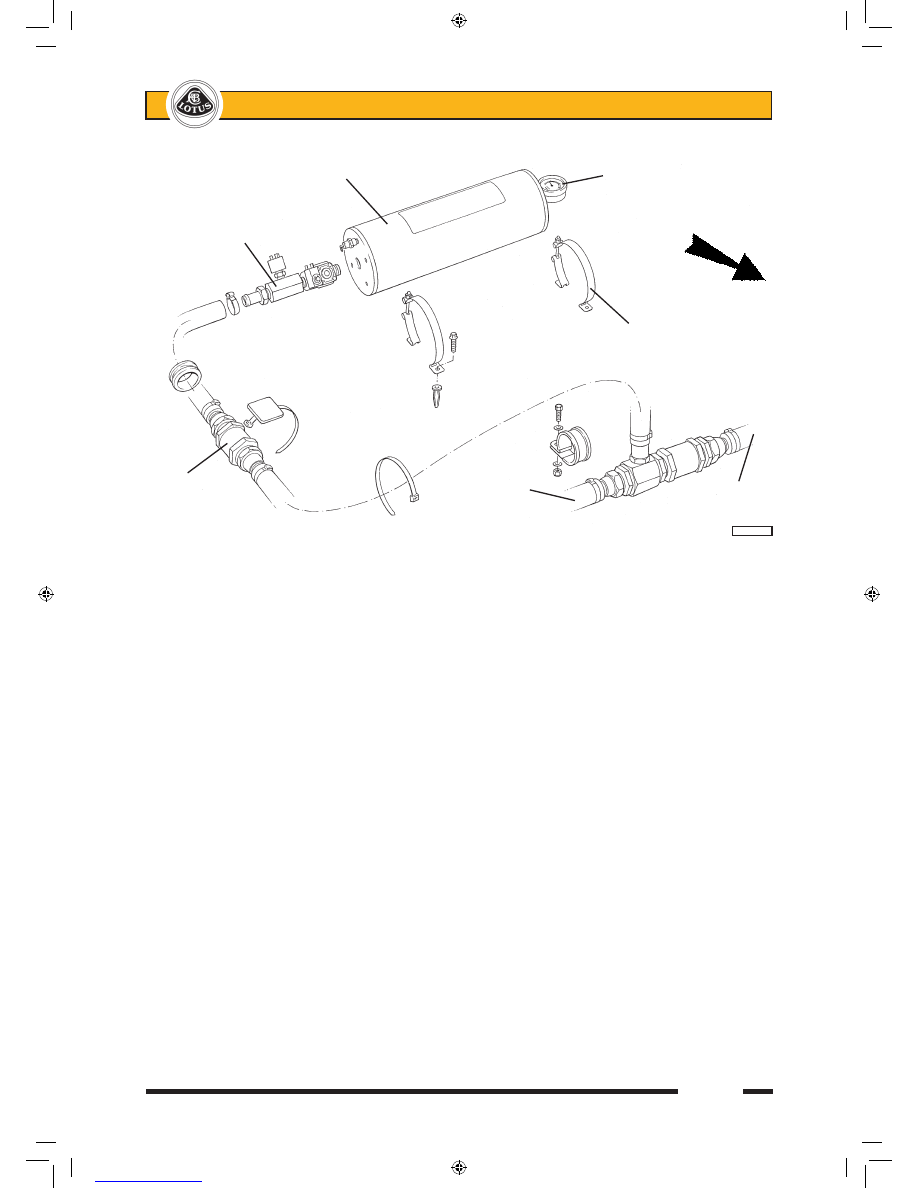
Before checking the oil level, the Accusump pre-charge pressure should first be checked; turn on the 

ignition to open the EPC valve and allow the stored oil to be discharged from the Accusump.  The pressure 

gauge reading will drop during this discharge, but should then register 7 - 15 psi representing the pre-charge.  

If necessary, adjust the air pressure using tyre inflator equipment on the Schraeder valve adjacent to the gauge 

and set to 15 psi.

The oil level should now be above the top mark on the dipstick.  To check for correct oil level, the engine 

should be started to charge the Accusump, and run to normal operating temperature until the Accusump pres-

sure gauge registers 40 psi.  If the engine is already hot, idle oil pressure may not be sufficient to open the 

Accusump valve, and the pressure gauge will continue to show 15 psi pre-charge.  Increase engine rpm to 

open the valve.  With the gauge showing 40 psi, turn off the engine.  The EPC valve will then close and trap the 

normal hot idle quantity of oil in the Accusump cylinder.  After a suitable oil drainback pause, the sump oil level 

may then be inspected on the disptick, and the level corrected to the top mark.  It is important to maintain oil at 

this level to accommodate the oil transfer into the Accusump at pressures greater than 40 psi.  Be aware that 

checking the oil level under any conditions other than 15 psi pre-charge and 40 psi oil pressure will produce 

inconsistent results.

Oil Changing

Before draining the sump, the ignition should first be switched on to open the EPC valve and allow the 

Accusump to discharge the stored oil into the sump.  Check that a pressure of 7 - 15 psi remains in the Ac-

cusump at the end of this process, and if necessary top up the pressure using tyre inflating equipment on the 

Schraeder valve next to the gauge and set to 15 psi.

The oil can then be drained in the usual way, with the quantity contained in the oil cooler lines disregarded 

for the purposes of routine maintenance.  If an engine failure has occurred, with possible debris contamination 

of oil hoses and coolers, it is recommended to replace both oil coolers, and to replace or thoroughly flush the 

feed and return hoses.  At each service interval the in-line filter gauze in the hose between the Accusump and 

'T'- piece, and located in the RH rear wheelarch, should be renewed. 

After renewing and pre-filling the engine oil filter, refill the sump to about 10mm above the top mark on the 

dipstick.  Start the engine and allow to idle.  Do NOT rev the engine or drive the car.  The Accusump will take 

up to 2 litres of oil from the sump to store within the cylinder.  Continue to idle the engine until the Accusump 

pressure gauge drops to 40 psi (as the oil warms) and then switch off the engine.  Top up the oil to the top 

mark on the dipstick.

        Accusump reservoir                             Air pressure gauge

    EPC valve

    assembly                                                    FRONT

                                                    Mounting clamp to 

                                                    boot floor

In-line 

filter                                To LH port                    From oil 

                                  on sandwich                  cooler

                                  plate


                pl4015cLR

sn_Exige Supercharged supplement.indd   9

03/03/2006   11:32:38


Lotus Service Notes   


       Exige S/C

Page 10

Supercharger Remove/Refit

To remove:

1.  Remove the chargecooler together with inlet and outlet 'U' shaped ducts.

2.  Remove the throttle body and vacuum/breather hose plumbing.  

3.  Using a 6-point socket, relieve auxiliary belt tension and remove the auxiliary belt.  Remove the alternator 

top mounting bolt, slacken the lower, and swing down the alternator.  Release the dipstick tube from the 

supercharger.

4.  Using a strap wrench, remove the supercharger pulley retaining nut, and slide off the pulley.

5.  Remove the support strut between the throttle body adaptor and the clutch slave cylinder.  Slacken the 

pinch bolt securing the supercharger to the nose bracket.  Remove the two bolts supporting the super-

charger to the inlet manifold and withdraw the supercharger.

To refit:

1.  With the supercharger nose bracket bolted to the engine mounting plinth, fit the upper fixing on the alter-

nator to the nose bracket outer end (with 13.5mm spacer).  This defines the position of the nose bracket.  

Tighten bracket to engine mounting plinth to 50 Nm.  Remove alternator top bolt and swing down to allow 

supercharger to be fitted.

2.  Prepare supercharger:  Clean mating faces of supercharger and outlet adaptor using Betaclean 3900.  Fit 

'O' ring into groove in outlet adaptor and fit to supercharger using 6 off M8 x 25 setscrews with Permabond 

A130.  On the fixing located inside the adaptor, Permabond should be applied over the entire thread length.  

Orientate the adaptor with the outlet pointing towards the rear of the car when fitted.  Torque tighten all 

fixings to 25 Nm. 


Clean mating faces of outlet adaptor and outlet elbow using Betaclean 3900.  Fit 'O' ring into groove in 

outlet adaptor face.  Fit outlet elbow to point to LH side of car using 4 off M8 x 25 setscrews with a pipe 

clip bracket secured by both rearmost fixings.  Tighten to 25 Nm.  

3.  Fit M8 stud B111E6081S into RH top (as viewed on face) fixing position in supercharger inlet flange.  Clean 

mating face on supercharger and inlet adaptor using Betaclean 3900.  Fit 'O' ring into groove in adaptor 

face and fit adaptor to supercharger using 2 off M8 x 30 flange head bolts in top positions and M8 flange 

nut on stud - all 25 Nm.  Disregard 4th position at this stage.

4.  Mount supercharger:  With the pulley removed from the supercharger, slide the nose into the nose bracket 

until hard against the machined step.  Support to the inlet manifold sliding bushes using M10 x 50 flange 

head bolts and Permabond A130, but do not tighten.  Tighten the nose bracket socket head pinch bolt to 

25 Nm.

5.  Loosley fit the supercharger support strut between the inlet adaptor (M8 x 55 bolt with A130) and the clutch 

slave cylinder fixings (M8 x 25 with A130).  Tighten the three support strut bolts to 25 Nm.  Carefully tighten 

the two M10 x 50 flange head bolts to pull in the two spacers evenly to clamp against the supercharger.

6.  Refit the alternator upper bolt and spacer and tighten to 25 Nm.  Tighten the lower bolt to 25 Nm.

7.  Fit the pulley to the supercharger with the longer boss towards the 'charger.  Fit the nut onto the shaft, and 

use a strap wrench to hold the pulley whilst the nut is tightened to 61 Nm.

sn_Exige Supercharged supplement.indd   10

03/03/2006   11:32:38

Page 11


Lotus Service Notes   


       Exige S/C

8.  Use a 6-point socket on the tensioner arm to allow fitment of the multirib accessory drive belt around the 

pulleys as shown, ensuring that the belt is correctly seated in all the ribbed pulleys.

9.  Refit other components in reverse order to removal.

Note areas of change compared with standard models;

Engine dipstick tube altered to avoid supercharger.

Crankcase breather pipe altered to avoid supercharger.

Relays on engine bulkhead move to avoid supercharger by-pass capsule

Charcoal canister moved from bulkhead to bracket on top of chassis right hand rear upright member to 

avoid alternator.

EXIGE S/C.G - WHEELS & TYRES

240R cars use lightweight forged alloy 5-spoke roadwheels at 7x16 and 8x17 are ½ inch wider, front and 

rear, than standard Exige wheels, but retain the standard insets of + 31.3 mm and + 38.0 mm.  The wheels 

are finished in either Satin Black or High Power Silver dependent on body colour (see above).  'Lotus Sport' is 

moulded into one of the spokes of each wheel.  Cup and Exige S models use standard Exige wheels finished 

in hi-power silver.

The Lotus specific, regular Exige Yokohama A048 tyres, identified by 'LTS', are fitted as standard.

EXIGE S/C.J - BRAKES

For 240R and Cup models, the braking system is uprated in the following respects:

Motorsport brake pads are fitted front and rear;

Steel braided brake hoses fitted all round;

Front and rear brake callipers are finished in 'Sport Yellow';

Hydraulic system filled with Castrol 'SRF' synthetic racing brake fluid.  Over 500°F boiling point.  Dot 4.

EXIGE S/C.K - COOLING

Twin front mounted oil/air coolers (std. Exige hot climate spec.) are fitted to all supercharged Exige mod-

els.  An engine intake air chargecooler radiator is rubber mounted to the engine, with cooling airflow collected 

by the roof duct and directed via the tailgate panel and flexible bellows to the radiator, after which the hot air 

exhausts through the tailgate louvres.

                                    Water pump

Slave pulley


                                                    Supercharger


        Belt tensioner                                        Alternator

      Crankshaft pulley

                                                      A.C. compressor


e232

sn_Exige Supercharged supplement.indd   11

03/03/2006   11:32:38


Lotus Service Notes   


       Exige S/C

Page 12

EXIGE S/C.O - MAINTENANCE & LUBRICATION

A Maintenance Schedule for supercharged cars is available under part number LSL460b.

Recommended lubricants are unchanged apart from:

240R & Cup cars: Brake Fluid; Castrol SRF

Fuel; Unleaded 98 RON

Spark plugs are part number ALS3E6015F (NGK PFR7G) with 0.8mm (- 0.1, + 0) gap.

EXIGE S/C.Q - CLUTCH

240R and Cup cars use an uprated clutch cover assembly and a competition specification sintered metal fric-

tion plate.  No routine maintenance is required other than annual renewal of the Castrol SRF hydraulic fluid.

EXIGE S/C.Z - MISCELLANEOUS

Supercharged models also differ from standard Exige in the following respects:

Engine dipstick tube altered to avoid supercharger.

Relays on engine bulkhead moved to avoid supercharger by-pass capsule.

Charcoal canister moved from bulkhead to bracket on top of chassis right hand rear upright member.

sn_Exige Supercharged supplement.indd   12

03/03/2006   11:32:38


Content   ..  1  2  3  4  ..