Seat Mii. Service Manual - part 13


  Index      Seat     Seat Mii. Service Manual


Search            copyright infringement  


Content      ..     11      12      13      14     ..


Seat Mii. Service Manual - part 13


-------------------------------------------------------------------------------------------------------------------------------------------------------------
Checking and refilling levels

Several warning and control lamps light up
for a few seconds when the ignition is switch-
ed on, signalling that the function is being
verified. They will switch off after a few sec-
onds.

WARNING

Observe the safety warnings 

››› 

 in On the

instrument panel on page 26

.

Checking the electrolyte level of the
vehicle battery

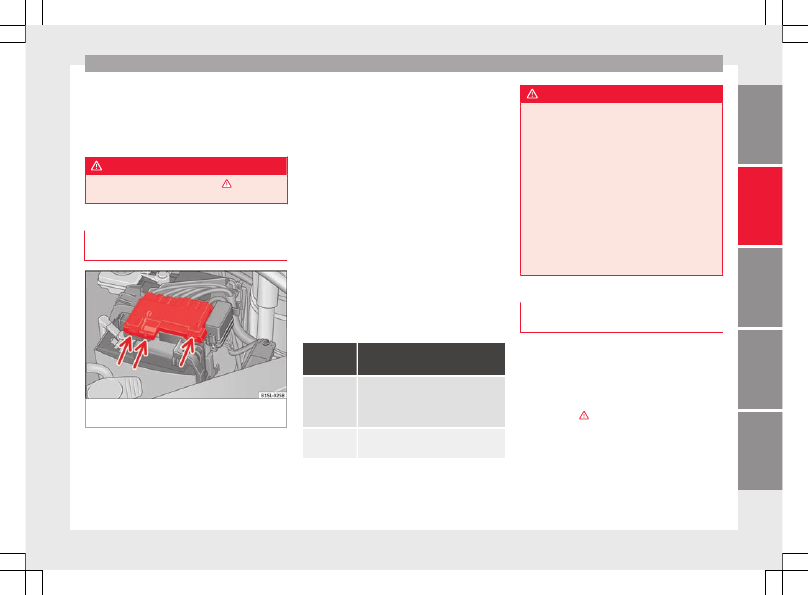
Fig. 172 

In the engine compartment: Remove

the cover from the vehicle's battery.

The battery's electrolyte level should be
checked regularly in high-mileage vehicles,
in hot countries and in older batteries. Other
batteries do not require maintenance.

Vehicles fitted with the Start-Stop system are
equipped with special batteries. For technical

reasons, the electrolyte level cannot be
checked in these batteries.

Preparations

Prepare the vehicle for work in the engine

compartment 

››› 

page 186

Open the bonnet 


››› 

page 186

.

Press on the tabs 

››› 

Fig. 172

 (arrows) in the

direction of the arrows and lift the battery
cover up.

Checking the battery electrolyte level

Make sure there is sufficient lighting to

clearly recognise the colours. Never use
flames or shiny objects as a light source.

Depending on the level of acid, the Magic

eye on the top of the battery will change col-
our.

Colour in-
dicator

Necessary operations

Light yellow
or colourless

The electrolyte level of the vehicle's bat-
tery is too low. Have the battery checked
and, where applicable, replaced by a
specialised workshop.

Black

The electrolyte level of the vehicle's bat-
tery is correct.

WARNING

Working with the vehicle battery involves a
risk of corrosion, explosions and electric
shock.

Never tilt the vehicle battery. Battery acid

could spill out of the openings for the release
of gases and cause corrosion damage.

Never open the vehicle battery.

If battery acid splashes on you, immediate-

ly rinse your eyes and skin abundantly with
water for several minutes. Then seek medical
care immediately.

If acid is swallowed by mistake, consult a

doctor immediately.

Charging, replacing and connecting or
disconnecting the battery

Charging the battery
The vehicle battery should be charged by a
specialised workshop only, as batteries us-
ing special technology have been installed
and they must be charged in a controlled en-
vironment 

››› 

SEAT recommends taking

your car in for technical service.

Replacing a vehicle battery
The battery has been developed to suit the
conditions of its location and has special

»

197

Tec

hnic

al

 d

at

a

Adv

ic

e

Oper

ation

Emer

genc

ie

s

Saf

ety

-------------------------------------------------------------------------------------------------------------------------------------------------------------

-------------------------------------------------------------------------------------------------------------------------------------------------------------

Advice

safety features. If the battery must be re-
placed, consult a technical service for infor-
mation on electromagnetic compatibility, the
size and maintenance, performance and
safety requirements of the new battery in
your vehicle before you purchase one. SEAT
recommends you have the battery replaced
by a technical service.

Use only maintenance-free genuine batteries
conforming to TL 825 06 and VW 7 50 73
Standards. These standards must be dated
April 2008 or later.

Vehicles fitted with the Start-Stop system are
equipped with a special battery. Therefore,
this battery must only be replaced by another
with the same specifications.

Disconnecting the vehicle's battery
If you must disconnect the battery from the
electrical system, please note the following:

Switch off the ignition and all electrical

equipment.

The vehicle must be unlocked before dis-

connecting the battery, otherwise the alarm
will be triggered.

First disconnect the negative cable and

then the positive 

››› 

.

Connecting the vehicle's battery

Before reconnecting the battery, switch off

the engine and all electrical devices.

First reconnect the positive cable and then

the negative 

››› 

.

Different control lamps may light up after
connecting the battery and switching the ig-
nition on. They will be turned off after a short
trip at a speed of between 15-20 km/h
(10-12 mph). If the warning indicators remain
lit, please visit a specialised workshop to
have the vehicle checked.

If the battery has been disconnected for a
long time, it is possible that the next service
date is not displayed or calculated correctly

››› 

page 88

. Respect the maximum service in-

tervals permitted 

››› 

Booklet Maintenance

Programme

.

Automatic device disconnection
The intelligent vehicle electrical system auto-
matically implements a range of measures to
prevent the battery from discharging when
high demands are made on it:

The idling speed is increased so that the al-

ternator provides more electricity.

Where necessary, the power to the most

powerful devices is reduced or even com-
pletely disconnected.

On starting the engine, the power supply

from the 12-volt power sockets and the ciga-
rette lighter may be interrupted for a short
time.

The on-board management program cannot
always prevent the battery from running flat.
For example, if the ignition is left on for a
long period with the engine off or if the side
lights or parking lights are left on while the
vehicle is stationary.

Why the battery runs flat:

When stationary for a long time without

starting the engine, particularly if the ignition
is switched on.

Use of electrical devices with the engine

switched off.

WARNING

Incorrectly securing the battery or using the
wrong battery can cause short-circuits, fire
and serious injuries.

Always use only maintenance-free batter-

ies, protected to prevent a leak, and whose
properties, specifications and size corre-
spond to the standard battery.

WARNING

A highly explosive mixture of gases is re-
leased when the battery is under charge.

The batteries should be charged in a well-

ventilated room only.

Never charge a frozen or recently thawed

battery. A flat battery can also freeze at tem-
peratures close to 0 °C (+32 °F).

Always replace a battery which has frozen.

198

-------------------------------------------------------------------------------------------------------------------------------------------------------------

-------------------------------------------------------------------------------------------------------------------------------------------------------------

Wheels and tyres

Battery cables not correctly connected may

cause a short circuit. Reconnect first the posi-
tive cable and then the negative cable.

CAUTION

Never disconnect the battery if the ignition

is switched on or if the engine is running.
This could damage the electrical system or
electronic components.

Never plug accessories that supply current,

such as solar panels or a battery charger, to
the 12-volt power socket or the cigarette
lighter. This could damage the vehicle's elec-
trical system.

For the sake of the environment

Dispose of the battery in an environment-
friendly manner. Batteries contain toxic sub-
stances such as sulphuric acid and lead.

For the sake of the environment

Battery acid can contaminate the environ-
ment. Collect any spilt service fluids and dis-
pose of them correctly.

Wheels and tyres

Tyres

Introduction

SEAT recommend that all work on tyres and
wheels is carried out by a specialised work-
shop. These workshops have the necessary
special tools and replacement parts, trained
personnel and facilities for disposing of the
old tyres while respecting the environment.
SEAT recommends taking your car in for tech-
nical service.

WARNING

The vehicle cannot be totally controlled or
braked if the tyres (new or used) are worn or
damaged.

Incorrect use of wheels and tyres could

make driving more dangerous and result in
serious accidents and damage.

All four wheels must be fitted with radial

tyres of the same type, size (rolling circumfer-
ence) and the same tread pattern.

New tyres do not give maximum grip and

will not have reached their maximum braking
capacity to start with, and therefore need
running in. To prevent accidents and major
damage, extreme caution should be taken for
the first 600 km.

Check tyre pressures regularly and ensure

they are maintained at the pressures indica-
ted. If the tyre pressure is too low, they could
overheat, resulting in tread detachment or
even burst tyres.

Never drive on damaged (punctured, cut,

cracked or dented) or worn tyres. Driving on
damaged or worn tyres could result in burst
tyres, serious accidents or damage. Worn or
damaged tyres must be replaced immediate-
ly.

Never exceed the maximum permitted

speed or loads specified for the type of tyre
fitted on your vehicle.

The effectiveness of driver and brake assist

systems also depends on the grip of the
tyres.

If you notice unusual vibration or if the ve-

hicle pulls to one side when driving, stop the
car immediately and check the tyres and
wheels for damage.

To minimise the risk of losing control of the

vehicle or causing a serious accident, never
undo the bolted joints of beadlock wheels.

Never mount used tyres or wheels if you are

not sure of their previous history. They may
be damaged, although the damage is not im-
mediately visible.

Old tyres, even if they have never been

used, may lose air or burst unexpectedly
while driving, especially at high speeds, re-
sulting in serious accident and injury. If tyres
are over six years old, they should only be

»

199

Tec

hnic

al

 d

at

a

Adv

ic

e

Oper

ation

Emer

genc

ie

s

Saf

ety

-------------------------------------------------------------------------------------------------------------------------------------------------------------

-------------------------------------------------------------------------------------------------------------------------------------------------------------

Advice

used in an emergency and with extreme cau-
tion.

Note

For technical reasons, it is not generally pos-
sible to use the wheels from other vehicles.
In some cases, this may also be true for the
same model of wheel. Please refer to the ve-
hicle documentation or ask at a technical
service.

Handling tyres and wheels

Fig. 173 

Diagram for changing wheels

The tyres of a vehicle are the components
which are subjected to most stress and are
the most underestimated. Tyres are very im-
portant, as the support offered by their nar-
row surface is the only point of contact be-
tween the vehicle and the road.

The service life of tyres is dependent on tyre
pressure, driving style, the care they receive
and the correct fitting.

The tyres and wheel rims are an essential
part of the vehicle's design. The tyres and
rims approved by SEAT are specially matched
to the characteristics of the vehicle and our
critical to good road holding and safe han-
dling.

Avoiding damage to tyres and wheels

If you have to drive over a kerb or similar

obstacle, drive very slowly and as near as
possible at a right angle to the kerb.

Inspect the tyres regularly for damage

(punctures, cuts, cracks, dents).

Remove any foreign bodies found on the

outside of the tyre tread and ensure that 

they

have not passed through the wall of the tyre

››› 

page 204

.

In addition, the instructions for tyre control

systems should always be observed.

Replace damaged or worn tyres as soon as

possible 

››› 

page 204

.

Regularly check tyres for non-visible dam-

age 

››› 

page 204

.

Never exceed the maximum permitted

speed or loads specified for the type of tyre
fitted on your vehicle 

››› 

page 207

.

Do not allow tyres (including the spare

wheel) to come into contact with aggressive

substances, grease, oil, fuel or brake fluid

››› 

.

Lost valve caps should be replaced imme-

diately.

Tyres with directional tread pattern
Tyres with directional tread pattern have
been designed to operate best when rotating
in only one direction. An arrow on the tyre
sidewall indicates the direction of rotation on
tyres with directional tread 

››› 

page 207

. Al-

ways observe the direction of rotation indica-
ted when mounting the wheel. This guaran-
tees optimum grip and helps to avoid aqua-
planing, excessive noise and wear.

If the tyre is mounted in the opposite direc-
tion of rotation, drive with extreme caution,
as the tyre is no longer being used correctly.
This is of particular importance when the
road surface is wet. Change the tyre as soon
as possible or remount it with the correct di-
rection of rotation.

Interchanging tyres
To ensure that the wear is equal on all tyres
the wheels should be changed round from
time to time according to the system

››› 

Fig. 173

. The useful life of all the tyres will

then be about the same time.

SEAT recommends you take the vehicle to a
specialised workshop to have the tyres
changed.

200

-------------------------------------------------------------------------------------------------------------------------------------------------------------

-------------------------------------------------------------------------------------------------------------------------------------------------------------

Wheels and tyres

Tyres over 6 years old
Tyres are subject to an ageing process as a
result of physical and chemical processes.
This may affect their performance. Tyres
which are stored for long periods of time
without being used, harden and become
more fragile than tyres which are in constant
use.

SEAT recommends that tyres over six years
old are replaced with new tyres. This also ap-
plies to tyres (including the spare wheel)
which appear to be in perfect condition on
the outside and which have a tread depth
within the values stipulated by the Law 

››› 

.

The date of manufacture, part of the tyre
identification number (TIN), indicates the age
of the tyre () 

››› 

page 207

.

Storing tyres
Mark tyres when you remove them to indicate
the direction of rotation (left, right, forwards,
backwards). This ensures you will be able to
mount them correctly when you replace
them. When removed, the wheels and/or
tyres should be stored in a cool, dry and pref-
erably dark location. Do 

not place tyres

mounted on the wheel in a vertical position.

Protect tyres not mounted on wheels from
dirt by storing them in suitable bags and
standing them on the ground on their tread.

WARNING

Aggressive fluids or substances could result
in visible or invisible damage with the conse-
quent risks.

Always ensure that tyres do not come into

contact with chemical products, oil, grease,
fuel, brake fluid or other aggressive substan-
ces.

WARNING

Old tyres, even if they have never been used,
may lose air or burst unexpectedly while driv-
ing, resulting in serious accident or damage.

If tyres are over six years old, they should

only be used in an emergency and with ex-
treme caution.

For the sake of the environment

Old tyres must be disposed of by qualified
personnel according to the laws in the coun-
try concerned.

Wheels

The design of wheel bolts is matched to the
rims. If different rims are fitted, the correct
wheel bolts with the right length and correct-
ly shaped bolt heads must be used. This en-
sures that wheels are fitted securely and that
the brake system functions correctly

››› 

page 72

.

For technical reasons, it is not generally pos-
sible to use the wheels from other vehicles.
In some cases, this may also be true for the
same model of wheel.

The tyres and rims approved by SEAT are spe-
cially matched to the characteristics of the
vehicle and are critical to good road holding
and safe handling.

Wheel bolts
Wheel bolts must be tightened to the correct
torque 

››› 

page 72

.

Beadlock wheel rims
Beadlock wheel rims have various compo-
nents. These are joined together by special
bolts using a special procedure. This ensures
good performance, a better seal, improved
safety and wheel run out. Therefore, worn
rims should always be replaced and must on-
ly be repaired in a specialised workshop.
SEAT recommends visiting a technical service

››› 

.

Wheel rims with bolted trims
Wheel rims may be fitted with interchangea-
ble trim parts which are attached to the rim
using self-locking bolts. Worn trims should
only be replaced at a specialised workshop.
SEAT recommends visiting a technical service

››› 

.

»

201

Tec

hnic

al

 d

at

a

Adv

ic

e

Oper

ation

Emer

genc

ie

s

Saf

ety

-------------------------------------------------------------------------------------------------------------------------------------------------------------

-------------------------------------------------------------------------------------------------------------------------------------------------------------

Advice

WARNING

The use of worn or damaged wheel rims could
make driving more dangerous and result in
serious accidents and damage.

Only wheel rims which have been approved

for use with your vehicle should be used.

Inspect wheel rims regularly for damage

and replace as required.

WARNING

If the bolted joints of wheel rims with bolted
ring trims are not correctly tightened or loos-
ened, this could result in serious accident.

Never loosen the bolted joints of wheel

rims with bolted ring trims.

Any work relating to wheel rims with bolted

rims should be carried out at specialised
workshop. SEAT recommends taking your car
in for technical service.

Note

A SEAT Service Centre should be consulted to
find out whether wheels or tyres of different
sizes to those originally fitted by SEAT can be
fitted, and to find out about the combinations
allowed between the front axle (axle 1) and
the rear axle (axle 2).

Replacement of wheel rims and new
tyres

New tyres

When tyres are new, drive with extreme

caution for the first 600 km, as all tyres need
to be run-in. Tyres which have not been run
in do not have such good grip or 

››› 

 brak-

ing capacity 

››› 

.

All four wheels must be fitted with radial

tyres of the same type, size (rolling circumfer-
ence) and the same tread pattern.

The tread depth of new tyres may vary, ac-

cording to the type and make of tyre and the
tread pattern.

Replacing tyres

Where possible, always replace both

wheels on an axle (both wheels on the front
axle or both wheels on the rear axle) 

››› 

.

Only replace used tyres with those author-

ised by SEAT for the corresponding type vehi-
cle. Pay special attention to size, diameter,
and maximum load and speed capacity.

Never use tyres which are larger than SEAT

approved tyres. If the tyres are too big, they
may knock or rub against the chassis or other
components, resulting in damage.

WARNING

New tyres do not give maximum grip and will
not have reached their maximum braking ca-
pacity to start with, and therefore need run-
ning in.

To prevent accidents and major damage,

extreme caution should be taken for the first
600 km.

WARNING

There should be adequate space between the
tyres and the vehicle in accordance with the
vehicle design. If this is not the case, the
tyres may rub against parts of the running
gear, chassis or brake lines, leading to faults
in the brake system or to tread detachment,
and the risk of burst tyres.

The true tyre dimension should not be

greater than the dimensions of tyres manu-
factured and approved by SEAT and should
not rub against parts of the vehicle.

Note

Although tyres may be shown as being the
same size, the true dimensions of different
types of tyre may vary with respect to the
nominal size, or tread patterns may be differ-
ent.

Note

If you use tyres that are approved by SEAT,
you can be sure that the true tyre dimensions

202

-------------------------------------------------------------------------------------------------------------------------------------------------------------

-------------------------------------------------------------------------------------------------------------------------------------------------------------

Wheels and tyres

will be correct for your vehicle. For other tyre
models, the tyre vendor should provide the
manufacturer's certificate with the tyre, indi-
cating that this type of tyre is suitable for
your vehicle. This certificate should always
be carried with the vehicle.

Tyre pressures

Fig. 174 

Position of tyre pressure specifica-

tion plate

The correct tyre pressures for tyres fitted at
the factory is shown on a label and is valid
for summer and winter tyres. The label

››› 

Fig. 174

 is located on the driver's door pil-

lar.

Under-inflation or over-inflation will reduce
the life of the tyres considerably and also im-
pair the car's handling 

››› 

. It is essential to

maintain the correct tyre pressures, especial-
ly if driving at 

high speeds. Incorrect tyre

pressure causes premature wear and could
cause tyre blow-out.

The pressure should therefore be checked at
least once a month and before starting a
journey.

As a general rule, the pressures given are for
cold tyres. When the tyres are hot, the pres-
sures are greater.

Never deflate a hot tyre in order to obtain the
required pressure. This could result in very
low tyre pressures which may lead to sudden
blow-outs.

Tyre pressure monitoring system
Check tyre pressures only when the vehicle
has not been driven for more than a few kilo-
metres at low speeds in the past three hours.

The tyre pressures should be checked regu-

larly, and only when the tyres are cold. Al-
ways check all tyres, including the spare
wheel. Tyre pressures should be checked
more often in colder regions, and only when
the vehicle has not been driven recently. Al-
ways use a correctly-operating tyre gauge.

Adjust tyre pressures to the loads carried in

the vehicle.

After adjusting the tyre pressure, check that

the caps are properly screwed on.

The 

spare wheel or temporary spare wheel

must always be kept at the maximum pres-
sure stipulated.

WARNING

If tyre pressures are too high or too low, the
tyre may deflate or burst suddenly while driv-
ing. This could result in a serious accident.

If the tyre pressure is too low, they could

overheat, resulting in tread detachment or
even burst tyres.

When driving at high speeds and/or fully

loaded, the tyre could suddenly overheat,
burst or be subject to tread detachment, with
the resultant loss of control of the vehicle.

Tyre pressures which are too high or too

low reduce the service life of the tyre, affect-
ing the vehicle's performance.

Tyre pressures should be checked regularly,

at least once a month and before long jour-
neys.

Adjust the pressures of all the tyres to the

vehicle load.

Never deflate excess pressure from hot

tyres.

»

203

Tec

hnic

al

 d

at

a

Adv

ic

e

Oper

ation

Emer

genc

ie

s

Saf

ety

-------------------------------------------------------------------------------------------------------------------------------------------------------------

-------------------------------------------------------------------------------------------------------------------------------------------------------------

Advice

CAUTION

Take care not to tilt the manometer when

placing it on the valve. Otherwise, the valve
may be damaged.

If tyre valves are not protected by caps, or if

the caps are not screwed on correctly, they
may become damaged. Check that the caps
are identical to the standard caps and have
been correctly tightened.

For the sake of the environment

Under-inflated tyres will increase fuel con-
sumption.

Wear indicator depth profile

Fig. 175 

Tyre tread: tread wear indicators

Tread depth
Certain driving conditions require a deeper
tread, as well as needing the tread to be ap-

proximately the same on the front and rear
tyres. This is particularly important when
driving in winter, in cold temperatures and on
wet roads 

››› 

.

The minimum tread depth required by law in
the majority of cases is 1.6 mm, measured in
the tread grooves next to the tread wear indi-
cators. Observe legal requirements in each
country.

The performance of 

winter tyres is much re-

duced when the tread has worn to 4 mm.

The tread depth of new tyres may vary, ac-
cording to the type and make of tyre and the
tread pattern.

Wear indicators on the tyre
The original tyres on your vehicle have
1.6 mm high 

››› 

Fig. 175

 tread wear indicators

running across the tread. A number of these
indicators are equally spaced around the tyre
tread. Certain marks on the tyre walls (e.g.
the letters “TWI” or other symbols) indicate
the position of the wear indicators.

Tread wear indicators indicate if a tyre is
worn. They must always be replaced before
the tyre tread has worn to the level of the in-
dicator.

WARNING

Driving with worn tyres is dangerous, and
may lead to loss of control of the vehicle with
serious consequences.

Tyres must be replaced before the wear in-

dicators are at the same level as the tread
pattern.

Worn tyres have significantly reduced grip,

especially on wet surfaces, increasing the
risk of “aquaplaning”.

Worn tyres make control of the vehicle

more difficult in normal or difficult driving
conditions, increasing the braking distance
and the risk of skidding.

Tyre damage

Damage to wheels and tyres is often invisible
to the naked eye. If you notice unusual 

vibra-

tion or the car pulling to one side, this may
indicate that one of the tyres is damaged

››› 

.

Slow down immediately if you think you

have a damaged wheel.

Check the wheels and tyres for damage.

If tyres are worn, stop driving and seek

qualified assistance.

If there is no visible exterior damage, drive

slowly and carefully to the nearest special-
ised workshop and have the vehicle checked.

204

-------------------------------------------------------------------------------------------------------------------------------------------------------------

-------------------------------------------------------------------------------------------------------------------------------------------------------------

Wheels and tyres

Foreign bodies in the tyre

Do not remove foreign bodies if they have

penetrated through the tyre wall!

You should obtain professional assistance

immediately.

Tyre wear
The wear of tyres depends on a number of
factors, for example:

Driving style.

Unbalanced wheels.

Running gear settings.

Driving style: Driving round bends quickly or
sudden acceleration or braking speed accel-
erates tyre wear. When the driving style is
normal, if the tyres wear too quickly, have the
running gear settings checked at a special-
ised workshop.

Wheel run-out: The wheels on new vehicles
are balanced. However, certain circumstan-
ces may lead to imbalance (run-out), which is
detected as vibrations in the steering wheel.
Run-out leads to wear of the steering and
suspension. In the event of run out, the
wheels should be balanced again. When a
new wheel is fitted, it should be balanced
again.

Running gear settings: an incorrectly posi-
tioned running gear increases the wear of
tyres and affects your safety while driving. If

tyres wear too quickly, have the wheel align-
ment checked at a specialised workshop.

WARNING

If you notice unusual vibration or the car pulls
to one side while driving, this may indicate
that one of the tyres is damaged.

Reduce speed immediately and stop, while

observing the highway code.

Check the wheels and tyres for damage.

Never carry on driving on worn tyres or

wheels. Request qualified assistance immedi-
ately.

If there is no visible exterior damage, drive

slowly and carefully to the nearest special-
ised workshop and have the vehicle checked.

Tyre monitor system* 

Fig. 176 

Centre console: tyre monitor system

button

The tyre control lamp compares wheel revolu-
tions and with it, the wheel diameter of each
wheel using the ESC. If the diameter of a
wheel changes, the tyre control lamp 
lights up. The wheel diameter changes when:

Tyre pressure is insufficient.

The tyre structure is damaged.

The vehicle is unbalanced because of a

load.

The wheels of one axle are under more

pressure (for example, driving with a trailer or
on steep slopes).

The vehicle is fitted with snow chains.

The temporary spare wheel is fitted.

The wheel on one axle is changed.

Tyre pressure adjustment
On adjusting tyre pressure or changing one
or more wheels, the 

››› 

Fig. 176

 button must

be kept pressed down, with the ignition on,
until an acoustic signal is heard.

If the wheels are under excessive load (for ex-
ample, driving with a trailer or heavy load),
the tyre pressure must be increased to the
recommended value for a full load (see the
sticker on the inside of the fuel flap). If the
tyre monitor system button is pressed down,
the new tyre pressures are confirmed.

»

205

Tec

hnic

al

 d

at

a

Adv

ic

e

Oper

ation

Emer

genc

ie

s

Saf

ety

-------------------------------------------------------------------------------------------------------------------------------------------------------------

-------------------------------------------------------------------------------------------------------------------------------------------------------------

Advice

The tyre pressure control lamp  lights up
If the tyre pressure of a wheel is much lower
than the value set by the driver, then the tyre
pressure control lamp 

››› 

 will light up.

WARNING

When the tyre pressure control lamp lights

up, reduce speed immediately and avoid any
sudden turning or braking manoeuvre. Stop
when possible, and check the tyre pressure
and status.

The driver is responsible for maintaining

correct tyre pressures. For this reason, tyre
pressure must be regularly checked.

Under certain circumstances (e.g. when

driving in a sporty manner, in winter condi-
tions or on a dirt track) the tyre control lamp
may light up belatedly or may function incor-
rectly.

Note

If the battery is disconnected, the yellow
warning lamp 
 lights up after turning the
ignition on. This should turn off after a brief
journey.

Spare wheel or temporary spare
wheel*

Fig. 177 

In the luggage compartment: hand

controlled wheel for securing the spare wheel

Removing the spare wheel

Open the rear lid and lift the luggage com-

partment shelf 

››› 

page 123

.

If necessary, remove the boot variable floor

››› 

page 123

.

Lift up the carpet from the recess and re-

move it from the luggage compartment.

If necessary, take out the vehicle tool kit

with the container.

Completely remove the hand controlled

wheel from the centre of the spare wheel

››› 

Fig. 177

 by turning it in an anticlockwise

direction, and take out the spare wheel.

Storing the replaced wheel

Pull back the carpet.

With the wheel rim facing downwards, sit-

uate the replaced wheel in the spare wheel
well so that the wheel rim central hole coin-
cides with the opening.

Turn the hand controlled wheel with the

shank screwed clockwise until the replaced
wheel is secured.

If necessary, store the vehicle tool in the

container, inside the boot.

Replace the carpet on the boot floor.

Lower the rear shelf.

Close the rear lid.

If the spare wheel is different to the rest of
the vehicle tyres
If the spare tyre is not the same as the tyres
that are mounted on the vehicle - for example
with winter tyres or the temporary spare
wheel - you should only use the spare tyre for
a short period of time and drive with extra
care 

››› 

.

Refit the normal road wheel as soon as possi-
ble.

Please observe driving advice:

Do not drive faster than 80 km/h (50 mph).

Avoid heavy acceleration, hard braking and

fast cornering.

206

-------------------------------------------------------------------------------------------------------------------------------------------------------------

-------------------------------------------------------------------------------------------------------------------------------------------------------------

Wheels and tyres

Snow chains on the temporary spare wheel

are not permitted 

››› 

page 41

.

After mounting the spare wheel or the tem-

porary spare wheel, check the tyre pressure
as soon as possible 

››› 

page 203

.

It is advisable to check the spare wheel or
temporary spare wheel tyre pressure when
checking the rest of the vehicle wheels at
least once a month. The spare wheel should
have the highest pressure allowed for the ve-
hicle 

››› 

page 203

The sticker situated on the

temporary spare wheel shows the tyre pres-
sure.

WARNING

Incorrect handling of the spare wheel or the
temporary spare wheel can cause loss of ve-
hicle control, producing collisions or other
serious accidents and injury.

Never use the spare wheel or the temporary

spare wheel if it is damaged or worn to the
wear indicator.

In some vehicles the spare wheel is smaller

than the original tyres. This can be seen on a
sticker showing the text “80 km/h” and
“50 mph”. This text indicates the maximum
velocity permitted for this type of tyre.

Never drive faster than 80 km/h (50 mph).

Avoid powerful acceleration, hard braking
and taking corners at high speed.

Never drive more than 200 km with a tem-

porary spare wheel fitted to the drive axle.

Replace the temporary spare wheel for a

normal wheel as soon as possible. The com-
pact temporary spare wheel is only intended
for temporary use over short distances.

The temporary spare wheel must always be

secured with the factory supplied wheel
bolts.

You should never use more than one tem-

porary spare wheel.

After mounting the temporary spare wheel,

check the tyre pressure as soon as possible

››› 

page 203

.

Snow chains on the temporary spare wheel

are not permitted.

Note

Wherever possible, secure the spare wheel,
temporary spare wheel or the replaced wheel
safely in the luggage compartment. In vehi-
cles with anti-puncture kit, it is not possible
to secure the defective wheel.

Tyre code

Fig. 178 

Universal code on tyres

Radial
Rim diameter code
Load index & speed rating
DOT tyre identification number
Severe snow conditions
Tyre ply composition and materials used
Max. load rating
Treadwear, traction and temperature
grades
Max. permissible inflation pressure
Passenger car tyre
Nominal width of tyre in millimetres

»

1

2

3

4

5

6

7

8

9

10

11

207

Tec

hnic

al

 d

at

a

Adv

ic

e

Oper

ation

Emer

genc

ie

s

Saf

ety

-------------------------------------------------------------------------------------------------------------------------------------------------------------

-------------------------------------------------------------------------------------------------------------------------------------------------------------

Advice

Ratio of height to width (aspect ratio)

Tyre code (example): Meaning

Makelogotype

Manufacturer

Product name

Name of tyre assigned by manufac-
turer.

P255 / 55 R 18

Size:

P

Passenger vehicle code.

255

Nominal width between
walls, in mm.

55

Height/width ratio in %

R

Tyre type (R indicates "radi-
al").

18

Rim diameter in inches

109 H

Load index 

››› 

page 209

 and speed

rating 

››› 

page 209

.

XL

Reinforced tyres (“Reinforced”).

M+S or M/S or

Winter tyres code (mud and snow
tyres).

RADIAL
TUBELESS

Radial tyre without inner tube.

E4 ...

E-mark certifying tyre complies with
international legislation followed by
a number denoting the country
granting the authorisation. The au-
thorisation number ( several digits)
is shown below.

12

Tyre code (example): Meaning

DOT BT RA TY5
1709

Tyre identification number (

TIN

a)

,

may be only on interior wall of
wheel) and date of manufacture:

DOT

The tyre complies with the
legal requirements of the
US Department of Trans-
port, responsible for tyre
safety regulations.

BT

Place of manufacture code.

RA

Information about manu-
facturer and tyre size.

TY5

Manufacturer's tyre specifi-
cations.

1709

Date of manufacture: Week
17 of 2009.

TWI

This identifies the position of the
Tread Wear Indicator 

››› 

page 204

.

Made in
Germany

Country of manufacture.

MAX LOAD
615 KG

US load rating, indicating maximum
permitted load per tyre.

MAX INFLATION
350 KPA
(51 PSI)

US limit, indicating maximum per-
mitted tyre pressure.

SIDEWALL 1 PLY
RAYON

Information about tyre wall compo-
nents:
1 layer of rayon (artificial silk).

Tyre code (example): Meaning

TREAD 4 PLIES
1 RAYON +
2 STEEL +
1 NYLON

Information about tread compo-
nents:
In the example, there are 4 layers
below the tread: 1 layer of rayon (ar-
tificial silk), 2 layers of steel rein-
forcement and 1 layer of nylon.

Information for the end consumer concerning the com-
parative values of the established base tyres (standar-
dised test procedures)
 

››› 

page 179

:

TREADWEAR 220

Relative service life of the tyre, with
respect to specific US standard test.

TRACTION A

Braking capacity of tyre on wet sur-
face (AA, A, B or C).

TEMPERATURE A

Tyre temperature resistance at high-
er test speeds (A, B or C).

If the tyre has other markings, these are specific tyre
manufacturer codes or specific national codes, e.g. for
Brazil or China.

a)

The letters TIN refer to the tyre serial number.

Tyres with directional tread pattern
Tyres with directional tread pattern have
been designed to operate best when rotating
in only one direction. An arrow on the tyre
sidewall indicates the direction of rotation on
tyres with directional tread. Always observe
the direction of rotation indicated when
mounting the wheel. This guarantees opti-
mum grip and helps to avoid aquaplaning,
grip, noise and wear.

208

-------------------------------------------------------------------------------------------------------------------------------------------------------------

-------------------------------------------------------------------------------------------------------------------------------------------------------------

Wheels and tyres

If the tyre is mounted in the opposite direc-
tion of rotation, drive with extreme caution,
as the tyre is no longer being used correctly.
This is of particular importance when the
road surface is wet. Change the tyre as soon
as possible or remount it with the correct di-
rection of rotation.

Tyre load rating
The load rating code indicates the maximum
load in kilogrammes each wheel can carry
(load capacity).

425 kg
462 kg
487 kg
515 kg
545 kg
615 kg

Speed rating
The speed rating indicates the maximum
speed permitted for the tyres.

max. 150 km/h (93 mph)
max. 160 km/h (99 mph)
max. 170 km/h (106 mph)
max. 180 km/h (112 mph)
max. 190 km/h (118 mph)
max. 200 km/h (124 mph)
max. 210 km/h (130 mph)

78
81
83
85
87
91

P
Q
R
S
T
U
H

max. 240 km/h (149 mph)
max. 270 km/h (168 mph)
max. 300 km/h (186 mph)

Some manufacturers use the letters “ZR” for
tyres with a maximum authorised speed
above 240 km/h.

V
Z
W
Y

209

Tec

hnic

al

 d

at

a

Adv

ic

e

Oper

ation

Emer

genc

ie

s

Saf

ety

-------------------------------------------------------------------------------------------------------------------------------------------------------------

-------------------------------------------------------------------------------------------------------------------------------------------------------------

Technical data

Technical data

Technical features

Important information

Introduction

The information in the vehicle documentation
always takes precedence over the informa-
tion in this Instruction Manual.

All technical specifications provided in this
documentation are valid for the standard
model in Spain. The vehicle data card inclu-
ded in the Maintenance Programme or the
vehicle registration documents shows which
engine is installed in the vehicle.

The figures may be different depending
whether additional equipment is fitted, for
different models, for special vehicles and for
other countries.

Abbreviations used in the Technical Specifi-
cations section

kW

Kilowatt, engine power measurement.

PS

Pferdestärke (horsepower), formerly
used to denote engine power.

rpm

Revolutions per minute - engine speed.

Nm

Newton metres, unit of engine torque.

CZ

Cetane number, indication of the diesel
combustion power.

RON

Research octane number, indication of
the knock resistance of petrol.

Vehicle identification data

Fig. 179 

Vehicle data label.

Fig. 180 

Vehicle identification number.

Vehicle identification number
The vehicle identification number (chassis
number) can be read from outside the vehicle
through a viewer in the windscreen

››› 

Fig. 180

. This viewer is located in the lower

part of the windscreen. The vehicle identifica-
tion number (chassis number) is also stam-
ped on the right water drain channel. The wa-
ter drain channel is located between the sus-
pension tower and the wing. Open the bon-
net to read the vehicle identification number

.

Vehicle data plate
The vehicle data label 

››› 

Fig. 179

 is at the

front of the spare wheel well. It contains the
following data:

Vehicle identification number (chassis
number).
Vehicle type, engine power, gearbox type.

1

2

210

-------------------------------------------------------------------------------------------------------------------------------------------------------------

-------------------------------------------------------------------------------------------------------------------------------------------------------------

Technical features

Engine and gearbox code, paint number,
interior equipment.
Optional extras, PR numbers.

These data are also provided in the Mainte-
nance Programme.

Specific vehicle weight information

The instructions in the official vehicle docu-
ments take precedence. All the technical data
provided in this documentation is applicable
to the basic model. The vehicle data label in
the Maintenance Programme or the vehicle
documentation shows which engine is instal-
led in your vehicle.

The figures may be different depending
whether additional equipment is fitted, for
different models and for special vehicles.

Kerb weight values shown in the following ta-
ble apply to a vehicle with driver (75 kg), liq-
uids including a fuel tank 90% full, in addi-
tion to tools and a spare wheel 

››› 

The

kerb weight indicated increases with optional
equipment and retrofitting of accessories,
while proportionally reducing carrying ca-
pacity.

The load is equivalent to the following
weights:

Passengers.

Total equipment.

3

4

Roof load, included in the carrier.

WARNING

Exceeding the maximum authorised weight
and the load on the axles could cause dam-
age to the vehicle, accidents and serious in-
juries.

The real load on the axles should never ex-

ceed the maximum permitted.

The load and its distribution in the vehicle

have effects on the vehicle handling and the
braking ability. Always drive at a suitable
speed.

CAUTION

Distribute the load as uniformly and as low
down on the vehicle as possible. When trans-
porting heavy objects in the luggage com-
partment, these should be placed as far for-
ward as possible or over the rear axle to have
as little influence on handling as possible.

Fuel consumption

Approved consumption values are derived
from measurements performed or supervised
by certified EU laboratories, according to the
legislation in force at the time (for more infor-
mation, see the Publications Office of the Eu-
ropean Union on the EUR-Lex website: © Eu-
ropean Union, http://eur-lex.europa.eu/) and
apply to the specified vehicle characteristics.

The values relating to fuel consumption and
CO

2

 emissions can be found in the documen-

tation provided to the purchaser of the vehi-
cle at the time of purchase.

Fuel consumption and CO

2

 emissions depend

on the equipment/features of each individual
vehicle, as well as on the driving style, road
conditions, traffic conditions, environmental
conditions, load or number of passengers.

Note

In practice, and considering all the factors
mentioned here, consumption values can dif-
fer from those calculated in the current Euro-
pean regulations.

Wheels

Tyre pressure, snow chains, wheel
bolts

Tyre pressures
The sticker with the tyre pressure values can
be found on the inside of the fuel tank flap.
The tyre pressure values are given for cold
tyres
 

››› 

page 203

The slightly raised pres-

sures of warm tyres must not be reduced.

››› 

»

211

Tec

hnic

al

 d

at

a

Adv

ic

e

Oper

ation

Emer

genc

ie

s

Saf

ety

-------------------------------------------------------------------------------------------------------------------------------------------------------------

-------------------------------------------------------------------------------------------------------------------------------------------------------------

Technical data

Snow chains
Snow chains may be fitted only to the front
wheels
.

Consult the section “wheels” of this manual.

Wheel bolts
After the wheels have been changed, the
tightening torque of the wheel bolts should
be checked as soon as possible with a torque
wrench 

››› 

. The tightening torque for steel

and alloy wheels is 

140 Nm.

WARNING

Check the tyre pressure at least once per

month. Checking the tyre pressure is very im-
portant. If the tyre pressure is too high or too
low, there is an increased danger of accidents
- particularly at high speeds.

If the tightening torque of the wheel bolts

is too low, they could loosen while the vehi-
cle is in motion. Risk of accident! If the tight-
ening torque is too high, the wheel bolts and
threads can be damaged.

Note

We recommend that you ask your Technical
Service for information about appropriate
wheel, tyre and snow chain size.

212

-------------------------------------------------------------------------------------------------------------------------------------------------------------


Content      ..     11      12      13      14     ..