Seat Leon 1M. Service Manual - part 13


  Index      Seat     Seat Leon 1M. Service Manual


Search            copyright infringement  


Content      ..     11      12      13      14     ..


Seat Leon 1M. Service Manual - part 13


-------------------------------------------------------------------------------------------------------------------------------------------------------------
3.54

–––––––––––––––––––––––––––––––––––––––––––––––––––––––––––––

SERVICING AND REPLACING

TIPS AND MAINTENANCE

D

Du

us

stt a

an

nd

d p

po

olllle

en

n ffiilltte

err*

*

The  dust and  pollen  filter  for  the  heating
and  ventilation  system  can  be  found
under the cover on the right in the plenum
chamber. T

Th

he

e ffiilltte

err s

sh

ho

ou

ulld

d b

be

e c

ch

ha

an

ng

ge

ed

d

iin

n  a

ac

cc

co

orrd

da

an

nc

ce

e  w

wiitth

h  tth

he

e  d

de

etta

aiills

s  g

giiv

ve

en

n

iin

n  tth

he

e  IIn

ns

sp

pe

ec

cttiio

on

n  a

an

nd

d  S

Se

errv

viic

ce

e  s

sc

ch

he

ed

d--

u

ulle

e.. IIff tth

he

e a

aiirr tth

hrro

ou

ug

gh

hp

pu

utt rre

ed

du

uc

ce

es

s c

co

on

n--

s

siid

de

erra

ab

blly

y,,  tth

he

e  ffiilltte

err  s

sh

ho

ou

ulld

d  b

be

e

c

ch

ha

an

ng

ge

ed

d e

ea

arrlliie

err::

R

Re

em

mo

ov

viin

ng

g ffiilltte

err

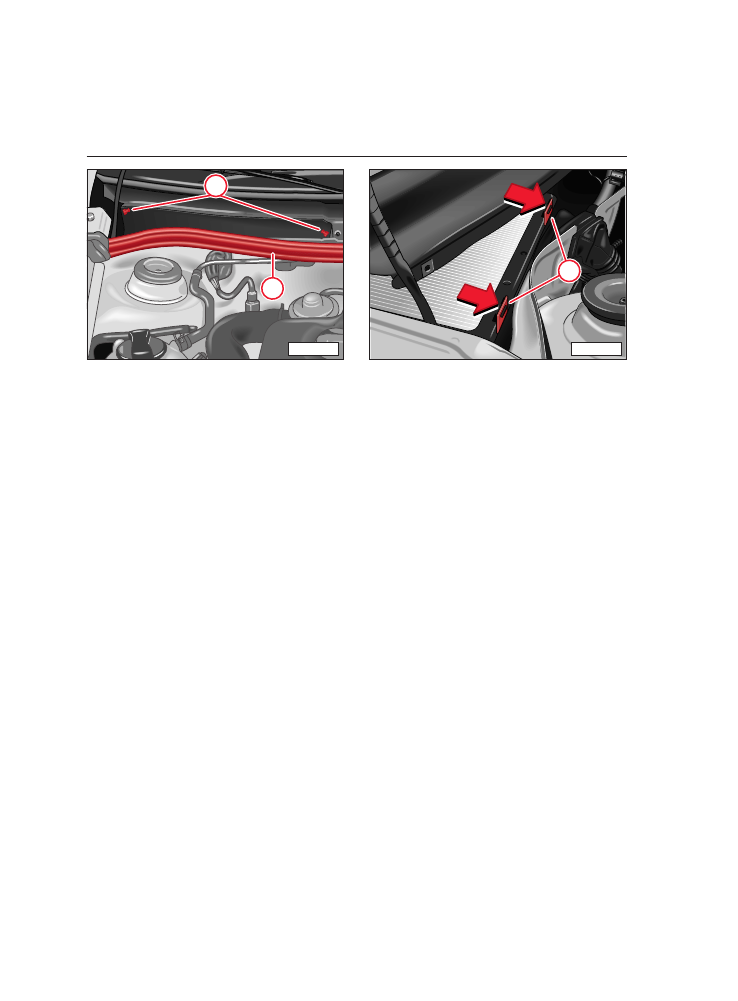
Pull up the rubber seal A

A

of the plenum

chamber to the middle.

C

Ca

arre

effu

ulllly

y

unscrew  all screws B

B com-

pletely and pull the cover off to the front.
Because  of their  shape  they will remain
suspended  in  the  cover.  Pull the  cover
outwards.

Push  back spring  clips C

C in  the  direc-

tion  of the  arrow  and  remove  the  filter
insert.

A

B

TO8-040

C

B1J-034

-------------------------------------------------------------------------------------------------------------------------------------------------------------

-------------------------------------------------------------------------------------------------------------------------------------------------------------

TIPS AND MAINTENANCE

SERVICING AND REPLACING 

–––––––––––––––––––––––––––––––––––––––––––––––––––––––––––––

3.55

IIn

ns

stta

alllliin

ng

g ffiilltte

err

For  greater  clarity,  the  illustration  shows
the dust and pollen filter already disman-
tled.

Push the filter into the recesses of the fil-
ter unit with the lugs D

D first. 

Then  press the  filter  down  at the  front
until the spring clips C

C engage on the lugs

E

E.

Screw  the  cover  on  tightly and  press the
rubber seal A

A onto the plenum chamber.

D

D

D

E

E

B11-060D

-------------------------------------------------------------------------------------------------------------------------------------------------------------

-------------------------------------------------------------------------------------------------------------------------------------------------------------

TIPS AND MAINTENANCE

3.56

–––––––––––––––––––––––––––––––––––––––––––––––––––––––––––––––––––––––––––

IF AND WHEN

F

Fiirrs

stt a

aiid

d k

kiitt,, w

wa

arrn

niin

ng

g ttrriia

an

ng

glle

e

In  some  countries a  luminous hazard
warning  triangle  must be  carried  in  the
vehicle  to  be  used  in  an  emergency,  as
well as a first aid kit and spare bulbs.

The first aid kit can be stored in the spare
wheel recess. The warning triangle can be
placed at the rear of the boot using rubber
bands.

N

No

otte

e

The  first aid  kit and  warning  triangle  are
n

no

ott delivered with the vehicle as standard

fittings.

R

Re

ec

co

om

mm

me

en

nd

da

attiio

on

ns

s

T

Th

he

e  ffiirrs

stt  a

aiid

d  k

kiitt  a

an

nd

d  w

wa

arrn

niin

ng

g  ttrriia

an

n--

g

glle

e m

mu

us

stt ffu

ullffiill lle

eg

ga

all rre

eq

qu

uiirre

em

me

en

ntts

s..

Y

Yo

ou

u s

sh

ho

ou

ulld

d b

be

ea

arr iin

n m

miin

nd

d tth

he

e u

us

se

e--b

by

y

d

da

atte

es

s  o

off  tth

he

e  c

co

on

ntte

en

ntts

s  o

off  tth

he

e  ffiirrs

stt  a

aiid

d

k

kiitt..

-------------------------------------------------------------------------------------------------------------------------------------------------------------

-------------------------------------------------------------------------------------------------------------------------------------------------------------

TIPS AND MAINTENANCE

IF AND WHEN 

–––––––––––––––––––––––––––––––––––––––––––––––––––––––––––––––––––––––––––

3.57

O

On

n b

bo

oa

arrd

d tto

oo

olls

s,, s

sp

pa

arre

e w

wh

he

ee

ell

T

To

oo

oll h

ho

ou

us

siin

ng

g

The  tools and  the  spare  wheel are  stored
in the housing under the boot floor cover-
ing.

In order to have both hands free to lift out
the  spare  wheel and  the  on  board  tools,
the floor mat can be hooked to the lower
part of the rear shelf.

The  tools are  located  in  a  polystyrene
retainer,  inside  the  spare  wheel recess
secured with a rubber strap.

W

Wa

arrn

niin

ng

g

E

En

ns

su

urre

e  tth

ha

att  tth

he

e  v

ve

eh

hiic

clle

e  tto

oo

olls

s  a

an

nd

d

s

sp

pa

arre

e  w

wh

he

ee

ell  a

arre

e  s

stto

ow

we

ed

d  s

se

ec

cu

urre

elly

y

tto

o a

av

vo

oiid

d iin

njju

urriie

es

s ffo

orr tth

he

e p

pa

as

ss

se

en

ng

ge

err

iin

n  c

ca

as

se

e  o

off  a

a  c

co

olllliis

siio

on

n  o

orr  s

su

ud

dd

de

en

n

b

brra

ak

kiin

ng

g..

LEO-030

-------------------------------------------------------------------------------------------------------------------------------------------------------------

-------------------------------------------------------------------------------------------------------------------------------------------------------------

TIPS AND MAINTENANCE

3.58

–––––––––––––––––––––––––––––––––––––––––––––––––––––––––––––––––––––––––––

IF AND WHEN

V

Ve

eh

hiic

clle

e tto

oo

olls

s /

/ jja

ac

ck

k

W

Wa

arrn

niin

ng

g

T

Th

he

e jja

ac

ck

k s

su

up

pp

plliie

ed

d b

by

y tth

he

e ffa

ac

ctto

orry

y

iis

s  o

on

nlly

y  d

de

es

siig

gn

ne

ed

d  ffo

orr  y

yo

ou

urr  v

ve

eh

hiic

clle

e

m

mo

od

de

ell..  O

On

n  n

no

o  a

ac

cc

co

ou

un

ntt  s

sh

ho

ou

ulld

d

h

he

ea

av

viie

err v

ve

eh

hiic

clle

es

s o

orr o

otth

he

err llo

oa

ad

ds

s b

be

e

lliifftte

ed

d!!

W

Wiitth

h  tth

he

e  v

ve

eh

hiic

clle

e  lliifftte

ed

d,,  n

ne

ev

ve

err

s

stta

arrtt  tth

he

e  e

en

ng

giin

ne

e  –

–  d

da

an

ng

ge

err  o

off  a

ac

cc

cii--

d

de

en

ntt..

IIff  w

wo

orrk

k  h

ha

as

s  tto

o  b

be

e  d

do

on

ne

e  u

un

nd

de

err--

n

ne

ea

atth

h tth

he

e v

ve

eh

hiic

clle

e,, e

en

ns

su

urre

e tth

ha

att iitt iis

s

s

su

up

pp

po

orrtte

ed

d o

on

n s

su

uiitta

ab

blle

e s

stta

an

nd

ds

s..

V

Ve

eh

hiic

clle

es

s m

ma

ay

y a

alls

so

o h

ha

av

ve

e::

1 – Screwdriver with box spanner in han-

dle  for  the  wheel bolts.  The  screw-
driver blade is reversible.

2 – Open jaw spanner 10 x 13

3 – Jack

Before the jack is placed back into the
tool box,  the  claw  must be  fully
wound  back.  The  crank is then  ten-
sioned against the side of the jack.

4 – Wire hook* for wheel trims

5 – Wheel bolt spanner

6 – Front towing ring

N

No

otte

e

Never  use  the  box spanner  in  the  handle
of the  screwdriver  to  loosen  or  tighten
wheel bolts. 

3

2

1

4

5

6

IB9-086

-------------------------------------------------------------------------------------------------------------------------------------------------------------

-------------------------------------------------------------------------------------------------------------------------------------------------------------

TIPS AND MAINTENANCE

IF AND WHEN 

–––––––––––––––––––––––––––––––––––––––––––––––––––––––––––––––––––––––––––

3.59

S

Sp

pa

arre

e w

wh

he

ee

ell/

/R

Re

ed

du

uc

ce

ed

d S

Sp

pa

ac

ce

e S

Sp

pa

arre

e

W

Wh

he

ee

ell*

* ((F

Fo

ou

urr--w

wh

he

ee

ell d

drriiv

ve

e v

ve

eh

hiic

clle

es

s))

The wheel is located in the well under the
floor covering in the boot, secured with a
plastic nut.

If the  wheel has been  replaced,  secure  it
with the plastic nut.

Four-wheel drive  vehicles are  equipped
with a reduced space spare wheel

1)

which

not only takes up less space than the nor-
mal spare  wheel in  the  boot,  but also
weighs substantially less.

R

Re

em

mo

ov

viin

ng

g tth

he

e s

sp

pa

arre

e w

wh

he

ee

ell

Attach  the  floor  mat to  the  lower  part of
the boot cover.

Loosen  the  retaining  strap  and  remove
the polystyrene retainer.

Then turn the hand wheel in an anti-clock-
wise direction and remove it.

1)

In  some  countries and  in  the  case  of some
model versions,  a  normal spare  wheel may be
provided  instead.  When  using  this wheel,  fol-
low the instructions on pages 3.66 to 3.72.

S

Se

ec

cu

urriin

ng

g tth

he

e s

sp

pa

arre

e w

wh

he

ee

ell

Place  the  defective  wheel in  the  hous-

ing and secure with the nut.

Feed  the  retaining  strap  through  the

holes in the rim – see illustration.

Turn  the  handwheel in  a  clockwise

direction  until the  wheel is properly
secured.

Place  the  polystyrene  retainer  in  the

recess and  secure  it with  the  retaining
strap.

Remove the floor mat from the luggage

compartment cover  and  replace  on  the
floor of the luggage compartment.

W

Wa

arrn

niin

ng

g

E

En

ns

su

urre

e  tth

ha

att  tth

he

e  s

sp

pa

arre

e  w

wh

he

ee

ell,,  tto

ow

w--

iin

ng

g d

de

ev

viic

ce

e*

* a

an

nd

d o

on

n b

bo

oa

arrd

d tto

oo

olls

s a

arre

e

p

prro

op

pe

errlly

y s

se

ec

cu

urre

ed

d,, s

so

o tth

ha

att tth

he

ey

y c

ca

an

n--

n

no

ott iin

njju

urre

e v

ve

eh

hiic

clle

e o

oc

cc

cu

up

pa

an

ntts

s iiff y

yo

ou

u

h

ha

av

ve

e tto

o b

brra

ak

ke

e s

su

ud

dd

de

en

nlly

y o

orr h

ha

av

ve

e a

an

n

a

ac

cc

ciid

de

en

ntt..

B1J-054D

B1J-055D

-------------------------------------------------------------------------------------------------------------------------------------------------------------

-------------------------------------------------------------------------------------------------------------------------------------------------------------

TIPS AND MAINTENANCE

3.60

–––––––––––––––––––––––––––––––––––––––––––––––––––––––––––––––––––––––––––

IF AND WHEN

W

Wh

he

ee

ells

s

G

Ge

en

ne

erra

all n

no

otte

es

s

New  tyres do  not give  maximum  grip

straight away and should therefore be run
in at moderate speeds and a careful style
of driving for about the first 100 km. This
will help to make the tyres last longer.

The  tread  depth  of new  tyres can  vary

due  to  construction  and  design  features,
and  depending  on  version  and  manufac-
tures.

Check tyres for  damage  from  time  to

time  (cuts,  splits,  cracks and  lumps)  and
remove  any foreign  bodies embedded  in
the treads.

To  avoid  damage  to  tyres and  wheels

drive  over  curbs and  similar  obstacles
very slowly and  as nearly at right angles
as possible.

W

Wa

arrn

niin

ng

g

D

Da

am

ma

ag

ge

e tto

o w

wh

he

ee

ells

s a

an

nd

d tty

yrre

es

s iis

s n

no

ott

a

allw

wa

ay

ys

s e

ea

as

sy

y tto

o s

se

ee

e.. U

Un

nu

us

su

ua

all v

viib

brra

a--

ttiio

on

ns

s o

orr a

a p

pu

ulllliin

ng

g tto

o o

on

ne

e s

siid

de

e c

co

ou

ulld

d

iin

nd

diic

ca

atte

e  tty

yrre

e  d

da

am

ma

ag

ge

e..  IIff  y

yo

ou

u  s

su

us

s--

p

pe

ec

ctt d

da

am

ma

ag

ge

e tto

o a

a tty

yrre

e,, y

yo

ou

u s

sh

ho

ou

ulld

d

iim

mm

me

ed

diia

atte

elly

y  rre

ed

du

uc

ce

e  s

sp

pe

ee

ed

d..  C

Ch

he

ec

ck

k

a

allll  tty

yrre

es

s  v

viis

su

ua

alllly

y  ffo

orr  d

da

am

ma

ag

ge

e

((b

bu

ullg

ge

es

s,,  tte

ea

arrs

s  e

ettc

c..))..  IIff  n

no

o  e

ex

xtte

errn

na

all

d

da

am

ma

ag

ge

e  c

ca

an

n  b

be

e  s

se

ee

en

n,,  d

drriiv

ve

e  c

ca

arre

e--

ffu

ulllly

y  tto

o  tth

he

e  n

ne

ea

arre

es

stt  T

Te

ec

ch

hn

niic

ca

all

S

Se

errv

viic

ce

e  C

Ce

en

nttrre

e  a

an

nd

d  h

ha

av

ve

e  tth

he

e  v

ve

eh

hii--

c

clle

e c

ch

he

ec

ck

ke

ed

d o

ov

ve

err..

Keep grease, oil and fuel off the tyres.

Replace  missing  dust caps as soon  as

possible.

Mark wheels before  taking  them  off so

that they rotate  in  the  same  direction
when put back on again.

When  taken  off,  the  tyres should  be

stored  in  a  cool,  dry and  preferably dark
place.

Tyres which  are  not on  wheels should  be
stored in a vertical position.

N

No

otte

e ffo

orr tty

yrre

es

s w

wh

he

erre

e tth

he

e d

diirre

ec

cttiio

on

n o

off

rro

otta

attiio

on

n iis

s s

sttiip

pu

ulla

atte

ed

d

It is imperative that the designated direc-
tion of rotation for tyre treads (which can
be determined from the arrow on the side
of the  tyre)  be  kept to. The  best tyre  per-
formance  i.e.  in  aquaplaning,  road  adhe-
sion, noise and wear is then guaranteed.

T

Ty

yrre

e lliiffe

e

Tyre  life  depends to  a  considerable  extent
on the following factors:

IIn

nfflla

attiio

on

n p

prre

es

ss

su

urre

e

The  inflation  pressures are  to  be  found
inside the fuel lid.

The  inflation  pressure  is very important
particularly at high speeds. Therefore, the
pressures should be checked at least once
a month and before every long journey.

-------------------------------------------------------------------------------------------------------------------------------------------------------------

-------------------------------------------------------------------------------------------------------------------------------------------------------------

TIPS AND MAINTENANCE

IF AND WHEN 

–––––––––––––––––––––––––––––––––––––––––––––––––––––––––––––––––––––––––––

3.61

At this opportunity do not forget the spare
wheel:

The  spare  wheel with  normal tyre

should  always be  inflated  to  the  highest
pressure required on the vehicle.

Always check the  pressures when  the

tyres are cold. When warm, the pressure is
higher  but do  not reduce.  If the  load
changes a  great deal the  pressure  must
be altered to suit. 

On  vehicles with  wheel hub  caps,  valve
extensions are fitted. It is not necessary to
remove the valve extension piece in order
to test and correct the inflation pressure.

P

Prre

es

ss

su

urre

es

s  w

wh

hiic

ch

h  a

arre

e  tto

oo

o  h

hiig

gh

h  o

orr  tto

oo

o

llo

ow

w  s

sh

ho

orrtte

en

n  tty

yrre

e  lliiffe

e  –

–  q

qu

uiitte

e  a

ap

pa

arrtt

ffrro

om

m  tth

he

e  d

de

ettrriim

me

en

ntta

all  iin

nffllu

ue

en

nc

ce

e  o

on

n

v

ve

eh

hiic

clle

e h

ha

an

nd

dlliin

ng

g..

W

Wa

arrn

niin

ng

g

A

Att  c

co

on

nttiin

nu

uo

ou

us

s  h

hiig

gh

h  s

sp

pe

ee

ed

ds

s  a

a  tty

yrre

e

iin

n  w

wh

hiic

ch

h  tth

he

e  p

prre

es

ss

su

urre

e  iis

s  tto

oo

o  llo

ow

w

fflle

ex

xe

es

s  m

mo

orre

e  a

an

nd

d  h

he

ea

atts

s  u

up

p  e

ex

xc

ce

es

s--

s

siiv

ve

elly

y..  T

Th

hiis

s  c

ca

an

n  c

ca

au

us

se

e  ttrre

ea

ad

d  s

se

ep

pa

a--

rra

attiio

on

n a

an

nd

d tty

yrre

e b

bllo

ow

w o

ou

utt..

A

A  p

prre

es

ss

su

urre

e  w

wh

hiic

ch

h  iis

s  tto

oo

o  llo

ow

w

iin

nc

crre

ea

as

se

es

s  tth

he

e  ffu

ue

ell  c

co

on

ns

su

um

mp

pttiio

on

n

a

an

nd

d  tth

hiis

s  b

bu

urrd

de

en

ns

s  tth

he

e  e

en

nv

viirro

on

nm

me

en

ntt

u

un

nn

ne

ec

ce

es

ss

sa

arriilly

y..

M

Mo

od

de

e o

off d

drriiv

viin

ng

g

Fast cornering, hard acceleration and vio-
lent braking also increase tyre wear.

B

Ba

alla

an

nc

ciin

ng

g w

wh

he

ee

ells

s

The wheels on new vehicles are balanced.
However when the vehicle is running vari-
ous influences can  cause  the  wheels to
become  unbalanced  and  this causes
steering vibration.

As imbalance  also  increases steering,
suspension  and  tyre  wear  the  wheels
should be balanced again. Furthermore a
wheel should always be rebalanced when
the tyre has been repaired or when a new
tyre has been fitted.

IIn

nc

co

orrrre

ec

ctt w

wh

he

ee

ell a

alliig

gn

nm

me

en

ntt

Incorrect wheel alignment not only causes
excessive,  usually uneven  tyre  wear,  but
can also impair the car ’s safe handling. If
unusual tyre  wear  is noticed,  contact a
Technical Service Centre.

-------------------------------------------------------------------------------------------------------------------------------------------------------------

-------------------------------------------------------------------------------------------------------------------------------------------------------------

TIPS AND MAINTENANCE

3.62

–––––––––––––––––––––––––––––––––––––––––––––––––––––––––––––––––––––––––––

IF AND WHEN

W

We

ea

arr iin

nd

diic

ca

atto

orrs

s

At the  bottom  of the  tread  of the  original
tyres there are 1.6 mm high “wear indica-
tors”  running  across the  tread  –  see  fig.
There are 6-8 of these indicators – accord-
ing  to  make  –  evenly spaced  around  the
tyre circumference. Marks on the walls of
the  tyre  (for  example  the  letters “TWI”  or
triangles)  show  the  locations of the  wear
indicators.

W

Wa

arrn

niin

ng

g

T

Th

he

e tty

yrre

es

s m

mu

us

stt b

be

e rre

en

ne

ew

we

ed

d w

wh

he

en

n

tth

he

ey

y  a

arre

e  w

wo

orrn

n  d

do

ow

wn

n  tto

o  tth

he

e  w

we

ea

arr

iin

nd

diic

ca

atto

orrs

s..

W

Wo

orrn

n  tty

yrre

es

s  a

arre

e  d

de

ettrriim

me

en

ntta

all  tto

o

rro

oa

ad

dh

ho

olld

diin

ng

g  p

pa

arrttiic

cu

ulla

arrlly

y  a

att  h

hiig

gh

h

s

sp

pe

ee

ed

ds

s o

on

n w

we

ett rro

oa

ad

ds

s.. F

Fu

urrtth

he

errm

mo

orre

e,,

tth

he

e  v

ve

eh

hiic

clle

e  tte

en

nd

ds

s  tto

o  a

aq

qu

ua

ap

plla

an

ne

e

s

so

oo

on

ne

err..

N

No

otte

e

When  tread  depth  is down  to  1.6  mm
measured  in  the  tread  groove  next to  the
wear indicator bar – the official permissi-
ble  minimum  tread  depth  has been
reached  (in  export countries this figure
may differ).

R

Re

en

ne

ew

wiin

ng

g w

wh

he

ee

ells

s/

/tty

yrre

es

s

Wheels and  tyres are  important design
features.  The  wheels and  tyres approved
by us should  be  used.  They are  specially
matched to the model concerned and con-
tribute  largely to  the  excellent roadhold-
ing and safe driving characteristics.

T

Th

he

e  T

Te

ec

ch

hn

niic

ca

all  S

Se

errv

viic

ce

es

s  h

ho

olld

d  u

up

p  tto

o

d

da

atte

e  iin

nffo

orrm

ma

attiio

on

n  rre

eg

ga

arrd

diin

ng

g  tth

he

e  s

stta

an

n--

d

da

arrd

d tty

yrre

es

s ffiitttte

ed

d b

by

y tth

he

e m

ma

an

nu

uffa

ac

cttu

urre

err..

A

Alls

so

o::  M

Ma

an

ny

y  T

Te

ec

ch

hn

niic

ca

all  S

Se

errv

viic

ce

es

s  p

po

os

s--

s

se

es

ss

s a

a lla

arrg

ge

e rra

an

ng

ge

e o

off tty

yrre

es

s a

an

nd

d rriim

ms

s..

Fitting  and  repairing  tyres requires

expert knowledge  and  special tools. This
work may only be carried out by specialist
personnel.

B

Be

ec

ca

au

us

se

e  o

off  tth

he

e  p

prro

ob

blle

em

m  o

off

d

diis

sp

po

os

siin

ng

g  o

off  tth

he

e  o

olld

d  tty

yrre

es

s,,  tth

he

e

s

sp

pe

ec

ciia

all  tto

oo

olls

s  n

ne

ec

ce

es

ss

sa

arry

y  a

an

nd

d  tth

he

e

s

sp

pe

ec

ciia

alliis

stt  k

kn

no

ow

wlle

ed

dg

ge

e  rre

eq

qu

uiirre

ed

d,,  tty

yrre

e

c

ch

ha

an

ng

giin

ng

g  s

sh

ho

ou

ulld

d  p

prre

effe

erra

ab

blly

y  b

be

e  d

do

on

ne

e

b

by

y a

a T

Te

ec

ch

hn

niic

ca

all S

Se

errv

viic

ce

e C

Ce

en

nttrre

e..

For  safety reasons the  tyres should  be

renewed in pairs and not singly. The tyres
with  the  deepest tread  should  always be
on the front wheels.

B1H-085

-------------------------------------------------------------------------------------------------------------------------------------------------------------

-------------------------------------------------------------------------------------------------------------------------------------------------------------

TIPS AND MAINTENANCE

IF AND WHEN 

–––––––––––––––––––––––––––––––––––––––––––––––––––––––––––––––––––––––––––

3.63

You should only combine radial tyres of

the  same  construction,  size  (rolling  cir-
cumference)  and,  as far  as possible,  the
same tread profile on all four wheels.

On  four-wheel drive  vehicles all tyres

must be  of the  same  brand.  Otherwise,
the 

viscosity

would 

unnecessarily

increase  the  proportion  of the  rear  drive
since the axes would be turning at differ-
ent speeds and this could cause damage.

If the  spare  wheel differs from  the ver-

sion  fitted  on  the  vehicle  (i.e.  winter  or
wide  tyres)  the  spare  tyre  may only be
used  briefly and  with  an  appropriately
careful style  of driving.  It must be
replaced  with  the  normal wheel as soon
as possible.

Never  fit used  tyres where  their  previ-

ous history is not known.

Knowing the tyre lettering and its mean-

ing  makes the  selection  of the  correct
tyres easier. Radial ply tyres have the fol-
lowing lettering on the sidewall:

T

Th

he

e  m

ma

an

nu

uffa

ac

cttu

urriin

ng

g  d

da

atte

e is also  to  be

seen  on  the  tyre  wall (possibly only on
inner side of wheel):

DOT  ...  183  ...  means that the  tyre  was
produced  in  the  18th  calendar  week of
2003.

W

Wa

arrn

niin

ng

g

T

Ty

yrre

es

s w

wh

hiic

ch

h a

arre

e m

mo

orre

e tth

ha

an

n 6

6 y

ye

ea

arrs

s

o

olld

d  s

sh

ho

ou

ulld

d  o

on

nlly

y  b

be

e  u

us

se

ed

d  iin

n  a

an

n

e

em

me

errg

ge

en

nc

cy

y a

an

nd

d tth

he

en

n w

wiitth

h a

a p

pa

arrttiic

c--

u

ulla

arrlly

y c

ca

arre

effu

ull s

stty

ylle

e o

off d

drriiv

viin

ng

g..

IIff  y

yo

ou

u  w

wiis

sh

h  tto

o  ffiitt  y

yo

ou

urr  c

ca

arr  w

wiitth

h  n

no

on

n--

s

stta

an

nd

da

arrd

d w

wh

he

ee

ells

s o

orr tty

yrre

es

s p

plle

ea

as

se

e n

no

otte

e::

W

Wa

arrn

niin

ng

g

F

Fo

orr  tte

ec

ch

hn

niic

ca

all  rre

ea

as

so

on

ns

s  iitt  iis

s  n

no

ott

n

no

orrm

ma

alllly

y  p

po

os

ss

siib

blle

e  tto

o  u

us

se

e  w

wh

he

ee

ells

s

ffrro

om

m o

otth

he

err v

ve

eh

hiic

clle

es

s –

– iin

n c

ce

errtta

aiin

n c

ciirr--

c

cu

um

ms

stta

an

nc

ce

es

s n

no

ott e

ev

ve

en

n w

wh

he

ee

ells

s ffrro

om

m

tth

he

e s

sa

am

me

e v

ve

eh

hiic

clle

e m

mo

od

de

ell!!

U

Us

siin

ng

g  tty

yp

pe

es

s  o

off  w

wh

he

ee

ell  a

an

nd

d/

/o

orr

tty

yrre

es

w

wh

hiic

ch

h

ha

av

ve

n

no

ott 

b

be

ee

en

n

a

ap

pp

prro

ov

ve

ed

d  b

by

y  u

us

s  ffo

orr  y

yo

ou

urr  v

ve

eh

hiic

clle

e

m

mo

od

de

ell  c

ca

an

n  b

be

e  d

de

ettrriim

me

en

ntta

all  tto

o  tth

he

e

s

sa

affe

etty

y  o

off  tth

he

e  v

ve

eh

hiic

clle

e..  IItt  c

ca

an

n  a

alls

so

o

a

affffe

ec

ctt  tth

he

e  v

ve

eh

hiic

clle

e  u

un

nd

de

err  tth

he

e

C

Co

on

ns

sttrru

uc

cttiio

on

n a

an

nd

d U

Us

se

e rre

eg

gu

ulla

attiio

on

ns

s..

W

Wa

arrn

niin

ng

g

P

Plle

ea

as

se

e  tta

ak

ke

e  n

no

ottiic

ce

e  o

off  tth

he

e  w

wa

arrn

niin

ng

g

n

no

otte

es

s o

on

n tth

he

e n

ne

ex

xtt p

pa

ag

ge

e..

e.g. 1

19

95

5 /

/ 6

65

5 R

R 1

15

5 9

91

1 T

T

1

19

95

5 =

Tyre width in mm

6

65

5

=

Height/width ratio in %

R

R

=

Radial construction code 
letter =  R

Radial

1

15

5

=

Wheel diameter in inches

9

91

1

=

Carrying capability code

T

T

=

Speed code letter

-------------------------------------------------------------------------------------------------------------------------------------------------------------

-------------------------------------------------------------------------------------------------------------------------------------------------------------

TIPS AND MAINTENANCE

3.64

–––––––––––––––––––––––––––––––––––––––––––––––––––––––––––––––––––––––––––

IF AND WHEN

W

Wh

he

ee

ells

s  a

an

nd

d  w

wh

he

ee

ell  b

bo

olltts

s  a

arre

e

m

ma

attc

ch

he

ed

d tto

o e

ea

ac

ch

h o

otth

he

err..

T

Th

he

erre

effo

orre

e,,  w

wh

he

en

ne

ev

ve

err  w

wh

he

ee

ells

s  a

arre

e

c

ch

ha

an

ng

ge

ed

d  tto

o  a

a  d

diiffffe

erre

en

ntt  v

ve

errs

siio

on

n

((e

e..g

g..  a

allllo

oy

y  w

wh

he

ee

ells

s  o

orr  w

wh

he

ee

ells

s  w

wiitth

h

w

wiin

ntte

err  tty

yrre

es

s)),,  tth

he

e  c

co

orrrre

es

sp

po

on

nd

diin

ng

g

w

wh

he

ee

ell  b

bo

olltts

s  w

wiitth

h  tth

he

e  c

co

orrrre

es

sp

po

on

nd

d--

iin

ng

g lle

en

ng

gtth

h a

an

nd

d tta

ap

pe

err,, m

mu

us

stt a

alls

so

o b

be

e

u

us

se

ed

d..  T

Th

he

e  s

se

ec

cu

urriitty

y  o

off  tth

he

e  w

wh

he

ee

ells

s

a

an

nd

d  tth

he

e  ffu

un

nc

cttiio

on

niin

ng

g  o

off  tth

he

e  b

brra

ak

ke

e

s

sy

ys

stte

em

m d

de

ep

pe

en

nd

d o

on

n tth

hiis

s!!

IIff  w

wh

he

ee

ell  ttrriim

m  d

diis

sc

cs

s  a

arre

e  s

su

ub

bs

se

e--

q

qu

ue

en

nttlly

y  iin

ns

stta

alllle

ed

d  iitt  iis

s  e

es

ss

se

en

nttiia

all  tto

o

e

en

ns

su

urre

e  tth

ha

att  tth

he

e  a

aiirr  ffllo

ow

w  rre

em

ma

aiin

ns

s

a

ad

de

eq

qu

ua

atte

e tto

o c

co

oo

oll tth

he

e b

brra

ak

ke

es

s..

Technical Service  Centres have  all the
necessary information about the possible
conversion  of wheels,  tyres and  wheel
trims.

W

Wh

he

ee

ell b

bo

olltts

s

T

Th

he

e  w

wh

he

ee

ell  b

bo

olltts

s  m

mu

us

stt  b

be

e  c

clle

ea

an

n  a

an

nd

d

e

ea

as

sy

y  tto

o  ttu

urrn

n  –

–  d

do

o  n

no

ott  g

grre

ea

as

se

e  o

orr  o

oiill

u

un

nd

de

err a

an

ny

y c

ciirrc

cu

um

ms

stta

an

nc

ce

es

s!!

T

Th

hiis

s  a

ap

pp

plliie

es

s  n

no

ott  o

on

nlly

y  tto

o  c

ch

ha

an

ng

giin

ng

g  a

a

d

de

effe

ec

cttiiv

ve

e  w

wh

he

ee

ell  b

bu

utt  a

alls

so

o  w

wh

he

en

n  rre

e--

p

plla

ac

ciin

ng

g  s

su

um

mm

me

err  tty

yrre

es

s  w

wiitth

h  w

wiin

ntte

err

tty

yrre

es

s a

an

nd

d v

viic

ce

e--v

ve

errs

sa

a..

C

Ch

ha

an

ng

giin

ng

g tth

he

e w

wh

he

ee

ells

s rro

ou

un

nd

d

If the  front tyres are  worn  more  than  the
rear  it is advisable  to  change  the  wheels
round  as shown.  All tyres will then  have
approximately the same length of service
life.

With certain types of tread wear it can be
an advantage to change the wheels diag-
onally. 

W

Wiin

ntte

err tty

yrre

es

s

W

Wa

arrn

niin

ng

g

IIn

n  w

wiin

ntte

err  c

co

on

nd

diittiio

on

ns

s,,  w

wiin

ntte

err  tty

yrre

es

s

w

wiillll s

siig

gn

niiffiic

ca

an

nttlly

y iim

mp

prro

ov

ve

e h

ha

an

nd

dlliin

ng

g

o

off tth

he

e v

ve

eh

hiic

clle

e.. T

Th

hiis

s a

alls

so

o a

ap

pp

plliie

es

s tto

o

v

ve

errs

siio

on

ns

s w

wiitth

h ffo

ou

urr-- w

wh

he

ee

ell d

drriiv

ve

e*

*..

B

Be

ec

ca

au

us

se

e  o

off  tth

he

eiirr  m

ma

ak

ke

e  u

up

p  ((w

wiid

dtth

h,,

rru

ub

bb

be

err  m

miix

xttu

urre

e,,  ttrre

ea

ad

d  ffo

orrm

ma

attiio

on

n

e

ettc

c..)),,  s

su

um

mm

me

err  tty

yrre

es

s  p

prro

ov

viid

de

e  lle

es

ss

s

ttrra

ac

cttiio

on

n o

on

n iic

ce

e a

an

nd

d s

sn

no

ow

w..

LEO-032

-------------------------------------------------------------------------------------------------------------------------------------------------------------

-------------------------------------------------------------------------------------------------------------------------------------------------------------

TIPS AND MAINTENANCE

IF AND WHEN 

–––––––––––––––––––––––––––––––––––––––––––––––––––––––––––––––––––––––––––

3.65

When  fitting  winter  tyres note  the  follow-
ing:

For  better  driving  performance,  fit win-

ter tyres on all four wheels.

Winter tyres are no longer fully effective

when the tread has worn down to a depth
of 4 mm.

The  following  speed  limits are  valid  for
winter tyres:

Code letter Q max. 160 km/h

Code letter T max. 190 km/h

Code letter H max. 210 km/h

W

Wa

arrn

niin

ng

g

T

Th

he

e h

hiig

gh

he

es

stt p

pe

errm

miis

ss

siib

blle

e s

sp

pe

ee

ed

d ffo

orr

y

yo

ou

urr  w

wiin

ntte

err  tty

yrre

es

s  m

mu

us

stt  n

no

ott  b

be

e

e

ex

xc

ce

ee

ed

de

ed

d..  T

Th

hiis

s  c

co

ou

ulld

d  d

da

am

ma

ag

ge

e  tth

he

e

w

wh

he

ee

ell  a

an

nd

d  lle

ea

ad

d  tto

o  a

a  s

se

erriio

ou

us

s  a

ac

cc

cii--

d

de

en

ntt..

F

Fo

orr  tth

hiis

s  rre

ea

as

so

on

n,,  iin

n  s

so

om

me

e  c

co

ou

un

nttrriie

es

s,,

v

ve

eh

hiic

clle

es

s w

wh

hiic

ch

h c

ca

an

n e

ex

xc

ce

ee

ed

d tth

hiis

s s

sp

pe

ee

ed

d

m

mu

us

stt  h

ha

av

ve

e  a

an

n  a

ap

pp

prro

op

prriia

atte

e  s

sttiic

ck

ke

err  iin

n

tth

he

e  d

drriiv

ve

err’’s

s  ffiie

elld

d  o

off  v

viie

ew

w..  T

Th

he

es

se

e  a

arre

e

a

av

va

aiilla

ab

blle

e  ffrro

om

m  T

Te

ec

ch

hn

niic

ca

all  S

Se

errv

viic

ce

e

C

Ce

en

nttrre

es

s..

Please  note  regulations to  this effect in
your country.

All-weather  tyres can  also  be  used

instead of winter tyres.

If you  have  a  flat tyre  the  remarks on

using  the  spare  wheel on  page  3.59
should be noted.

Do  not leave  winter  tyres fitted  for  an

unnecessary long  period  because  when
the  roads are  free  of snow  and  ice  the
handling with summer tyres is better.

F

Fo

orr  e

en

nv

viirro

on

nm

me

en

ntta

all  rre

ea

as

so

on

ns

s  s

su

um

m--

m

me

err  tty

yrre

es

s  s

sh

ho

ou

ulld

d  b

be

e  ffiitttte

ed

d  a

ag

ga

aiin

n

a

as

s  s

so

oo

on

n  a

as

s  p

po

os

ss

siib

blle

e  b

be

ec

ca

au

us

se

e  n

no

orr--

m

ma

alllly

y tth

he

ey

y a

arre

e q

qu

uiie

ette

err iin

n rru

un

nn

niin

ng

g,, tty

yrre

e

w

we

ea

arr  iis

s  rre

ed

du

uc

ce

ed

d  a

an

nd

d  tth

he

e  ffu

ue

ell  c

co

on

n--

s

su

um

mp

pttiio

on

n iis

s llo

ow

we

err.. 

S

Sn

no

ow

w c

ch

ha

aiin

ns

s

Snow  chains may only be  fitted  on  the
front wheels. This also applies to vehicles
with four-wheel drive*.

The  use  of snow  chains on  the  tyres
195/65 R 15 or 175/80 R 14 is allowed.

O

On

nlly

y  u

us

se

e  tth

hiin

n  c

ch

ha

aiin

ns

s  w

wh

hiic

ch

h  d

do

o  n

no

ott

s

stta

an

nd

d c

clle

ea

arr m

mo

orre

e tth

ha

an

n 1

15

5 m

mm

m ((iin

nc

cllu

ud

d--

iin

ng

g tte

en

ns

siio

on

ne

err))..

When  using  snow  chains wheel trim
plates and trim rings must be taken off. In
this case,  the  wheel bolts must then  be
fitted with caps to protect them.

When driving over roads which are free of
snow  you  must remove  the  chains.  On
such roads they are detrimental to vehicle
handling, damage the tyres and wear out
quickly.

In some countries the maximum permissi-
ble speed with snow chains is 50 km/h.

-------------------------------------------------------------------------------------------------------------------------------------------------------------

-------------------------------------------------------------------------------------------------------------------------------------------------------------

C

Ch

ha

an

ng

giin

ng

g w

wh

he

ee

ells

s

TIPS AND MAINTENANCE

3.66

–––––––––––––––––––––––––––––––––––––––––––––––––––––––––––––––––––––––––––

IF AND WHEN

W

Wa

arrn

niin

ng

g

IIn

n c

ca

as

se

e o

off a

a fflla

att tty

yrre

e o

orr p

pu

un

nc

cttu

urre

e,,

p

pa

arrk

k tth

he

e v

ve

eh

hiic

clle

e a

as

s ffa

arr a

as

s p

po

os

ss

siib

blle

e

a

aw

wa

ay

y  ffrro

om

m  tth

he

e  ttrra

affffiic

c  ffllo

ow

w..  IIff  n

ne

ec

c--

e

es

ss

sa

arry

y,,  s

sw

wiittc

ch

h  h

ha

az

za

arrd

d  w

wa

arrn

niin

ng

g

lliig

gh

htts

s  o

on

n  a

an

nd

d  p

plla

ac

ce

e  tth

he

e  w

wa

arrn

niin

ng

g

ttrriia

an

ng

glle

e  iin

n  p

po

os

siittiio

on

n  –

–  n

no

otte

e  a

an

ny

y

s

stta

attu

utto

orry

y rre

eq

qu

uiirre

em

me

en

ntts

s..

A

Allll v

ve

eh

hiic

clle

e o

oc

cc

cu

up

pa

an

ntts

s s

sh

ho

ou

ulld

d lle

ea

av

ve

e

tth

he

e  v

ve

eh

hiic

clle

e  a

an

nd

d  m

mo

ov

ve

e  tto

o  a

a  s

sa

affe

e

a

arre

ea

a ((e

e..g

g.. b

be

eh

hiin

nd

d s

sa

affe

etty

y b

ba

arrrriie

err))..

A

Ap

pp

plly

y h

ha

an

nd

db

brra

ak

ke

e ffiirrm

mlly

y,, e

en

ng

ga

ag

ge

e a

a

g

ge

ea

arr  o

orr  p

plla

ac

ce

e  tth

he

e  g

ge

ea

arr  s

se

elle

ec

ctto

orr  iin

n

p

po

os

siittiio

on

n “

“P

P”

” a

an

nd

d c

ch

ho

oc

ck

k tth

he

e o

op

pp

po

os

siitte

e

w

wh

he

ee

ell w

wiitth

h a

a s

stto

on

ne

e o

orr s

siim

miilla

arr..

W

Wh

he

en

n tto

ow

wiin

ng

g a

a ttrra

aiille

err,, tth

he

e ttrra

aiille

err

m

mu

us

stt ffiirrs

stt b

be

e d

diis

se

en

ng

ga

ag

ge

ed

d ffrro

om

m tth

he

e

tto

ow

wiin

ng

g v

ve

eh

hiic

clle

e b

be

effo

orre

e tth

he

e w

wh

he

ee

ell iis

s

c

ch

ha

an

ng

ge

ed

d..

C

Ca

arrrry

y o

ou

utt w

wh

he

ee

ell c

ch

ha

an

ng

ge

e o

on

n a

as

s fflla

att a

a

s

su

urrffa

ac

ce

e a

as

s p

po

os

ss

siib

blle

e..

Take  tools and  spare  wheel out of lug-

gage compartment.

W

Wh

he

en

n u

us

siin

ng

g tth

he

e rre

ed

du

uc

ce

ed

d s

sp

pa

ac

ce

e s

sp

pa

arre

e

w

wh

he

ee

ell*

* ((iin

n ffo

ou

urr--w

wh

he

ee

ell d

drriiv

ve

e v

ve

eh

hiic

clle

es

s)),,

p

plle

ea

as

se

e o

ob

bs

se

errv

ve

e tth

he

e ffo

ollllo

ow

wiin

ng

g p

po

oiin

ntts

s::

As the emergency spare is smaller than

a normal wheel, the free height of the axle
over  the  spare  is lowered  by about 30
mm.  Try not to  use  roads with  bumps or
pot holes to  avoid  damaging  the  under-
body.  Nor  should  you  use  an  automatic
care  wash  as the  underbody may touch
the floor.

The  emergency wheels of the  different

versions of the  vehicle  have  been  spe-
cially developed for their respective mod-
els.  So  they should  not be  exchanged  or
used in a different model. Nor should you
use  the  emergency wheel from  another
model of car.

Neither  normal tyres nor  winter  tyres

should be fitted onto this wheel.

W

Wa

arrn

niin

ng

g!!

T

Th

he

e  e

em

me

errg

ge

en

nc

cy

y  s

sp

pa

arre

e*

*  s

sh

ho

ou

ulld

d

o

on

nlly

y b

be

e u

us

se

ed

d tte

em

mp

po

orra

arriilly

y a

an

nd

d ffo

orr a

a

s

sh

ho

orrtt  ttiim

me

e,,  a

an

nd

d  iitt  m

mu

us

stt  b

be

e  rre

e--

p

plla

ac

ce

ed

d a

as

s s

so

oo

on

n a

as

s p

po

os

ss

siib

blle

e..

A

Afftte

err  ffiittttiin

ng

g  tth

he

e  e

em

me

errg

ge

en

nc

cy

y

s

sp

pa

arre

e,,  c

ch

he

ec

ck

k  iitts

s  p

prre

es

ss

su

urre

e,,  w

wh

hiic

ch

h

s

sh

ho

ou

ulld

d b

be

e 4

4..2

2 b

ba

arr,, a

as

s s

so

oo

on

n a

as

s p

po

os

s--

s

siib

blle

e..

Y

Yo

ou

u  s

sh

ho

ou

ulld

d  n

no

ott  d

drriiv

ve

e  a

ab

bo

ov

ve

e  8

80

0

k

km

m/

/h

h..  A

Av

vo

oiid

d  b

brru

us

sq

qu

ue

e  a

ac

cc

ce

elle

erra

a--

ttiio

on

ns

s,,  b

brra

ak

kiin

ng

g,,  a

an

nd

d  s

sp

pe

ee

ed

diin

ng

g

a

arro

ou

un

nd

d b

be

en

nd

ds

s..

Y

Yo

ou

u  m

mu

us

stt  n

ne

ev

ve

err  d

drriiv

ve

e  w

wiitth

h  m

mo

orre

e

tth

ha

an

n  o

on

ne

e  e

em

me

errg

ge

en

nc

cy

y  s

sp

pa

arre

e  w

wh

he

ee

ell..

F

Fo

orr 

tte

ec

ch

hn

niic

ca

all 

rre

ea

as

so

on

ns

s,, 

s

sn

no

ow

w

c

ch

ha

aiin

ns

s  m

ma

ay

y  n

no

ott  b

be

e  u

us

se

ed

d  o

on

n  s

sp

pa

arre

e

w

wh

he

ee

ells

s..

IIff  y

yo

ou

u  h

ha

av

ve

e  tto

o  d

drriiv

ve

e  w

wiitth

h  s

sn

no

ow

w

c

ch

ha

aiin

ns

s a

an

nd

d o

on

ne

e o

off tth

he

e ffrro

on

ntt tty

yrre

es

s iis

s

p

pu

un

nc

cttu

urre

ed

d,, p

pu

utt tth

he

e s

sp

pa

arre

e w

wh

he

ee

ell o

on

n

tth

he

e  rre

ea

arr  a

ax

xlle

e..  R

Re

ep

plla

ac

ce

e  tth

he

e  p

pu

un

nc

c--

ttu

urre

ed

d  ffrro

on

ntt  w

wh

he

ee

ell  w

wiitth

h  tth

he

e  rre

ea

arr

w

wh

he

ee

ell  y

yo

ou

u  h

ha

av

ve

e  rre

em

mo

ov

ve

ed

d..  P

Pu

utt  tth

he

e

s

sn

no

ow

w  c

ch

ha

aiin

ns

s  o

on

n  b

be

effo

orre

e  ffiittttiin

ng

g  tth

he

e

w

wh

he

ee

ell..

-------------------------------------------------------------------------------------------------------------------------------------------------------------

-------------------------------------------------------------------------------------------------------------------------------------------------------------

TIPS AND MAINTENANCE

IF AND WHEN 

–––––––––––––––––––––––––––––––––––––––––––––––––––––––––––––––––––––––––––

3.67

– Remove  c

ce

en

nttrre

e  c

co

ov

ve

err with  the  wheel

spanner  and  the  wire  hook*.  Put the
wire  hook in  one  of the  recesses of the
wheel trim. Pass wheel spanner through
hook and  lever  trim  off –  see  illustra-
tion.

Push the wheel spanner as far as possi-

ble onto the wheel bolt as shown and turn
the  spanner  anti-clockwise.  When  doing
this,  grip  the  spanner  as far  as possible
towards the lever end.

If the  bolts cannot be  loosened,  one  can
in an emergency, carefully push the span-
ner  down  with  a  foot on  the  end  of the
lever.  One  should  ensure  that one  has a
firm  stance  and  a  good  grip  on  the  vehi-
cle.

Loosen wheel bolts about one turn.

B45-082C

TO8-042

-------------------------------------------------------------------------------------------------------------------------------------------------------------

-------------------------------------------------------------------------------------------------------------------------------------------------------------

TIPS AND MAINTENANCE

3.68

–––––––––––––––––––––––––––––––––––––––––––––––––––––––––––––––––––––––––––

IF AND WHEN

Depressions under vehicle for jack:

W

Wa

arrn

niin

ng

g

IIff  tth

he

e  jja

ac

ck

k  iis

s  n

no

ott  ffiitttte

ed

d  a

att  tth

he

e

p

po

oiin

ntts

s  m

ma

arrk

ke

ed

d  o

orr  d

de

es

sc

crriib

be

ed

d,,  d

da

am

m--

a

ag

ge

e  c

co

ou

ulld

d  b

be

e  c

ca

au

us

se

ed

d  tto

o  tth

he

e  v

ve

eh

hii--

c

clle

e.. T

Th

he

erre

e iis

s a

alls

so

o a

a rriis

sk

k o

off iin

njju

urry

y!!

– Depressions in the side member at front

and rear indicate the points at which the
jack must be fitted – see arrows in illus-
tration.

– These marks are about 15 cm and 25 cm

from  the  front and  rear  wheel arch,
respectively.

Place jack under vehicle:

The  illustration  shows the  jack fitted  on
the rear left hand side.

W

Wa

arrn

niin

ng

g

IIff tth

he

e g

grro

ou

un

nd

d u

un

nd

de

err tth

he

e jja

ac

ck

k iis

s tto

oo

o

s

so

offtt,,  tth

he

e  v

ve

eh

hiic

clle

e  c

co

ou

ulld

d  s

slliip

p  o

offff  tth

he

e

jja

ac

ck

k..

E

En

ns

su

urre

e,,  tth

he

erre

effo

orre

e,,  tth

ha

att  tth

he

e  jja

ac

ck

k  iis

s

o

on

n  a

a  s

so

olliid

d  s

su

urrffa

ac

ce

e..  IIff  n

ne

ec

ce

es

ss

sa

arry

y,,

u

us

se

e  a

a  lla

arrg

ge

e,,  s

stta

ab

blle

e  u

un

nd

de

errlla

ay

y  tto

o

p

plla

ac

ce

e u

un

nd

de

err tth

he

e jja

ac

ck

k..

IIff tth

he

e g

grro

ou

un

nd

d u

un

nd

de

err tth

he

e jja

ac

ck

k iis

s s

slliip

p--

p

pe

erry

y,,  p

plla

ac

ce

e  a

a  n

no

on

n--s

slliip

p  rru

ub

bb

be

err  m

ma

att

u

un

nd

de

errn

ne

ea

atth

h..

TO8-043

B45-084C

-------------------------------------------------------------------------------------------------------------------------------------------------------------

-------------------------------------------------------------------------------------------------------------------------------------------------------------

TIPS AND MAINTENANCE

IF AND WHEN 

–––––––––––––––––––––––––––––––––––––––––––––––––––––––––––––––––––––––––––

3.69

In vehicles fitted  with  a  plastic cover*,

remove  the  cover  to  access the  attach-
ment points of the  vehicle.  For  this pro-
ceed as follows:

Pull on  the  cover  and  remove  from  its
housing in the direction of the arrow.

Once  the  cover  is removed  it will remain
suspended  by a  rubber  band  to  avoid  its
loss as shown in the illustration.

LEO-039

LEO-038

-------------------------------------------------------------------------------------------------------------------------------------------------------------


Content      ..     11      12      13      14     ..