Seat Ateca. Service Manual - part 17


  Index      Seat     Seat Ateca. Service Manual


Search            copyright infringement  


Content      ..     15      16      17      18     ..


Seat Ateca. Service Manual - part 17


-------------------------------------------------------------------------------------------------------------------------------------------------------------
Towing bracket device*

Trailer brakes
If the trailer has its own brake system, please
take the relevant legal requirements into ac-
count. Never connect the trailer's brake sys-
tem to the vehicle's brake system.

Tow rope
Always use a cable between the vehicle and
the trailer 

››› 

page 263

.

Trailer rear lights
The trailer's rear lights should comply with
the statutory safety regulations 

››› 

page 263

.

Never connect the trailer's rear lights directly
to the vehicle's electric system. If you are not
sure that the trailer's electrical connection is
correct, have it checked by a specialised
workshop. SEAT recommends visiting a SEAT
dealership for this.

Exterior mirrors
If you cannot see the area behind the trailer
with the exterior mirrors of the towing vehi-
cle, additional mirrors will have to be instal-
led in accordance with the regulations of the
country in question. The exterior mirrors
should be adjusted before you start driving
and must provide a sufficient field of vision
at the rear.

Trailer maximum electricity consumption

Consumers

Europe, Asia,
Africa, South

America and

Central America

Australia

Brake lights (total)

84 Watts

108 Watts

Turn signal (on each
side)

42 Watts

54 Watts

Side lights (on each
side)

50 Watts

100 Watts

Reverse lights (on
each side)

42 Watts

54 Watts

Rear fog light

42 Watts

54 Watts

Never exceed the values indicated!

WARNING

If the towing bracket is wrongly fitted or is
not the right one, the trailer could become
detached from the vehicle and cause serious
injury.

CAUTION

If the rear lights of the trailer are not cor-

rectly connected, the vehicle's electronic sys-
tem may be damaged.

If the trailer absorbs excessive electric cur-

rent, the vehicle's electronic system may be
damaged.

Never connect the trailer's electric system

directly to the electrical connections of the
tail lights or any other power sources. Only
use the connections intended for providing
electric current to the trailer.

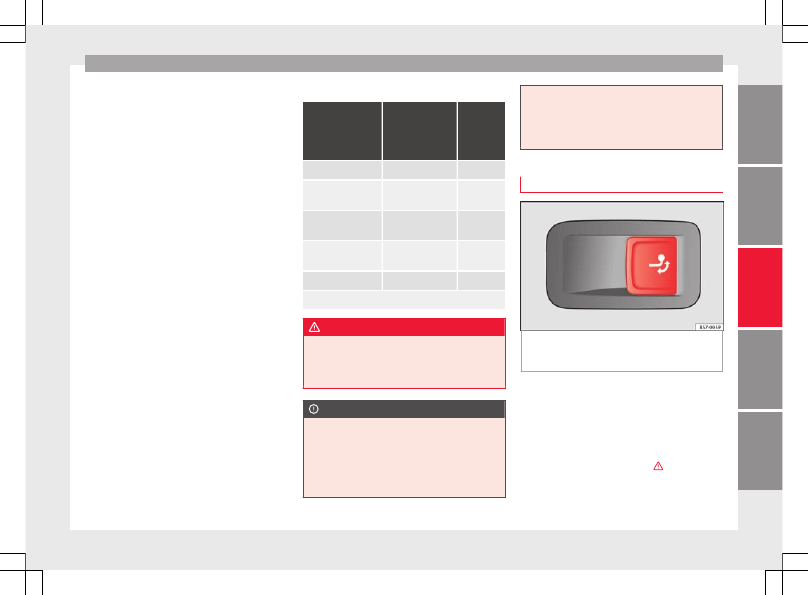
Electrical unlocking tow hitch

Fig. 219 

On the right side of the luggage

compartment: button for unlocking the tow
hitch.


››› 

table on page 2

The tow hitch is located in the bumper. The
electrical unlocking tow hitch cannot be dis-
assembled.

There should be no person, animal or object
in the path of the tow hitch 

››› 

.

»

261

Tec

hnic

al

 d

at

a

Adv

ic

e

Oper

ation

Emer

genc

ie

s

Saf

ety

-------------------------------------------------------------------------------------------------------------------------------------------------------------

-------------------------------------------------------------------------------------------------------------------------------------------------------------

Operation

Unlock the tow hitch and remove it

Stop the vehicle and connect the electronic

parking brake 

››› 

page 174

.

Switch off the engine.

Open the rear lid.

Pull the 

››› 

Fig. 219

 button briefly. The tow

hitch unlocks electrically and automatically
turns outwards. The control lamp in the but-
ton will flash 

››› 

Fig. 219

.

Remove the tow hitch with your hand until

you feel and see that it has engaged and the
control lamp on the button stays on.

Close the tailgate.

Cover the tow hitch

Stop the vehicle and apply the electronic

parking brake.

Switch off the engine.

Unhook the trailer and interrupt the electri-

cal connection between it and the vehicle. If
you are using an adapter, remove it from the
trailer's power socket.

Open the rear lid.

Pull the 

››› 

Fig. 219

 button briefly. The tow

hitch unlocks electrically.

Turn the tow hitch under the bumper with

your hand until you feel and see that it en-
gages and the control lamp on the 

››› 

Fig. 219

button stays on.

Close the tailgate.

Meaning of control lamp

If the warning light of the button 

››› 

Fig. 219

is flashing, this means that the tow hitch has
not been attached properly or is damaged

››› 

.

If the warning lamp stays on with the rear

lid open, the tow hitch is correctly in place
both when engaged and when covered.

The control lamp of the button will go off

approx. 1 minute after closing the rear lid.

WARNING

Undue use of the towing bracket may cause
injury and accidents.

Only use the tow hitch if it is properly en-

gaged.

Always ensure that no person, animal or

object is to be found in the path of the tow
hitch.

Never use a tool or instrument while the

tow hitch is moving.

Never press the 

››› 

Fig. 219

 button when

there is a trailer hooked to the vehicle or
when a carrier system or other accessories
are mounted on the tow hitch.

If the tow hitch is not attached properly, do

not use it. Instead, go to a specialised work-
shop and have the towing bracket checked.

If you detect any fault in the electrical sys-

tem or in the towing bracket, contact a speci-
alised workshop and ask them to check it.

If the ball has a diameter of less than 49

mm at any one point, do not use the towing
bracket under any circumstances.

CAUTION

If you clean the vehicle with high-pressure or
steam devices, do not point the jet directly
towards the retractable tow hitch or the trail-
er power socket, as this may damage the
joints or remove the grease necessary for lu-
brication.

Note

At extremely low temperatures, the tow hitch
may be impossible to use. In this case, place
the vehicle in a warmer location (for example,
a garage).

Fitting a bicycle carrier on the retract-
able tow hitch

The maximum allowed weight of the carrier
system, including the load, is 

75 kg. The car-

rier system should not protrude more than
700 mm backwards from the spherical head.
Only carrier systems on which up to 3 bikes
can be mounted are allowed. Heavier bicy-
cles must be mounted as close to the vehicle
as possible (tow hitch).

262

-------------------------------------------------------------------------------------------------------------------------------------------------------------

-------------------------------------------------------------------------------------------------------------------------------------------------------------

Towing bracket device*

WARNING

The incorrect use of the tow hitch with a bicy-
cle rack mounted on the tow hitch can cause
accidents and injury.

Never exceed the maximum weight or the

limits indicated above.

The bicycle rack may not be mounted to the

neck of the hitch below the ball because, due
to the shape of the neck and depending on
the rack model, the rack could be incorrectly
mounted on the vehicle.

Always read and take the manufacturer as-

sembly instructions into account.

CAUTION

If the maximum weight and limits indicated
above are exceeded, the vehicle may suffer
considerable damage.

Never exceed the values indicated!

Note

SEAT recommends removing, as far as possi-
ble, all removable parts of the bicycles before
setting off. These parts include, for example,
baskets and saddlebags, child seats or bat-
teries. This improves aerodynamics and the
centre of gravity of the rack system.

Hooking up and connecting a trailer

Fig. 220 

Schematic diagram: assignment of

the pins of the trailer's power socket.

Key to the 

Fig. 220

:

Pin

Meaning

1

Left turn signal

2

Rear fog light

3

Table of pins 1, 2, 4, 5, 6, 7 and 8

4

Right turn signal

5

Rear light, right

6

Brake lights

7

Rear light, left

8

Reverse lights

9

Permanent live

10

Live charge cable

11

Table for pin 10

Key to the 

Fig. 220

:

Pin

Meaning

12

Unassigned

13

Table for pin 9

Trailer power socket
The vehicle is fitted with a 13-pole power
socket for the electrical connection between
the trailer and the vehicle. With the engine
running, electrical devices on the trailer re-
ceive power from the electrical connection
(pin 9 and pin 10 of the trailer power socket).

If the system detects that a trailer has been
connected electrically, the electrical equip-
ment on the trailer will receive voltage
through this connection (pins 9 and 10). Pin
9 has a permanent live. This powers, for ex-
ample, the trailer's interior lighting. Electrical
devices such as a fridge in a caravan 

only re-

ceive electrical power if the engine is running
(through pin 10).

To avoid overloading the electrical system,
you cannot connect the ground wires of pin
3, pin 11 or pin 13.

If the trailer has a 

7-contact connector, you

will need to use an adapter cable. In this case
the function corresponding to pin 10 will not
be available.

»

263

Tec

hnic

al

 d

at

a

Adv

ic

e

Oper

ation

Emer

genc

ie

s

Saf

ety

-------------------------------------------------------------------------------------------------------------------------------------------------------------

-------------------------------------------------------------------------------------------------------------------------------------------------------------

Operation

Tow rope
The tow rope must always be securely fixed
to the towing vehicle and loose enough so
that the vehicle can handle turns smoothly.
However, make sure that the cable does not
rub on the ground while driving.

Trailer rear lights
Always check the trailer's rear lights to en-
sure they are working correctly and that they
comply with the relevant safety regulations.
Make sure that the maximum permissible
power that can be absorbed by the trailer is
not exceeded 

››› 

page 261

.

Connection to the anti-theft system
The trailer is included in the anti-theft system
if the following conditions are met:

If the vehicle is factory-equipped with an

anti-theft alarm and towing bracket.

If the trailer is electrically connected to the

towing vehicle through the trailer power
socket.

If the electrical systems of the vehicle and

trailer are in perfect condition and have no
faults or damage.

If the vehicle is locked with the key and the

anti-theft alarm is activated.

When the vehicle is locked, the alarm is trig-
gered if the electrical connection with the
trailer is cut off.

Before hitching or unhitching a trailer, always
turn off the anti-theft alarm. Otherwise, the
tilt sensor could cause the alarm to go off.

Trailers with LED rear lights
For technical reasons, trailers fitted with LED
rear lights cannot be connected to the anti-
theft alarm system.

When the vehicle is locked, the alarm does
not go off when the electrical connection with
the trailer is cut if it has rear lights with light-
emitting diodes.

If the 

Eco driving profile was selected when

hitching the trailer, this will automatically
switch to the 

Normal profile. If the system

cannot detect the attached trailer or if the
towing bracket has been retrofitted by an au-
to repair shop other than SEAT, you must
manually select the 

Normal profile before you

start driving with a trailer attached. To recon-
nect the 

Eco profile once the trailer has been

unhitched, switch the ignition off and back
on once.

WARNING

If the cables are improperly or incorrectly
connected, it may lead to an excessive
amount of current supplied to the trailer,
which can cause abnormalities in the entire
vehicle electronic system, as well as acci-
dents and serious injuries.

Ensure that any repairs that need to be car-

ried out on the electrical system are carried
out by a specialised workshop.

Never connect the trailer's electric system

directly to the electrical connections of the
tail lights or any other power sources.

WARNING

Contact between the pins of the trailer power
socket can cause short circuits, overloading
of the electrical system or failure of the light-
ing system, and consequently can cause acci-
dents and serious injuries.

Never connect the pins of the trailer power

socket to each other.

Make sure any work on bent pins is carried

out by a specialised workshop.

CAUTION

Do not leave the trailer connected to the vehi-
cle when parked; place it on its support
wheel or its supports. If the vehicle rises or
falls due, for example, to a variation of the
load or a burst tyre, increased pressure will
be placed on the towing bracket and the trail-
er, and both the vehicle and the trailer can be
damaged.

Note

 In case of malfunctioning of the electrical

systems of the vehicle or trailer, as well as of

264

-------------------------------------------------------------------------------------------------------------------------------------------------------------

-------------------------------------------------------------------------------------------------------------------------------------------------------------

Towing bracket device*

the anti-theft system, have these checked out
by a specialised workshop.

If the trailer accessories consume energy

through the power socket to the trailer and
the engine is turned off, the battery will dis-
charge.

If the vehicle battery is running low, the

electrical connection with the trailer will be
automatically cut.

Loading a trailer

Technically permissible maximum trailer
weight and vertical load on the coupling de-
vice
The technically permissible maximum trailer
weight is the weight that the vehicle can tow

››› 

The vertical load on the coupling load

is exerted vertically from above on the tow
hitch of the towing bracket 

››› 

page 307

.

The information on the maximum trailer
weight and vertical load on the coupling de-
vice contained in the type plate of the towing
bracket are experimental values only. The
correct figures for your specific model, which
may be lower than these figures, are given in
the vehicle documentation. The information
in the vehicle documentation takes prece-
dence at all times.

To promote safety while driving, SEAT recom-
mends making the most of the maximum 

ver-

tical load technically permissible on the cou-
pling device 

››› 

page 259

. An insufficient ver-

tical load has a negative influence on the be-
haviour of both the vehicle and trailer.

The vertical load increases the weight on the
rear axle, reducing the vehicle's carrying ca-
pacity.

Gross combination weight of the towing ve-
hicle and trailer
The gross combination weight is the actual
weight of the loaded vehicle plus the actual
weight of the loaded trailer.

In some countries trailers are classified into
distinct categories. SEAT recommends ob-
taining information from a specialised work-
shop regarding which type of trailer is most
suitable for your vehicle.

Trailer loading
The weight of the towing vehicle and trailer
must be balanced. In order to do this, the
load must be as close as possible to the max-
imum vertical load technically permissible on
the coupling point, and it must be evenly dis-
tributed between the back and front of the
trailer:

Distribute loads in the trailer so that heavy

objects are as near to the axle as possible or
above it.

Secure the trailer load properly.

Tyre pressure
Set the tyre pressure of the trailer tyres in ac-
cordance with the trailer manufacturer's rec-
ommendations.

When towing a trailer, inflate the tyres of the
towing vehicle with the maximum allowable
pressure 

››› 

page 296

.

WARNING

If the maximum permissible axle weight, the
maximum load technically permissible on the
coupling point, the maximum authorised ve-
hicle weight or the gross combination weight
of the towing vehicle and trailer are excee-
ded, accidents and serious injuries may oc-
cur.

Never exceed the values indicated!

The actual weight on the front and rear

axles must never exceed the maximum per-
missible axle weight. The weight on the front
and rear axles must never exceed the maxi-
mum permissible weight.

WARNING

A shift in weight could jeopardize the stabili-
ty and security of the towing vehicle and
trailer, which could lead to accidents and se-
rious injuries.

Always load the trailer correctly.

Always secure the load properly using belts

or straps that are suitable and in good condi-
tion.

265

Tec

hnic

al

 d

at

a

Adv

ic

e

Oper

ation

Emer

genc

ie

s

Saf

ety

-------------------------------------------------------------------------------------------------------------------------------------------------------------

-------------------------------------------------------------------------------------------------------------------------------------------------------------

Operation

Driving with a trailer

Adjusting the headlights
When towing a trailer, the front part of the ve-
hicle could lift up, and if the dipped beams
are on, this could dazzle other drivers. Use
the headlight range control to lower the cone
of light. If you do not have headlight range
control, have the headlights adjusted by a
specialised workshop.

Special characteristics of driving with a trail-
er

If your trailer has an 

overrun brake, brake

gently at first and then rapidly. This will pre-
vent the jerking that can be caused by the
locking of trailer wheels.

Due to the gross combination weight of the

towing vehicle and trailer, the braking dis-
tance increases.

When going down a slope, go into lower

gear (if using a manual gearbox or the Tip-
tronic automatic gearbox) to take advantage
of the braking power provided by the engine.
Otherwise, the braking system could over-
heat and even fail.

The trailer weight, as well as the gross com-

bination weight of the towing vehicle and
trailer, change the centre of gravity and the
properties of the vehicle.

If the towing vehicle is empty and the trail-

er is loaded, then the load distribution is in-

correct. Under these conditions, drive slowly
and with extra caution.

Hill starts with a trailer
Depending on the slope of the hill and the
combination weight of the towing vehicle
and trailer, the vehicle might start rolling
backwards slightly when you first start up.

For hill-starting with a trailer, do the follow-
ing:

Press and hold the brake pedal.

Press the  button to disconnect the elec-

tronic parking brake 

››› 

page 174

.

If the vehicle is equipped with a manual

gearbox, push the clutch pedal all the way
down.

Put the vehicle into first gear or turn the se-

lector lever to position 

D/S 

››› 

page 180

.

Pull out the  button and hold it in that

position to stop the towing vehicle and trailer
with the electronic parking brake.

Release the brake pedal.

Start driving slowly. To do this, in the case

of a manual gearbox, slowly release the
clutch pedal.

Do not release the  button until the en-

gine has sufficient force to start driving.

WARNING

If a trailer is pulled incorrectly, this may lead
to loss of control of the vehicle and serious
injury.

Driving with a trailer and transporting

heavy or large objects will change the vehicle
handling and braking distances.

Always drive cautiously and carefully.

Brake earlier than usual.

Adapt your speed and driving style at all

times to suit visibility, weather, road and traf-
fic conditions. Slow down, especially when
driving down hills or slopes.

Accelerate with particular care and caution.

Avoid sudden braking and manoeuvres.

Take great care when overtaking. Reduce

speed immediately if you notice that the trail-
er is swaying, however slightly.

Never attempt to “straighten” the towing

vehicle and trailer while accelerating.

Take into account the speed limit for vehi-

cles with a trailer, as it could be lower than
for vehicles without a trailer.

Stabilisation of the towing vehicle
and trailer

The stabilisation of the towing vehicle and
trailer together is an additional function of
the electronic stability control (ESC).

266

-------------------------------------------------------------------------------------------------------------------------------------------------------------

-------------------------------------------------------------------------------------------------------------------------------------------------------------

Towing bracket device*

If the system detects that the trailer is sway-
ing, it intervenes automatically with the driv-
er steering recommendation to reduce the
swaying of the trailer.

Requirements for the stabilisation of the
towing vehicle and trailer

The vehicle is factory-equipped with a tow-

ing bracket or has been retro-fitted with a
compatible towing bracket.

The ESC and ASR are active. The control

lamp  or  is not lit up on the instrument
panel.

The trailer is electrically connected to the

towing vehicle through the trailer power
socket.

The vehicle is travelling at over 60 km/h

(approx. 37 mph).

The maximum vertical load technically per-

missible is being utilised on the coupling de-
vice.

The trailer has a rigid draw bar.

If the trailer has brakes, it must be equip-

ped with a mechanical overrun brake.

WARNING

The enhanced security provided by the elec-
tric stability control of the towing vehicle and
trailer should not lead you to take any risks
that could compromise your safety.

Adapt your speed and driving style at all

times to suit visibility, weather, road and traf-
fic conditions.

Accelerate with caution when the road is

slippery.

When adjusting any settings, stop acceler-

ating.

WARNING

The electric stability control for the towing
vehicle and trailer may not correctly detect all
driving conditions.

When the ESC is switched off, the stabilisa-

tion of the towing vehicle and trailer is also
switched off.

The stability system does not always detect

light and unstable trailers, so it may not sta-
bilise these correctly.

When driving on slippery surfaces with

poor grip, the trailer can even interfere with
the stability system.

Trailers with a high centre of gravity can tip

even without having previously swayed.

If a trailer is not attached, but the trailer

power socket is connected (e.g. installation
of a bicycle rack with lights), repeated auto-
matic braking may occur in extreme driving
conditions.

Retrofitting a towing bracket

Fig. 221 

Limits and attachment points for ret-

rofitting a towing bracket.

»

267

Tec

hnic

al

 d

at

a

Adv

ic

e

Oper

ation

Emer

genc

ie

s

Saf

ety

-------------------------------------------------------------------------------------------------------------------------------------------------------------

-------------------------------------------------------------------------------------------------------------------------------------------------------------

Operation

SEAT recommends that towing brackets be
retrofitted at a specialised workshop. For ex-
ample, it may very well be necessary to ad-
just the cooling system or mount thermal pro-
tection plates. SEAT recommends visiting a
SEAT dealership for this.

If a towing bracket is retrofitted, the distance
specifications should always be kept in
mind. The distance between the centre of the
spherical head and the road 

››› 

Fig. 221 

D

must never be less than that indicated. This
also applies when the vehicle is fully loaded,
including the technically permissible maxi-
mum vertical load on the coupling device.

Distance specifications 

››› 

Fig. 221

:

Attachment points
932.5 mm
65 mm min.
350-420 mm
220 mm
615.5 mm
1,043 mm

WARNING

If the cables are improperly or incorrectly
connected, this may lead to malfunctions in
the entire vehicle electronic system, as well
as to accidents and serious injuries.

Never connect the trailer's electric system

to the electrical connections of the tail lights

A

B

C

D

E

F

G

or any other unsuitable power sources. Only
use suitable connectors to connect the trail-
er.

The towing bracket should be retrofitted

only at a specialised workshop.

WARNING

If the towing bracket is badly fitted or unsuit-
able, the trailer may separate from the vehi-
cle while driving. This could cause serious ac-
cidents and fatal injuries.

Note

Only use towing brackets that have been ap-
proved by SEAT for the model in question.

268

-------------------------------------------------------------------------------------------------------------------------------------------------------------

-------------------------------------------------------------------------------------------------------------------------------------------------------------

Care and maintenance

Advice

Care and maintenance

Accessories and modifications
to the vehicle

Accessories, replacement parts and
repair work

Always ask your dealer or specialist retailer
for advice before purchasing accessories and
replacement parts.

Your vehicle is designed to offer a high
standard of active and passive safety. For this
reason, we recommend that you ask a SEAT
Official Service for advice before fitting ac-
cessories or replacement parts. Your SEAT Of-
ficial Service has the latest information from
the manufacturer and can recommend acces-
sories and replacement parts which are suita-
ble for your requirements. They can also an-
swer any questions you might have regarding
official regulations.

We recommend you to use only 

SEAT acces-

sories and Genuine SEAT parts

®

. SEAT has

tested these parts and accessories for suita-
bility, reliability and safety. SEAT Official
Services have the necessary experience and
facilities to ensure that the parts are installed
correctly and professionally.

Any 

retro-fitted equipment which has a direct

effect on the vehicle and/or the way it is driv-
en, such as a cruise control system 

or elec-

tronically-controlled suspension, must be
approved for use in your vehicle and bear the
e mark (the European Union's authorisation
symbol).

If 

any additional electrical devices are fitted

which do not serve to control the vehicle it-
self (for instance a refrigerator box, laptop or
ventilator fan, etc.), they must bear the 
sign (manufacturer conformity declaration in
the European Union).

WARNING

Accessories, for example telephone holders
or cup holders, should never be fitted on the
covers, or within the working range of the air-
bags. Otherwise, there is a danger of injury if
the airbag is triggered in an accident.

Modifications

Modifications must always be carried out ac-
cording to our specifications.

Unauthorised modifications to the electronic
components, software, wiring or data transfer
in the vehicle may cause malfunctioning. Due
to the way the electronic components are
linked together in networks, other indirect
systems may be affected by the faults. This
can seriously impair safety, lead to excessive

wear of components, and also invalidate your
vehicle registration documents.

You will appreciate that your SEAT dealership
cannot be held liable for any damage caused
by modifications and/or work performed in-
correctly.

We therefore recommend that all work should
be performed by a SEAT Official Service using
genuine SEAT parts

®

.

WARNING

Incorrectly performed modifications or other
work on your vehicle can lead to malfunctions
and cause accidents.

Radio transmitters and office equip-
ment

Radio transmitters (fixed installation)
Any retrofit installations of radio transmitters
in the vehicle require prior approval. SEAT
generally authorises in-vehicle installations
of approved types of radio transmitters provi-
ded that:

The aerial is installed correctly.

The aerial is installed on the exterior of the

vehicle (and shielded cables are used togeth-
er with non-reflective aerial trimming).

The effective transmitting power does not

exceed 10 Watts at the aerial base.

»

269

Tec

hnic

al

 d

at

a

Adv

ic

e

Oper

ation

Emer

genc

ie

s

Saf

ety

-------------------------------------------------------------------------------------------------------------------------------------------------------------

-------------------------------------------------------------------------------------------------------------------------------------------------------------

Advice

A SEAT Official Service and specialised work-
shop will be able to inform you about options
for installing and operating radio transmitters
with a higher transmitting power.

Mobile radio transmitters
Commercial mobile telephones or radio
equipment might interfere with the electron-
ics of your vehicle and cause malfunctions.
This may be due to:

No external aerial.

External aerial incorrectly installed.

Transmitting power more than 10 W.

You must, therefore, do not operate portable
mobile telephones or radio equipment inside
the vehicle
 without a properly installed exter-
nal aerial 

››› 

.

Please note also that the maximum range of
the equipment can only be achieved with an
external aerial.

Business equipment
Retrofit installation of business or private
equipment in the vehicle is permitted, provi-
ded the equipment cannot interfere with the
driver's immediate control of the vehicle and
that any such equipment carries the  mark.
Any retrofit equipment that could influence
the driver's control of the vehicle must have a
type approval for your vehicle and must carry
the 

e mark.

WARNING

Mobile telephones or radio equipment which
is operated inside the vehicle without a prop-
erly installed external aerial can create exces-
sive magnetic fields that could cause a health
hazard.

Note

The posterior fitting of electric and elec-

tronic equipment in this vehicle affects its li-
cence and could lead to the withdrawal of the
vehicle registration document under certain
circumstances.

Please use the mobile telephone/radio op-

erating instructions.

Care and cleaning

General information

Regular and careful care helps to 

maintain

the value of the vehicle. This may also be one
of the requirements for upholding any war-
ranty claims in the event of corrosion or paint
defects.

SEAT Official Services and specialist retailers
carry stocks of suitable 

car care materials.

Please follow the instructions for use on the
packaging.

WARNING

Cleaning products and other materials used

for car care can be damaging to your health if
misused.

Always keep care products in a safe place,

out of the reach of children. Failure to comply
could result in poisoning.

For the sake of the environment

If possible, use environmentally friendly

products.

The remains of car care products should not

be disposed of with ordinary household
waste.

Vehicle exterior care

Washing the vehicle

The longer substances such as insects, bird
droppings, resinous tree sap, road dirt, in-
dustrial deposits, tar, soot or road salt and
other aggressive materials remain on the ve-
hicle, the more damage they do to the paint-
work. High temperatures (for instance due to
strong sunlight) further intensify the corro-
sive effect.

After the period when salt is put on the roads
it is important to have the underside of the
vehicle washed thoroughly.

270

-------------------------------------------------------------------------------------------------------------------------------------------------------------

-------------------------------------------------------------------------------------------------------------------------------------------------------------

Care and maintenance

Automatic car washes
Before going through a car wash, be sure to
take the usual precautions such as closing
the windows and roof. If the vehicle has spe-
cial accessories such as spoilers or a roof
rack or two-way radio aerial, etc., it is advisa-
ble to consult the car wash tunnel operator.

It is best to use a car wash without revolving
bristles if possible.

Washing the vehicle with a high pressure
cleaner
When washing the vehicle with a high-pres-
sure cleaner, always follow the operating in-
structions for the equipment. This applies
particularly to the 

operating pressure and the

spraying distance. Do not hold the nozzle too
close to soft materials such as rubber hoses
or seals. The same applies to the parking aid
sensors*, which are located in the rear
and/or front bumpers.

Do not use a nozzle that sprays the water out
in a 

direct stream or one that has a rotating

jet for forcing off dirt.

Stickers attached by the factory
Follow these directions to avoid damaging
the stickers:

Do not use high pressure cleaners.

To remove ice or snow from the stickers do

not use window scrapers or ice scrapers.

Do not polish the stickers.

Do not use dirty cloths or sponges.

Preferably wash using a soft sponge and

soft neutral soap.

Washing the car by hand
When washing the car by hand, use plenty of
water to soften the dirt first, and rinse off as
well as possible.

Then clean the vehicle with a soft 

sponge,

glove or brush using only slight pressure.
You should start on the roof and work down.
Special car 

soap should only be used for very

persistent dirt.

Rinse the sponge or glove thoroughly and of-
ten.

Wheels, sills and similar should be cleaned
last. Use a second sponge for this.

WARNING

The vehicle should only be washed with the

ignition switched off. Failure to follow this in-
struction could result in an accident.

Do not clean the underside of chassis, the

inside of wheel arches or wheel trims without
protecting your hands and arms. You may cut
yourself on sharp-edged metal parts. Other-
wise, there is a risk of sustaining cuts.

When washing the car during the winter

season: water and ice in the brake system
can reduce braking effectiveness: risk of acci-
dent!

CAUTION

Do not wash the vehicle in direct sunlight –

otherwise the paint can be damaged.

Do not use sponges, abrasive household

sponges or similar to clean insect remains.
This could damage the surface.

Clean off stubborn dirt (insects, etc.) from

the headlights at regular intervals, for in-
stance when filling the fuel tank. The head-
lights should only be washed with water, do
not wipe them with a dry cloth or sponge. It
is best to use soapy water.

Never wash tyres with a jet that sprays the

water out in a direct stream. This could dam-
age the tyres even if the spray is kept at a
distance and only used for a very short time.

Before washing the vehicle in an automatic

car wash, please make sure to retract the ex-
terior mirrors to prevent them from being
damaged. Electrically retractable exterior
mirrors must not be folded in or out by hand,
always use the electrical power control.

CAUTION

Before washing the vehicle in an automatic

car wash, please proceed as follows to lock
the wiper arms so that they are not moved to-
wards the top of the windscreen:

the bonnet must be closed.

switch the ignition on and off.

press the windscreen wiper lever forward
briefly (windscreen washer function).
This will lock the wiper arms.

»

271

Tec

hnic

al

 d

at

a

Adv

ic

e

Oper

ation

Emer

genc

ie

s

Saf

ety

-------------------------------------------------------------------------------------------------------------------------------------------------------------

-------------------------------------------------------------------------------------------------------------------------------------------------------------

Advice

For the sake of the environment

The car should only be washed in special
wash bays. These areas are prepared to pre-
vent oily water from getting into the public
drains. In some places, washing vehicles out-
side the areas intended for this purpose is
prohibited.

Camera sensors and lenses

Use a small brush to remove snow and a

de-icer spray to remove ice.

Clean the sensors with a solvent-free prod-

uct and a soft, dry cloth.

Moisten the camera lens using a standard

alcohol-based glass cleaning agent and
clean the lens with a dry cloth. In the active
lane assist
*, the area in front of the lens is
normally cleaned with the windscreen wash-
er.

CAUTION

When you clean the vehicle with a pressure

washer:

Stay a suitable distance from the sensors
on the front and rear bumpers.

Do not clean the camera lenses or sur-
rounding area with the pressure washer.

Never use warm or hot water to remove

snow and ice from the reverse camera lens,
as it could crack the lens.

Never use abrasive cleaning agents on the

lens.

Waxing and polishing

Care
Waxing protects the paintwork. It is time to
apply a 

coat of good wax when water no lon-

ger 

forms droplets and rolls off the clean

paintwork.

Even if a 

wax solution is used regularly in the

vehicle washing tunnel, it is advisable to pro-
tect the paint with a hard wax coating at least
twice a year.

In the summer, you will find it is much easier
to remove dead insects (which accumulate
on the bumper and the front of the bonnet) if
the car has been treated with care products
recently.

Polishing
Polishing is only necessary if the paint has
lost its shine, and the gloss cannot be
brought back by putting on wax.

If the polish does not contain wax, a wax
product should be applied after polishing.

CAUTION

Do not use polishes and hard wax on pain-

ted parts with a matt finish or on plastic
parts.

Do not apply paint polishes to the side trim

that runs around the panoramic roof and ends
on the windscreen. However, it can be treated
with hard wax.

Trims

In respect for the environment, the silver-
plated trims on the body are made of pure
aluminium (they do not contain chrome).

Dirt or marks on the trim mouldings should
be removed with a 

cleaning product with a

neutral PH (do not use a chrome cleaner).
Body polish is also unsuitable for use on trim
mouldings. The intensive cleaning fluids of-
ten used before the car goes into a car wash
may contain alkaline substances, which can
cause dull or milky patches when they dry
out.

SEAT Official Services carry stocks of cleaning
products which have been tested for use on
your vehicle and are not harmful to the envi-
ronment.

272

-------------------------------------------------------------------------------------------------------------------------------------------------------------

-------------------------------------------------------------------------------------------------------------------------------------------------------------

Care and maintenance

Plastic parts

Plastic parts are cleaned with a power wash-
er. If this is not sufficient, plastic parts
should only be treated with a special solvent-
free 

plastic cleaning agent. Do not use paint-

work cleaners, polishes or wax on plastic
parts.

Carbon parts

The carbon parts on your vehicle have a pain-
ted surface. They do not need any special
care and are cleaned just like any other pain-
ted part 

››› 

page 270

.

Paint damage

Minor damage to the paint, such as scratches
or stone chips, should be touched up without
delay
 before the metal starts to corrode. Suit-
able 

touch-up brushes or sprays for your car

can be obtained from a SEAT Official Service.

The number of the original paint finish on the
vehicle is given on the data sticker

››› 

page 305

.

If corrosion is already visible it must be thor-
oughly removed by a specialised workshop.

Windows

Clear vision is an essential safety factor.

The windscreen must not be cleaned with in-
sect remover or wax, otherwise the wind-
screen wipers will not function properly (jud-
dering).

Traces of rubber, oil, grease or silicone can
be removed with a 

window cleaning solution

or a 

silicone remover. Wax residue can only

be removed with a special cleaner. Your SEAT
Official Service will be able to provide you
with more detailed information.

The windows should also be cleaned on the
inside at regular intervals.

Use a separate cloth or chamois to dry the
windows. Cloths used for waxing and polish-
ing contain residues that will cause smears
on the glass.

WARNING

Do not use water-repellent coatings on the
windscreen. In bad visibility conditions (e.g.
in the rain, dark or with a low sun), these
coatings may cause dazzle: risk of accident!
Such coatings can also cause the windscreen
wiper blades to make noise.

CAUTION

Remove snow and ice from windows and ex-

terior mirrors with a plastic scraper only. To

avoid scratches caused by dirt on the glass,
the scraper should only be pushed in one di-
rection and not moved to and fro.

The heating element for the rear window is

located on the inner side of the window. To
avoid damaging them, do not apply stickers
to these heating elements.

Never use warm or hot water to remove

snow and ice from windows and mirrors. This
could cause the glass to crack!

Wheels

The wheels require regular attention to pre-
serve their appearance. It is important to re-
move road salt and brake dust by washing
the wheels at regular intervals, otherwise the
finish will be impaired.

After washing, the wheels should only be
cleaned with an "acid-free" cleaning agent
for alloy wheels. This is available from SEAT
Official Services and specialist retailers. Nev-
er leave the cleaning agent on the rims for
any longer than specified in the instructions
before rinsing it off. If the wheel cleaner fluid
contains acid it can attack the surfaces of the
wheel bolts.

Car polish or other abrasive agents should
not be used for maintaining the rims. If the
protective coating is damaged, e.g. by flying
stones, the damaged area should be re-
paired immediately.

»

273

Tec

hnic

al

 d

at

a

Adv

ic

e

Oper

ation

Emer

genc

ie

s

Saf

ety

-------------------------------------------------------------------------------------------------------------------------------------------------------------

-------------------------------------------------------------------------------------------------------------------------------------------------------------

Advice

WARNING

Please note when cleaning the wheels that
water, ice and road salt can impair the effec-
tiveness of the brakes; this can cause an acci-
dent.

Exhaust tail pipe

It is important to remove road salt and brake
dust by washing the wheels at regular inter-
vals, otherwise the exhaust tail pipe material
could be damaged. To remove impurities, do
not use rim, paint or chrome cleaners or oth-
er abrasive products. Clean the exhaust tail
pipes with cleaning products that are suita-
ble for stainless steel.

SEAT Official Services carry stocks of cleaning
products that have been tested and ap-
proved for use on your vehicle.

Caring for the vehicle interior

radio display/Easy Connect* and con-
trol panel*

The display can be cleaned with a soft cloth
and a professionally available “LCD cleaner”.
Moisten the cloth with a small amount of the
cleaning fluid.

The Easy Connect control panel* should first
be cleaned with a brush so that no dirt goes
into the device or between the keys and
housing. Next, we recommend cleaning the
Easy Connect control panel* using a cloth
dampened with water and washing-up liquid.

CAUTION

To avoid scratching the screen, do not wipe

the display with a dry cloth.

To avoid damage, ensure that no liquid

goes into the Easy Connect control panel*.

Plastic and leatherette parts

Plastic parts and leatherette can be cleaned
with a damp cloth. If this is not sufficient,
plastic parts and leatherette should only be
treated with a 

special solvent-free plastic

cleaner.

Textile covers and trim parts

Textile covers and trim parts (e.g. seats, door
trim) should be cleaned regularly with a vac-
uum cleaner. This will remove surface dirt
which could otherwise be rubbed into the
textile material during use. Do not use steam
cleaners, as the steam could carry the dirt
deeper into the textile material.

Normal cleaning
We recommend that you use a soft sponge or
a commercially available lint-free, micro-fibre
cloth for normal cleaning. Only use brushes
on floor coverings and mats, as other textile
surfaces could become damaged.

In the case of normal surface dirt you can use
a foam cleaner. Use a sponge to spread the
foam on the textile surface and to work it into
the material lightly. However, make sure that
the textile material does not become soaking
wet. Then dab off the foam with a dry and ab-
sorbent cloth (e.g. a micro-fibre cloth) and
vacuum off any residue once the surface is
completely dry.

Cleaning stains
Treat drink stains (such as coffee or fruit
juice, etc.) with a cleaning solution for deli-
cate fabrics. This solution should be applied
with a sponge. If the stains are difficult to re-
move, a washing paste can be applied direct-
ly onto the stain and worked into the fabric.
The surface will then have to be wiped with
clear water to remove any residue left by the
paste. To do so, use a damp cloth or sponge
and then dab the stain with an absorbent
cloth.

Remove chocolate or make-up stains with a
cleaning paste (for e.g., soft soap). Then re-
move the soap with water (wet sponge).

274

-------------------------------------------------------------------------------------------------------------------------------------------------------------

-------------------------------------------------------------------------------------------------------------------------------------------------------------

Care and maintenance

A spirit-based cleaner can be used to remove
grease, oil, lipstick or ball point pen. Then
dab the dissolved grease or colour particles
off with an absorbent cloth or similar. You
may also have to treat the stain once more
using washing paste and water.

If the covers or textile trim panels are badly
soiled we recommend that you have them
cleaned by a professional cleaning company
with a shampoo and spray.

Note

Open Velcro fasteners on clothes can damage
the seat upholstery. Make sure they are
closed.

Natural leather

General information
Our range of leathers is large. The main type
used is particularly nappa in various forms,
that is, leather with a smooth surface in dif-
ferent colours.

The amount of dye used determines the ap-
pearance and properties of leather. If the
leather is left in a more natural state, it re-
tains its typical natural napped appearance
and confers excellent all-weather properties
to the seats. Fine veins, healed scars, insect
bites, wrinkles and a subtle variation in shad-

ing remain visible; these are the characteris-
tic features of genuine natural leather.

Natural napped leather does not have a pro-
tective surface coating of dye. It is therefore
somewhat more prone to damage. This
should be borne in mind if children or pets
often travel in the car, or if there are other
factors that could lead to damage.

Types of leather with a coloured surface coat-
ing are likely to be more resistant to damage.
This has a great advantage for day-to-day
use. However, this means that the typical
natural characteristics of the surface are less
apparent, though this does not affect quality.

Cleaning and care
Due to the natural properties of the specially
selected hides employed, the finished leath-
er has a certain sensitivity to grease and dirt,
etc. so a degree of care is required in every-
day use and when looking after the leather.
Dark clothing (especially if damp or incorrect-
ly dyed) may stain leather upholstery on the
seats. Dust and grit in the pores and seams
can scratch and damage the surface. There-
fore leather should be cleaned at regular in-
tervals, depending on the actual amount of
use. When they have been in use for a certain
time, your car seats will acquire a typical and
unmistakable patina. This is characteristic for
leather as a natural product and is a sign of
genuine quality.

To maintain the value of natural leather you
should note the following points:

CAUTION

Avoid exposing leather to direct sunlight

for long periods, otherwise it may tend to
lose some of its colour. If the car is left for a
prolonged period in the bright sun, it is best
to cover the leather.

Sharp-edged objects on clothing, such as

belts, zip fasteners, rivets or similar, can also
leave permanent scratches and rough marks
on the surface of the leather.

Note

Use a suitable impregnating cream with ul-

tra-violet protection at regular intervals and
after cleaning. The cream nourishes and
moisturises the leather, keeps it supple and
able to breathe. A protective film will also
form.

Clean the leather every 2 to 3 months and

remove fresh dirt as soon as possible.

Remove stains from fresh ball-pen and oth-

er inks, lipstick, shoe cream and similar
stains as soon as possible.

Preserve the colour of the leather. A special

coloured cream will renew the colour of the
leather when required and will eliminate dif-
ferences in colour.

275

Tec

hnic

al

 d

at

a

Adv

ic

e

Oper

ation

Emer

genc

ie

s

Saf

ety

-------------------------------------------------------------------------------------------------------------------------------------------------------------

-------------------------------------------------------------------------------------------------------------------------------------------------------------

Advice

Cleaning and care of leather uphols-
tery

Natural leather requires an extra degree of at-
tention and care.

Normal cleaning

Moisten a cotton or woollen cloth with wa-
ter and wipe over the leather surfaces.

More stubborn dirt

More stubborn dirt can be removed using a
mild soap solution (pure liquid soap: two
tablespoons dissolved in one litre of wa-
ter).

Do not let the water soak through the leath-
er or penetrate into the seams.

Then wipe off with a soft, dry cloth.

Removal of stains

Remove fresh 

water-based stains such as

coffee, tea, juices, blood etc. with an ab-
sorbent cloth or kitchen roll, or use the
cleaning agent from the care set for dried-
on stains.

Remove fresh 

grease-based stains that

have not penetrated the surface such as
butter, mayonnaise, chocolate, etc. with an
absorbent cloth or kitchen roll or with the
cleaning agent from the care set.

Treat 

fat-based, dried-in stains with grease-

dissolving spray.

Treat 

less common stains on leather, such

as ball-pen and other inks, felt-tip pens,
nail polish, dispersion paint, shoe cream
etc. with a special leather stain remover.

Leather maintenance

The leather should be treated regularly
(about twice a year) with a special leather-
care product.

Apply these products very sparingly.

Then wipe off with a soft cloth.

Should you have questions regarding the
care and cleaning of the leather upholstery in
your vehicle, we recommend that you contact
your SEAT Official Service. Our representa-
tives will be happy to advise you and tell you
about the product range for leather conserva-
tion, for example:

Cleaning and care set.

Coloured leather-care cream.

Stain remover for ball-pen inks, shoe cream

etc.

Grease dissolving spray.

New products and further developments

CAUTION

On no account use solvents (such as petrol,
turpentine), wax polish, shoe cream or simi-
lar materials.

Cleaning Alcantara upholstery

Removing dust and dirt

Moisten a cloth just a little and wipe down
the seat covers.

Removing stains

Moisten a cloth with lukewarm water or di-
luted 

white spirits.

Dab at the stain. Start at the outside and
work inwards.

Dry the clean area with a soft cloth.

Do not use leather cleaning products on Al-
cantara seat covers.

You may use a suitable soap on dust and dirt.

Dust and grit in the pores and seams can
scratch and damage the surface. If the car is
left standing in the sun for long periods, Al-
cantara leather should be protected against
direct sunlight to prevent it from fading. How-
ever, slight colour variations will arise in nor-
mal use.

276

-------------------------------------------------------------------------------------------------------------------------------------------------------------


Content      ..     15      16      17      18     ..