Seat Alhambra. Service Manual - part 4


  Index      Seat     Seat Alhambra. Service Manual


Search            copyright infringement  


Content      ..     2      3      4      5     ..


Seat Alhambra. Service Manual - part 4


-------------------------------------------------------------------------------------------------------------------------------------------------------------
The essentials

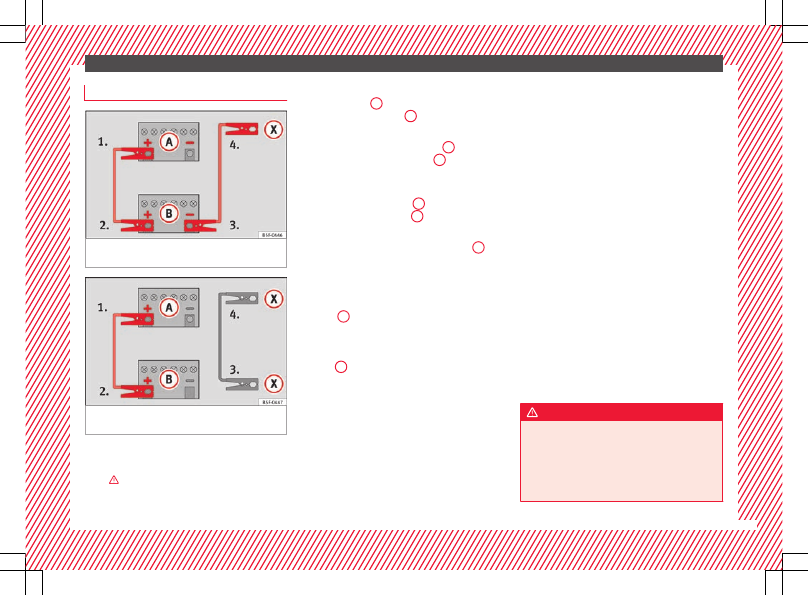
How to jump start: description

Fig. 75 

Diagram of connections for vehicles

without Start-Stop system.

Fig. 76 

Diagram of connections for vehicles

with Start-Stop system.

Jump lead terminal connections
1. Switch off the ignition of both vehicles

››› 

.

2. Connect one end of the red jump lead to

the positive 

+

 terminal of the vehicle

with the flat battery 

A


››› 

Fig. 75

.

3. Connect the other end of the red jump

lead to the positive terminal 

+

 in the ve-

hicle providing assistance 

B

.

4. For vehicles without Start-Stop system:

connect one end of the black jump lead to
the negative terminal 

 of the vehicle

providing the current 

B


››› 

Fig. 75

.

For vehicles with Start-Stop system: con-
nect one end of the black jump lead 

X

 to a

suitable ground terminal, to a solid piece of
metal in the engine block, or to the engine
block itself 

››› 

Fig. 76

.

5. Connect the other end of the black jump

lead 

X

 to a solid metal component bolted

to the engine block or to the engine block
itself of the vehicle with the flat battery.
Do not connect it to a point near the bat-
tery 

A

.

6. Position the leads in such a way that they

cannot come into contact with any moving
parts in the engine compartment.

Starting
7. Start the engine of the vehicle with the

boosting battery and let it run at idling
speed.

8. Start the engine of the vehicle with the flat

battery and wait for 2 or 3 minutes until
the engine is running.

Removing the jump leads
9. Before you remove the jump leads, switch

off the dipped beam headlights if they are
switched on.

10.Turn on the heater blower and heated rear

window in the vehicle with the flat battery.
This helps minimise voltage peaks which
are generated when the leads are discon-
nected.

11.When the engine is running, disconnect

the leads in reverse order to the details
given above.

Make sure the battery clamps have sufficient
metal-to-metal contact with the battery termi-
nals.

If the engine fails to start, switch off the start-
er after about 10 seconds and try again after
about 1 minute.

WARNING

Please note the safety warnings referring to

working in the engine compartment

››› 

page 268

.

The battery providing assistance must have

the same voltage as the flat battery (12V) and
approximately the same capacity (see imprint

»

53

-------------------------------------------------------------------------------------------------------------------------------------------------------------

-------------------------------------------------------------------------------------------------------------------------------------------------------------

The essentials

on battery). Failure to comply could result in
an explosion.

Never use jump leads when one of the bat-

teries is frozen. Danger of explosion! Even af-
ter the battery has thawed, battery acid could
leak and cause chemical burns. If a battery
freezes, it should be replaced.

Keep sparks, flames and lighted cigarettes

away from batteries, danger of explosion.
Failure to comply could result in an explo-
sion.

Observe the instructions provided by the

manufacturer of the jump leads.

Do not connect the negative cable from the

other vehicle directly to the negative terminal
of the flat battery. The gas emitted from the
battery could be ignited by sparks. Danger of
explosion.

Do not attach the negative cable from the

other vehicle to parts of the fuel system or to
the brake line.

The non-insulated parts of the battery

clamps must not be allowed to touch. The
jump lead attached to the positive battery
terminal must not touch metal parts of the ve-
hicle, this can cause a short circuit.

Position the leads in such a way that they

cannot come into contact with any moving
parts in the engine compartment.

Do not lean on the batteries. This could re-

sult in chemical burns.

Note

The vehicles must not touch each other, oth-
erwise electricity could flow as soon as the
positive terminals are connected.

Changing windscreen wipers

Windscreen wipers service position

Fig. 77 

Wipers in service position

The wiper arms can be raised when the wip-
ers are in service position 

››› 

Fig. 77

.

Close the bonnet 

››› 

page 268

.

Switch the ignition on and off.

Press the windscreen wiper lever down-

wards briefly 

››› 

page 26


4

.

Before driving, always lower the wiper arms.
Using the windscreen wiper lever, the wind-

screen wiper arms return to their initial posi-
tion.

››› 

page 87

Changing the front wiper blades

Fig. 78 

Changing the front wiper blades

Fig. 79 

Changing the rear wiper blade

54

-------------------------------------------------------------------------------------------------------------------------------------------------------------

-------------------------------------------------------------------------------------------------------------------------------------------------------------

The essentials

Cleaning windscreen wiper blades

Lifting and unfolding the wiper arms.

Use a soft cloth to remove dust and dirt

from the wiper blades.

If the blades are very dirty, a sponge or

damp cloth may be used 

››› 

 in Changing

the windscreen and rear window wiper
blades on p
age 87

.

Change the windscreen wiper blades

Lifting and unfolding the wiper arms.

Press and hold release button 

››› 

Fig. 78


1

and pull gently on the wiper blade in the di-
rection of the arrow.

Fit a new wiper blade 

of the same length

and design on to the wiper arm and hook it
into place.

Rest the wiper arms back onto the wind-

screen.

Lifting and unfolding the wiper arms
The wiper arm may 

only be lifted at the point

where it is fastened to the blade.

Changing the rear wiper blade

Lift and unfold the wiper arm.

Pull the wiper blade out of its mounting on

the wiper arm 

››› 

Fig. 79

 (arrow 

A

).

Hold down the release button 

››› 

Fig. 79


1

while gently pulling the blade in the direction
of arrow 

B

. This may require some strength.

Insert a new blade of the 

same length and

type in the wiper arm in the opposite direc-
tion to the arrow 

››› 

Fig. 79


B

 and hook into

place. This feature is operational when the
knob is in position (arrow 

A

).

Replace the wiper arm on the rear window.

››› 

 in Changing the windscreen and

rear window wiper blades on page 87

››› 

page 87

55

-------------------------------------------------------------------------------------------------------------------------------------------------------------

-------------------------------------------------------------------------------------------------------------------------------------------------------------

Safety

Safety

Safe driving

Safety first!

This chapter contains important information,
tips, suggestions and warnings that you
should read and consider for both your own
safety and for your passengers' safety.

WARNING

This manual contains important informa-

tion about the operation of the vehicle, both
for the driver and the passengers. The other
sections of the on-board documentation also
contain further information that you should
be aware of for your own safety and for the
safety of your passengers.

Ensure that the on-board documentation is

kept in the vehicle at all times. This is espe-
cially important when lending or selling the
vehicle to another person.

Advice about driving

Introduction

Depending upon how you expect to use your
vehicle, it may a good idea to protect the en-
gine from below. An undercarriage may help

to reduce the risk of damage to the lower part
of the vehicle and the oil sump when driving
over kerbs, or along dirt tracks or unsurfaced
roads, etc. SEAT recommends you have the
guard fitted by a technical service centre. 

WARNING

Driving under the influence of alcohol, drugs,
medication or narcotics may result in severe
accidents and even loss of life.

Alcohol, drugs, medication and narcotics

may significantly alter perception, affect re-
action times and safety while driving, which
could result in the loss of control of the vehi-
cle.

Before setting off

For your own safety and the safety of your
passengers, always note the following points
before every trip:

Make sure that the vehicle's lights and turn
signals are working properly.

Check tyre pressure.

Ensure that all windows provide a clear and
good view of the surroundings.

Make sure all luggage is secured

››› 

page 150

.

Make sure that no objects can interfere
with the pedals.

Adjust front seat, head restraint and mir-
rors properly according to your size.

Ensure that the passengers in the rear
seats always have the head restraints in
the in-use position 

››› 

page 142

.

Instruct passengers to adjust the head re-
straints according to their height.

Protect children with appropriate child
seats and properly applied seat belts

››› 

page 74

.

Assume the correct sitting position. Instruct
your passengers also to assume a proper
sitting position 

››› 

page 57

.

Fasten your seat belt securely. Instruct your
passengers also to fasten their seat belts
properly 

››› 

page 64

.

What affects driving safety?

As a driver, you are responsible for yourself
and your passengers. When your concentra-
tion or driving safety is affected by any cir-
cumstance, you endanger yourself as well as
others on the road 

››› 

, for this reason:

Always pay attention to traffic and do not
get distracted by passengers or telephone
calls.

Never drive when your driving ability is im-
paired (e.g. by medication, alcohol, drugs).

56

-------------------------------------------------------------------------------------------------------------------------------------------------------------

-------------------------------------------------------------------------------------------------------------------------------------------------------------

Safe driving

Observe traffic laws and speed limits.

Always reduce your speed as appropriate
for road, traffic and weather conditions.

When travelling long distances, take
breaks regularly - at least every two hours.

If possible, avoid driving when you are tired
or stressed.

WARNING

When driving safety is impaired during a trip,
the risk of injury and accidents increases.

Safety equipment

Never put your safety or the safety of your
passengers in danger. In the event of an acci-
dent, the safety equipment may reduce the
risk of injury. The following list includes most
of the safety equipment in your SEAT:

three-point seat belts,

belt tension limiters for the front and rear

side seats,

belt tensioners for the front seats,

front airbags,

knee airbags,

side airbags in the front seat backrests,

side airbags in the rear seat backrests*,

head-protection airbags,

“ISOFIX” anchor points for child seats in

the rear side seats with the “ISOFIX” system,

height-adjustable front head restraints,

rear head restraints with in-use position

and non-use position,

adjustable steering column.

The safety equipment mentioned above
works together to provide you and your pas-
sengers with the best possible protection in
the event of an accident. However, these
safety systems can only be effective if you
and your passengers are sitting in a correct
position and use this equipment properly.

Safety is everyone's business!

Correct position of the vehicle
occupants

Correct sitting position

Fig. 80 

The correct distance between the driv-

er and the steering wheel must be at least 25
cm (10 inches).

Fig. 81 

Correct belt web and head restraint

positions

»

57

Tec

hnic

al

 d

at

a

Adv

ic

e

Oper

ation

Emer

genc

ie

s

Saf

ety

-------------------------------------------------------------------------------------------------------------------------------------------------------------

-------------------------------------------------------------------------------------------------------------------------------------------------------------

Safety

The correct sitting positions for the driver and
passengers are shown below.

If your physical constitution prevents you
from maintaining the correct sitting position,
contact a specialised workshop for help with
any special devices. The seat belt and airbag
can only provide optimum protection if a cor-
rect sitting position is adopted. SEAT recom-
mends taking your car in for technical serv-
ice.

For your own safety and to reduce the risk of
injury in the event of an accident or sudden
braking or manoeuvre, SEAT recommend the
following positions:

Valid for all vehicle occupants:

Adjust the head restraint so that its upper

edge is at the same level as the top of your
head, or as close as possible to the same lev-
el as the top of your head and under no cir-
cumstances below eye level. Keep the back
of your neck as close as possible to the head
restraint 

››› 

Fig. 80

 and 

››› 

Fig. 81

.

Short people must lower the head restraint

completely, even if your head is below its up-
per edge.

Tall people must raise the head restraint

completely.

Adjust the seat backrest to an upright posi-

tion so that your back rests completely
against it.

Always keep your feet in the footwell while

the vehicle is in motion.

Adjust and fasten your seat belt correctly

››› 

page 64

.

Also valid for the driver:

Adjust the steering wheel so that there is a

distance of at least 25 cm (10 inches) be-
tween it and your chest 

››› 

Fig. 80

 and so that

you can hold the steering wheel with both
hands on the outside of the ring at the 9
o'clock and 3 o'clock positions with your
arms slightly bent.

The adjusted steering wheel must face your

chest and not your face.

Adjust the driver seat forwards or back-

wards so that you are able to press the accel-
erator, brake and clutch pedals to the floor
with your knees slightly angled and the dis-
tance between your knees and the dash pan-
el is at least 10 cm (4 inches) 

››› 

Fig. 80

.

Adjust the height of the driver seat so that

you can easily reach the top of the steering
wheel.

Keep both feet in the footwell so that you

have the vehicle under control at all times.

Also valid for the front passenger:

Move the front passenger seat back as far

as possible for optimum protection should
the airbag deploy.

Adjusting the steering wheel position

Read the additional information carefully

››› 

page 16

.

WARNING

Incorrect use of the steering wheel adjust-
ment function and an incorrect adjustment of
the steering wheel can result in severe or fa-
tal injury.

After adjusting the steering column, push

the lever 

››› 

Fig. 24


1

 firmly upwards to

ensure the steering wheel does not acciden-
tally change position while driving.

Never adjust the steering wheel while the

vehicle is in motion. If you need to adjust the
steering wheel while the vehicle is in motion,
stop safely and make the proper adjustment.

The adjusted steering wheel should be fac-

ing your chest and not your face so as not to
hinder the driver's front airbag protection in
the event of an accident.

When driving, always hold the steering

wheel with both hands on the outside of the
ring at the 9 o'clock and 3 o'clock positions
to reduce injuries when the driver's front air-
bag deploys.

Never hold the steering wheel at the 12

o'clock position or in any other manner (e.g.
in the centre of the steering wheel). In such
cases, if the driver's airbag deploys, you may
sustain injuries to your arms, hands and
head.

58

-------------------------------------------------------------------------------------------------------------------------------------------------------------

-------------------------------------------------------------------------------------------------------------------------------------------------------------

Safe driving

Danger of injuries due to an incorrect
sitting position

Number of seats
Depending on the equipment, your vehicle
has a total of 

five or seven seats. Each seat is

equipped with a seat belt.

5 seats

Seats in the

front

Seats in the

second row

Seats in the

third row

2

3

7 seats

Seats in the

front

Seats in the

second row

Seats in the

third row

2

3

2

If the seat belts are worn incorrectly or not at
all, the risk of severe injuries increases. Seat
belts can provide optimal protection only if
the belt web is properly worn. Being seated
in an incorrect position means the seat belt
cannot offer its full protection. This could re-
sult in severe and even fatal injuries. The risk
of severe or fatal injuries is especially height-
ened when a deploying airbag strikes a vehi-
cle occupant who has assumed an incorrect
sitting position. The driver is responsible for
all passengers in the vehicle, particularly
children.

The following list shows just some examples
of incorrect sitting positions which can be
dangerous to all vehicle occupants.

Whenever the vehicle is in motion:

Never stand in the vehicle.

Never stand on the seats.

Never kneel on the seats.

Never tilt your seat backrest too far to the

rear.

Never lean against the dash panel.

Never lie on the rear bench.

Never sit on the front edge of a seat.

Never sit sideways.

Never lean out of a window.

Never put your feet out of a window.

Never put your feet on the dash panel.

Never put your feet on the surface of a seat

or seat backrest.

Never travel in a footwell.

Never sit on the armrests.

Never travel on a seat without wearing the

seat belt.

Never carry any person in the luggage com-

partment.

WARNING

An incorrect sitting position in the vehicle
can lead to severe injuries or death in the

event of sudden braking or manoeuvres, colli-
sion or accidents or if the airbag deploys.

Before the vehicle moves, assume the prop-

er sitting position and maintain it throughout
the trip. This also includes fastening the seat
belt.

Never transport more people than there are

seats with a seat belt available in the vehicle.

Children must always be protected with an

approved child restraint system suited to
their height and weight 

››› 

page 74

.

Always keep your feet in the footwell while

the vehicle is in motion. Never, for example,
put your feet on the surface of a seat or on
the dash panel and never put them out of a
window. Otherwise the airbag and seat belt
offer insufficient protection and the risk of in-
jury in the event of an accident is increased.

WARNING

Before every trip, adjust the seat, the seat
belt and the head restraints and instruct your
passengers to fasten their seat belts proper-
ly.

Move the front passenger seat back as far

as possible.

Adjust the driver seat so that there is a dis-

tance of at least 25 cm (10 inches) between
the centre of your chest and the hub of the
steering wheel. Adjust the driver seat so that
you are able to press the accelerator, brake
and clutch pedals to the floor with your knees
slightly angled and that the distance

»

59

Tec

hnic

al

 d

at

a

Adv

ic

e

Oper

ation

Emer

genc

ie

s

Saf

ety

-------------------------------------------------------------------------------------------------------------------------------------------------------------

-------------------------------------------------------------------------------------------------------------------------------------------------------------

Safety

between your knees and the dash panel is at
least 10 cm (4 inches). If your physical consti-
tution prevents you from meeting these re-
quirements, contact a specialised workshop
to make any modifications required.

Never drive with the seat backrest tilted far

back. The further the seat backrests are tilted
to the rear, the greater the risk of injury due
to incorrect positioning of the belt web or to
the incorrect sitting position!

Never drive with the seat backrest tilted

forwards. Should a front airbag deploy, it
could throw the seat backrest backwards and
injure the passengers of the rear seats.

Sit as far away as possible from the steer-

ing wheel and the dash panel.

Keep your back straight and resting com-

pletely against the seat backrest and the
front seats correctly adjusted. Never place
any part of your body in the area of the airbag
or very close to it.

If passengers on the rear seats are not sit-

ting in an upright position, the risk of severe
injury due to incorrect positioning of the belt
web increases.

WARNING

Incorrect seat adjustment may lead to acci-
dents and severe injuries.

Only adjust the seats when the vehicle is

stationary, as the seats could move unex-
pectedly while the vehicle is in motion and
you could lose control of the vehicle. Further-

more, an incorrect position is adopted when
adjusting the seat.

Only adjust the height, seat backrest and

forwards or backwards position of the seat
when there is nobody in the seat adjustment
area.

There must be no objects blocking the seat

adjustment area.

Only adjust the height, angle and longitu-

dinal position of the rear seats when nobody
is in the way.

The seat adjustment and lock areas must

be kept clean.

Pedal area

Pedals

Do not allow floor mats or other objects to
obstruct the free passage of the pedals.

Floor mats should leave the pedal area free
and unobstructed and be correctly secured in
the footwell zone.

In the event of failure of a brake circuit, the
brake pedal must be pressed harder than
normal to brake the vehicle.

WARNING

Objects falling into the driver's footwell could
prevent use of the pedals. This could lead the

driver to lose control of the vehicle, increas-
ing the risk of a serious accident.

Make sure the pedals can be used at all

times, with no objects rolling underneath
them.

Always secure the mat in the footwell.

Never place other mats or rugs on top of

the original mat supplied by the factory.

Ensure that no objects can fall into the driv-

er's footwell while the vehicle is in motion.

CAUTION

The pedals must always have free and unob-
structed passage to the floor. For example, in
case of a fault in the brake circuit, the brake
pedal will need to be pressed further to stop
the vehicle. To press the brake pedal down
further will require more force than usual.

60

-------------------------------------------------------------------------------------------------------------------------------------------------------------

-------------------------------------------------------------------------------------------------------------------------------------------------------------

Seat belts

Seat belts

Why wear a seat belt?

Introduction

Check the condition of all the seat belts at
regular intervals. If you notice that the belt
webbing, fittings, retractor mechanism or
buckle of any of the belts is damaged, the
belt must be replaced immediately by a spe-
cialised workshop 

››› 

The specialised

workshop must use the appropriate spare
parts corresponding to the vehicle, the
equipment and the model year. SEAT recom-
mends taking your car in for technical serv-
ice.

WARNING

Unbuckled or badly buckled seat belts in-
crease the risk of severe or even fatal inju-
ries. The seat belt cannot offer its full protec-
tion if it is not fastened and used correctly.

Seat belts are the most effective way of re-

ducing the risk of sustaining severe or fatal
injuries in the event of an accident. Seat belts
must be correctly fastened when the vehicle
is in motion to protect the driver and all vehi-
cle occupants.

Before each trip, every occupant in the ve-

hicle occupants must sit properly, correctly
fasten the seat belt belonging to his or her
seat and keep it fastened throughout the trip.

This also applies to other vehicle occupants
when driving in town.

When travelling, children must be secured

in the vehicle with a child restraint system
suitable for their weight and height and with
the seat belts correctly fastened

››› 

page 74

.

Instruct your passengers to fasten their

seat belts properly before driving off.

Insert the latch plate into the buckle for the

appropriate seat and ensure it is engaged.
Using the latch plate in the buckle of another
seat will not protect you properly and may
cause severe injuries.

Do not allow liquids or foreign bodies to en-

ter the buckle fastenings. This could damage
the buckles and seat belts.

Never unbuckle your seat belt when the ve-

hicle is moving.

Never allow more than one passenger to

share the same seat belt.

Never hold children or babies on your lap

sharing the same seat belt.

Loose, bulky clothing (such as a jacket) im-

pairs the proper fit and function of the seat
belt.

WARNING

It is extremely dangerous to drive using dam-
aged seat belts and could result in serious in-
jury or loss of life.

Avoid damaging the seat belt by jamming it

in the door or the seat mechanism.

If the fabric or other parts of the seat belt

are damaged, the seat belts could break in
the event of an accident or sudden braking.

Always have damaged seatbelts replaced

immediately by seat belts approved for the
vehicle in question by SEAT. Seat belts which
have been worn in an accident and stretched
must be replaced by a specialised workshop.
Renewal may be necessary even if there is no
apparent damage. The belt anchorage should
also be checked.

Never attempt to repair, modify or remove a

seat belt yourself. All repairs to seat belts, re-
tractors and buckles must be carried out by a
specialised workshop.

61

Tec

hnic

al

 d

at

a

Adv

ic

e

Oper

ation

Emer

genc

ie

s

Saf

ety

-------------------------------------------------------------------------------------------------------------------------------------------------------------

-------------------------------------------------------------------------------------------------------------------------------------------------------------

Safety

Warning lamp

Fig. 82 

Warning lamp on the instrument pan-

el.

Fig. 83 

Example of seat belt status display for

the rear seats (here, a 7-seat vehicle) on the
instrument panel above, the second row and,
below, the third row of seats.

Lights up or flashes

Driver's seat belt not
fastened or front pas-
senger seat belt not
fastened if the front
passenger seat is occu-
pied.

Fasten seat belts!

Objects on the front
passenger seat.

Remove any objects from the
front passenger seat and
store them safely.

Some control and warning lamps on the in-
strument panel will come on to check certain
functions when the ignition is switched on.
They will switch off after a few seconds.

An audible warning will be heard for a maxi-
mum of 90 seconds if the seat belts are not
fastened as the car drives off and reaches a
speed of more than 25 km/h (15 mph) or if
the seat belts are unfastened while the vehi-
cle is in motion. The seat belt warning lamp

 will also flash.

The warning lamp  does not switch off until
the driver and front passenger fasten their
seat belts while the ignition is switched on.

Seat belt status display for rear seats
The seat belt status display on the instru-
ment panel informs the driver, when the igni-
tion is switched on, whether any passengers
in the rear seats have fastened their seat
belts. The symbol  indicates that the pas-

senger in this seat has fastened “his or her”
seat belt 

››› 

Fig. 83

.

The seat belt status is displayed for around
30 seconds when a seat belt in the rear seats
is fastened or unfastened. You can switch off
this display by pressing the 

0.0 / SET

 button.

The seat belt status flashes for a maximum of
30 seconds when a seat belt in the rear seats
is unfastened while the vehicle is in motion.
An audible warning will also be heard if the
vehicle is travelling at over 25 km/h
(15 mph).

The rear seat display can be enabled or disa-
bled by a technical service centre.

The protective function of seat belts

Fig. 84 

Drivers with properly worn seat belts

will not be thrown forward in the event of sud-
den braking

62

-------------------------------------------------------------------------------------------------------------------------------------------------------------

-------------------------------------------------------------------------------------------------------------------------------------------------------------

Seat belts

Properly worn seat belts hold the occupants
in the proper position. They also help prevent
uncontrolled movements that may result in
serious injury and reduce the risk of being
thrown out of the vehicle in case of an acci-
dent.

Vehicle occupants wearing their seat belts
correctly benefit greatly from the ability of the
belts to absorb kinetic energy. In addition,
the front part of your vehicle and other pas-
sive safety features (such as the airbag sys-
tem) are designed to absorb the kinetic ener-
gy released in a collision. Taken together, all
these features reduce the releasing kinetic
energy and consequently, the risk of injury.
This is why it is so important to fasten seat
belts before every trip, even when "just driv-
ing around the corner".

Ensure that your passengers wear their seat
belts as well. Accident statistics have shown
that wearing seat belts is an effective means
of substantially reducing the risk of injury
and improving the chances of survival when
involved in a serious accident. Furthermore,
properly worn seat belts improve the protec-
tion provided by airbags in the event of an
accident. For this reason, wearing a seat belt
is required by law in most countries.

Although your vehicle is equipped with air-
bags, the seat belts must be fastened and
worn. The front airbags, for example, are only
triggered in some cases of head-on collision.
The front airbags will not be triggered during

minor frontal or side collisions, rear-end colli-
sions, rollovers or accidents in which the air-
bag trigger threshold value in the control unit
is not exceeded.

Therefore, you should always wear your seat
belt and ensure that all vehicle occupants
have fastened their seat belts properly before
you drive off!

Head-on collisions and the laws of
physics

Fig. 85 

A driver not wearing a seat belt is

thrown forward violently

Fig. 86 

The unbelted rear passenger is

thrown forward violently, hitting the driver
wearing a seat belt

It is easy to explain how the laws of physics
work in the case of a head-on collision: when
a vehicle starts moving, a type of energy
called “kinetic energy” is created both in the
passengers and inside the vehicle.

The amount of “kinetic energy” depends on
the speed of the vehicle and the weight of
the vehicle and its passengers. The higher
the speed and the greater the weight, the
more energy there is to be “absorbed” in an
accident.

The most significant factor, however, is the
speed of the vehicle. If the speed doubles
from 25 km/h (15 mph) to 50 km/h
(30 mph), for example, the corresponding ki-
netic energy is multiplied by four.

Because the vehicle occupants in our exam-
ple are not restrained by seat belts, in the

»

63

Tec

hnic

al

 d

at

a

Adv

ic

e

Oper

ation

Emer

genc

ie

s

Saf

ety

-------------------------------------------------------------------------------------------------------------------------------------------------------------

-------------------------------------------------------------------------------------------------------------------------------------------------------------

Safety

event of crashing against a wall, all of the oc-
cupants' kinetic energy will be absorbed
solely by said impact.

Even at speeds of 30 km/h (19 mph) to
50 km/h (30 mph), the forces acting on bod-
ies in a collision can easily exceed one tonne
(1000 kg). At greater speed these forces are
even higher.

Vehicle occupants not wearing seat belts are
not “attached” to the vehicle. In a head-on
collision, they will move forward at the same
speed their vehicle was travelling just before
the impact. This example applies not only to
head-on collisions, but to all accidents and
collisions.

Even at low speeds the forces acting on the
body in a collision are so great that it is not
possible to brace oneself with one's hands.
In a frontal collision, unbelted passengers
are thrown forward and will make violent con-
tact with the steering wheel, dash panel,
windscreen or whatever else is in the way

››› 

Fig. 85

.

It is also important for rear passengers to
wear seat belts properly, as they could other-
wise be thrown forward violently through the
vehicle interior in an accident. Passengers in
the rear seats who do not use seat belts en-
danger not only themselves but also the front
occupants 

››› 

Fig. 86

.

Using seat belts

Twisted seat belt
If it is difficult to remove the seat belt from
the guide, the seat belt may have become
twisted inside the side trim after being
wound too quickly on unfastening:

Pull out the seat belt completely, carefully

pulling on the latch plate.

Untwist the belt and guide it back, assist-

ing it by hand.

The seat belt must be fastened even if it is
impossible to untwist it. In this case, the
twisted area must not be in an area in direct
contact with your body. Have the seat belt
untwisted urgently by a specialised work-
shop.

WARNING

An improperly handled seat belt increases
the risk of sustaining severe or fatal injuries.

Regularly check that the seat belts and

their components are in perfect condition.

Always keep your seat belt clean.

Do not jam or damage the seat belt or rub it

with sharp edges.

Make sure there are no liquids or foreign

bodies on the latch plate and in the buckle.

How to properly adjust your
seatbelt

Fastening and unfastening your seat
belt

Fig. 87 

Insert the latch plate into the buckle

64

-------------------------------------------------------------------------------------------------------------------------------------------------------------

-------------------------------------------------------------------------------------------------------------------------------------------------------------

Seat belts

Fig. 88 

Position of seat belt during pregnan-

cy.

Properly worn seat belts hold the vehicle oc-
cupants in the position that most protects
them in the event of an accident or sudden
braking 

››› 

.

Fastening the seat belt
Fasten your seat belt before each trip.

Adjust the front seat and head restraint cor-

rectly 

››› 

page 57

.

Engage the seat backrest of the rear seat in

an upright position 

››› 

.

Pull the latch plate and place the belt web-

bing evenly across your chest and lap. Do 

not

twist the seat belt when doing so 

››› 

.

Engage the latch plate in the buckle of the

corresponding seat 

››› 

Fig. 87


A.

Pull the belt to ensure that the latch plate is

securely engaged in the buckle.

Unfastening the seat belt
The seat belt must not be unfastened until
the vehicle has come to a standstill 

››› 

.

Press the red button on the buckle

››› 

Fig. 87


B. The latch plate is released from

the buckle.

Guide the belt back by hand so that it rolls

up easily and the trim will not be damaged.

Correct belt position
Seat belts offer their maximum protection in
the event of an accident and reduce the risk
of sustaining severe or fatal injuries only
when they are properly positioned. Further-
more, if the webbing is correctly positioned,
the seat belt will hold the vehicle occupants
in the optimum position to ensure the airbag
provides the maximum protection. The seat
belt must therefore always be worn and the
webbing correctly positioned.

Incorrectly worn seat belts can cause severe
or even fatal injuries 

››› 

page 57, Correct po-

sition of the vehicle occupants

.

The shoulder part of the seat belt must lie

on the centre of the shoulder, never across
the neck or the arm, under the arm or behind
the shoulder.

The lap part of the seat belt must lie across

the pelvis, never across the stomach.

The seat belt must lie flat and fit comforta-

bly. Pull the belt tight if necessary to take up
any slack.

In the case of 

pregnant women, the seat belt

must lie evenly across the chest and as low
as possible over the pelvis, never across the
stomach and must be worn properly at all
times during the pregnancy 

››› 

Fig. 88

.

Adapting the position of the belt webbing to
your size
The seat belt can be adapted using the fol-
lowing equipment:

Belt height adjustment for the front seats.

Front seat height adjustment.

WARNING

An incorrectly worn seat belt web can cause
severe or fatal injuries in the event of an acci-
dent.

The seat belt cannot offer its full protection

unless the seat backrest is in an upright posi-
tion and the seat belt is worn correctly, ac-
cording to your size.

Unbuckling your seat belt while the vehicle

is in motion can cause severe or fatal injuries
in the event of an accident or sudden braking.

»

65

Tec

hnic

al

 d

at

a

Adv

ic

e

Oper

ation

Emer

genc

ie

s

Saf

ety

-------------------------------------------------------------------------------------------------------------------------------------------------------------

-------------------------------------------------------------------------------------------------------------------------------------------------------------

Safety

The seat belt itself, or a loose seat belt, can

cause severe injuries if the belt moves from
hard areas of the body to soft areas (e.g. the
stomach).

The shoulder part of the seat belt must lie

on the centre of the shoulder, never across
the neck or the arm.

The seat belt must lie flat and fit comforta-

bly on the torso

The lap part of the seat belt must lie across

the pelvis, never across the stomach. The
seat belt must lie flat and fit comfortably on
the pelvis Pull the belt tight if necessary to
take up any slack.

For pregnant women, the lap part of the

seat belt must lie as low as possible over the
pelvis and always lie flat, “surrounding” the
stomach 

››› 

Fig. 88

.

Do not twist the seat belt while it is fas-

tened.

Once the seat belt is positioned correctly,

don't pull it away from your body with your
hand.

Do not lie the seat belt across rigid or frag-

ile objects, e.g. glasses, pens or keys.

Never use seat belt clips, retaining rings or

similar instruments to alter the position of
the belt webbing.

Note

If your physical constitution prevents you
from maintaining the correct position of the

belt webbing, contact a specialised workshop
for help with any special devices to ensure
the optimum protection of the seat belt and
airbag. SEAT recommends taking your car in
for technical service.

Fastening or unfastening the seat belt
with two buckles

Fig. 89 

Fasten the seat belt on the centre seat

in the second row of seats

Properly worn seat belts hold the vehicle oc-
cupants in the position that most protects
them in the event of an accident or sudden
braking 

››› 

.

The seat belts for the centre seat in the sec-
ond row of seats and for the seats in the third
row of seats are fastened using two buckles.

Fastening the seat belt
Fasten your seat belt before each trip.

Adjust the rear seat and head restraint cor-

rectly 

››› 

page 57

.

Engage the seat backrest of the rear seat in

an upright position 

››› 

.

Use latch plate of the belt 

››› 

Fig. 89


1

 to

pull the seat belt down. Do 

not twist the seat

belt when doing so 

››› 

.

Engage the latch plate 

1

 in the buckle of

the corresponding seat 

A

.

Use the latch plate 

››› 

Fig. 89


2

 to pull the

seat belt across your lap.

Engage the latch plate 

2

 in the buckle of

the corresponding seat 

B

.

Pull the belt to ensure that 

both latch

plates are securely engaged in the buckles.

Unfastening the seat belt
The seat belt must not be unfastened until
the vehicle has come to a standstill 

››› 

.

Press the red button on the buckle

››› 

Fig. 89


A

. The latch plate is released from

the buckle.

Press the red button on the buckle

››› 

Fig. 89


B

. The latch plate is released from

the buckle.

Guide the belt back by hand so that it rolls

up easily and the trim will not be damaged.

66

-------------------------------------------------------------------------------------------------------------------------------------------------------------

-------------------------------------------------------------------------------------------------------------------------------------------------------------

Seat belts

WARNING

An incorrectly worn seat belt web can cause
severe or fatal injuries in the event of an acci-
dent.

The seat belt cannot offer its full protection

unless the seat backrests are in an upright
position and the seat belt is worn correctly,
according to your size.

Unbuckling your seat belt while the vehicle

is in motion can cause severe or fatal injuries
in the event of an accident or sudden braking.

Note

Seat belts with two buckles include a dia-
gram to show how to fasten the seat belt.

Belt height adjustment

Fig. 90 

Next to the front seats: belt height ad-

juster

Using the height adjusters for the front seats
and the outer seats of the second row, the
position of the seat belts can be adjusted in
the shoulder area according to the height of
the occupant:

Keep the guide device pressed down in the

direction of the arrow 

››› 

Fig. 90

.

Move the guide device up or down until the

seat belt lies over the centre of your shoulder

››› 

page 64

.

Release the guide device.

Pull the belt sharply to check that the de-

vice is engaged securely.

WARNING

Never adjust the belt height while the vehicle
is in motion.

Seat belt tensioners

Automatic belt retractor, belt tension-
er, belt tension limiter

Seat belts are part of the vehicle’s safety fea-
tures and consist of the following important
functions:

Automatic belt retainer
Every seat belt is equipped with an automatic
belt retainer on the shoulder belt. If the belt

is pulled slowly or during normal driving, the
system allows for total freedom of movement
on the shoulder belt. However, during sud-
den braking, during travel in mountains or
bends and during acceleration, the automat-
ic belt retainer on the seat belt is locked is
pulled quickly.

Belt tensioners
The seat belts on the front seats and the out-
er seats of the second row are equipped with
belt tensioners.

Sensors trigger the belt tensioners during se-
vere head-on, lateral and rear collisions and
retract and tighten the seat belts. If the seat
belt is loose, it is retracted to reduce the for-
wards movement of vehicle occupants or
movement in the direction of the collision.
The belt tensioner works in combination with
the airbag system. The belt tensioner will not
be triggered in the event of the vehicle over-
turning if the side airbags are not deployed.

If the belt tensioner is triggered, a fine dust is
produced. This is normal and it is not an indi-
cation of fire in the vehicle.

Belt tension limiter
The belt tension limiter reduces the force of
the seat belt on the body in the event of an
accident.

»

67

Tec

hnic

al

 d

at

a

Adv

ic

e

Oper

ation

Emer

genc

ie

s

Saf

ety

-------------------------------------------------------------------------------------------------------------------------------------------------------------

-------------------------------------------------------------------------------------------------------------------------------------------------------------

Safety

Note

The relevant safety requirements must be ob-
served when the vehicle is dismantled or sys-
tem components are removed. These require-
ments are known to specialised workshops

››› 

page 68

.

Service and disposal of belt tension
devices

If you work on the belt tensioners or remove
and install other parts of the vehicle when
performing other repair work, the seat belt
may be damaged. The consequence may be
that, in the event of an accident, the belt ten-
sioners function incorrectly or not at all.

So that the effectiveness of the belt tensioner
is not reduced and that removed parts do not
cause any injuries or environmental pollu-
tion, regulations must be observed. These re-
quirements are known to specialised work-
shops.

WARNING

Improper handling and homemade repairs of
seat belts, automatic belt retainers and ten-
sion devices increase the risk of sustaining
severe or fatal injuries. The belt tensioner
may fail to trigger or may trigger in the wrong
circumstances.

Never attempt to repair, adjust or remove or

install parts of the belt tensioners or seat
belts. Any work must be performed by a spe-
cialised workshop only 

››› 

page 244

.

Belt tensioners and automatic belt retain-

ers cannot be repaired and must be replaced.

For the sake of the environment

Airbag modules and belt tensioners may con-
tain perchlorate. Observe the legal require-
ments for their disposal.

Airbag system

Brief introduction

Introduction

Front airbags have been installed for both
driver and passenger. The front airbags can
also protect the chest and head of driver and
passenger if the seats, seat belts head re-
straints and, for the driver, the steering
wheel are correctly adjusted and used. Air-
bags are considered as additional safety
equipment. An airbag cannot replace the
seat belt, which must be worn at all times,
even in front seats where front airbags have
been installed.

WARNING

Never exclusively trust the airbag system as a
means of protection.

Even when triggered, airbag protection is

only auxiliary.

The airbags provide the best protection

when the seat belts are properly fastened,
thus reducing the risk of sustaining injuries

››› 

page 64, How to properly adjust your seat-

belt

.

Before each trip, every occupant must sit

properly, correctly fasten the seat belt be-
longing to his or her seat and keeping it fas-
tened throughout the trip. This rule is valid
for all vehicle occupants.

68

-------------------------------------------------------------------------------------------------------------------------------------------------------------


Content      ..     2      3      4      5     ..