Scion Q EV. Service Manual - part 22
 

  Index      Manuals     Scion Q EV. Service Manual


Search            copyright infringement  


Content      ..     20      21      22      23     ..


Scion Q EV. Service Manual - part 22


350

8-2. Steps to take in an emergency

After taking the specified steps to correct the suspected problem,
check that the warning message and light go off.

Have the malfunction repaired immediately.

Interior

buzzer

Exterior

buzzer

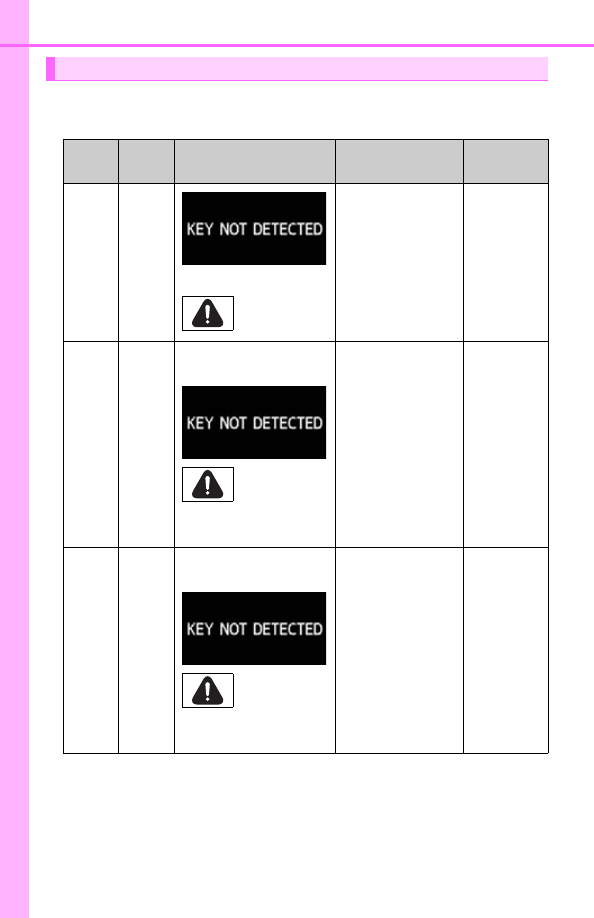
Warning message

Details

Correction 

procedure

Once

The electronic key
is not detected
when attempting
to start the EV
system.

Start the
EV system
with the
electronic
key
present.

Once

3
times

The electronic key
has been carried
outside the
vehicle and a
door other than
the driver’s door
was opened and
closed while the
power switch is in
ACCESSORY or
ON mode.

Bring the
electronic
key back
into the
vehicle.

Once

3
times

The driver’s door
has been opened
and closed while
the electronic key
was not in the
vehicle, the shift
lever was in P and
the power switch
is in
ACCESSORY or
ON mode.

Turn the
power
switch off
or bring the
electronic
key back
into the
vehicle.

(Comes on for 15 seconds)

(Flashes)

(Flashes)

(Flashes)

-------------------------------------------------------------------------------------------------------------------------------------------------------------

351

8-2. Steps to take in an emergency

8

W
hen

 troub

le 
arises

Once

Con-
tinu-
ous

The electronic key
has been carried
outside the vehi-
cle, with the shift
lever in P and the
doors have been
locked without
first turning the
power switch off.

Turn the
power
switch off
and lock
the doors
again.

Once

An attempt was
made to drive
when electronic
key was not
inside the vehicle.

Confirm
the loca-
tion of the
electronic
key to
inside of
the vehicle.

Con-
tinu-
ous

The driver’s door
has been opened
with the shift lever
in a position other
than P and with-
out first turning
the power switch
is off.

Shift the
shift lever
to P.

Con-
tinu-
ous

Con-
tinu-
ous

The driver’s door
was opened and
closed while the
electronic key
was not in the
vehicle, the shift
lever was not in P
and the power
switch was not
turned off.

• Shift  the

shift
lever to
P.

• Bring the

elec-
tronic
key back
into the
vehicle.

Interior

buzzer

Exterior

buzzer

Warning message

Details

Correction 

procedure

(Displayed alternately)

(Flashes)

(Flashes)

(Flashes)

(Displayed alternately)

(Flashes)

-------------------------------------------------------------------------------------------------------------------------------------------------------------

352

8-2. Steps to take in an emergency

Once

Con-
tinu-
ous

An attempt to lock
the doors has
been made using
the smart key sys-
tem while the
electronic key is
inside the vehicle.

Take the
electronic
key out-
side the
vehicle,
and lock
the doors
again.

With the elec-
tronic key inside
the vehicle, a side
door has been
opened, the
inside door lock
button has been
moved to the lock
position, the door
has been closed
and an attempt
has been made to
lock the door.

Once

When the doors
were unlocked
with the mechani-
cal key and then
the power switch
was pressed, the
electronic key
could not be
detected in the
vehicle.

Touch the
electronic
key to the
power
switch
while
depress-
ing the
brake
pedal.

The electronic key
could not be
detected in the
vehicle even after
the power switch
was pressed two
consecutive
times.

Interior

buzzer

Exterior

buzzer

Warning message

Details

Correction 

procedure

(Flashes)

(Flashes)

-------------------------------------------------------------------------------------------------------------------------------------------------------------

353

8-2. Steps to take in an emergency

8

W
hen

 troub

le 
arises

Once

An attempt was
made to start the
EV system with
the shift lever in a
position other
than P.

Shift the
shift lever
to P and
start the
EV system.

Power was turned
off due to the
automatic power
off function.

Next time
when start-
ing the EV
system,
maintain
that level
for approxi-
mately 15
minutes to
recharge
the 12-volt
battery.

Once

The electronic key
battery is low.

Replace the
battery. 
(

P. 299)

Interior

buzzer

Exterior

buzzer

Warning message

Details

Correction 

procedure

(Flashes)

(Comes on for 15 seconds)

-------------------------------------------------------------------------------------------------------------------------------------------------------------

354

8-2. Steps to take in an emergency

Once

The driver’s door
was opened and
closed with the
power switch
turned off and
then the power
switch was put in
ACCESSORY
mode twice with-
out the EV system
being started.

Press the
power
switch
while
depress-
ing the
brake
pedal.

During the EV
system starting
procedure in the
event that the
electronic key
was not function-
ing properly
(

P. 384), the

power switch
was touched
with the elec-
tronic key.

Press the
power
switch
within 10
seconds of
the buzzer
sounding.

Once

The steering lock
could not be
released within 3
seconds of the
power switch
being pressed.

Press the
power
switch
while
depress-
ing the
brake
pedal and
moving the
steering
wheel left
and right.

Interior

buzzer

Exterior

buzzer

Warning message

Details

Correction 

procedure

(Flashes)

(Flashes)

(Flashes)

-------------------------------------------------------------------------------------------------------------------------------------------------------------

355

8-2. Steps to take in an emergency

8

W
hen

 troub

le 
arises

A message showing the charge results will be displayed if the power
switch is turned to ON mode after charging has completed (when the
vehicle’s charging indicator has turned off).

If one of the messages is displayed, follow the correction procedures.
If the message displays again after following the correction procedure,
contact your Scion dealer.

*

: For information about the safety functions, refer to P. 86.

Once

The power switch
is pressed when
the shift lever is in
a position other
than P during the
EV system start-
ing.

Press the
power
switch off
after shift-
ing the shift
lever to P.

Charging messages

Interior

buzzer

Exterior

buzzer

Warning message

Details

Correction 

procedure

(Flashes)

Messages

Details

Correction 

procedure

The charging cable has
been connected to the
vehicle while the
“READY” indicator was
illuminated.

A buzzer also
sounds.

The EV system auto-
matically stopped due
to operation of the
safety functions

*

Turn the power
switch off, and per-
form charging
according to the pro-
cedures on P. 181,
195.

An attempt has been
made to start the EV
system while the charg-
ing cable was con-
nected.

A buzzer also
sounds.

The EV system cannot
be started while the
charging cable is con-
nected due to the
safety functions

*

.

Disconnect the
charging cable and
start the EV system.

-------------------------------------------------------------------------------------------------------------------------------------------------------------

356

8-2. Steps to take in an emergency

Messages

Details

Correction 

procedure

One of the following sit-
uations has occurred:
• The charging cable

was disconnected

• Charging was inter-

rupted by a power
outage or similar

• Charging has been

stopped due to the
timer function of
charging station with
normal charge

Charging has not fin-
ished properly. Refer to
the procedures on P.
181, 195 and perform
charging again.

The vehicle can be
used even if charging
has not finished.
However, the driving
range decreases.

One of the following sit-
uations has occurred:
• The charging con-

nector is not properly
inserted

• The latch release

button has been
pressed and held

• The charging con-

nector has been dis-
connected

Reinsert the charging
connector to restart
charging.

Charging has been
interrupted by a mal-
function in the charg-
ing system.

Stop charging immedi-
ately, and contact your
Scion dealer.
Also, driving is possible
when the EV system
has been started.

-------------------------------------------------------------------------------------------------------------------------------------------------------------

357

8-2. Steps to take in an emergency

8

W
hen

 troub

le 
arises

Charging has been
stopped because of the
high energy consump-
tion of electrical com-
ponents, such as the
headlights.

Switch the electrical
appliance off, and
restart charging by fol-
lowing the procedure
on P. 181, 195.

If the message is still
displayed, the 12-volt
battery may have a
low charge.
In this event, turn the
power switch off
approximately 15
minutes after starting
the EV system, and
restart charging.

Charging has been
stopped because of
extremely low voltage,
possibly caused by the
plug not being inserted
correctly.

Check that the plug is
inserted correctly, and
restart charging by fol-
lowing the procedure
on P. 181, 195.

Check that the plug is
not connected to a
power strip and that
an extension cord,
multi-outlet, etc. is
not being used.

Charging has been
stopped because of a
problem with the charg-
ing cable.

If the charging cable is
not a genuine Scion
product, or if you are
charging using a charg-
ing station (other than a
Scion dealer), try
charging with a genu-
ine Scion charging
cable.

If the message is still
displayed, contact
your Scion dealer.

Messages

Details

Correction 

procedure

-------------------------------------------------------------------------------------------------------------------------------------------------------------

358

8-2. Steps to take in an emergency

Warning buzzer

In some cases, the buzzer may not be heard because of noisy place or an
audio sound.

Estimated charging time

Due to the following reasons, an estimated charging time will become longer
or shorter. However, the maximum charging time of quick charging is up to 60
minutes.

Preset charging time of a quick charger.

The traction battery’s remaining charge at the time the charging has been
started.

The traction battery temperature.

Charging has com-
pleted because of the
continued high temper-
ature of the traction
battery (in order to pro-
tect the battery).

If the desired charge
level has not been
achieved, restart charg-
ing by following the pro-
cedure on P. 181, 195
after the traction bat-
tery has cooled down.

Charging has been
stopped because the
remaining charge time
has become zero in
quick charging.
• The quick charger’s

timer has reached
the set time.

• Charging has been

conducted in an
extremely low tem-
perature.

If the desired charge
level has not been
achieved, restart charg-
ing by following the pro-
cedure on P. 181, 195.

Messages

Details

Correction 

procedure

-------------------------------------------------------------------------------------------------------------------------------------------------------------

359

8

W
hen

 troub

le 
arises

8-2. Steps to take in an emergency

If you have a flat tire

● Stop the vehicle in a safe place on a hard, flat surface.
● Set the parking brake.
● Shift the shift lever to P.
● Stop the EV system.
● Turn on the emergency flashers. (P. 328)

A puncture caused by a nail or screw passing through the tire
tread can be repaired temporarily using the emergency tire
puncture repair kit. (The kit contains a bottle of sealant. The
sealant can be used only once to temporarily repair one tire
without removing the nail or screw from the tire.) After tempo-
rarily repairing the tire with the repair kit, have the tire repaired
or replaced by your Scion dealer.

CAUTION

If you have a flat tire

Do not continue driving with a flat tire.
Driving even a short distance with a flat tire can damage the tire and the
wheel beyond repair, which could result in an accident. 
Driving with a flat tire may cause a circumferential groove on the side
wall. In such a case, the tire may explode when using a repair kit.

Before repairing the tire

-------------------------------------------------------------------------------------------------------------------------------------------------------------

360

8-2. Steps to take in an emergency

Location of the emergency tire puncture repair kit

Emergency tire puncture repair kit

Towing eyelet

1
2

-------------------------------------------------------------------------------------------------------------------------------------------------------------

361

8-2. Steps to take in an emergency

8

W
hen

 troub

le 
arises

Emergency tire puncture repair kit components

Hose

Bottle

Compressor

Air pressure gauge

Compressor switch

Power plug

Speed limit label

Sealant injected label

Air release cap

1
2
3
4
5

6
7
8
9

-------------------------------------------------------------------------------------------------------------------------------------------------------------

362

8-2. Steps to take in an emergency

Fold down the rear seat seatbacks. (

P. 140)

Remove the luggage box.

Turn the knobs and remove
them.

Remove the luggage box.

Take out the emergency tire
puncture repair kit.

Taking out the emergency tire puncture repair kit

1

Luggage box

2

1

2

Emergency tire 
puncture repair kit

3

-------------------------------------------------------------------------------------------------------------------------------------------------------------

363

8-2. Steps to take in an emergency

8

W
hen

 troub

le 
arises

Check the degree of the tire damage.

A tire should only be repaired with
the emergency tire puncture
repair kit if the damage is caused
by a nail or screw passing through
the tire tread.

• Do not remove the nail or screw

from the tire. Removing the
object may widen the opening
and disenable emergency
repair with the repair kit.

• To avoid sealant leakage, move

the vehicle until the area of the
puncture, if known, is posi-
tioned at the top of the tire.

Take out the repair kit from the plastic bag. 

Remove the valve cap from the
valve of the punctured tire.

Remove the air release cap
from the hose.

You will use the air release cap
again. Therefore keep it in a safe
place.

Before performing emergency repair

Emergency repair method

1

2

3

-------------------------------------------------------------------------------------------------------------------------------------------------------------

364

8-2. Steps to take in an emergency

Connect the hose to the valve.

Screw the end of the hose clock-
wise as far as possible.

Make sure that the compressor
switch is off.

Remove the rubber stopper
from the compressor.

Connect the power plug to the
power outlet socket. (

P. 243)

4

5

6

7

-------------------------------------------------------------------------------------------------------------------------------------------------------------

365

8-2. Steps to take in an emergency

8

W
hen

 troub

le 
arises

Connect the bottle to the com-
pressor.

Make sure that the bottle is
securely connected.

Attach the 2 stickers as shown.

Remove any dirt and moisture
from the wheel before attaching
the label.

8

9

-------------------------------------------------------------------------------------------------------------------------------------------------------------


Content      ..     20      21      22      23     ..