Scion iA. Service Manual - part 28


  Index      Manuals     Scion iA. Service Manual


Search            copyright infringement  


Content      ..     26      27      28      29     ..


Scion iA. Service Manual - part 28


iA_OM_OM99M17z_(U)

447

5-3. Owner Maintenance

5

Mainten

ance an

d Care

Keep your tire pressure at the correct levels. If one frequently needs
inflating, have it inspected.

During rotation, inspect them for
correct balance.

Also, inspect them for uneven wear and damage. Abnormal wear is
usually caused by one or a combination of the following:
● Incorrect tire pressure
● Improper wheel alignment
● Out-of-balance wheel
● Severe braking
After rotation, inflate all tire pressures to specification (

P. 570) and

inspect the lug nuts for tightness.

Vehicles with tire pressure monitoring system:
After adjusting the tire pressure, initialization of the tire pressure mon-
itoring system is necessary to make the system operate normally.

WARNING

Always inflate the tires to the correct pressure
Overinflation or underinflation of tires is dangerous. Adverse handling or
unexpected tire failure could result in a serious accident.
Refer to Tires on (

P. 570).

Use only a Scion-genuine tire valve cap
Use of a non-genuine part is dangerous as the correct tire air pressure
cannot be maintained if the tire valve becomes damaged. If the vehicle
is driven under this condition, the tire air pressure will decrease which
could result in a serious accident. Do not use any part for the tire valve
cap that is not a Scion-genuine part.
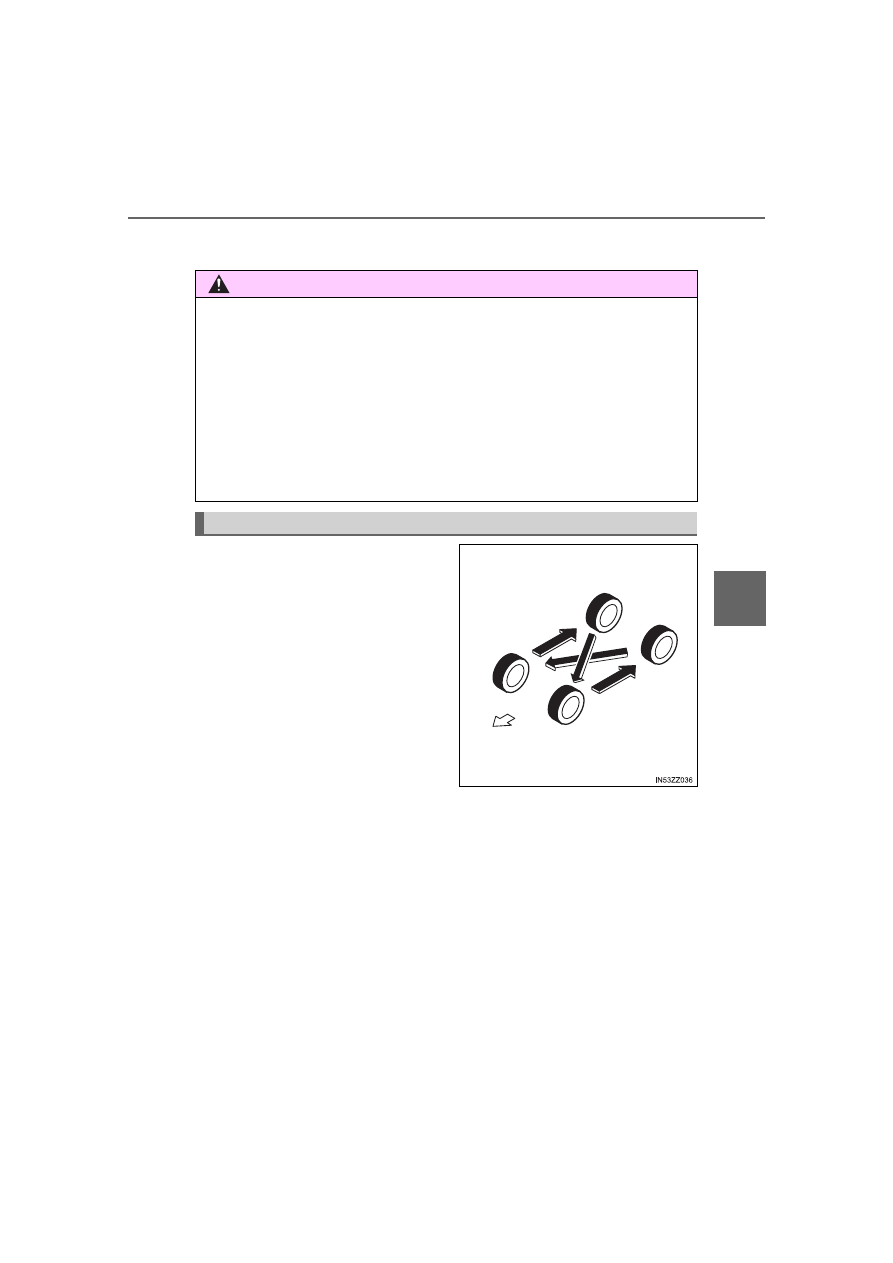
Tire Rotation

Forward

Do not include (TEMPORARY 
USE ONLY) spare tire in rotation.

-------------------------------------------------------------------------------------------------------------------------------------------------------------

448

5-3. Owner Maintenance

iA_OM_OM99M17z_(U)

Refer to Tire Pressure Monitoring System Initialization on P. 221.

If a tire wears evenly, a wear indi-
cator will appear as a solid band
across the tread.

Replace the tire when this hap-
pens.

You should replace the tire before the band crosses the entire tread.

Vehicles with tire pressure monitoring system:

After adjusting the tire pressure, initialization of the tire pressure mon-
itoring system is necessary to make the system operate normally.

Refer to Tire Pressure Monitoring System Initialization on P. 221.

Tires degrade over time, even when they are not being used on the road.
It is recommended that tires generally be replaced when they are 6 years
or older. Heat caused by hot climates or frequent high loading conditions
can accelerate the aging process. You should replace the spare tire when
you replace the other road tires due to the aging of the spare tire. The
period in which the tire was manufactured (both week and year) is indi-
cated by a 4-digit number. 
Refer to Tire Labeling on P. 541.

WARNING

Rotate tires periodically
Irregular tire wear is dangerous. To equalize tire wear and extend tire
life, Scion recommends that tire rotation is carried out at the same inter-
val as tire inspection.
For scheduled maintenance information, please refer to the “Owner’s
Manual Supplement/Scheduled Maintenance Guide”.

NOTICE

Rotate unidirectional tires and radial tires that have an asymmetrical
tread pattern or studs only from front to rear, not from side to side. Tire
performance will be reduced if rotated from side to side.

Replacing a Tire

Tread wear indicator

New tread

Worn tread

-------------------------------------------------------------------------------------------------------------------------------------------------------------

iA_OM_OM99M17z_(U)

449

5-3. Owner Maintenance

5

Mainten

ance an

d Care

Inspect the temporary spare tire at least monthly to make sure it is
properly inflated and stored.

The temporary spare tire is easier to handle because of its construc-
tion which is lighter and smaller than a conventional tire. This tire
should be used only for an emergency and only for a short distance.

Use the temporary spare tire only until the conventional tire is
repaired, which should be as soon as possible. 
Refer to Tires on P. 570.

The temporary spare tire condition gradually deteriorates even if it has
not been used.

Tires degrade over time, even when they are not being used on the
road. It is recommended that tires generally be replaced when they are
6 years or older. Heat caused by hot climates or frequent high loading
conditions can accelerate the aging process. You should replace the
spare tire when you replace the other road tires due to the aging of the
spare tire. The period in which the tire was manufactured (both week
and year) is indicated by a 4-digit number.
Refer to Tire Labeling on P. 541.

WARNING

Always use tires that are in good condition
Driving with worn tires is dangerous. Reduced braking, steering, and
traction could result in an accident.

Replace all four tires at the same time
Replacing just one tire is dangerous. It could cause poor handling and
poor braking resulting in loss of vehicle control. Scion strongly recom-
mends that you replace all four tires at the same time. If you replace
only two tires, the new tires should be installed on the rear of the vehi-
cle.

Temporary Spare Tire

-------------------------------------------------------------------------------------------------------------------------------------------------------------

450

5-3. Owner Maintenance

iA_OM_OM99M17z_(U)

Proper tire balancing provides the best riding comfort and helps
reduce tread wear. Out-of-balance tires can cause vibration and
uneven wear, such as cupping and flat spots.

When replacing a wheel, make sure the new one is the same as the orig-
inal factory wheel in diameter, rim width, and offset (inset/outset).

NOTICE

Do not use your temporary spare tire rim with a snow tire or a conven-
tional tire. Neither will properly fit and could damage both tire and rim.

The temporary spare tire has a tread life of less than 3,000 miles
(5,000 km). The tread life may be shorter depending on driving condi-
tions.

The temporary spare tire is for limited use, however, if the tread wear
solid- band indicator appears, replace the tire with the same type of
temporary spare (

P. 450).

Replacing a Wheel

WARNING

Always use wheels of the correct size on your vehicle
Using a wrong-sized wheel is dangerous. Braking and handling could
be affected, leading to loss of control and an accident.

NOTICE

A wrong-sized wheel may adversely affect:

Tire fit

Wheel and bearing life

Ground clearance

Snow-chain clearance

Speedometer calibration

Headlight aim

Bumper height

Tire Pressure Monitoring System (if equipped)

-------------------------------------------------------------------------------------------------------------------------------------------------------------

451

iA_OM_OM99M17z_(U)

5-3. Owner Maintenance

5

Mainten

ance an

d Care

Light Bulbs

Front

Headlights (Low/High beam)/
Daytime running lights

Front side-marker lights

Overhead lights/Map lights

Front turn signal lights/Park-
ing lights

Fog lights (if equipped)

Rear

Trunk light

License plate lights

Reverse lights

Rear turn signal lights

Brake lights/Taillights/Rear
side-marker lights

1

2
3
4

5

1
2
3
4
5

-------------------------------------------------------------------------------------------------------------------------------------------------------------

452

5-3. Owner Maintenance

iA_OM_OM99M17z_(U)

Headlights/Daytime running lights

Make sure the ignition is switched off, and the headlight switch is
off.

Lift the hood.

Disconnect the connector
from the bulb.

Detach the sealing cover
from the bulb.

Retaining spring

Sealing cover

Unhook the bulb retaining spring.

Swing the retaining spring out and away to free the headlight
bulb.

Carefully remove the headlight bulb from the socket by pulling it
straight back.

Replace the bulb.

Install the new bulb in the reverse order of the removal proce-
dure.

Replacing Exterior Light Bulbs

1

2

3

4

1
2

5

6

7

8

9

-------------------------------------------------------------------------------------------------------------------------------------------------------------

iA_OM_OM99M17z_(U)

453

5-3. Owner Maintenance

5

Mainten

ance an

d Care

Front turn signal lights/Parking lights, Front side-marker lights

Make sure the ignition is switched off, and the headlight switch is
off.

Lift the hood.

Front turn signal lights/Parking lights

Remove the fuse block
cover.

Turn the socket and bulb assembly counterclockwise and
remove it.

Disconnect the bulb from the socket.

Install the new bulb in the reverse order of the removal proce-
dure.

1

2

3

4

5

Front turn signal lights/Parking
lights

Front side-marker lights

6

-------------------------------------------------------------------------------------------------------------------------------------------------------------

454

5-3. Owner Maintenance

iA_OM_OM99M17z_(U)

Fog lights (if equipped)

Make sure the ignition is switched off, and the fog light switch is
off.

Turn the screws counter-
clockwise and remove them.

Pull the center of each retain-
ers and remove them, and
then partially peel back the
front under cover.

Removal

Installation

Disconnect the connector
from the unit by pressing the
tab on the connector with
your finger and pulling the
connector downward.

1

2

3

1
2

4

-------------------------------------------------------------------------------------------------------------------------------------------------------------

iA_OM_OM99M17z_(U)

455

5-3. Owner Maintenance

5

Mainten

ance an

d Care

Turn the socket and bulb
assembly to remove it. Care-
fully remove the bulb from its
socket in the reflector by
gently pulling it straight back-
ward out of the socket.

Install the new bulb in the reverse order of the removal proce-
dure.

Rear turn signal lights, Brake lights/Taillights/Rear side-marker
lights

Make sure the ignition is switched off, and the headlight switch is
off.

Remove the cover.

Turn the socket and bulb assembly counterclockwise and
remove it.

Disconnect the bulb from the socket.

5

6

1

2

3

4

Rear turn signal lights

Brake lights/Taillights/Rear
side-marker lights

-------------------------------------------------------------------------------------------------------------------------------------------------------------

456

5-3. Owner Maintenance

iA_OM_OM99M17z_(U)

Install the new bulb in the reverse order of the removal proce-
dure.

Verify that the cover is securely installed.

Insert the cover tabs and install the cover.

Reverse lights

Make sure the ignition is switched off, and the headlight switch is
off.

Pull the center of each plastic retainers and remove them.

Remove the trunk lid trim.

Removal

Installation

Disconnect the electrical
connector from the bulb by
pressing the tab on the con-
nector with your finger and
pulling the connector.

Turn the socket and bulb assembly counterclockwise and
remove it.

Disconnect the bulb from the
socket.

Install the new bulb in the reverse order of the removal proce-
dure.

5

6

1

2

3

1
2

4

5

6

7

-------------------------------------------------------------------------------------------------------------------------------------------------------------

iA_OM_OM99M17z_(U)

457

5-3. Owner Maintenance

5

Mainten

ance an

d Care

License plate lights

Make sure the ignition is switched off, and the headlight switch is
off.

Pull the center of each plastic retainers and remove them.

Remove the trunk lid trim.

Removal

Installation

Turn the socket and bulb assembly counterclockwise and
remove it.

Disconnect the bulb from the
socket.

Install the new bulb in the reverse order of the removal proce-
dure.

Side turn signal lights (if equipped), High-mount brake light

The LED bulb cannot be replaced as a single unit because it is an
integrated unit. The LED bulb has to be replaced with the unit. We
recommend your Scion dealer when the replacement is necessary.

Replacing Exterior Light Bulbs

To replace the bulb, contact your Scion dealer.

If the halogen bulb is accidentally touched, it should be cleaned with rubbing
alcohol before being used.

Use the protective cover and carton of the replacement bulb to dispose of
the old bulb promptly out of the reach of children.

When reinstalling the sealing cover, make sure it is fitted correctly.

1

2

3

1
2

4

5

6

-------------------------------------------------------------------------------------------------------------------------------------------------------------

458

5-3. Owner Maintenance

iA_OM_OM99M17z_(U)

Overhead lights/Map lights

Wrap a small flathead screwdriver with a soft cloth to prevent
damage to the lens, and then remove the lens by carefully prying
on the edge of the lens with the flathead screwdriver.

Disconnect the bulb by pull-
ing it out.

Install the new bulb in the reverse order of the removal proce-
dure.

Replacing Interior Light Bulbs

1

2

3

-------------------------------------------------------------------------------------------------------------------------------------------------------------

iA_OM_OM99M17z_(U)

459

5-3. Owner Maintenance

5

Mainten

ance an

d Care

Trunk light

Press both sides of the lens cap to remove it.

Disconnect the bulb by pull-
ing it out.

Install the new bulb in the reverse order of the removal proce-
dure.

1

2

WARNING

Never touch the glass portion of a halogen bulb with your bare hands
and always wear eye protection when handling or working around the
bulbs
When a halogen bulb breaks, it is dangerous. These bulbs contain pressur-
ized gas.

If one is broken, it will explode and serious injuries could be caused by the
flying glass.

If the glass portion is touched with bare hands, body oil could cause the
bulb to overheat and explode when lit.

Always keep halogen bulbs out of the reach of children
Playing with a halogen bulb is dangerous. Serious injuries could be caused
by dropping a halogen bulb or breaking it some other way.

NOTICE

When removing the lens or lamp unit using a flathead screwdriver, make
sure that the flathead screwdriver does not contact the interior terminal. If
the flathead screwdriver contacts the terminal, a short circuit may occur.

3

-------------------------------------------------------------------------------------------------------------------------------------------------------------

460

iA_OM_OM99M17z_(U)

5-3. Owner Maintenance

Fuses

Replacing the fuses on the vehicle’s left side

If the electrical system does not work, first inspect the fuses on the
vehicle’s left side.

Make sure the ignition is switched off, and other switches are off.

Open the fuse panel cover.

Pull the fuse straight out with
the fuse puller provided on
the fuse block located in the
engine compartment.

Your vehicle’s electrical system is protected by fuses.

If any lights, accessories, or controls do not work, inspect the
appropriate circuit protector. If a fuse has blown, the inside ele-
ment will be melted.

If the same fuse blows again, avoid using that system and con-
sult your Scion dealer as soon as possible.

Fuse Replacement

1

2

3

-------------------------------------------------------------------------------------------------------------------------------------------------------------

iA_OM_OM99M17z_(U)

461

5-3. Owner Maintenance

5

Mainten

ance an

d Care

Inspect the fuse and replace
it if it is blown.

Normal

Blown

Insert a new fuse of the same amperage rating, and make sure it
fits tightly. If it does not fit tightly, have an expert install it. We rec-
ommend your Scion dealer. 
If you have no spare fuses, borrow one of the same rating from a
circuit not essential to vehicle operation, such as the AUDIO or
OUTLET circuit.

Reinstall the cover and make sure that it is securely installed.

Replacing the fuses under the hood

If the headlights or other electrical components do not work and the
fuses in the cabin are normal, inspect the fuse block under the
hood. If a fuse is blown, it must be replaced. Follow these steps:

Make sure the ignition is switched off, and other switches are off.

Remove the fuse block
cover.

4

1
2

5

6

1

2

-------------------------------------------------------------------------------------------------------------------------------------------------------------

462

5-3. Owner Maintenance

iA_OM_OM99M17z_(U)

If any fuse but the MAIN fuse
is blown, replace it with a
new one of the same amper-
age rating.

Normal

Blown

Reinstall the cover and make sure that it is securely installed.

3

1
2

WARNING

Do not replace the main fuse and multiplex slow blow fuse by yourself.
Have your Scion dealer perform the replacement
Replacing these fuses by yourself is dangerous because they are high cur-
rent fuses. Incorrect replacement could cause an electrical shock or a short
circuit resulting in a fire.

NOTICE

Always replace a fuse with a genuine Scion fuse or equivalent of the same
rating. Otherwise you may damage the electric system.

4

-------------------------------------------------------------------------------------------------------------------------------------------------------------


Content      ..     26      27      28      29     ..