Rover 75. Service Manual - part 7
Automatic Transmission
AUTOMATICALLY SELECTED MODES
•
Cruise control mode
When cruise control (if fitted) is activated, a suitable gear
NOTE: Automatically selected modes cannot be selected by the driver and
change pattern is selected which is less sensitive to throttle
will not operate if Sport or Snow mode are selected.
changes. This reduces the amount and frequency of gear
The transmission control system automatically selects different gear
changes, providing a smoother ride.
change modes, listed below, designed to suit a variety of driving
•
Cold start mode
conditions.
In very cold conditions the automatic transmission will stay in
•
Hill ascent, trailer and high altitude mode
the lower gears for longer, to help the engine reach its normal
A suitable gear change pattern is selected to counter
operating temperature more quickly. This will help to improve
momentum loss, caused by the more frequent gear changing
overall fuel economy and driveability, and reduce emissions.
which can occur when climbing hills, or when towing a trailer
•
High coolant temperature mode
or caravan. This gear change pattern is also selected at high
In high ambient temperatures during extreme load conditions,
altitudes to combat low engine torque.
it is possible for the engine and the gearbox to overheat. At a
•
Hill descent mode
certain temperature, the transmission will select a gear change
Unless some form of braking is applied, vehicles will naturally
pattern designed to aid the cooling process, whilst enabling the
increase speed when travelling down hill. On most automatic
gearbox to continue performing normally in high temperatures.
vehicles, this results in the highest gear being selected, thereby
•
Smooth change mode
reducing engine braking to a minimum.
Engine torque is reduced during gear changes, creating a much
On this car however, the hill descent mode applies a brake
smoother ride.
within the transmission and, depending on circumstances,
changes to a lower gear, or (more commonly on diesel engine
cars) inhibits automatic selection of higher gears.
Hill descent mode will only be activated when the accelerator
pedal is fully released, and when some braking effort has been
applied but a certain amount of acceleration is still occurring.
The precise operating parameters of hill decent mode will differ
according to engine type.
NOTE: Hill descent mode is not designed to be driver-activated, or to
replace the good practice of selecting an appropriate low gear for steep
descents, or making normal use of the brakes at all times.
98
Manual Gearbox
Manual Gearbox
GEAR LEVER
Precautions while driving
• Do not rest your hand on the gear lever while driving - pressure
from your hand may cause premature wear to the gear selector
mechanism.
• Do not rest your foot on the clutch pedal when driving -
excessive wear to the clutch will result.
2
• Do not hold the car stationary on a hill by slipping the clutch.
This will wear out the clutch. Always use the handbrake.
H2811
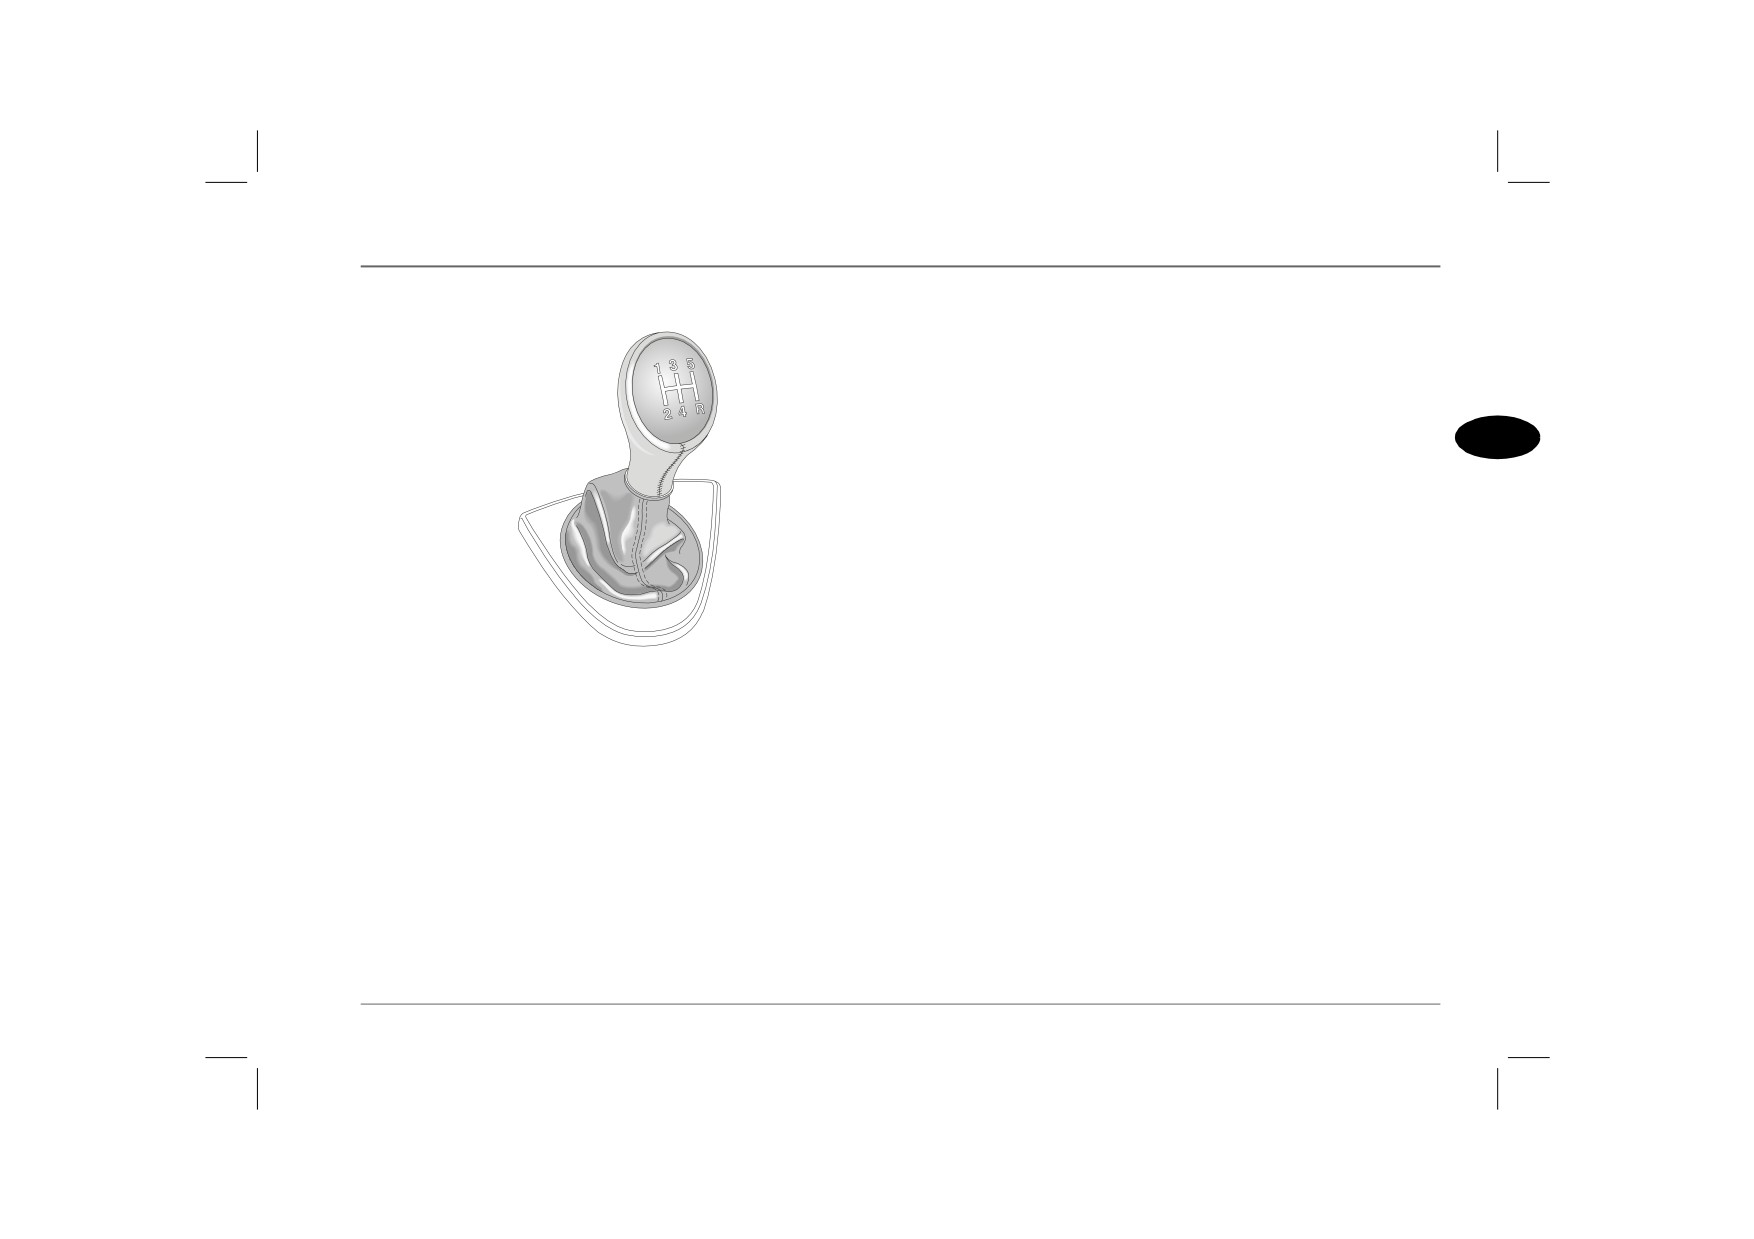
The gear positions are indicated on the gear lever knob.
Synchromesh is provided on all gears (including reverse). In the
neutral position, the gear lever is spring loaded to rest naturally in
the centre of the gate between 3rd and 4th gears.
99
Fuel System
Fuel System
TYPE OF FUEL
Diesel engines
Petrol engines
Diesel fuel specification: Good quality diesel fuel to EN 590
Petrol fuel specification: 95 RON unleaded petrol to EN 228
specification.
specification.
The quality of diesel fuel can vary in different countries and only
The RON value (octane rating) and type of petroleum (unleaded
clean, good quality fuel should be used. It is important that the
or leaded) available at garage forecourts, will vary in different parts
sulphur content of diesel fuel does not exceed 0.3%. In Europe, all
of the world. For example, in most European countries 95 RON
supplies should be within this limit, but in other parts of the world,
unleaded fuel is readily available, but in other parts of the world
you should check with your supplier.
fuel supplies may be limited to leaded or lower octane fuels only.
SAFETY ON THE FORECOURT
Before a new car is delivered to the first owner, the engine is tuned
to suit the fuel supplies commonly available in the market in which
Petroleum gases are highly inflammable and, in confined
the car is to be purchased. However, if the car is later exported to
spaces, are also extremely explosive.
a different country, or is used to travel between different
territories, you should be aware that the available fuel supplies may
Always take care when refuelling:
not be compatible with the engine specification. If in doubt,
• Switch off the engine.
consult an MG Rover dealer for advice.
• Do not smoke or use a naked flame.
The RON value quoted above is a MINIMUM requirement for
• Do not use a mobile phone.
the United Kingdom and most European markets and can be safely
• Avoid spilling fuel.
exceeded. For optimum engine performance, 98 RON unleaded
• Do not overfill the tank.
petrol should be used.
IN AN EMERGENCY (and only if the correct fuel is
unavailable), lower octane rated fuel can be used for very limited
periods of moderate, low speed motoring, provided engine
‘knocking’ does not occur.
100
Fuel System
FUEL FILLER
Emergency fuel filler release (Tourer models only)
2
HB0036
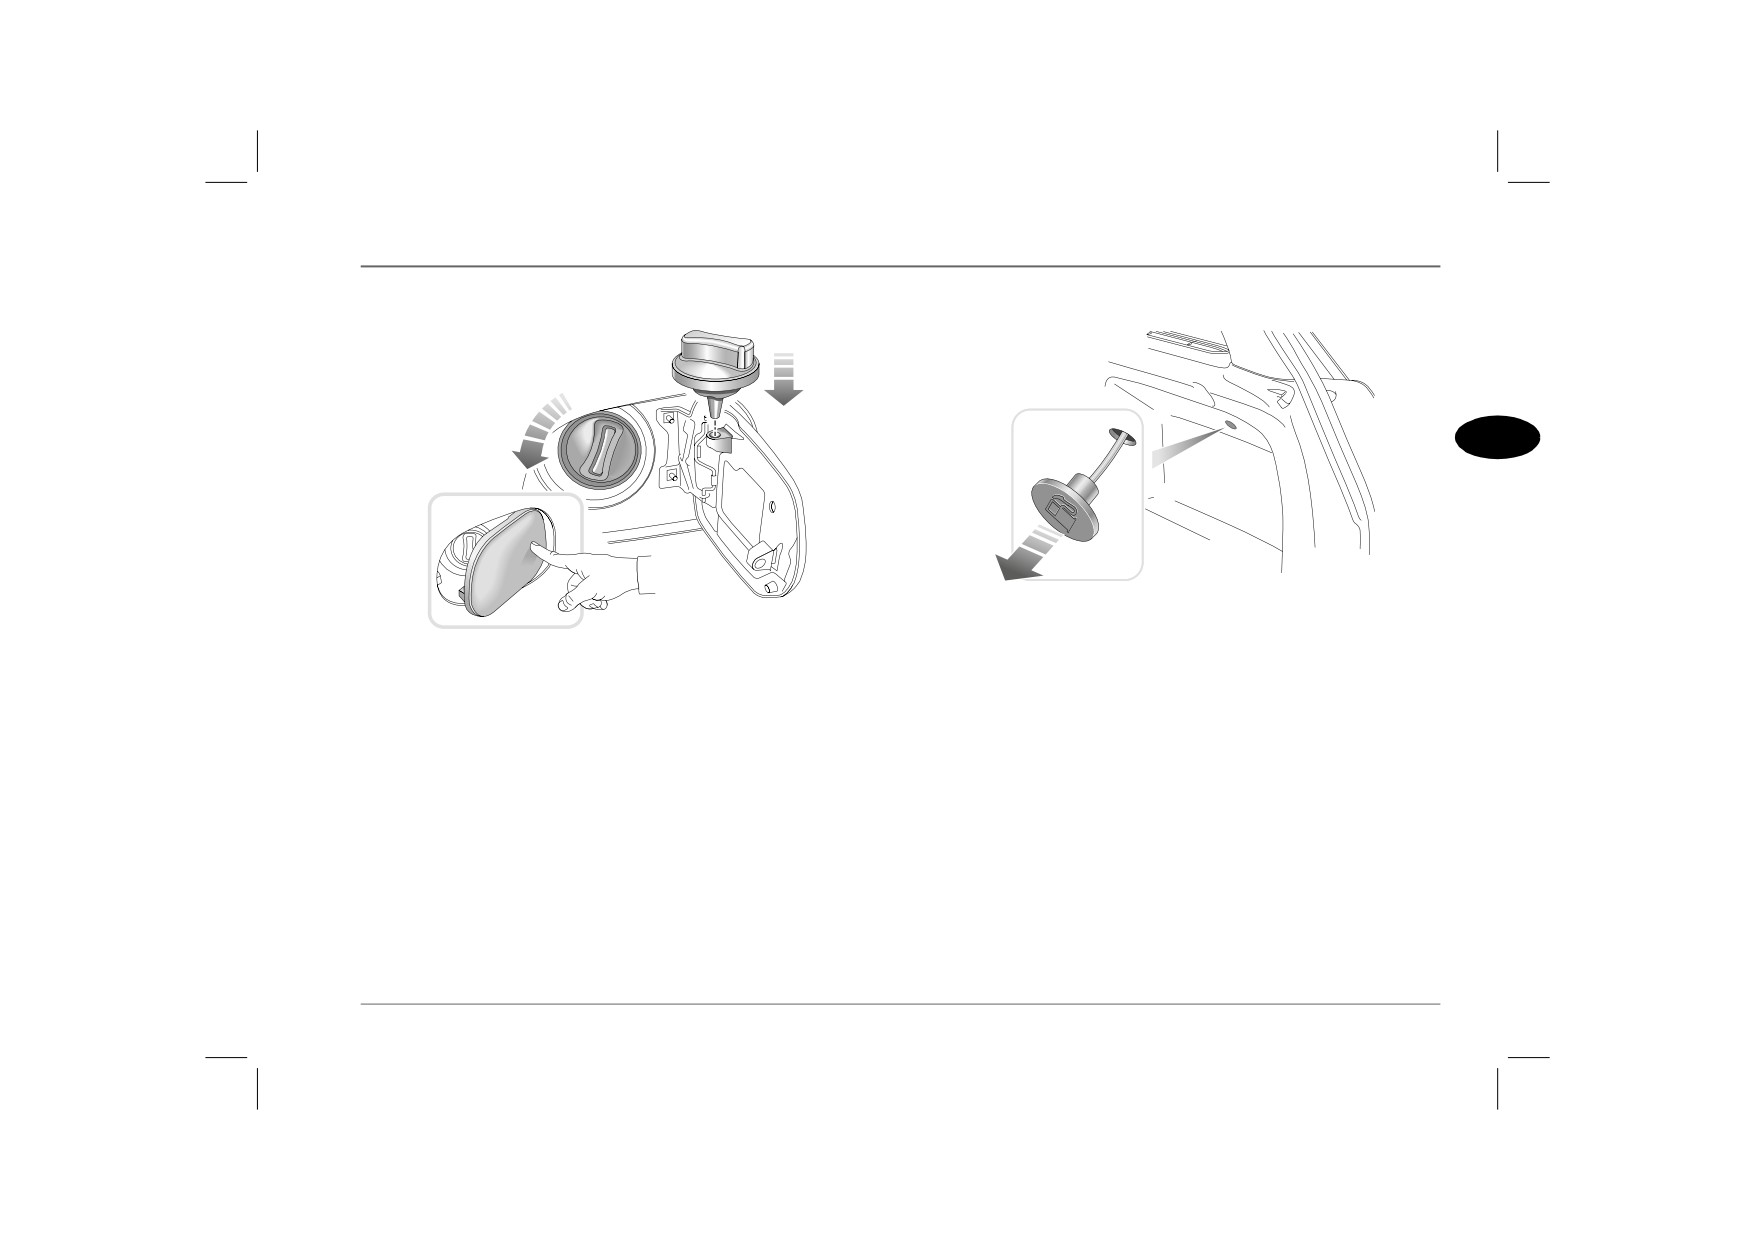
If, for any reason, the fuel filler flap automatic unlocking
H2717
mechanism fails, the flap can be released manually by pulling a
release cord in the loadspace area.
Fuel filler flap
The fuel filler flap is located on the rear right-hand wing and is
The cord is located on the right hand side, to the rear of the fuel
linked to the central door locking system. With the car unlocked,
filler and under the top lip of the storage pocket (see illustration).
push on the right-hand side of the flap to open.
NOTE: The fuel flap is locked only when the car is locked using the
handset (locking the car with the key or interior locking switch will not
secure the fuel flap).
Fuel filler cap
Unscrew the filler cap anti-clockwise and allow any pressure inside
the tank to escape, before removing the cap.
Stow the filler cap where shown in the illustration.
101
Fuel System
FUEL FILLING
Empty fuel tank
Never allow the car to run out of fuel - the resultant misfire could
Use only the recommended fuel! Serious damage to the catalytic
destroy the catalytic converter. In the event of the fuel tank
converter will occur if the wrong fuel is used.
running dry:
• Petrol engine: Start the engine carefully after refuelling. If the
Always fill the tank SLOWLY, until the filler nozzle automatically
engine runs unevenly, switch off and contact your MG Rover
cuts-off the fuel supply. DO NOT attempt to fill the tank beyond
dealer before attempting to restart the engine.
this point, or spillage could result due to expansion of the fuel.
• Diesel engine: The fuel system will prime automatically and the
Petrol engines
engine can be started.
The filler tube is designed to accept a narrow filler nozzle, of the
type found on pumps that deliver ONLY unleaded fuel. A flap lies
across the filler neck; insert the nozzle sufficiently to fully open the
flap before filling.
DO NOT fully fill the tank if the vehicle is to be parked in
direct sunlight, or high ambient temperature - expansion of the
fuel could cause spillage.
Diesel engines
The diesel fuel filling system on garage forecourts is designed to fill
at a maximum of 45 litres per minute. Use of commercial vehicle
diesel pumps with a higher fill rate may result in premature pump
cut-off and fuel spillage.
102
Fuel System
FUEL CUT-OFF SWITCH
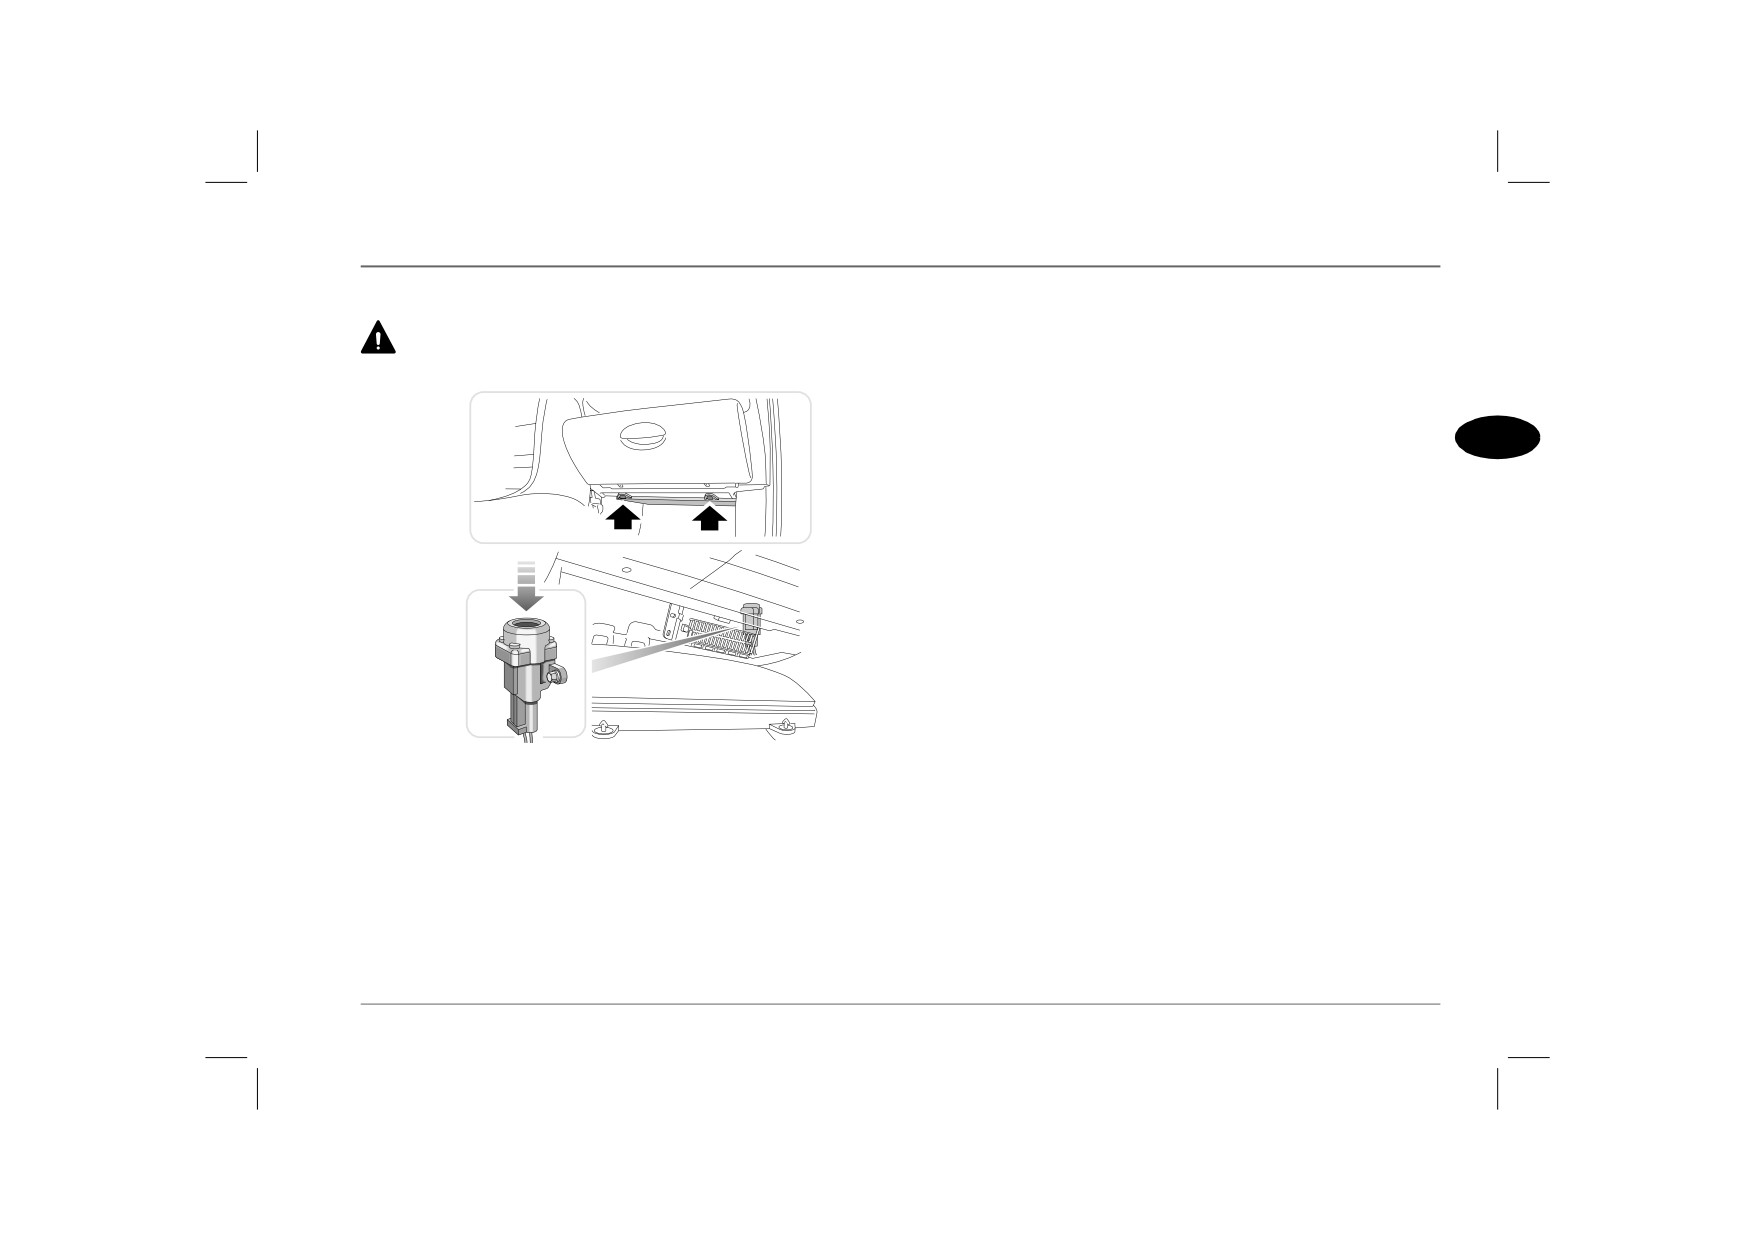
The inertia switch is located behind the glovebox and can be
reached from underneath by removing the four fixings securing
ALWAYS check for fuel leaks before resetting the fuel cut-off
the access cover.
switch.
The switch must be reset before the engine can be started.
2
H2803a
In the event of a collision or sudden impact, an inertia switch
automatically cuts off the fuel supply to the engine and, providing
the alarm is disarmed, unlocks the doors.
When the switch operates, the interior lights illuminate until the
system is reset by pressing the rubber top of the cut-off switch
(arrowed in illustration). In addition, the hazard warning lights
flash until switched off.
103
Lights & Indicators
Lights & Indicators
LIGHTING SWITCH
Headlights
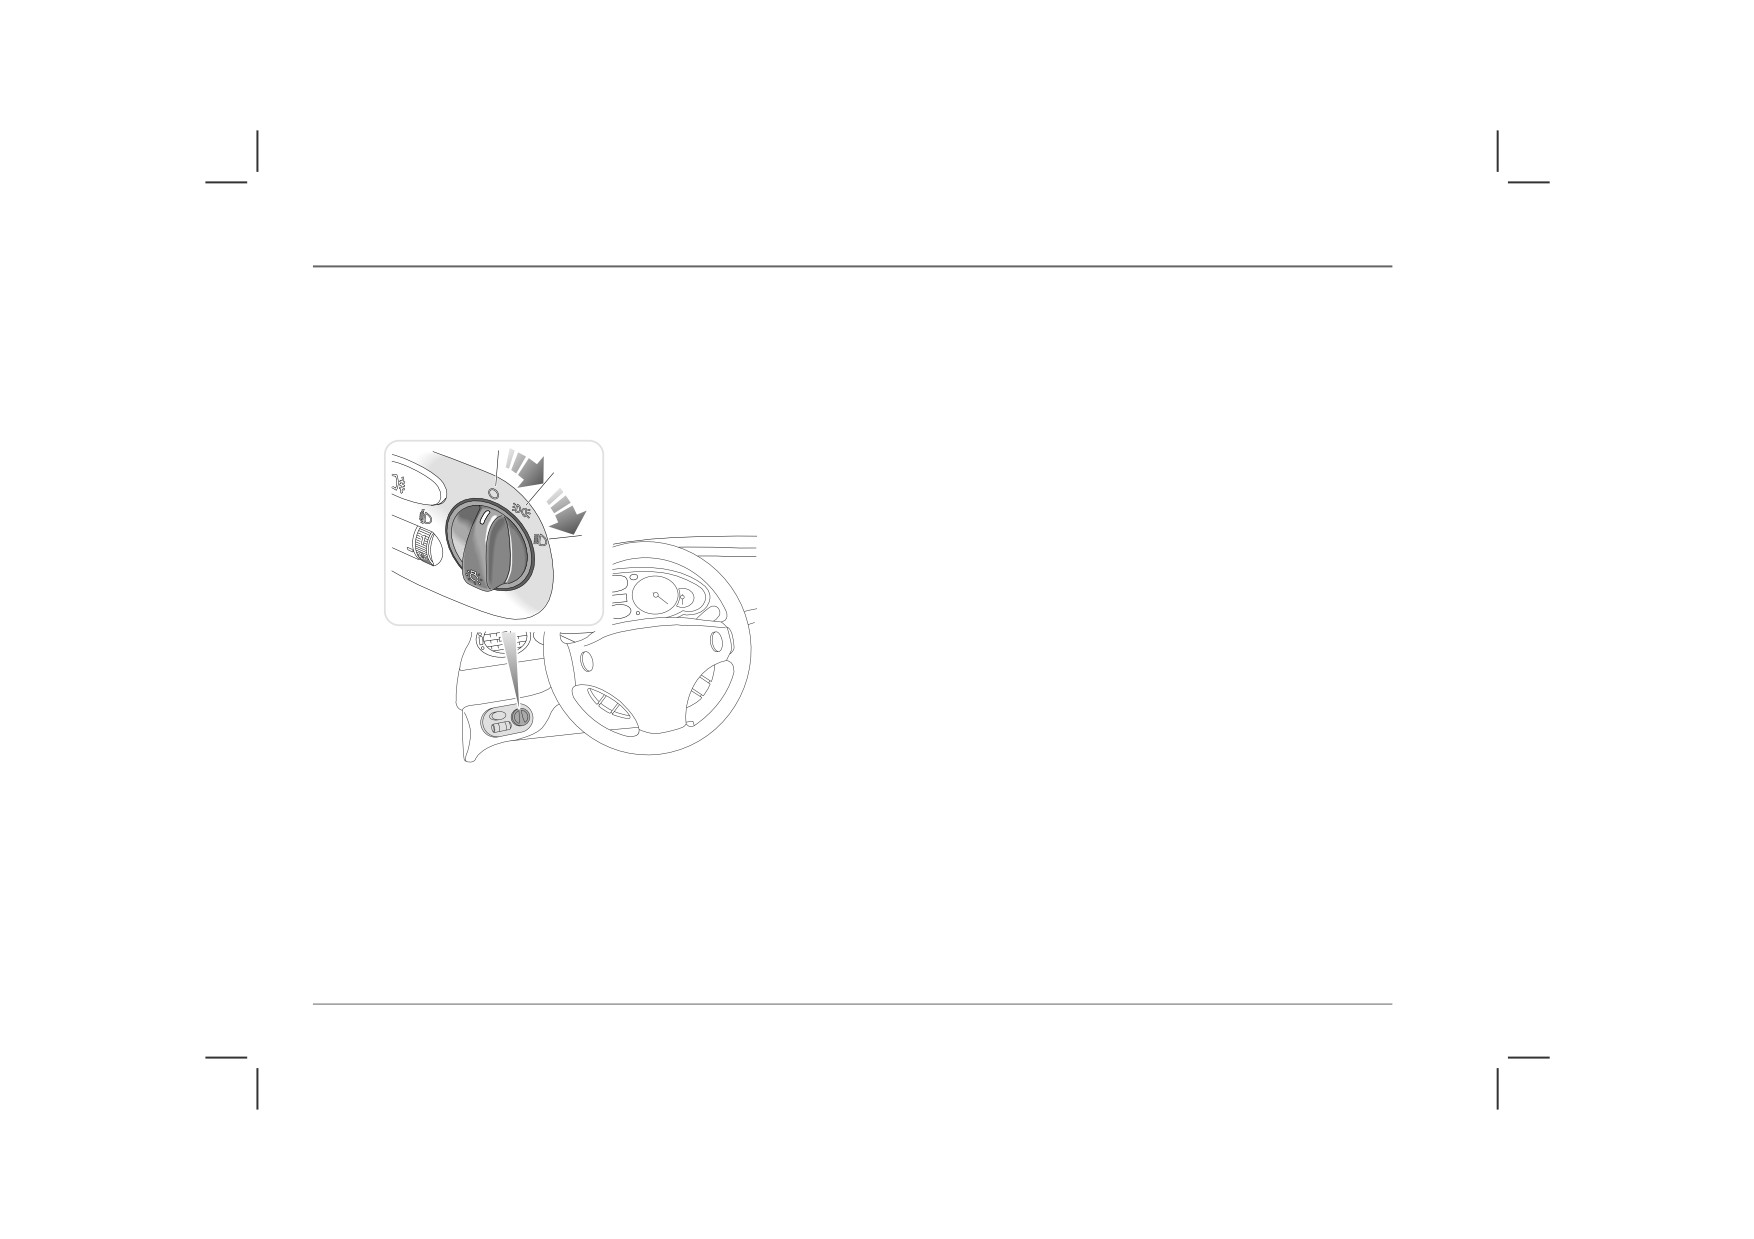
With the starter switch turned to the second position, turn the
NOTE: If the lights (other than parking lights and headlight courtesy
lighting switch to the second position.
delay) are left on after the starter switch has been turned off, a warning
chime will sound when the driver's door is opened, until either the lights
To illuminate the driveway after stopping the engine, the
are turned off, or the door is closed.
headlight courtesy delay feature can be operated as follows:
Having stopped the car, turn the starter switch off BEFORE
turning off the lighting switch. The headlights will then remain
1
illuminated for approximately 30 seconds. (If the light switch is
turned off before the starter switch is turned to position ‘0’, the
feature will not operate).
2
If necessary, the courtesy delay can be cancelled at any time during
the 30 seconds by turning the starter switch on and then off again.
H2812a
Side, tail and instrument panel lights
Turn the lighting switch to the first position.
NOTE: If a tail light bulb is defective, the corresponding brake light will
illuminate as a substitute tail light until the defective bulb is replaced. Note
that on cars equipped with a message centre, bulb failures are identified on
the instrument panel display.
104
Lights & Indicators
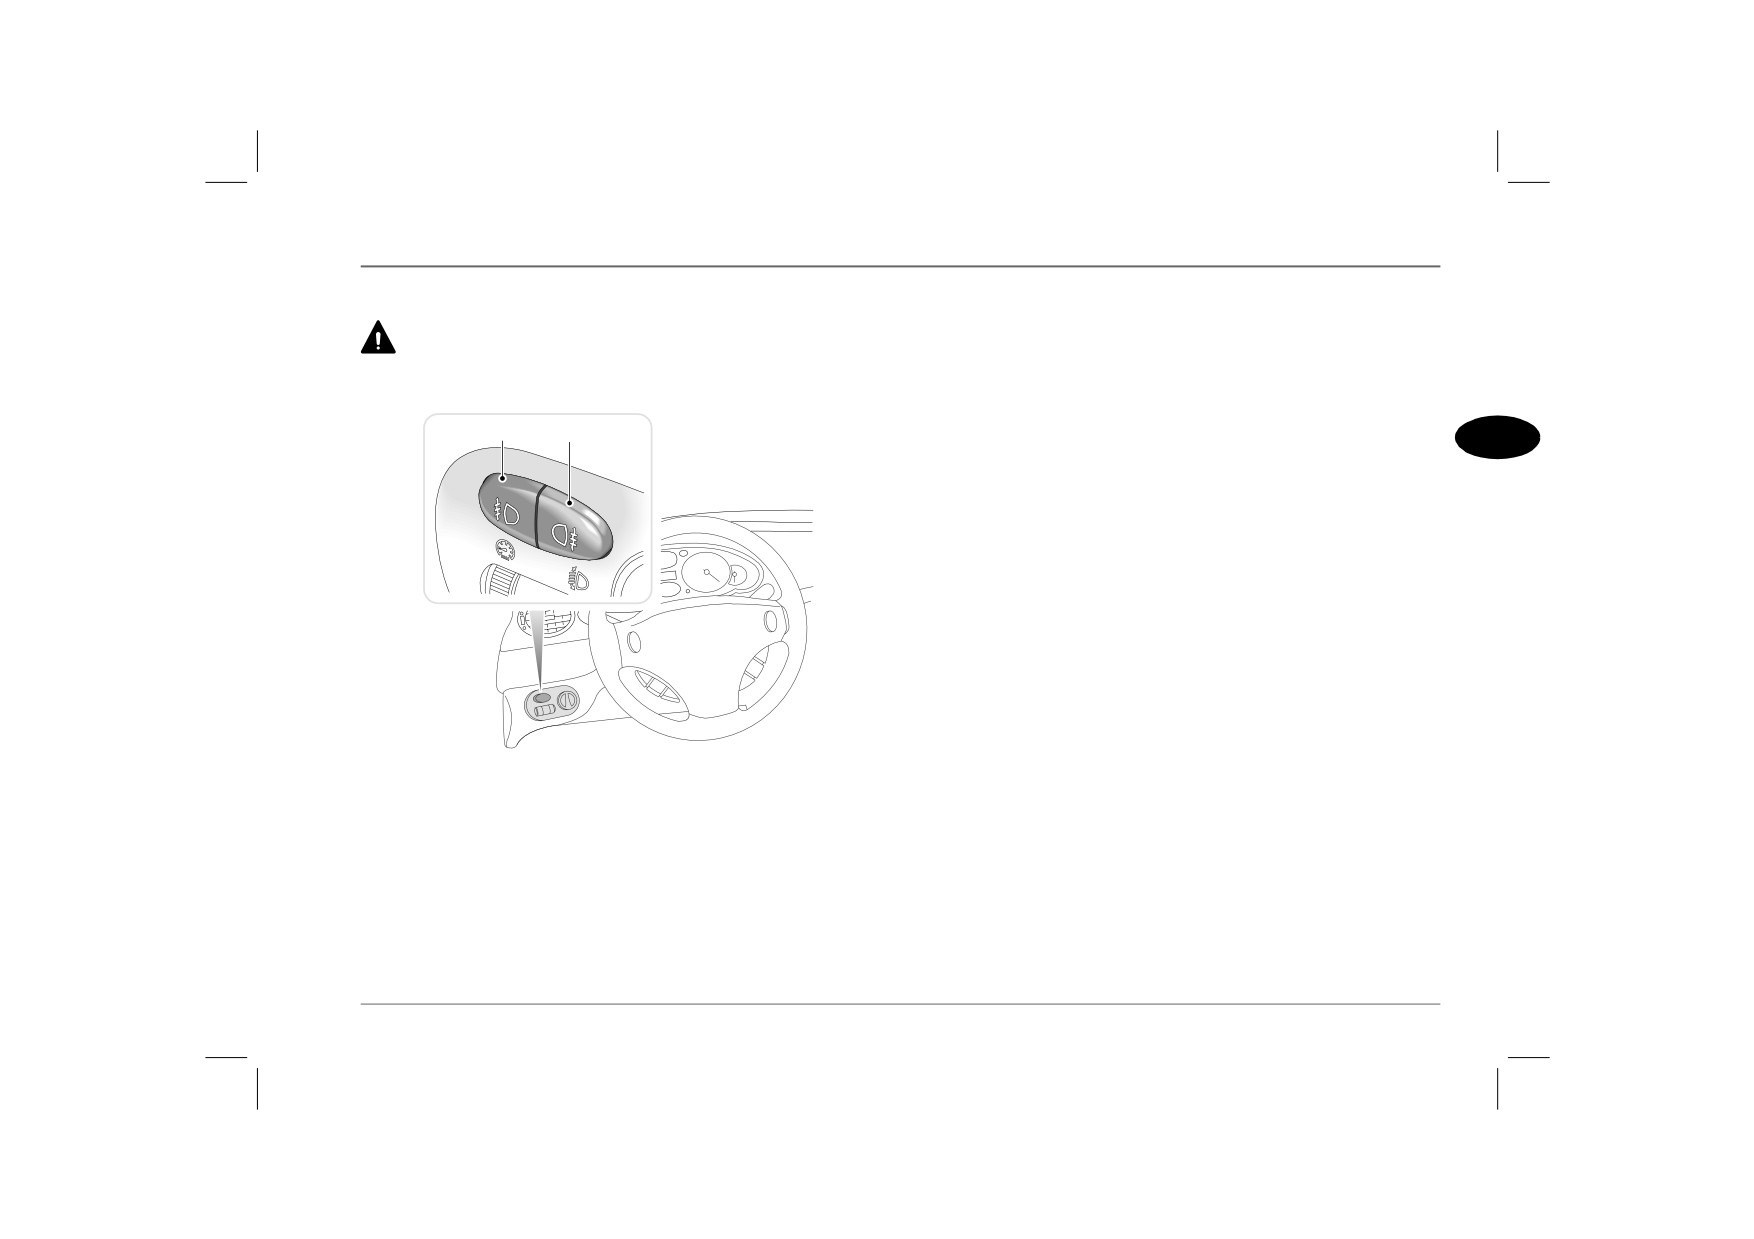
FOG LIGHTS
Rear fog guard lights
Press the switch (1) to switch on and off; the warning light in the
Fog lights should ONLY be used when visibility is severely
instrument panel will illuminate when the fog lights are on. The
restricted - other road users could be dazzled in clear
lights will only operate when the starter switch is in the second
conditions.
position and when:
• The headlights are switched on.
2
1
• The sidelights and front fog lights (if fitted) are switched on.
2
Front fog lights*
Press the switch (2) to switch on and off; the warning light in the
instrument panel will illuminate when the fog lights are on.
The lights operate only with the starter switch in the second
position and the headlights or sidelights switched on.
H2834a
NOTE: Both the rear and front fog lights are switched off automatically
when the main lighting switch or the starter switch are turned off, and will
need to be reselected when the starter switch is turned back on.
105
Lights & Indicators
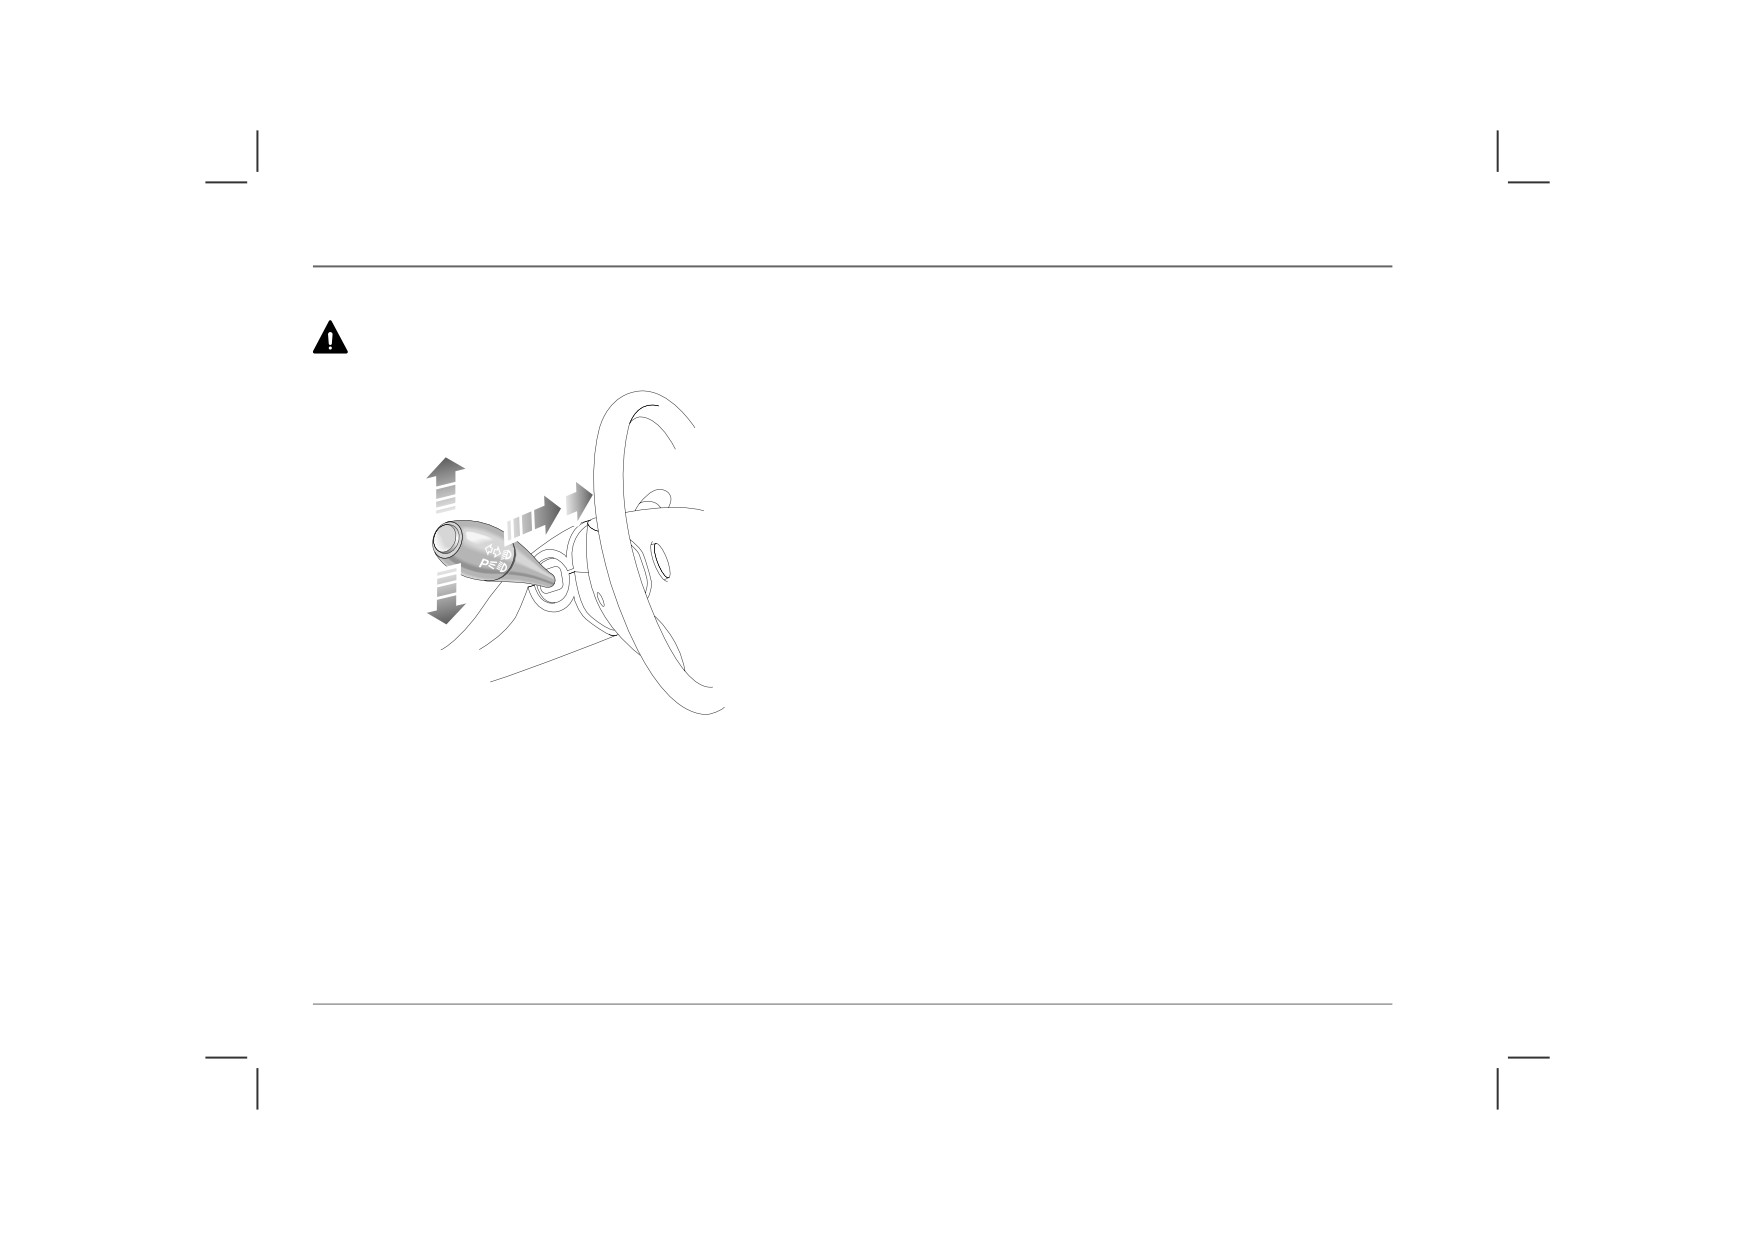
DIRECTION INDICATOR LEVER
Headlight main and dipped beam
Pull the lever fully towards the steering wheel to change headlight
Take care not to dazzle oncoming vehicles when driving using
beams (the BLUE warning light in the instrument panel
main beam headlights.
illuminates when the headlights are on main beam).
NOTE: Main beam selection is cancelled automatically whenever the
lighting or starter switches are turned off.
Headlight flash
To briefly flash the main beams on and off, pull the lever part way
towards the steering wheel and then release.
Parking lights
The near or off-side tail and side lights can be switched on
independently for parking purposes, as follows:
With the starter switch turned off, move the direction indicator
lever fully DOWN to switch on the left hand parking lights. Move
the direction indicator lever fully UP to illuminate the right hand
parking lights.
H2681
To cancel the parking lights, return the direction indicator lever to
the off position.
Direction indicators
Move the lever down to indicate a LEFT turn, or up to indicate a
RIGHT turn. The indicators will cancel automatically once a turn
has been completed.
The corresponding GREEN warning light in the instrument panel
will flash in time with the direction indicators.
106
Lights & Indicators
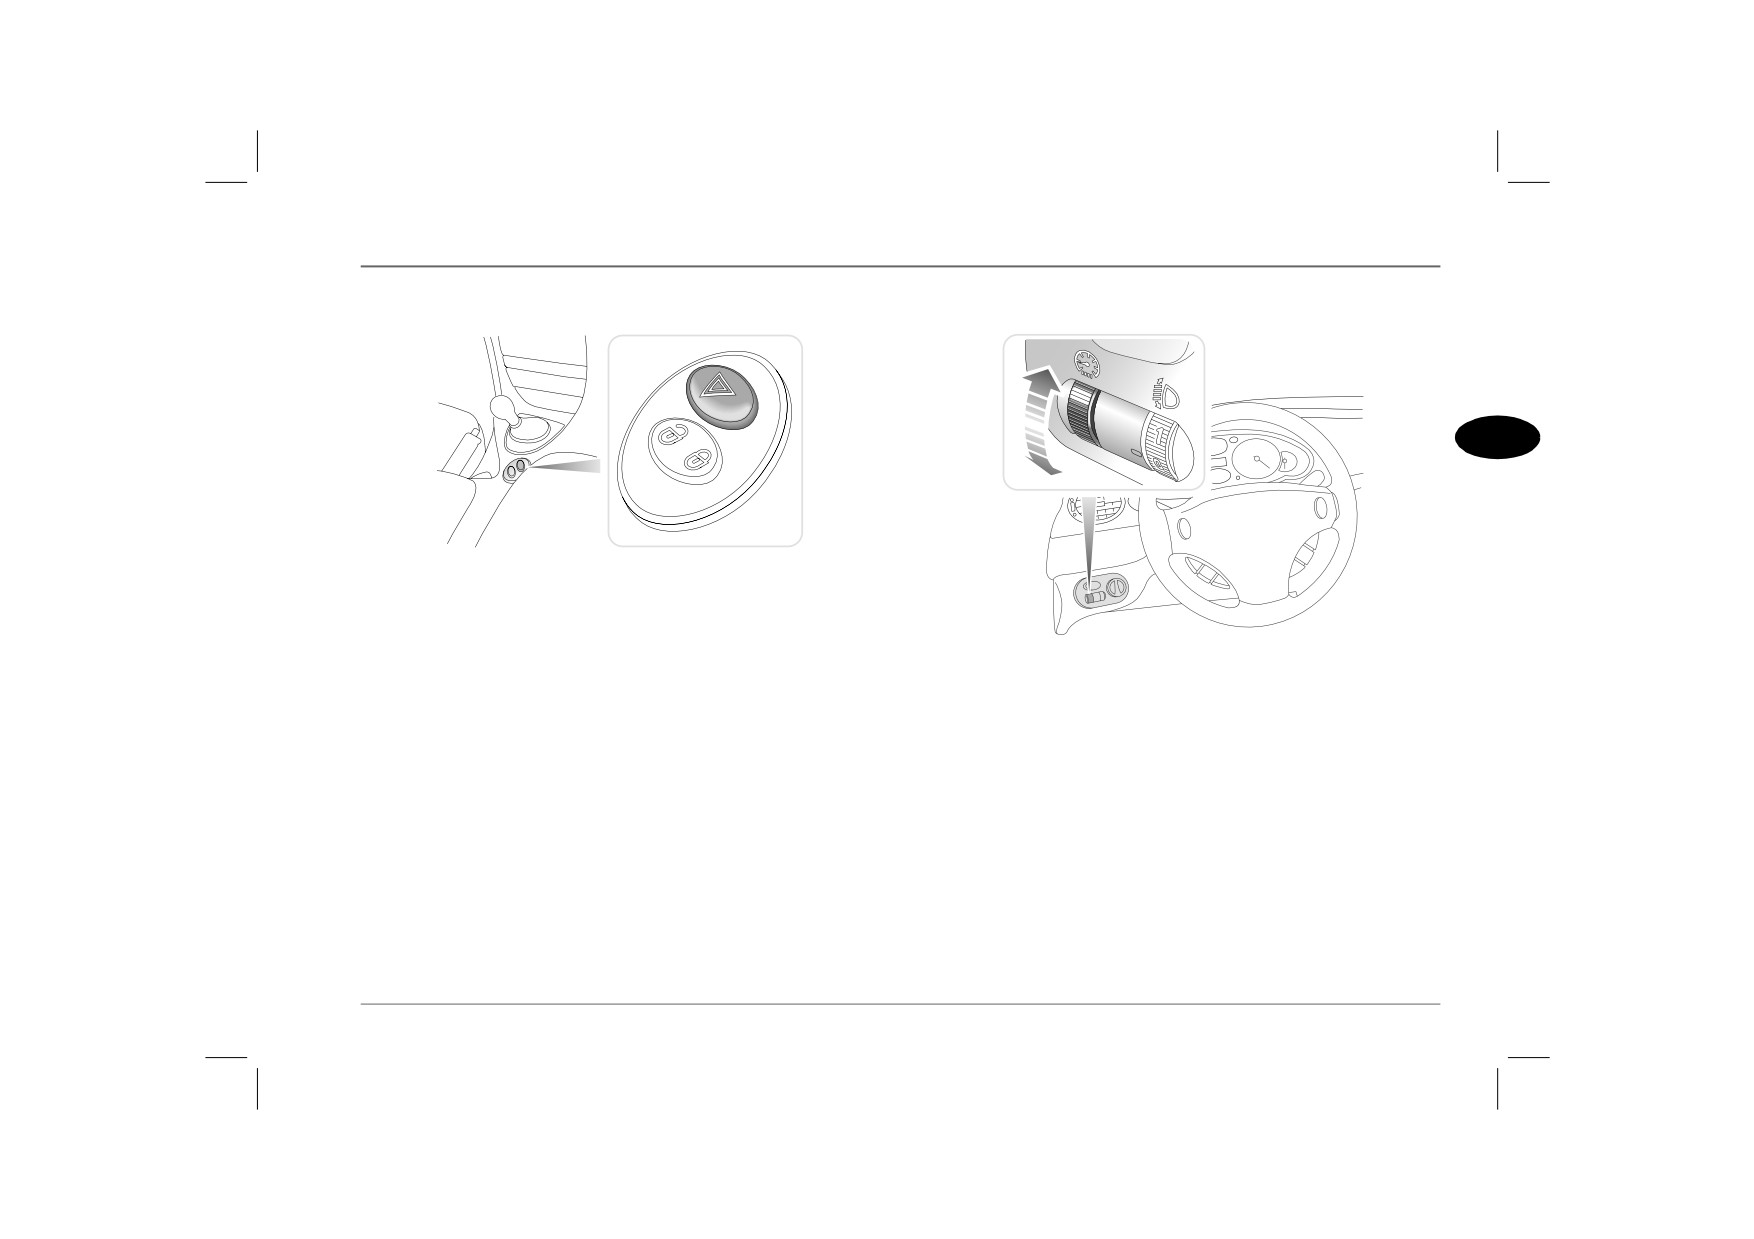
HAZARD WARNING LIGHTS
INSTRUMENT DIMMER CONTROL
2
H2732a
Press to operate. All the direction indicators and direction
indicator warning lights will flash together. Use only in an
emergency to warn other road users when your car is causing an
H2805a
obstruction or is in a hazardous situation. Remember to switch off
Rotate the control up to increase and down to decrease instrument
before driving away.
illumination. The instrument dimmer also controls the
illumination of switches, audio system, message centre, trip
computer and the satellite navigation system*.
NOTE: Instrument and switch illumination will automatically dim when
the sidelights are switched on.
107
Lights & Indicators
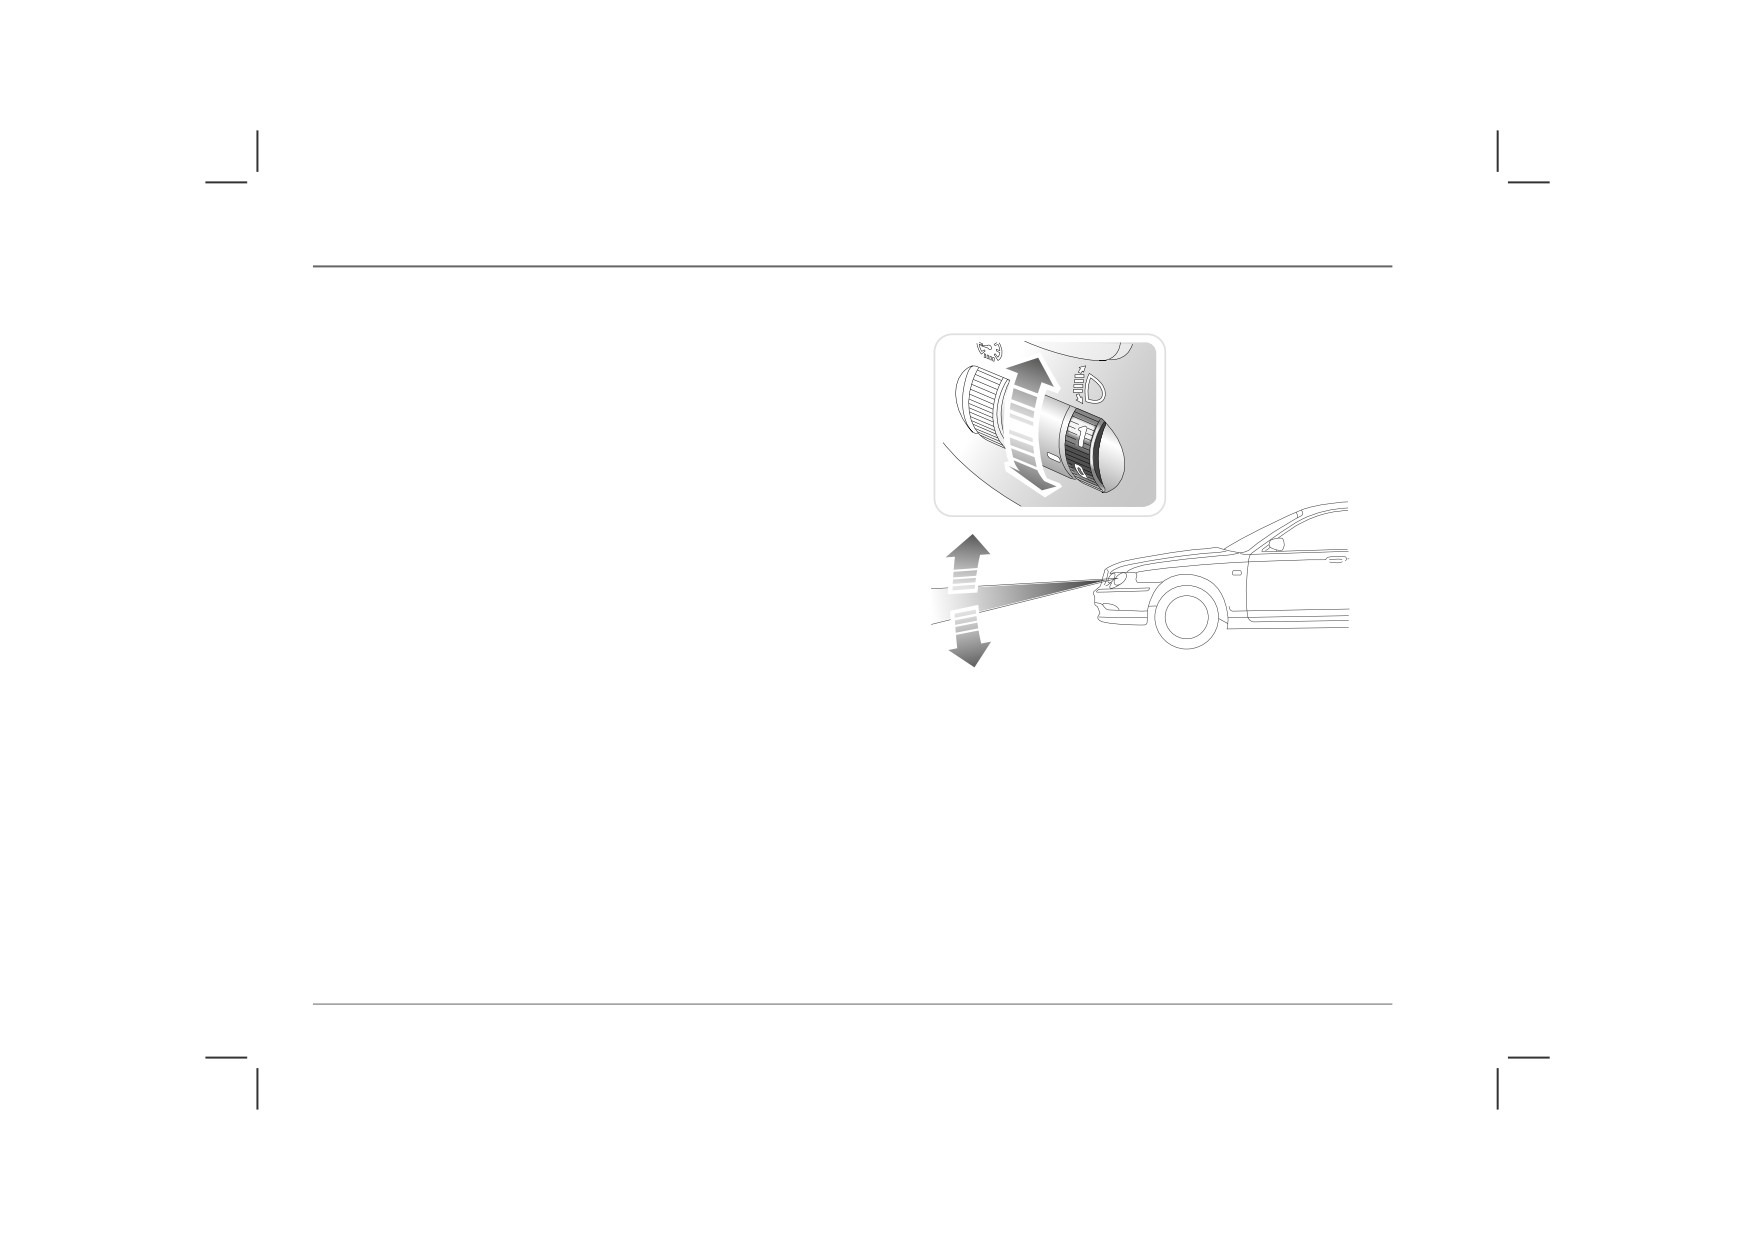
HEADLIGHT BEAM HEIGHT ADJUSTER
Manual adjustment
The angle of the dipped beams is affected by the distribution of
passenger and luggage weight within the car. It is important that
the headlights are adjusted to ensure that the point at which the
beams of light meet the road surface provides adequate
illumination ahead of the vehicle, without dazzling other road
users.
Automatic adjustment
Cars fitted with Xenon headlights are equipped with a headlight
levelling system, which automatically adjusts the height of the
headlight beams for varying load conditions.
NOTE: Any failure of the automatic levelling system will be apparent
from the headlight beams maintaining their lowest position, regardless of
vehicle load, in which case the vehicle should be taken to a dealer for
rectification at the earliest opportunity.
H2715
Using the following load conditions as a guide, adjust the
headlights by rotating the adjuster wheel (see inset):
• Position ‘0’
Driver only, or driver plus a front seat passenger.
• Position ‘1’
Up to all the seats occupied plus an evenly distributed load in
the boot.
• Position ‘2’
Driver only, plus an evenly distributed load in the boot.
These loading definitions assume that all loads will be within the
limits of the maximum permissible axle and vehicle weights
108
Lights & Indicators
HEADLIGHT BEAM SPREAD ADJUSTMENT
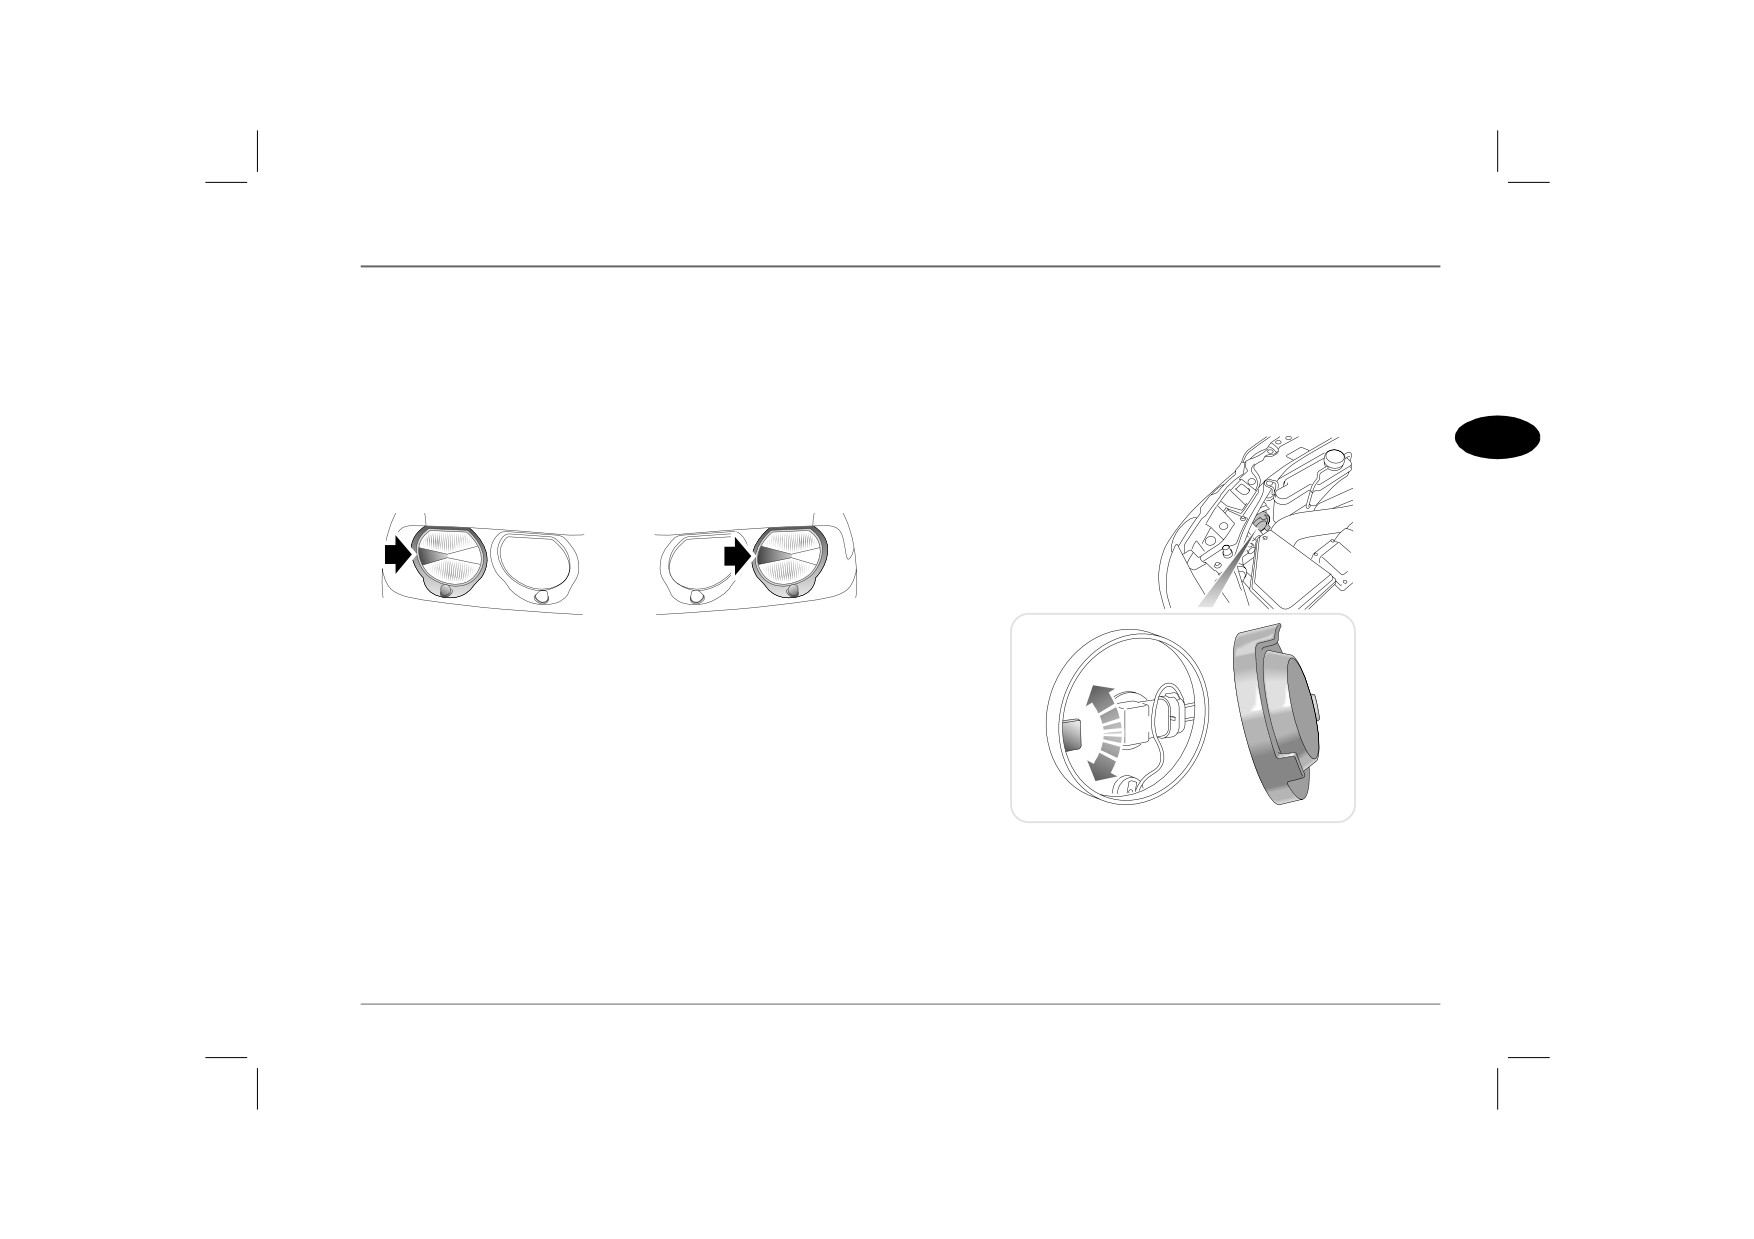
Cars with Halogen projector or Xenon headlights
Headlight beams are set during manufacture to conform to the
These cars have an adjuster built into the light unit which can be
requirements of either left or right hand drive markets.
moved to adjust the beam spread pattern of the outboard dipped
beam headlights. The adjuster lever is located in the inboard light
Owners of cars travelling to countries where it is necessary to drive
unit on Xenon headlights and in the outboard light unit on
on the opposite side of the road, are required to adjust the beam
Halogen projector headlights and should be used as follows:
spread pattern of dipped beam headlights to avoid dazzling other
road users.
2
Cars with Halogen reflector-type headlights
HB0317
Conversion of RH Drive headlights illustrated.
LH drive conversion symmetrically opposite
Use masking tape cut to size and affixed to the lens of both dipped
beam lights in the (darkened) segments shown in the illustration.
The markings on the lens will act as a guide. Alternatively, use a
proprietary masking kit or accessory of the type available at many
garages and service stations.
HB0316
LH Xenon headlight illustrated
1. Remove the cover from the rear of the appropriate headlight.
2. Locate the lever inside the headlight unit and move the lever
to the alternative position from which it is currently set.
3. Remember to replace the headlight cover.
On return to your home country, remember to reset the lever to
its original position.
109
Wipers & Washers
Wipers & Washers
WINDSCREEN WIPER CONTROLS
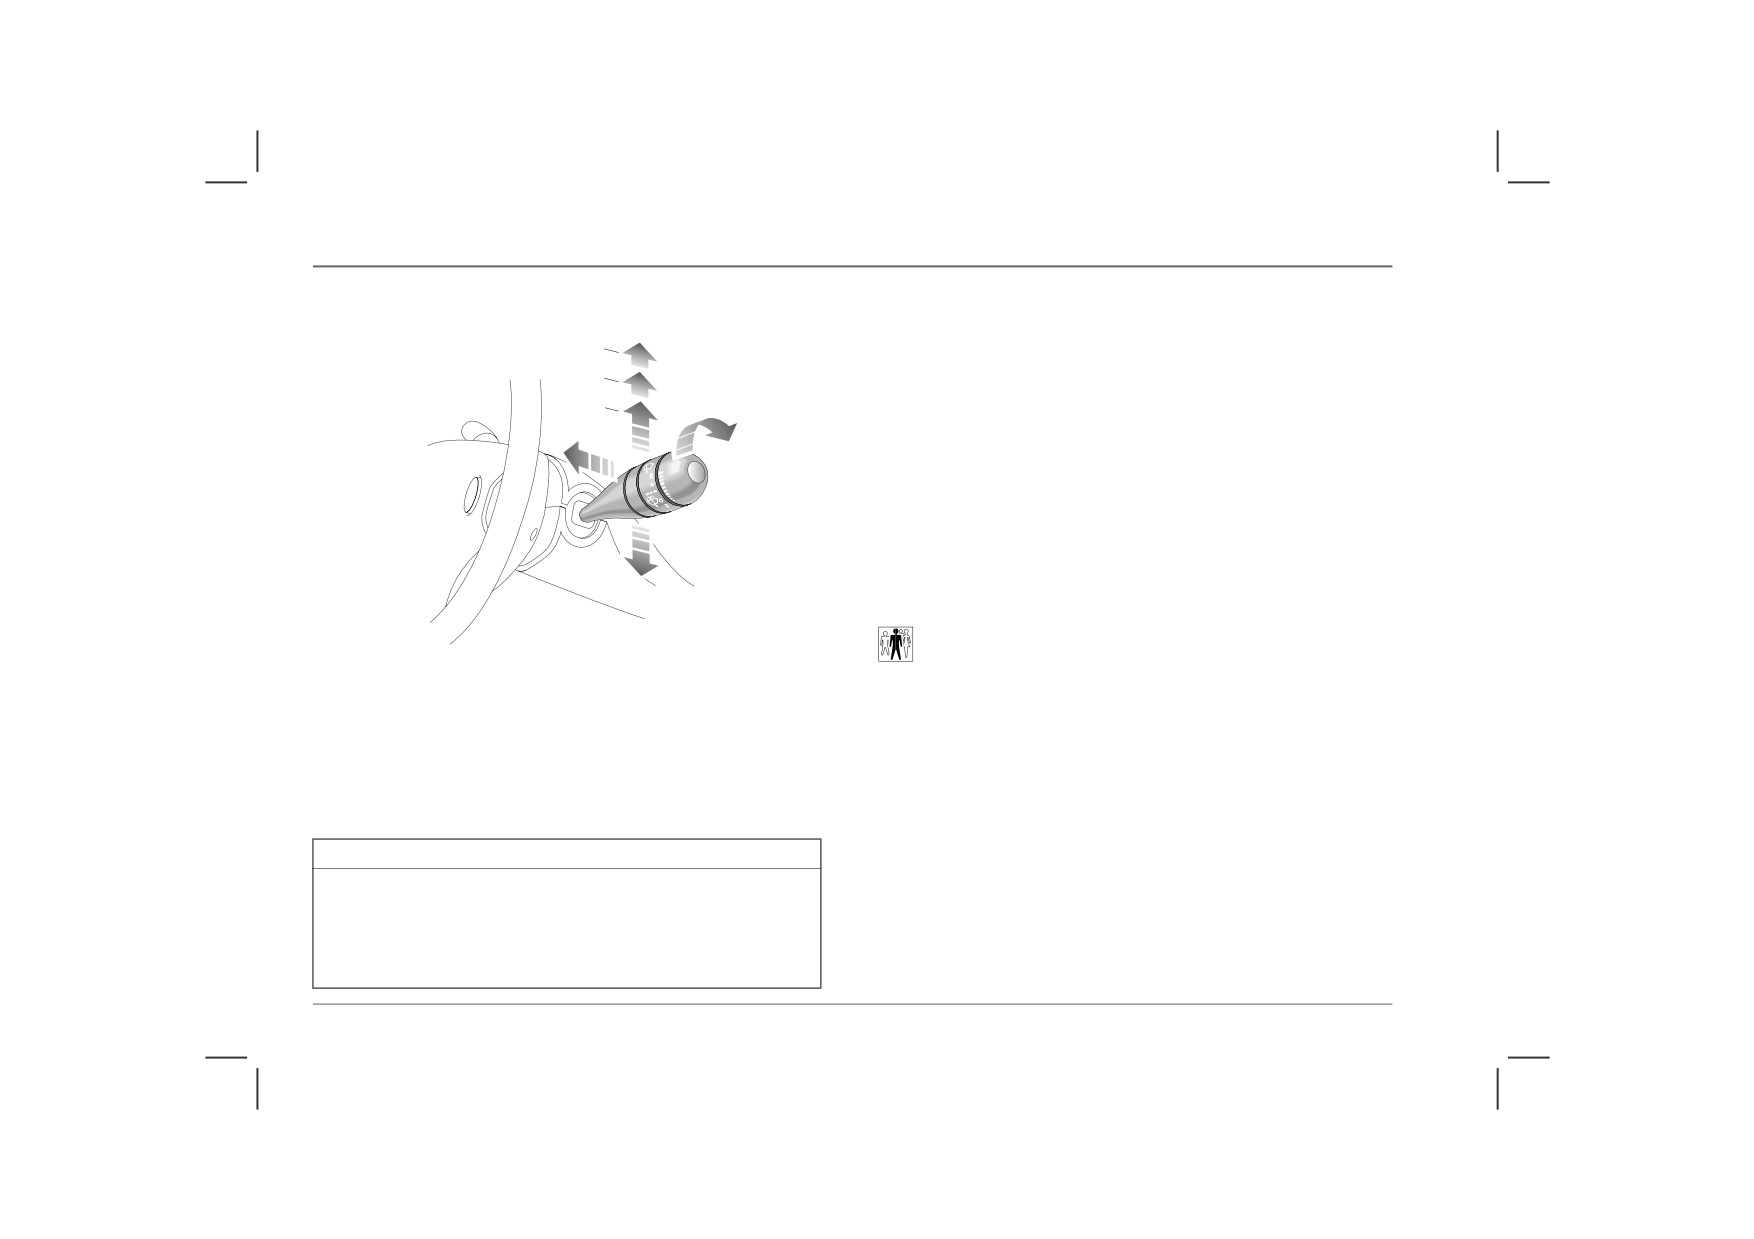
Push the lever up to select different wiper speeds
1. Intermittent wipe
2. Normal speed wipe
3
3. Fast speed wipe
2
1
Single wipe
Pull the lever down and release (if the lever is held down, the
wipers will operate at high speed until the lever is released).
Variable delay - intermittent wipe
Rotate the switch to vary the delay between wipes. The delay will
also vary according to road speed - any increase in speed will
reduce the delay.
Auto-park
Auto-park can be selected or deselected by an MG Rover dealer.
H2680a
The wipers and washers will only operate when the starter switch
If the starter switch is turned off while the wipers are operating, the
is in the first or second position.
wipers will continue operating until the parked position is reached.
If the road speed drops below 8 km/h while the wipers are
Rain sensor*
operating, they will slow to the next slowest operating mode; i.e.
Some cars are equipped with an optical rain sensor fitted to the
fast wipe to normal wipe, normal wipe to intermittent. This facility
inside of the windscreen behind the rear view mirror. The sensor
can be manually overridden by changing the wipe setting.
is able to detect varying amounts of dirt and water on the outside
of the windscreen. With the wiper control set to Intermittent
IMPORTANT
Wipe, the variable delay will be adjusted automatically according
• DO NOT operate the wipers on a dry screen.
to the information supplied by the rain sensor.
• In freezing or very hot conditions, ensure that the blades are not
If the sensor detects constant rain, the wipers will operate
frozen or stuck to the glass before being operated.
continuously at normal speed wipe.
• In winter, remove snow or ice from around the arms and blades,
including the wiped area of the screen.
110
Wipers & Washers
WINDSCREEN WASHERS
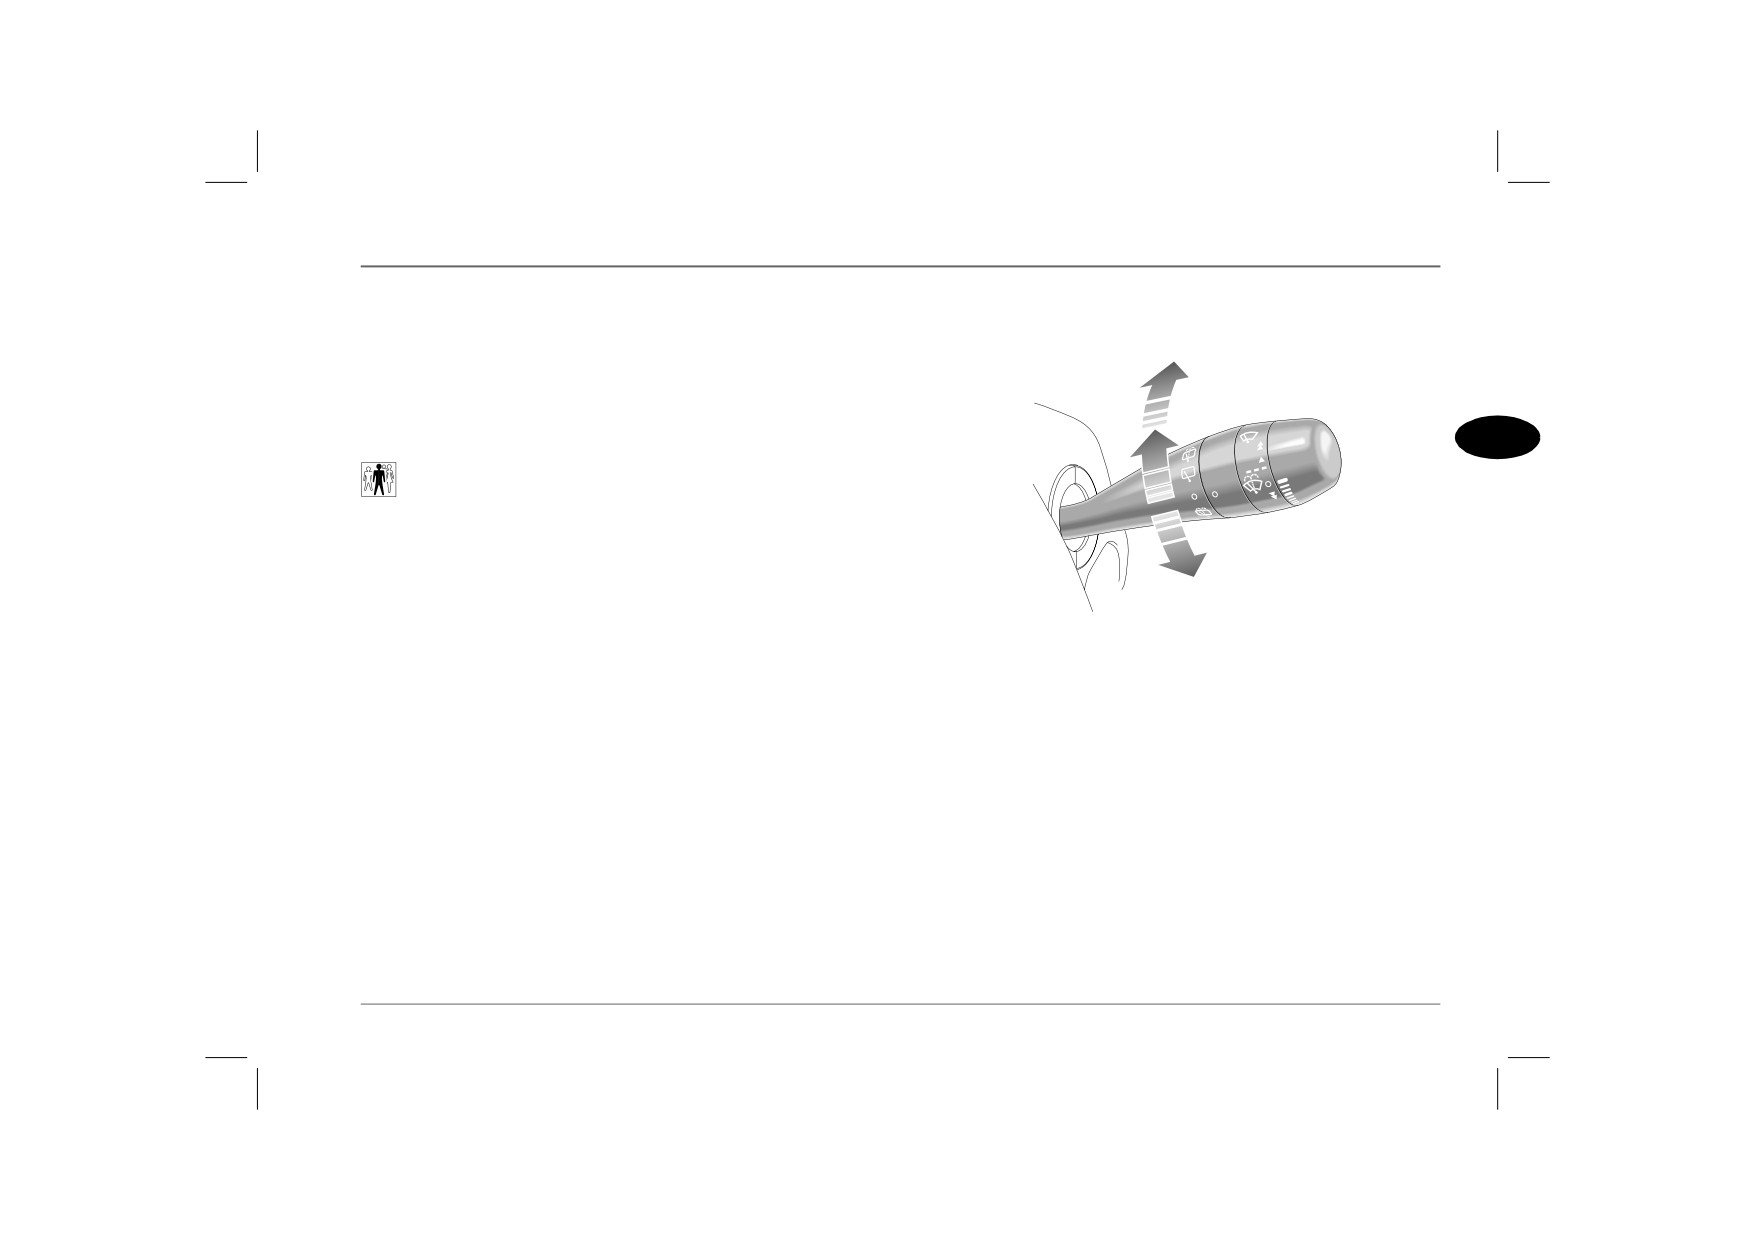
REAR SCREEN WIPER AND WASHER (Tourer
Pull the lever towards the steering wheel - the washers operate
models only)
immediately. After a short delay, the wipers will commence
operating in conjunction with the washers, both functions
continuing until the lever is released.
2
Note that the wipers continue operating for a further three wipes
after the lever is released.
2
1
The number of wipes can be adjusted to either 2 or 4 by an MG
Rover dealer.
If the washers fail to deliver the screen wash solution (dirt or ice
may have blocked the jets), release the lever immediately. This will
3
prevent the wipers from operating, and the consequent risk of
visibility being impaired by dirt smearing across the unwashed
HB0020
windscreen.
1.
Rotate the switch clockwise to the first position: after three
initial wipes the wiper continues operating intermittently.
HEADLIGHT WASHERS*
2.
Rotate the switch further clockwise, to the second position
When the headlights are illuminated, the headlight washers
and hold against spring pressure: both wiper and washer
operate automatically in conjunction with every fifth operation of
operate continuously while the switch is held in this position.
the windscreen washers.
Screen washing ceases as soon as the switch is released but
intermittent wiping continues until the switch is returned to
the off position.
3.
Rotating the switch anti-clockwise to the third position
provides the same features described in 2 (above).
NOTE: If reverse gear is selected while the windscreen wipers are switched
on, the tailgate wiper will operate automatically for three wipes.
111
Cruise Control
Cruise Control
CRUISE CONTROL*
• On petrol engine vehicles, DO NOT rest your foot under the
accelerator pedal while cruise control is engaged - your foot
could become trapped.
• ALWAYS switch off the master switch when you no longer
intend to use cruise control.
To operate cruise control
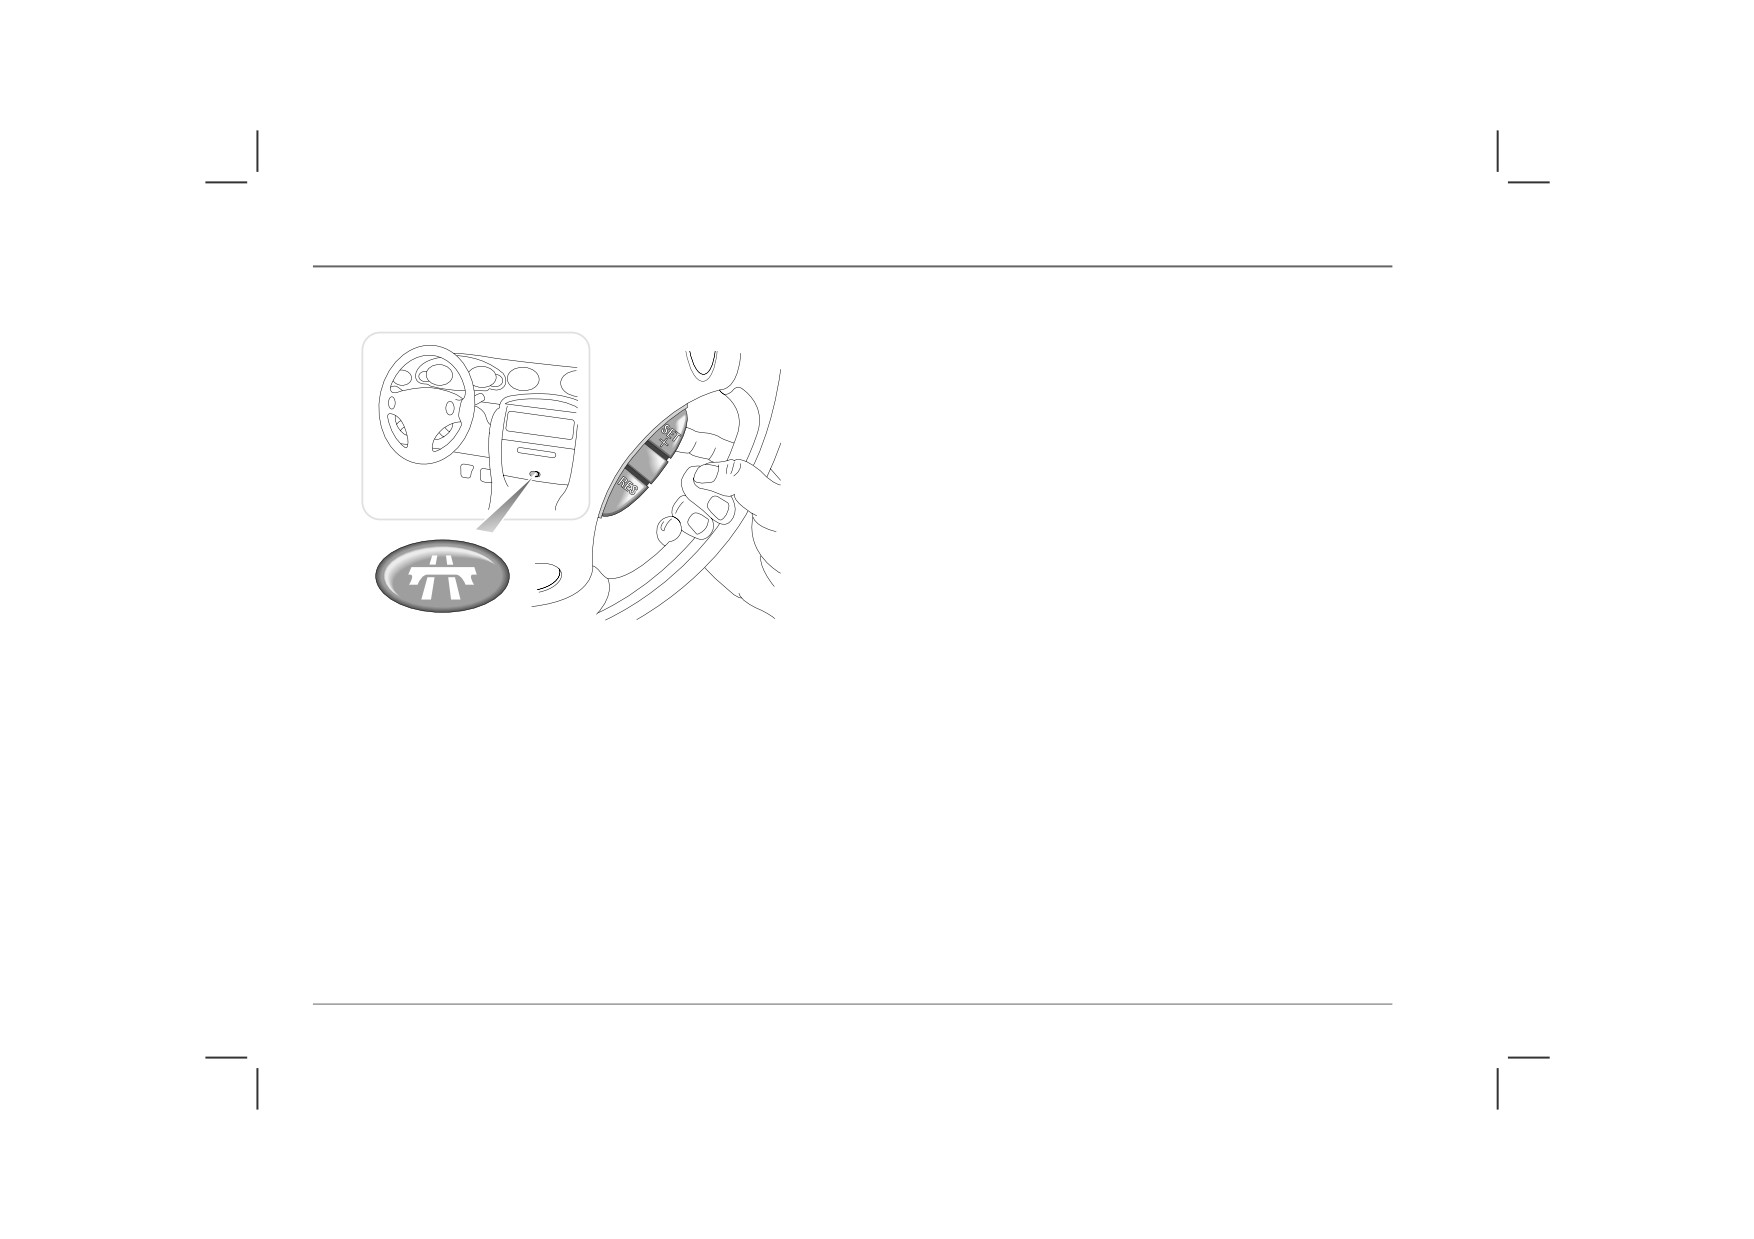
The cruise control system has three switches; a master switch on
the centre console and two control switches marked ‘SET+’ and
‘RES’ mounted on the steering wheel.
1. Press the master switch (the switch indicator light and the
warning light in the instrument panel illuminate whenever
cruise control is operating).
2. Accelerate until the desired cruising speed is reached. This
must be above the system's minimum operational speed of
H2808b
35 km/h and below the maximum operating speed of
Cruise control enables the driver to maintain a constant road speed
200 km/h.
without using the accelerator pedal. This is particularly useful for
NOTE: The set speed held in the cruise control memory will be
motorway cruising, or for any journey where a constant speed can
cancelled when either the cruise control master switch or the starter
be maintained for a lengthy period.
switch is turned off.
NOTE: Using ‘sport’ mode on automatic gearbox vehicles is not
3. Lift the ‘SET+’ switch to set the road speed in the system
recommended with cruise control selected.
memory. Cruise control will now maintain that speed
The following precautions must be observed when using
without the need to use the accelerator pedal.
cruise control:
With cruise control operating, speed can be increased by normal
• DO NOT attempt to use cruise control when using reverse
use of the accelerator; e.g. for overtaking. When the accelerator is
gear.
released, road speed will return to the selected cruising speed. On
• DO NOT use cruise control on winding or slippery road
diesel engine cars, cruise control will be disengaged if the
surfaces, or in traffic conditions where a constant speed cannot
accelerator is used for longer than 30 seconds - lift the ‘RES’
easily be maintained.
switch to re-engage.
112
Cruise Control
To increase the set cruising speed
Lift and hold the ‘SET+’ switch - the car will accelerate
automatically. Release the switch as soon as the desired speed has
been reached.
Alternatively, the set speed can be increased incrementally by
‘tapping’ the ‘SET+’ switch. Each operation of the switch will
increase the speed by approximately 1.5 km/h.
2
Disengaging cruise control
Cruise control will automatically disengage if the brake or clutch
pedals are depressed, or if ‘N’ (neutral) is selected on an automatic
gearbox. Cruise control can also be disengaged by operating the
‘RES’ switch.
To re-engage cruise control at the previously set speed, operate the
‘RES’ switch.
113