MG ZS. Service Manual - part 3
 

  Index      Manuals     MG ZS. Service Manual


Search            copyright infringement  


Content      ..     1      2      3      4      ..


MG ZS. Service Manual - part 3


INSTRUMENTS AND CONTROLS

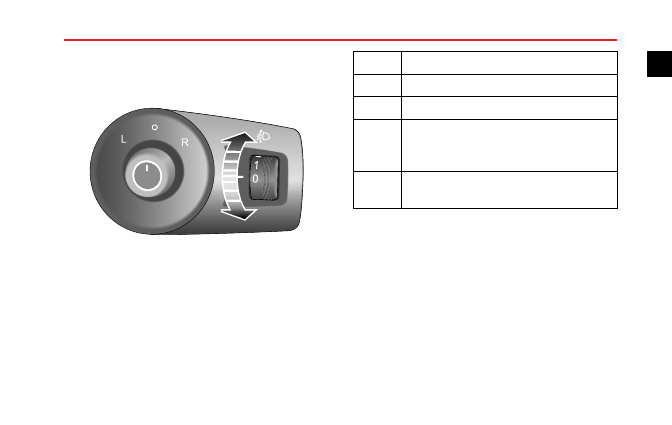
Headlamp Levelling Manual Adjustment

Position 0 is the initial position of the headlamp levelling
adjustment switch. The headlamp levelling adjustment can
be made as per the following table according to the vehicle
load.

Location

Load

0

Driver, or driver & front passenger.

1

All the seats occupied with no load.

2

All the seats occupied plus an evenly
distributed load in the boot, or driver with
full load.

3

Driver only, plus an evenly distributed load in
the boot.

33

1

-------------------------------------------------------------------------------------------------------------------------------------------------------------

INSTRUMENTS AND CONTROLS

Fog Lamp Switch

Fog lights should only be used when visibility
is below 100m - other road users could be
dazzled in clear conditions.

Front Fog Lamps

*

With the ignition switch in the ON position and the side
lights on, turn the fog lamp switch to position 1 to turn

on the front fog lamps. The indicator illuminates in the
instrument panel when the front fog lamps are on.

Rear Fog Lamps
With the ignition switch in the ON position and the
headlamps or front fog lamps on, turn the fog lamp switch
to position 2, this will turn on the rear fog lamps, release
the switch to allow it to return to position 1. The indicator
illuminates in the instrument panel when the rear fog
lamps are on.

34

-------------------------------------------------------------------------------------------------------------------------------------------------------------

INSTRUMENTS AND CONTROLS

Direction Indicator/Main Beam Switch

Take care not to dazzle oncoming vehicles
when driving using main beam headlamps.

Direction Indicators
Move the lever down to indicate a LEFT turn (1). Move the
lever up to indicate a RIGHT turn (2). The corresponding

GREEN indicator lamp in the instrument pack will lash
when the turning signal lamps are working.

Rotating the steering wheel will cancel the indicator
operation (small movements of the steering wheel may
not operate the self cancelling). To indicate a lane change,
move the lever briely and release, the indicators will lash
three times and then cancel.

Headlamp High/Low Beam Switching
With the ignition switch in the ON position and the master
lighting switch turned to position 3, or the auto function
has switched the lights on, push the lever (3) towards the
instrument panel to turn on headlamp high beams. The
high beam indicator lamp in instrument pack illuminates,
press the lever (3) again to switch to headlamp low beams.

High Beam Flash
To briely lash the high beam on and off, pull the lever
towards the steering wheel (4) and then release.

35

1

-------------------------------------------------------------------------------------------------------------------------------------------------------------

INSTRUMENTS AND CONTROLS

Hazard Warning Lamp

Press the hazard warning lamp button

to turn on

the hazard warning lamps. The turning signal lamps and
direction indicator lamps will lash together. Press the
button again to switch off the hazard warning lamps. All
turning signal lamps and direction indicator lamps will stop
lashing. For more details and location refer to 'Emergency
Information' 'Hazard Warning Devices'.

36

-------------------------------------------------------------------------------------------------------------------------------------------------------------

INSTRUMENTS AND CONTROLS

Wipers and Washers

Windscreen Wiper Operation

The wipers and washers will only operate with the ignition
switch in the ACC or ON position. Operate the lever to
select different wipe speeds:
• Intermittent wipe (1)
• Slow wipe (2)

• Fast wipe (3)
• Single wipe (4)
• Intermittent wipe frequency adjustment (5)

*

• Programmed wash/wipe (6)

Intermittent Wipe
By pushing the lever up to the Intermittent wipe position
(1), the wipers will operate automatically. Turn the switch
(5)

*

to adjust the intermittent wipe frequency. This speed

will also change with the vehicle speed. As the vehicle
speed increases, the wiper frequency increases. As the
vehicle speed decreases, the wiper frequency decreases.

Slow Wipe
By pushing the lever up to the slow wipe position (2), the
wipers will operate slowly. Move the lever to re-select the
wipe speed.

Fast Wipe
By pushing the lever up to the fast wipe position (3), the
wipers will operate fast. Move the lever to re-select the
wipe speed.

37

1

-------------------------------------------------------------------------------------------------------------------------------------------------------------

INSTRUMENTS AND CONTROLS

Single Wipe
Pressing the lever (4) down and releasing will operate
a single wipe, if the lever is held down, the wipers will
operate at high speed until the lever is released.

IMPORTANT

• Avoid operating the wiper on a dry windscreen.
• In freezing or extremely hot weather conditions,

make sure that the wiper blades are not
frozen/adhered to the windscreen.

• In winter, remove snow or ice from around the arms

and blades, including the wiped area of the screen.

Programmed Wash/Wipe

Pulling the lever toward the steering wheel (6) will operate
the windscreen washers. After a short delay, the wipers
will commence operating in conjunction with the washers.

Note: The wipers continue operating for a further
three wipes after the lever is released. After several
seconds, there will be a further wipe to remove any
luid draining down the screen.

IMPORTANT

If the washers fail to deliver the screen wash solution
(dirt or ice may have blocked the jets), release the
lever immediately.

This will prevent the wipers

from operating, and the consequent risk of visibility
being impaired by dirt smearing across the unwashed
windscreen.

Note: When the bonnet is opened, fully or on
secondary catch, windscreen wiper operations will be
disabled.

38

-------------------------------------------------------------------------------------------------------------------------------------------------------------

INSTRUMENTS AND CONTROLS

Rear Window Wiper Operation

• Intermittent wipe (1)
• Wash and wipe (2)
• Wash and wipe (3)
• Intermittent wipe frequency adjustment (4)

*

The rear window wiper and washer will only operate with
the ignition switch in the ON position. Turn the rear
window wiper switch to intermittent wipe (1), the rear
window wiper will operate, after 3 consecutive wipes, the

wipers will enter into intermittent mode. The time period
between the wipes can be increased/decreased via the
intermittent wipe frequency adjustment switch (4).

Turn the rear window wiper switch to wash and wipe (2)
position and hold, the rear window wiper and washer will
operate, the rear window wiper wipes quickly. release the
switch allowing it to return to intermittent wipe (1), the
rear window washer will stop operating, and the wiper
wipes slowly, change the stalk switch position 4

*

to adjust

the wipe speed.

Turn the rear window wiper switch to wash and wipe (3)
and hold, the rear window wiper and washer will operate.
release the switch allowing it to return to OFF position,
the rear window washer will stop operating, and the rear
window wiper wipes for 3 times, after several seconds, the
wiper will wipe once more to remove the washer luid on
the windscreen.

Note: When the tailgate is opened, rear window wiper
operations will be disabled.

39

1

-------------------------------------------------------------------------------------------------------------------------------------------------------------

INSTRUMENTS AND CONTROLS

Note: When the windscreen wipers are switched on, if
the shift lever is in R position, the rear window wiper
will operate.

40

-------------------------------------------------------------------------------------------------------------------------------------------------------------

INSTRUMENTS AND CONTROLS

Steering System

Adjustment of Steering Column

DO NOT attempt to adjust the angle of
the steering column while the vehicle is in
motion. This is extremely dangerous.

To adjust the angle of the steering column to suit your
driving position:

1 Fully release the locking lever.

2 Hold the steering wheel in both hands and tilt the

steering column up or down to move the wheel into
the most comfortable position.

3 Once a comfortable driving position has been selected,

pull the locking lever fully up to lock the steering
column into its new position.

41

1

-------------------------------------------------------------------------------------------------------------------------------------------------------------

INSTRUMENTS AND CONTROLS

Electric Power Steering

If the electric power steering fails or cannot
operate the steering will appear very heavy,
this will affect driving safety.

The electric power steering system only works when the
engine is running. The system operates via a motor with
assistance levels automatically adjusted based on vehicle
speed, steering wheel torque and steering wheel angle.

IMPORTANT

Holding the steering wheel on full lock for long periods
will result in a reduction in power assistance causing a
heavier feel to the steering for a short period of time.

Steering Mode Switching

*

The electric power steering system provides 3 different
steering modes:

1 Normal: provides moderate power assistance.

2 Urban: provides a high level of assistance, with a light

feel.

3 Dynamic: provides low level power assistance, with a

heavier feel.

The steering mode is selectable for vehicle speeds up to
60 mph through the touch screen interface, please refer to
"Driving and Maintenance" under "Vehicle Settings" in the
"Air Conditioning and Audio Systems" section.

Electric Power Steering (EPS) Warning Lamp
See "Warning Lamps and Indicators" under the
"Instruments and Controls" section.

42

-------------------------------------------------------------------------------------------------------------------------------------------------------------

INSTRUMENTS AND CONTROLS

Horn

Press the horn button area (indicated by arrow) on the
steering wheel to operate the horn.

Note: The vehicle horn press location and the driver's
airbag are located in close proximity on the steering
wheel. The illustration shows the position of the horn
switches, please ensure that you press in this area to

avoid any potential conlict with the operation of the
airbag.

IMPORTANT

To avoid possible SRS issues, please do not press with
excessive force or hit the airbag cover when operating
the horn.

43

1

-------------------------------------------------------------------------------------------------------------------------------------------------------------

INSTRUMENTS AND CONTROLS

Mirrors

Door Mirrors

Note: Objects viewed in exterior mirrors may appear
further away than they actually are.

Electric Door Mirror Glass Adjustment

• When the ignition switch is in ACC or ON/RUN/START

position, rotate the knob to select left (L) or right (R)
rearview mirror.

• Move the knob in the desired direction to adjust the

angle of the exterior mirror glass.

• Upon completion of the adjustment, rotate the knob

back to the central position, this will ensure no
accidental adjustment of the mirror.

Heating Elements

*

The door mirrors have integral heating elements which
disperse ice or mist from the glass. The heating elements
operate while the Heated Rear Window

is switched on.

Note: The heating elements of rear window and mirror
will only work when the engine is running.

Mirror Folding
The mirrors can be folded back manually towards the
side windows into a ‘park’ position to enable the car to
negotiate narrow openings and avoid collisions.

44

-------------------------------------------------------------------------------------------------------------------------------------------------------------

INSTRUMENTS AND CONTROLS

IMPORTANT

• Exterior rearview mirror glass adjustments

are operated by electrical motors.

Operating

them directly by hand may damage the internal
components.

• Washing or lushing exterior rearview mirrors with

high pressure water jets or car washes may result in
electrical motor failure.

Interior Rear-view mirror

Before driving, adjust the body of the mirror by hand to
achieve the best possible view to the rear. The manual
dipping function of the interior rear-view mirror helps to
reduce glare from the headlights of following vehicles at
night.

Manual Mirror

Move the lever at the base of the mirror forward to‘dip'
the mirror. Normal visibility is restored by pulling the lever
back again.

45

1

-------------------------------------------------------------------------------------------------------------------------------------------------------------

INSTRUMENTS AND CONTROLS

Note: In some circumstances, the view relected in a
‘dipped’ manual mirror can confuse the driver as to the
precise location of following vehicles.

46

-------------------------------------------------------------------------------------------------------------------------------------------------------------

INSTRUMENTS AND CONTROLS

Sunvisors

The vanity mirror on the driver side should
only be used when the car is stationary.

Sunvisors (1) are arranged on the roof ahead of both the
driver and the front passenger. Some models have vanity
mirror (2) , depending on the vehicle coniguration. For
the models which have vanity mirror, pull the sunvisor
downward and slide the cover aside to use the vanity
mirror.

2

1

AIRBAG

3

L

R

Note: Warnings and instructions on use of child
restraint (3) are attached to both sides of the sunvisor
of passenger.

47

1

-------------------------------------------------------------------------------------------------------------------------------------------------------------

INSTRUMENTS AND CONTROLS

Windows

Power Operated Window Switch

1 Front Right Window Switch

2 Front Left Window Switch

3 Rear Right Window Switch

4 Rear Left Window Switch

5 Rear Window Isolation Switch

Window Operation

Ensure children are kept clear when raising or
lowering a window.

Improper use or activation of the electric
windows by children could cause serious harm
or even death. It is the responsibility of the
driver and adult passengers to ensure that
when carrying children the necessary steps
are taken to isolate the window operation.
This should include the removal of the
ignition key when children are left alone in
the vehicle.

Push the switch (1-4) down to lower, and pull the switch up
to raise the window. The window will stop moving as soon
as the switch is released (unless the ‘One-Touch’ function
is active).

Note: The front and rear passenger windows can also
be operated by individual window switches, mounted
on each door. The rear window switches will not be

48

-------------------------------------------------------------------------------------------------------------------------------------------------------------


Content      ..     1      2      3      4      ..