MG3. Touch User Manual - part 2
 

  Index      Manuals     MG3. Touch User Manual


Search            copyright infringement  


Content      ..      1      2      3      ..


MG3. Touch User Manual - part 2


MG Motor UK Ltd 

18 

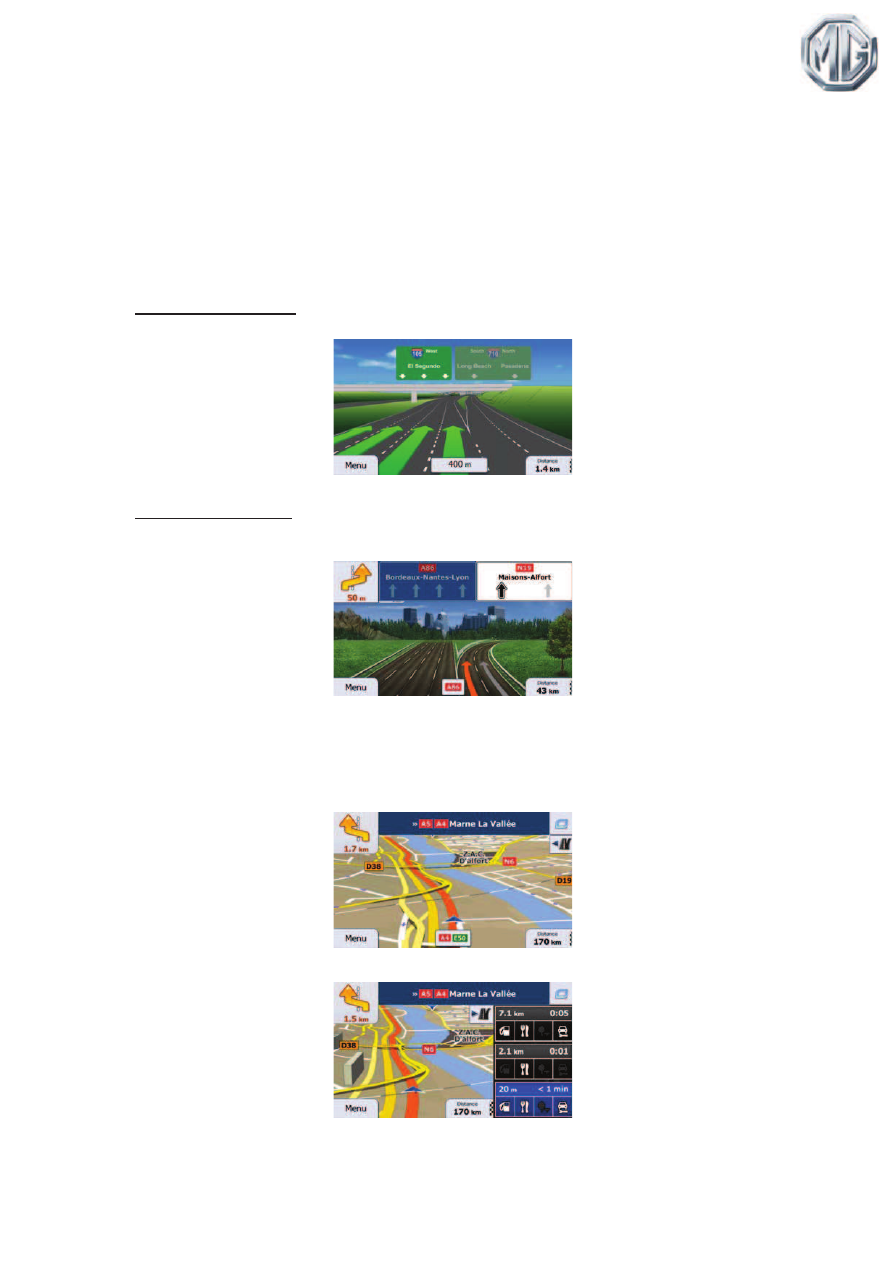
2.3.3.4 Junction view 

If you are approaching a motorway exit or a complex intersection and the needed information 
exists,  the  map  is  replaced  with  a  3D  view  of  the  junction.  The  lanes  you  need  to  take  are 
displayed with arrows. At the top of the screen road signs show you additional information. 

If  you  want  to  hide  the  currently  displayed  junction,  tap  the  picture  and  the  Map  screen 
returns. 

There are two kinds of Junction Views: 

Provider Junction Views show a realistic view of the junction with realistic pictures of the road 
signs: 

Where  Provider  Junction  Views  are  not  available  but  the  necessary  information  exists, 
Generic Junction Views show an generic view of the junction with focusing on the number and 
layout  of  lanes  only.  The  road  signs  are  created  from  road  shield,  road  number  and 
destination information received in the map data: 

2.3.3.5 Motorway exit services 

You  may  need  a  petrol  station  or  a  restaurant  during  your  journey.  This  feature  displays  a 
new button on the map when you are driving on motorways. 

Tap this button to open a panel with the details of the next few exits or service stations. 

MG Motor UK Ltd 

19 

Tap any of them to display the exit area on the map. You can now easily add this exit as a 
waypoint to your route if needed. 

If you want to display other types of Places for the exits, you can change the icons in Visual 
Guidance settings (page 110). 

2.3.3.6 3D object types 

iGO primo supports the following 3D object types: 

Type 

Description 

3D terrain 

3D terrain map data shows changes in terrain, elevations or depressions in 
the land when you view the map in 2D, and use it to plot the route map in 
3D when you navigate. Hills and mountains are shown in the background of 
the 3D map, and illustrated by colour and shading on the 2D map. 

Elevated roads 

Complex intersections and vertically isolated roads (such as overpasses or 
bridges) are displayed in 3D. 

3D landmarks 

Landmarks  are  3D  artistic  or  block  representations  of  prominent  or  well-
known objects. 

3D buildings 

3D  block  representation  of  full  city  building  data  containing  actual  building 
size and position on the map. 

2.3.3.7 Elements of the active route 

iGO primo shows the route in the following way: 

Symbol 

Name 

Description 

Current GPS position and 
Start point 

Your current position displayed on the map. 

x  In pedestrian mode it is the exact GPS 

position. 

x  If a vehicle is selected for route calculation 

and roads are near, the symbol is snapped 
onto the nearest road. 

Normally  if  GPS  position  is  available,  the  route
starts from the current position. If there is no valid 
GPS  position,  iGO  primo  uses  the  last  known 
position as the start point. 

Waypoint  (intermediate 
destination) 

An  intermediate  destination  of  the  route  before 
reaching the final destination. 

Destination (end point) 

The final destination of the route. 


Route colour 

The route always stands out with its colour on the 
map, both in daytime and in night colour mode. 

MG Motor UK Ltd 

20 


Streets and roads that are 
excluded from the navigation

You can choose whether you want to use or 
avoid certain road types (page 104). However, 
when iGO primo cannot avoid such roads, the 
route will include them and it will show them in a 
colour that is different from the route colour. 


Streets and roads that are 
affected by traffic events 

Road segments may be affected by traffic events 
received. These streets and roads are displayed 
in an alternate colour, and small symbols 
displayed along the route show the type of the 
traffic event. 

2.3.3.8 Traffic events 

Road segments affected by traffic events are displayed with an alternate colour on the map, 
and small symbols above the road show the nature of the event: 

1. 

Tap 

 to open the Traffic Summary screen. 

2. 

Tap 

 to open the list of event categories. 

3. 

Tap the traffic category you are interested in, or tap 

 to see the list 

of all events: 

MG Motor UK Ltd 

21 

4. 

Now tap any of the list items to see its details, and to display the affected road 
segment in its full length on the map: 

Note! 

If there are traffic events on the recommended route that the application has not 

bypassed, the 

 icon will open the list of significant traffic events to let you 

quickly check them. 

2.3.4 Manipulating the map 

Tap  the  map  anywhere  to  browse  it  during  navigation.  The  map  stops  following  the  current 
position (the Vehimarker, a blue arrow by default, is not locked in a fix position on the screen 
any more) and control buttons appear to help you modify the map view. 

Action 

Button(s) 

Description 

Moving the map 
with drag&drop 

No buttons 

You  can  move  the  map  in  any  direction:  tap 
and  hold  the  map,  and  move  your  finger 
towards  the  direction  you  want  to  move  the 
map.

Zooming in and out 

 , 

Changes how much of the map is displayed on 
the screen. 

iGO  primo  uses  high-quality  vector  maps  that 
let  you  examine  the  map  at  various  zoom 
levels, always with optimised content. It always 
displays  street  names  and  other  text  with  the 
same  font  size,  never  upside-down,  and  you 
only see the streets and objects that you need.

Map scaling has a limit in 3D map view mode. 
If  you  zoom  out  further,  the  map  switches  to 
2D view mode. 

Tap the button once to modify the view in large 
steps,  or  tap  and  hold  the  button  to  modify  it 
continuously and smoothly. 

MG Motor UK Ltd 

22 

Tilting up and down 

 , 

Changes the vertical view angle of the map in 
3D mode. 

Tap the button once to modify the view in large 
steps,  or  tap  and  hold  the  button  to  modify  it 
continuously and smoothly. 

Rotating left and 
right 

 , 

Changes the horizontal view angle of the map. 

Tap the button once to modify the view in large 
steps,  or  tap  and  hold  the  button  to  modify  it 
continuously and smoothly. 

2D or 3D view 

 , 

Tap  this  button  to  switch  between  the  3D
perspective  and  2D  top-down  map  view 
modes. 

Compass in 2D 
map view mode 

 , 

The  direction  of  the  compass  shows  North. 
Tap the button to switch to North-up view, and 
then  tap  again  to  rotate  the  map  in  the 
previous direction. 

Compass in 3D 
map view mode 

 , 

The  direction  of  the  compass  shows  North. 
Tap the button to switch to North-up view, and 
then  tap  again  to  rotate  the  map  in  the 
previous direction. 

Location
information

Tap  this  button  to  open  a  new  screen  with 
information  about  the  selected  map  point,  the 
Cursor. 

Return to normal 
navigation 

Tap this button to move the map back to follow 
the  current  GPS  position.  Automatic  map 
rotation is also re-enabled. 

The  map  manipulation  buttons  disappear  and 
navigation continues. 

Additional options 

Tap  this  button  to  open  a  list  of  additional 
features  like  saving  the  Cursor  as  a  Favourite
destination, or searching for Places around the 
Cursor. 

Select destination 

Tap  this  button  to  select  the  Cursor  as  a  new 
destination. 

The 

route 

is 

automatically 

calculated. 

MG Motor UK Ltd 

23 

2.3.5 Quick menu 

The  Quick  menu  is  a  selection  of  controls  and  functions  that  are  frequently  needed  during 

navigation. It can be opened directly from the Map screen by tapping 

.

The menu will close after a few seconds of inactivity or if you tap 

.

The menu will also close if you initiate simple controls like muting the device. In other cases 
tapping a button will open a new screen with options. 

Most of these functions are shortcuts. They are accessible from the menu system. 

There are more functions available than the number of buttons in the menu. In Settings, you 
can choose the function of each button (page 102). The following options are available: 

Button 

Description 

Shortcut for 

Master Volume 
slider

This  slider  adjusts  the  sound  volume  of  the  device. 
All sounds of the application are affected. 

More  /  Settings  / 
Sound  and  Warnings 
/  Volume  /  Master 
slider

,

This switch mutes all sounds of the application. Tap 
again to re-enable sounds. 

More / Settings / 
Sound and Warnings 
/ Volume / Master 
switch 

This button opens the Combined Search function that 
allows  you  to  search  addresses,  Places,  Favourite 
and  recent  destinations  by  name  in  one  unified 
environment. 

Destination (page 28) 

This function lets you search for a Place by its name. 
The  search  is  carried  out  either  along  your  route  or 
around  your  current  location  if  there  is  no  route 
calculated. 

Destination / Find 
Places / Quick Search 
(page 46) 

This  button  opens  the  list  of  your  Favourite
destinations. 

Find / Favourite (page 
59)

This button opens the History list. You can select one 
of your previous destinations. 

Find / History (page 
61)

MG Motor UK Ltd 

24 

This button opens the route editing function. 

My Route / Edit Route

This button opens the route related settings. 

More / Settings / 
Route Settings (page 
104)

This button opens the map related settings. 

More / Settings / Map 
Settings (page 108) 

This  button  opens  a  special  screen  with  information 
about the current position and a button to search for 
nearby  emergency  or  roadside  assistance.  For 
details, see the next chapter. 

Tap the Current 
Street field on the 
Map screen 

This  button  cancels  the  route  and  stops  navigation. 
The button is replaced with the next one if waypoints 
are given. 

My Route / Cancel 
Route (page 69) 

This button skips the next waypoint from the route. 

n/a

This button opens a 2D map scaled and positioned to 
show the entire route. 

My Route / Overview 
(page 65) 

This  button  opens  the  Visual  Guidance  settings 
screen. 

More / Settings / 
Visual Guidance 
(page 110) 

This button opens the Traffic Summary screen. 

Tap the Traffic icon in 
the Navigation menu 
or on the Map screen 

This  button  lets  you  bypass  parts  of  the 
recommended route. 

My Route / 
Avoidances

This button opens the Trip Monitor screen where you 
can manage your previously saved trip logs and track 
logs. 

More / Trip Monitor 
(page 96) 

This  button  opens  the  list  of  manoeuvres  (the 
itinerary).

Tap the top of the 
Map screen during 
navigation. 

MG Motor UK Ltd 

25 

With  this  function  you  can  save  the  active  route  for 
later use. 

My Route / More / 
Save Route 

With  this  function  you  can  replace  the  active  route 
with a previously saved route. 

My Route / More / 
Load Route 

With  this  function  you  can  search  for  Places  of 
Interest in various different ways. 

Find / Find Places 
(page 46) 

This  button  opens  the  Map  screen  and  starts 
simulating the active route. 

My Route / More / 
Simulate Navigation 
(page 78) 

This button starts the Music player application. 

More / Music Player 
(page 96) 

This  button  opens  the  GPS  Information  screen  with 
satellite position and signal strength information. 

Tap the top of the 
Map screen when 
there is no GPS 
reception 

This  button  opens  the  parameters  of  the  selected 
Vehicle profile. 

More / Settings / 
Route (page 104) 

This button opens the Lorry settings screen. 

More / Settings / Lorry 

This  button  opens  the  Driving  timer  configuration 
screen. 

More / Settings / Lorry 
/ Configure Driving 
Timers (page 84) 

MG Motor UK Ltd 

26 

2.3.6 Checking the details of the current position (Where Am I?) 

This screen contains information about the current position (or about the last known position if 
GPS reception is not available) and a button to search for useful Places nearby. 

You can access this screen from the map in one of the following ways: 

x  If the current street is displayed below the Vehimarker (the current position on the 

map), tap it to open the Where Am I? screen. 

x  Open the Quick menu and tap the 

 button. 

Information on this screen: 

x

,

: Latitude and Longitude (coordinate of the current position in WGS84 

format). 

x

: Altitude (elevation information coming from the GPS receiver - often 

inaccurate). 

x

: House number on the left. 

x

: House number on the right. 

x  In the middle of the screen you can see whether the position is current, or the time left 

since it was last updated. 

x  Address details (when available) of the current position are displayed at the bottom. 

You can also perform some actions on this screen: 

Tap

 to save the current position as a Favourite destination. 

You  can  also  search  for  assistance  near  your  current  position.  Tap 

  to 

open a new screen for the Quick search: 

MG Motor UK Ltd 

27 

The following services can be searched around the current position or the last known position: 

x

: Car repair and roadside assistance services 

x

: Police stations 

x

: Medical and emergency services 

x

: Petrol stations 

Tap any of the buttons, select a Place from the list, and navigate to it. 

MG Motor UK Ltd 

28 

3 On-road navigation 

When  first  started,  iGO  primo  calculates  routes  using  the  road  network  of  the  high  quality 
vector maps provided with the product. 

You can set up your route in different ways: 

x  If you need a route for immediate navigation, you can select the destination and start 

navigating to it right away (normal navigation). 

x  You can also plan a route independently of your current GPS position or even without 

GPS reception. To achieve this you need to set a new starting point in My Route / Edit 
Route by tapping the flag icon at the current position. This will also turn off the GPS 
receiver so that the route is not recalculated when a new position is received. 

You  can  plan  routes  with  multiple  destinations.  Select  the  first  destination.  Then  select  a 
second  destination  and  add  it  to  your  route  to  create  a  multi-point  route.  You  can  add  as 
many destinations to your route as you like. 

You can also use iGO primo for off-road navigation. For details, see page 80. 

3.1 Selecting the destination of a route 

iGO primo offers you several ways of choosing your destination: 

x  Enter a full address or a part of an address, for example a street name without a house 

number or the names of two intersecting streets (page 37). 

x  Enter an address with postal code (page 43). This way you do not need to select the 

name of the city/town and the search for street names might be faster as well. 

x  Use a built-in Place of Interest as your destination (page 46). 
x  Select a location on the map with the Find on Map feature (page 58). 
x  Use a previously saved Favourite destination (page 59). 
x  Select a location from the History of previously used destinations (page 61). 
x  Enter the coordinate of the destination (page 62). 
x  Use the location where a photo was taken (page 63). 

3.1.1 Combined Search 

There  are  several  ways  to  select  the  destination  of  the  route.  You  can  find  buttons  in  the 
Destination  menu  that  initiate  a  separate  search  for  addresses,  Places,  Favourite  or  recent 
destinations.  The  fastest  way  to  search  for  any  of  these  is  to  use  the  Combined  Search.  In 
this  section  you  can  find  the  full  description  of  how  this  feature  works.  The  below  process 
shows  how  to  carry  out  the  search  and  the  following  subsections  will  help  you  find  specific 
kinds of results. 

1. 

In the Navigation menu, tap 

.

2. 

First you see hints on the screen showing how you can use the function. These hints 
are only displayed the first time you use this screen. 

MG Motor UK Ltd 

29 

3. 

Tap anywhere and the hints disappear. Once you get through this screen to the search 
results, the hint will not appear again when you open this window later but you can see 
them again if you tap the information button on the right side of the input field. 

4. 

You can see the input field at the top of the screen. Right below that you see the 
search area, the city/town around which the search is carried out. The default search 
area is the area where you are located. For a local search, skip the next step. 

5. 

(optional) To search in a different area, do as follows: 

1. 

Tap 

. A new screen opens with a new input field. A hint 

bubble explains how you can specify the new search centre. 

2. 

Tap anywhere and the hint disappears. If you successfully select a new search 
area, the hint will not appear again when you open this window later but you can 
see it again if you tap the information button on the right side of the input field. 

3. 

Start entering the centre of the new search area using the screen keyboard. You 
only need to enter a few letters to get a result. If the new search area is in a 
different country, you can narrow the search results if you enter one space and 
then a few letters of the country of the search area. 

4. 

The most likely result appears below the input field as you enter new letters. 
Tap to select this as your new search area. If you cannot see your preferred 

area after a few letters, tap 

 and select one from the list. 

6. 

With the proper search area displayed, you can start entering the name, address or 
category of the destination you are looking for. The number shown in the 

 button shows how many results match the entered text. The 

background search is carried out while you enter letters so this number may keep on 
increasing if you wait a few seconds. Keep on entering new letters while this number is 
high. 

MG Motor UK Ltd 

30 

7. 

Once the number of results is acceptable after a few seconds of searching, you can 

tap

 to switch to the result screen. 

8. 

The result screen also opens with hints. Tap anywhere to suppress them. Once you 
select a destination, they will not appear again. 

9. 

You see all results in the list, regardless of their type. Addresses, Places, Place 
categories, Favourite and recent destinations are mixed within one list. 

10.  You have the following options: 

x  Tap the result you want to use as your destination. Scroll the list if necessary. 
x  To narrow the search for only one type of result (for example for Places only) 

you can tap the related button at the top of the screen. See the next sections for 
details. 

x  Tap the 

 button and the new search will start for the same input text using 

the Google Local Search facility. Wait for the result, and select one item from 
the list. 

11.  Once the destination is selected, a full screen map appears with the selected point in 

the middle. If necessary, tap the map somewhere else to modify the destination. The 

Cursor (

) appears at the new location. Tap 

 to confirm the 

destination, or tap 

 to select a different destination. 

12.  After a short summary of the route parameters, the map appears showing the entire 

route. The route is automatically calculated. Tap 

 to modify route 

parameters, or tap 

 and start your journey. 

MG Motor UK Ltd 

31 

Tip!

If you know that you will use this destination frequently, before tapping 

 to confirm the destination, put it on the list of your 

Favourites first: tap 

 then 

, give a 

name for the new Favourite, and tap 

 to save the location. 

The map with the destination returns automatically. Now you can start your 
journey. 

3.1.1.1 Combined Search - Navigating to a recent destination (History) 

To  find  one  of  your  recent  destinations  in  Combined  Search,  carry  out  the  search  as 
described  earlier.  For  the  input  text  you  can  use  either  a  part  of  the  name  or  a  part  of  the 
address of the recent destination. When you get to the result screen, do as follows: 

1. 

Tap 

 at the top of the screen. 

2. 

The list is now filtered. What you see is the list of recent destinations with a matching 
name or address. 

3. 

Scroll down the list if necessary and then select one of the destinations from the list. 

4. 

Once the destination is selected, a full screen map appears with the selected point in 
the middle. If necessary, tap the map somewhere else to modify the destination. The 

Cursor (

) appears at the new location. Tap 

 to confirm the 

destination, or tap 

 to select a different destination. 

5. 

After a short summary of the route parameters, the map appears showing the entire 

route. The route is automatically calculated. Tap 

 to modify route 

parameters, or tap 

 and start your journey. 

Note! 

The alternative way to search for a recent destination is to tap the 

 button 

in the Quick menu or in the Destination menu. The rest of the procedure is 
similar to the above. 

MG Motor UK Ltd 

32 

3.1.1.2 Combined Search - Navigating to a Favourite destination 

To  find  one  of  your  Favourite  destinations  in  Combined  Search,  carry  out  the  search  as 
described earlier. When you get to the result screen, do as follows: 

1. 

Tap 

 at the top of the screen. 

2. 

The list is now filtered. What you see is the list of your Favourite destinations with a 
matching name. 

3. 

Scroll down the list if necessary and then select one of the destinations from the list. 

4. 

Once the destination is selected, a full screen map appears with the selected point in 
the middle. If necessary, tap the map somewhere else to modify the destination. The 

Cursor (

) appears at the new location. Tap 

 to confirm the 

destination, or tap 

 to select a different destination. 

5. 

After a short summary of the route parameters, the map appears showing the entire 

route. The route is automatically calculated. Tap 

 to modify route 

parameters, or tap 

 and start your journey. 

Note! 

The alternative way to search for a Favourite destination is to tap the 
button in the Quick menu or in the Destination menu. The rest of the procedure 
is similar to the above. 

3.1.1.3 Combined Search - Navigating to an address 

To  find  an address  in  Combined  Search,  carry  out  the  search  as described earlier. Use  the 
name  of  the street  alone or  combined with  the  house  number  as your  input  text.  When  you 
get to the result screen, do as follows: 

1. 

Tap 

 at the top of the screen. 

2. 

The list is now filtered. What you see is the list of matching addresses. 

3. 

Scroll down the list if necessary and then select one of the addresses from the list. 

4. 

Once the destination is selected, a full screen map appears with the selected point in 
the middle. If necessary, tap the map somewhere else to modify the destination. The 

Cursor (

) appears at the new location. Tap 

 to confirm the 

destination, or tap 

 to select a different destination. 

MG Motor UK Ltd 

33 

5. 

After a short summary of the route parameters, the map appears showing the entire 

route. The route is automatically calculated. Tap 

 to modify route 

parameters, or tap 

 and start your journey. 

Note! 

The alternative way to search for an address is to tap the 

 button in the 

Destination menu. Unlike the Combined Search, this alternative search method 
is a structured one where you can define the parts of the address separately. 

3.1.1.4 Search Centre - Navigating to an intersection 

To search for an intersection in the Search Centre, follow the steps below: 

1. 

In the Navigation menu, tap 

.

2. 

(optional) If screen hints are displayed, tap 

 to hide them. 

3. 

The screen proposes the province and county/city where you are located. They can be 
seen in the top right corner. For a local search in the same county/city, skip the next 
step. 

4. 

(optional) To search in a different province or county/city, do as follows: 

x  To search the current province but in a different county/city, tap the name of the 

county/city on the right and select the new county/city from the list. If the list is 

too long, you can tap 

 and enter the first few characters of its name to 

narrow down the list. 

x  To search in a different province, tap the name of the province and select a new 

one from the list. With the new province selected, you need to select the 

county/city. Select one from the list or tap 

 and enter the first few 

characters of its name to narrow down the list. 

5. 

With province and county/city selected, you need to enter the name of one of the 
intersecting streets. 


Content      ..      1      2      3      ..