Smart 2012. Audio system navigation, multimedia. Manual - part 5
 

  Index      Manuals     Smart 2012. Audio system navigation, multimedia. Owners Manual


Search            


Content      ..     3      4      5      6     ..


Smart 2012. Audio system navigation, multimedia. Manual - part 5


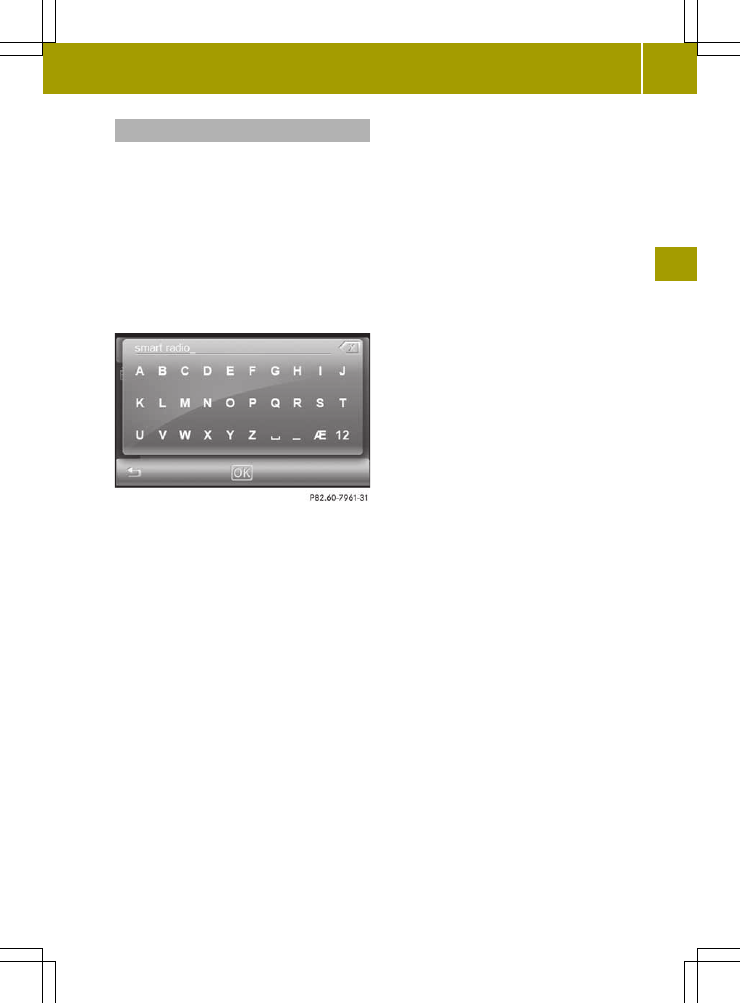
Editing Bluetooth

®

device names

The Bluetooth

®

device name enables

Bluetooth

®

connection to Bluetooth

®

mobile phones and Bluetooth

®

audio

devices. The Bluetooth

®

device name for

audio system navigation/multimedia is

smart Radio

smart Radio

. You can change this device

name.

X

Press

Bluetooth name

Bluetooth name

in the

"Bluetooth

®

settings" menu.

An input menu appears.

X

Enter a name. Instructions for entering

characters can be found in the "Entering

characters in the phone book" section

(

Y

page 15).

The name is shown at the top left.

X

To delete: briefly press1 to delete the

last letter.
Press and hold 1 to delete the entry.

X

Press

OK

OK

to confirm the entry.

The input menu is closed and the

"Bluetooth

®

settings" menu appears.

Telephone settings

73

>>

Tele

phon

e.

Z

-------------------------------------------------------------------------------------------------------------------------------------------------------------

74

-------------------------------------------------------------------------------------------------------------------------------------------------------------

>>

Audio.

Radio mode ...................................... 76
Music mode ...................................... 81
Audio settings .................................. 93

-------------------------------------------------------------------------------------------------------------------------------------------------------------

Radio mode
Introduction

i

Portable electronic devices in the

vehicle may seriously impair radio

reception.

Switching radio mode on/off

Switching to radio mode

X

Press

Radio

Radio

in the main menu

(

Y

page 10).

The radio display appears. You will hear

the station currently selected.

Example: radio display
:

Status bar showing the current

waveband, clock and additional

displays

;

To switch radio mode off

=

Display/selection window with station

name and station frequency (line 1),

radio text display (line 2), waveband

(line 3) and assignment of the first four

presets (line 4)

?

To call up the settings menu

A

Station search, forwards/backwards

B

To call up a station preset

Switching radio mode off

X

Press ; in the radio display.

The main function active last is shown.

Switching wavebands

X

Press symbol ? in the radio display.

The settings menu appears.

X

Press

Band

Band

in the menu. The entry on the

right beside

Band

Band

shows the current

setting.

A list of available wavebands is shown.

You can choose from wavebands FM, FMT, FM

Dynamic, AM, or AMT.
FMT, AMT: Each waveband contains 12

stations that were automatically stored by

the Travelstore function, sorted by signal

strength (

Y

page 79). The strongest

station is stored as Preset 1. When you next

use this function, the current preset

stations are overwritten.
FM dynamic: while the vehicle is in motion,

the tuner scans regularly and stores the 32

stations with the best reception quality. It

is not possible to store a station manually.

Dynamic updating can cause a stored

station to change preset position in the

list.

X

Press 9 or : to scroll in the list.

X

Press the desired waveband.

Waveband

Frequency

FM, FMT, FM

Dynamic

87.7 - 107.9 MHz

AM, AMT

530 – 1710 kHz

76

Radio mode

>>

Audio.

-------------------------------------------------------------------------------------------------------------------------------------------------------------

Selecting a station

Selecting a station using the station

search function

X

Press û or ü in the radio display

(

Y

page 76).

The needle jumps left or right in the

waveband and stops at the next station

with adequate reception.

Selecting a station using the waveband

scan

X

Press symbol B in the radio display

(

Y

page 76).

The station preset memory appears

(

Y

page 77).

X

Press the magnifying glass symbol in the

station preset memory.

The "Station search" menu appears.

"Station search" menu

X

Press

Band scanning...

Band scanning...

.

The

Band

Band scanning...

scanning...

message appears.

All available stations are played

briefly.
When the smart radio finds a station, the

display shows

Playing 98.3 MHz

Playing 98.3 MHz

, for

example.

X

To select the station being played: press

1.

The band scan is stopped.

Selecting stations via the station

presets

Option 1
The station assignment of preset positions

1 to 4 appears in the radio display under

the waveband.

X

Press one of preset positions 1 to 4.

The selected station is played.

Option 2

X

Press symbol B in the radio display

(

Y

page 76).

The station preset memory appears.

An arrow and a note indicate under which

preset the currently selected station is

stored.

X

Press 9 or : to scroll in the list.

X

Press the desired station.

The selected station is played.

X

Press the symbol at the bottom left to call

up the radio display.

Selecting stations by entering the

frequency manually

You can use this function for FM wavebands.

X

Press symbol B in the radio display

(

Y

page 76).

The station preset memory appears.

X

Press the magnifying glass symbol in the

station preset memory.

X

Press

Enter frequency

Enter frequency

.

An input menu appears.

Radio mode

77

>>

Audio.

-------------------------------------------------------------------------------------------------------------------------------------------------------------

X

Enter the desired frequency by pressing

the numbers.

The frequency is shown at the top right,

the dot is entered automatically.

X

Press

OK

OK

and confirm the frequency

entered.

If the smart radio finds the respective

station, the display shows

Playing

Playing

98.3 MHz

98.3 MHz

, for example. The radio

display then appears.

i

You can only enter currently permitted

numbers.
If you enter a frequency that is outside

of the frequency range, audio system

navigation/multimedia sets the next

lower frequency.

Selecting a station by entering the

station name

You can use this function for FM wavebands.

X

Press symbol B in the radio display

(

Y

page 76).

The station preset memory appears.

X

Press the magnifying glass symbol in the

station preset memory.

X

Press

Enter station name

Enter station name

.

An input menu appears.

:

Entry line

;

To delete an entry

=

To enter numbers and special

characters

?

To enter umlauts

X

Enter a station name. Instructions for

entering characters can be found in the

"At a glance" chapter (

Y

page 15).

X

To confirm the entry: press

OK

OK

.

The

Searching...

Searching...

display appears. You

then see a list of stations that can be

received.

X

Press 9 or : to scroll in the list.

X

Press the desired station.

X

Press & to exit the list.

The selected station is played.
If no station is found for an entry,

GG not

not

found

found

is shown, for example.

Storing stations

Storing stations manually

There are 32 preset positions available

each for the FM and FMT wavebands. You

cannot store stations manually in the FM

dynamic waveband. In the AM and AMT

wavebands, up to 12 stations can be stored.

X

Quick save: in the radio display, press

and hold one of preset positions 1 to 4

until you hear a confirmation tone.

The currently set station is stored to the

preset position selected.

78

Radio mode

>>

Audio.

-------------------------------------------------------------------------------------------------------------------------------------------------------------

X

In the preset memory: press 9

or : to scroll in the list.

X

Press and hold a preset position until

you hear a confirmation tone.

The currently set station is stored to the

preset position selected.

Storing stations automatically (travel

store)

This function automatically assigns

stations that can be received to the preset

memory for the FMT and AMT wavebands. The

entire waveband is searched, starting at

the lowest frequency. The 12 stations with

the best reception quality are stored to the

preset positions according to their

reception quality. The station with the

best reception is stored at preset position

1.

X

Press B in the radio display

(

Y

page 76).

The station preset memory appears.

X

Press the magnifying glass symbol in the

station preset memory.

X

Press

Travel store

Travel store

in the "Station

search" menu.

X

The

Travel store

Travel store

message appears.

Audio system navigation/multimedia

searches for stations that can be

received. The available stations are

automatically stored in the preset

positions.

X

To cancel the function: press 1.

Radio Data System (RDS)

General notes

The Radio Data System (RDS) provides

inaudible additional information in the

FM wavebands (FM, FMT, FM dynamic). The

system consists of a listening receiver and

a monitoring receiver.

The monitoring receiver constantly scans

the FM waveband and collects data from all

the stations with adequate reception, e.g.

reception quality and RDS data such as

program name and alternative frequencies.

Audio system navigation/multimedia saves

the data and keeps the preset list up to

date. The listening receiver is therefore

able to switch instantaneously to an

alternative frequency with a better signal.

i

RDS only functions for stations which

transmit RDS data.

Switching RDS on/off

X

Press d in the radio display

(

Y

page 76).

The settings menu appears.

X

Press

RDS

RDS

in the menu.

Depending on the previous status, the

function is switched on O or off ª.

X

Press & and return to the radio

display.

Switching regional mode on/off

Some RDS programs broadcast regional

programs with local content. Switching on

regional mode prevents the station from

switching to an alternative frequency.

Radio mode

79

>>

Audio.

-------------------------------------------------------------------------------------------------------------------------------------------------------------

X

Press d in the radio display

(

Y

page 76).

The settings menu appears.

X

Press

Regional

Regional

in the menu.

Depending on the previous status, the

function is switched on O or off ª.

X

Press & and return to the radio

display.

Program type category (PTY)

PTY is a service offered by several stations

in RDS. You can use it to select stations

with a certain program type.

X

Press d in the radio display

(

Y

page 76).

The settings menu appears.
After

PTY

PTY

, the display either shows the

current program type selected or

NO

NO

PTY

PTY

.

X

Press

PTY

PTY

in the menu.

The list of available program types

appears.

X

To switch off PTY: press

NO PTY

NO PTY

.

The O symbol indicates that the

function is switched off. The setting is

accepted and the list closes.

X

To select a program type: press 9

or : to scroll in the list.
Press the desired program type.

X

Press & and close the list.

Available program types:

R

News

R

Information

R

Sports

R

Talk

R

Rock

R

Classic Rock

R

Adult Hits

R

Soft Rock

R

Top 40

R

Country

R

Oldies

R

Soft

R

Nostalgia

R

Jazz

R

Classical

R

Rhythm and Blues

R

Soft Rhythm and Blues

R

Foreign Language

R

Religious Music

R

Religious Talk

R

Personality

R

Public

R

College

R

Weather

Radio text

Notes

This function is available in FM radio

mode.
Radio text is additional information that

is shown in the radio display, e.g.

information about the current program.
The radio text is switched off in the

standard setting.

80

Radio mode

>>

Audio.

-------------------------------------------------------------------------------------------------------------------------------------------------------------

Switching radio text on/off

X

Press d in the radio display

(

Y

page 76).

The settings menu appears.

X

Press

Radio text

Radio text

in the menu.

Depending on the previous status, the

function is switched on O or off ª.

X

Press & and return to the radio

display.

If the station supports radio text and

information is available, this is shown

when the function is switched on. Longer

text information is shown as scrolling

text.

Reception settings

Switching stereo reception on/off

X

Press d in the radio display

(

Y

page 76).

The settings menu appears.

X

Press

Stereo

Stereo

in the menu.

Depending on the previous status, the

function is switched on O or off ª.

X

Press & and return to the radio

display.

Noise suppression

This function suppresses interference

noises, e.g. as a result of poor reception,

by reducing the treble.

X

Press d in the radio display

(

Y

page 76).

The settings menu appears.

X

Press

Hicut

Hicut

in the menu.

A settings menu appears.

X

Press = or Ì to select a value

between 0 (no reduction) and 7 (high

reduction).

X

Press

OK

OK

and confirm the entry.

X

Press & and return to the radio

display.

Setting the sensitivity

By setting the sensitivity, you affect the

range of available channels when you use

the following functions:

R

Station search (

Y

page 77)

R

Band scan (

Y

page 77)

R

Travel store (

Y

page 79)

At high sensitivity, you only receive

stations with high reception quality. At

low sensitivity, you also receive stations

with low reception quality.

X

Press d in the radio display

(

Y

page 76).

The settings menu appears.

X

Press

Sensitivity

Sensitivity

in the menu.

A settings menu appears.

X

Press = or Ì to select a value

between 1 (low) and 6 (high).

X

Press

OK

OK

and confirm the entry.

X

Press & and return to the radio

display.

Music mode
Safety note

G

WARNING

Only when the vehicle is stationary should

you:

R

insert a data carrier

R

eject a disc

There is a risk of being distracted from the

road and traffic conditions if you insert or

eject a disc while the vehicle is in motion.

General notes

A maximum of 1500 media files (audio,

video, images) can be played from CD/DVD,

and a maximum of 20,000 from SD/USB.
If a data medium is divided into several

partitions, only the first partition found

is played.

Music mode

81

>>

Audio

.

Z

-------------------------------------------------------------------------------------------------------------------------------------------------------------

Inserting and removing a CD/DVD

Notes

If the CD/DVD has a printed side, this must

face upwards when the CD/DVD is inserted.

If neither side is printed, the side to be

played should face downwards. The system

may not be able to play CDs/DVDs with copy

protection.

i

If a medium contains other files in

addition to music files, the loading time

before the first track starts to play may

be longer.

Inserting a CD/DVD

X

Press the 8 button on the front panel.

The front panel is folded down and

uncovers the disc slot.
If the eject button, item F(

Y

page 10), is

lit up in orange, a CD/DVD has already

been inserted. If this is the case, remove

the CD/DVD first.

X

Insert a CD/DVD into the disc slot.

Audio system navigation/multimedia

draws the CD/DVD in.
The

Disc reading...

Disc reading...

message appears.

If the CD/DVD is a permissible data

medium and was inserted correctly,

playback starts.

X

Press the 8 button on the front panel

again.

The front panel raises and closes the

disc slot.

i

The front panel moves up automatically

after one minute.

Removing a CD/DVD

X

Press the 8 button on the front panel.

The front panel is folded down and

uncovers the disc slot.

The eject button lights up orange if there

is a CD/DVD in the disc slot.

X

Press the eject button, item

F(

Y

page 10).

X

Remove the CD/DVD from the disc slot.

X

Press the 8 button on the front panel

again.

The front panel raises and closes the

disc slot.

i

The front panel moves up automatically

after one minute.

Inserting and ejecting an SD/MMC

memory card

General notes

Audio system navigation/multimedia

supports SDHC memory cards, SD memory

cards and MMC memory cards.

R

SDHC (SanDisk High Capacity)

R

SD (SanDisk)

R

MMC (Multimedia Card)

SD memory cards feature the following

logo:

This logo is a registered trademark of

SanDisk Corporation. The logo is shown on

the left beside the SD/MMC memory card

slot (visible when you fold the display

down).

i

Do not insert SD-WLAN cards or so-

called "partitioned SD cards", as these

either hinder opening and closing the

front panel or do not install in the slot.

i

Not all SD/MMC memory cards are

designed for the temperatures which may

be reached in the vehicle.

82

Music mode

>>

Audio.

-------------------------------------------------------------------------------------------------------------------------------------------------------------

Due to the wide range of SD/MMC memory

cards available on the market, playback

cannot be guaranteed for all brands of

SD/MMC memory card.
A maximum of 20,000 media files (audio,

video, images) can be played. If the SD/

MMC memory card is divided into several

partitions, only the first partition

found is played.
The size of a partition should be smaller

than 32 GB.

Inserting an SD/MMC memory card

X

Press the 8 button on the front panel.

The front panel is folded down and

uncovers the slot for the SD/MMC memory

card (on the right beside the SD logo).

X

Insert an SD/MMC memory card into the

slot. The side with the contacts must face

downwards and point towards the slot.

X

Press the 8 button on the front panel

again.

The front panel moves up and closes the

SD/MMC memory card slot.

Removing the SD/MMC memory card

X

Press the 8 button on the front panel.

The front panel is folded down and

uncovers the slot for the SD/MMC memory

card (on the right beside the SD logo).

X

Press the SD/MMC memory card.

The SD/MMC memory card is ejected.

X

Remove the SD/MMC memory card.

X

Press the 8 button on the front panel

again.

The front panel moves up and closes the

SD/MMC memory card slot.

iPod

®

/iPhone

®

mode

Supported devices

i

iPod

®

and iPhone

®

are registered

trademarks of Apple Inc., Cupertino,

California, USA.

The following iPod

®

variants are

supported:

R

iPod

®

classic 120 GB

R

iPod

®

classic

R

iPod

®

nano 5G

R

iPod

®

nano 4G

R

iPod

®

nano 3G

R

iPod

®

nano 2G

R

iPod

®

touch 3G

R

iPod

®

touch 2G

R

iPod

®

touch

R

iPod

®

5G

The following iPhone

®

variants are

supported:

R

iPhone

®

3G

R

iPhone

®

3GS

Connecting an iPod

®

/iPhone

®

X

Connect the device to the USB port.

i

Connecting an iPod which has been fully

discharged can result in an extended

initialization period.

i

Do not leave the iPod

®

/iPhone

®

in your

vehicle. Extreme temperatures can

effect functionality (e.g. direct

sunlight or extremely low external

temperatures; see the operating

instructions of the respective device).

smart does not take responsibility for

any damage to external devices.

Music mode

83

>>

Audi

o.

Z

-------------------------------------------------------------------------------------------------------------------------------------------------------------

Operation via a USB/AUX port

USB/AUX port

The ports are in the glove box on the left-

hand side.

:

USB port

;

AUX port

You can connect an external audio source

(AUX) to audio system navigation/

multimedia.
The USB port supports the following USB

devices:

R

USB sticks (flash memory)

R

USB hard discs requiring a permanent

current of up to 500 mA (it may be

necessary to connect a separate power

supply)

i

Audio system navigation/multimedia

supports USB storage devices in the "USB

Device Subclass 6". Information

concerning USB Device Subclass 6 is

available from the equipment

manufacturer.
A maximum of 20,000 media files (audio,

video, images) can be played. If the USB

storage medium is divided into several

partitions, only the first partition

found is played.
Size specifications for a partition:

R

USB sticks < 64 GB

R

USB hard discs < 1000 GB
Partitions of over 256 GB result in an

extended initialization period. It

could therefore take a long time before

playback starts.
Media files must be smaller than

256 GB.

For more details and a comprehensive list

of supported devices, please contact a

smart center.

Connecting an audio device to AUX

X

Connect the audio device to AUX port ;

using a 3.5 mm stereo jack plug.

X

Please see the respective operating

instructions for how to operate the

external audio source.

Connecting a USB device

i

Do not leave external devices in the

vehicle, as their correct function cannot

be guaranteed if they are subjected to

extreme temperatures, e.g. from

exposure to direct sunlight or very low

outside temperatures (see the operating

instructions of the respective device).

smart does not take responsibility for

any damage to external devices.

X

Connect the USB device to USB port :.

Bluetooth

®

audio mode

Conditions

Bluetooth

®

audio device

Bluetooth

®

audio mode requires a

Bluetooth

®

-capable audio device.

Not all Bluetooth

®

audio devices available

on the market are equally suitable. You can

obtain more detailed information about

suitable Bluetooth

®

audio devices and

about connecting Bluetooth

®

audio devices

to audio system navigation/multimedia

from your smart Center.

84

Music mode

>>

Audio.

-------------------------------------------------------------------------------------------------------------------------------------------------------------

Before using Bluetooth

®

audio mode, you

should check your Bluetooth

®

audio device

for the following (see the Bluetooth

®

audio

device's operating instructions):

X

Bluetooth

®

audio profile

The Bluetooth

®

audio device must

support the A2DP and AVRCP Bluetooth

®

audio profiles.

i

A2DP (Advanced Audio Distribution

Profile): Bluetooth

®

audio profile for

audio data transmission
AVRCP (Audio Video Remote Control

Profile): Bluetooth

®

audio profile for

audio data control

X

Bluetooth

®

visibility

On certain Bluetooth

®

audio devices, as

well as activating the Bluetooth

®

function, the device itself must also be

made "visible" to other devices (see the

Bluetooth

®

audio device's operating

instructions).

X

Bluetooth

®

device name

Every Bluetooth

®

device has its own

Bluetooth

®

device name. This device

name is freely definable, but can be

identical for all devices from the same

manufacturer. You should therefore

change the name of the device so that you

can correctly identify your Bluetooth

®

audio device (see the Bluetooth

®

audio

device's operating instructions).

X

Activate Bluetooth

®

and Bluetooth

®

visibility on the Bluetooth

®

audio

device.

General information

You will need to register your Bluetooth

®

audio device before using it with audio

system navigation/multimedia for the

first time.

This process includes:

R

the search by the Bluetooth

®

audio device

as well as

R

subsequent connection.

You can connect up to five Bluetooth

®

devices.

i

If you register a mobile phone that

supports Bluetooth

®

audio and transmits

the A2DP and AVRCP Bluetooth

®

audio

profiles, these profiles are connected

automatically. The mobile phone is then

entered in both the Bluetooth

®

telephones list (

Y

page 63) and in the

Bluetooth

®

audio device list.

i

The functions supported depend on the

Bluetooth

®

audio device or the mobile

phone.

Connecting Bluetooth

®

audio devices

X

Proceed as described under

"Registering and connecting a mobile

phone" in the Telephone section

(

Y

page 63). Press

Audio streaming

Audio streaming

instead of

Cell phone

Cell phone

in the new device

menu.

Activating music mode

Option 1: inserting or connecting a data

medium

X

Insert a CD/DVD (

Y

page 82) or an SD/MMC

memory card (

Y

page 83).

or

X

Connect a USB device (

Y

page 84), an

iPod

®

/iPhone

®

(

Y

page 83) or an audio

device (

Y

page 84).

or

X

Connect a Bluetooth

®

audio device to

audio system navigation/multimedia

(

Y

page 85).

X

To start playback: playback starts

automatically for CDs/DVDs. For all other

Music mode

85

>>

Audio.

Z

-------------------------------------------------------------------------------------------------------------------------------------------------------------

data media, press ; in the basic

display.

Option 2: selecting a data medium in the

music main menu

A CD/DVD or an SD/MMC memory card is

inserted or a data medium is connected to

audio system navigation/multimedia.

X

Press

Music

Music

in the main menu

(

Y

page 10).

The music main menu appears.

Music main menu

X

Press a data medium symbol.

The data medium is read. Playback then

starts.

Example: CD/DVD mode
:

Status bar showing the current mode and

the current playback options

;

Display with track, artist, album name

and genre (if supplied), with the

playback bar underneath

=

Menu bar

Example: SD memory card mode

i

For USB mode and SD/MMC memory card

mode, the cover is shown on the display

if the corresponding data is contained

in the ID3 tag.

Switching off music mode

X

Press 1 in the corresponding basic

display.

The main function last active is shown.

Pause function

X

Press Ë in the corresponding basic

display.

Playback is interrupted. Ì is shown

instead of Ë.

X

To continue playback: press Ì.

Playback continues from the point where

it was interrupted.

Selecting a track

By skipping

X

Press û or ü in the corresponding

basic display.

The skip forward function skips to the

next track.
Skipping backwards restarts the current

track (if it has been playing for more

than eight seconds) or starts the

86

Music mode

>>

Audio.

-------------------------------------------------------------------------------------------------------------------------------------------------------------

previous track (if the current track has

only been playing for a shorter time).
If you have activated the

Mix

Mix

playback

option, the tracks are played in a random

order. Depending on the data medium, all

the tracks on the medium, the tracks with

certain playback criteria or the tracks

in a folder are played.

By track list

X

Press the symbol at the bottom left in the

corresponding basic display.

The track list appears.

X

Press 9 or : to scroll in the track

list.

X

Select a title.

The track is played.

X

To return to the basic display: press the

symbol at the bottom left.

Fast forwarding/rewinding

There are two options for this function. The

second option can be used when playing a

CD/DVD, an SD/MMC memory card or a USB

device.
Option 1

X

Press and hold û or ü until the

desired position has been reached.

i

On an iPod

®

, fast rewind only functions

within the current track.

Option 2

X

Press somewhere on playback bar : in

the following picture.

i

This function is not available for

iPod

®

.

:

Playback bar

Selecting a folder

This function is available in MP3 mode.

X

Press the symbol at the bottom left in the

corresponding basic display.

The track list appears.

X

To call up the next higher folder level:

press the folder symbol on the bottom

right.

X

To open a folder: press a folder symbol.

The folder content is shown.

Playback criteria

General information

You can select playback criteria for

iPods

®

, USB devices and SD/MMC memory

cards. Playback criteria include, for

example, playlists, artists or genres. After

selecting a criterion and a sub-entry, you

will then hear the corresponding tracks.
You can display the folder structure with

selection criterion

Media data

Media data

.

Music mode

87

>>

Audio

.

Z

-------------------------------------------------------------------------------------------------------------------------------------------------------------

i

Selection criterion

Media data

Media data

is not

available for iPod

®

.

Selecting playback criteria

X

Press the symbol at the bottom left in the

corresponding basic display.

The track list appears.

X

Press magnifying glass symbol ;.

X

Press one of the playback criteria.

If you press

Artists

Artists

, for example, a list

of available artists appears.

X

Select an artist.

A list of available tracks is shown.

X

Press a track to start playback.

Displaying metadata

X

Press

Media data

Media data

in the criteria

display.

A folder structure or a track list

appears.

:

Alphabetical track search

;

To search by playback criteria

=

To select the next highest folder level

X

Press folder symbol =.

The folder structure appears.

Folder structure (highest level)

X

When the highest folder level is shown,

press the folder symbol at the bottom

right again.

The

Criteria

Criteria

message appears again.

Track search

This function is available within the

displayed list for USB mode and SD/MMC

memory card mode.

X

Press symbol : in the track list or after

selecting a playback criteria (e.g.

Artists

Artists

).

An input menu appears.

88

Music mode

>>

Audio.

-------------------------------------------------------------------------------------------------------------------------------------------------------------


Content      ..     3      4      5      6     ..