Vauxhall Ampera (2013 year). Manual - part 5


  Index      Vauxhall     Vauxhall Ampera (2013 year) - manual in english


Search            copyright infringement  


Content      ..     3      4      5      6     ..


Vauxhall Ampera (2013 year). Manual - part 5


-------------------------------------------------------------------------------------------------------------------------------------------------------------
72
Instruments and controls
Immobiliser
Cruise control
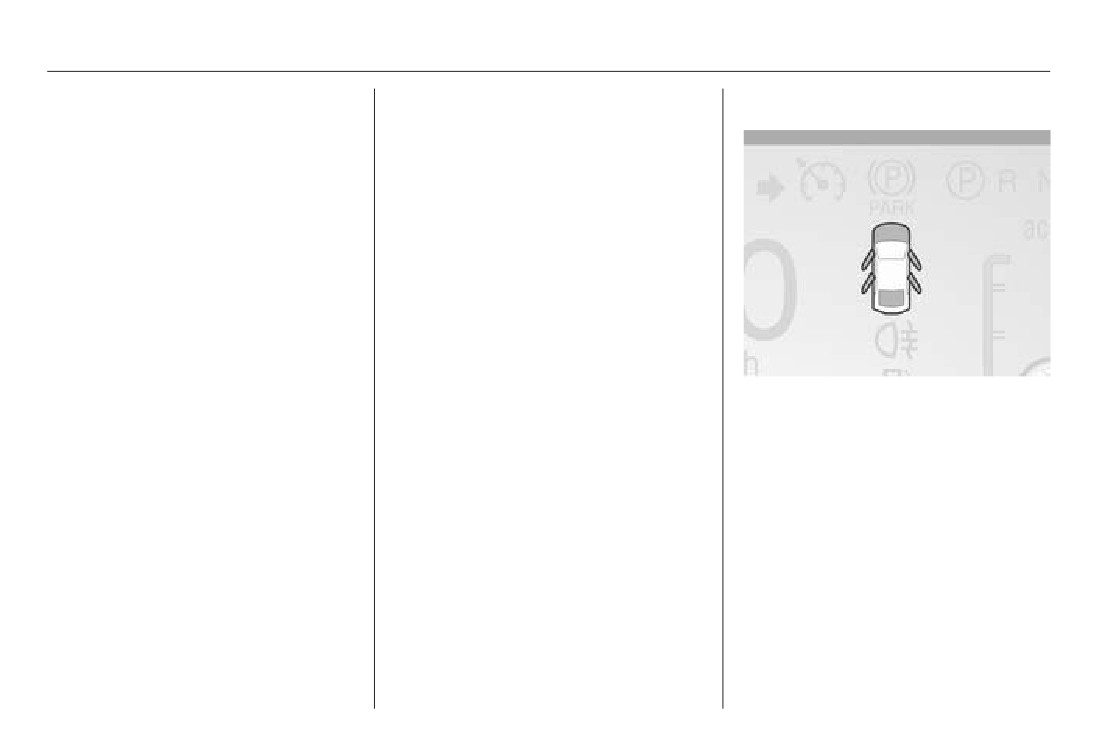
Door open
d illuminates yellow.
m illuminates white or green.
Fault in the immobiliser system. The
Illuminates white
engine cannot be started.
The system is on.
Seek the assistance of a workshop.
Illuminates green
Vehicle ready
A certain speed is stored.
R
illuminates whenever the
Cruise control 3 120.
vehicle is ready to be driven.
Vehicle detected ahead
Exterior light
A illuminates green or yellow.
8 illuminates green.
If a door, the bonnet or the tailgate is
The exterior lights are on 3 89.
Illuminates green
opened, a light comes on.
A vehicle is detected ahead.
An additional graphic is shown in the
High beam
Driver Information Centre (DIC) every
Illuminates yellow
time the bonnet or the tailgate are
C illuminates blue.
The distance to the vehicle ahead is
opened.
Illuminated when high beam is on and
too low.
Driver Information Centre (DIC)
during headlight flash 3 90.
Forward collision alert 3 122.
3 73.
Rear fog light
r illuminates yellow.
The rear fog light is on 3 91.

-------------------------------------------------------------------------------------------------------------------------------------------------------------

Instruments and controls
73
DIC controls
Selecting menus and functions
Information displays
At the main DIC menu:
Driver Information Centre
1. Turn the SELECT knob to scroll
through the possible DIC menus.
2. Press SELECT knob when a
menu item is highlighted to enter
that menu.
3. Continue to turn and press the
SELECT knob to scroll through
and select the available menu
items:
Trip A 0 and Trip B 1
CONFIG: Press to select either the
3 63.
simple or enhanced instrument
Remaining oil life I
cluster configuration display.
The Driver Information Centre (DIC)
The percentage of remaining oil life is
display is located in the instrument
9 BACK: Press to return to the
displayed.
cluster. The DIC displays information
previous screen, to exit a screen or
Engine oil 3 144.
about the vehicle. If a system problem
return to the main menu. Press 9
is detected, it also displays warning
BACK to minimise the DIC menu
Tyre pressure A
messages.
display.
The approximate pressures of all four
Vehicle messages 3 83.
SELECT: Press the centre of the
tyres are displayed.
knob to select the highlighted item.
If dashes are displayed instead of
Turn the knob to scroll through the
values, there may be a problem with
menu items.
the vehicle.
Seek the assistance of a workshop.

-------------------------------------------------------------------------------------------------------------------------------------------------------------

74
Instruments and controls
Tyre pressure 3 162.
Power gauge D
Tyre pressure monitoring system
Select this menu item to view the
3 162.
power gauge.
The power gauge is a gauge that
Vehicle messages 3
informs the customer of the total
Turn the SELECT knob to scroll
power coming from the engine or
through any active warning message.
battery to operate the vehicle.
Press SELECT to review the
messages.
Following distance indication E
Select this menu item to adjust the
A message may display on the lower
Vehicle messages 3 83.
following distance indication.
left of the screen to indicate that a
Unit 7
Following distance indication 3 124.
charging interruption of AC power at
the vehicle's charge port has
Turn the SELECT knob to change the
Navigation *
occurred.
unit display between SI and US.
Press SELECT to confirm the setting.
Arrow guidances are displayed by
selecting this item.
Colour-Info-Display
Tutorial mode T
See the Infotainment system manual
Colour-Info-Display is located in the
Press CONFIG to switch between two
for further information.
instrument panel.
tutorial screens that explain some of
the features of the cluster.
Colour-Info-Display indicates:
Instrument cluster display
Tutorial mode is only available when
■ Climate control 3 95
the vehicle is in park position P.
After unlocking and opening the
■ Infotainment system, see
driver's door, an information display
description in the Infotainment
Traffic sign assistant
appears, indicating the charge cord
system manual.
Select this menu item to view
status and the charge level of the high
detected traffic signs. Traffic Sign
voltage battery.
■ Vehicle personalisation settings
Assistant 3 128.
■ Power flow information
■ Charging settings

-------------------------------------------------------------------------------------------------------------------------------------------------------------

Instruments and controls
75
■ Energy information
Power Flow screens
■ Temperature
The Colour-Info-Display controls only
need a light touch to operate and work
best when using bare hands. The
controls will work with most gloves
although they may take longer to
respond. Use the finger pad rather
than the finger tip to minimise
Select one option:
response time. If the controls are not
responding, remove the gloves.
■ Immediately upon plug-in
The Power Flow screens indicate the
current system operating condition.
■ Delayed based on departure time
The screens show the energy flow
■ Delayed based on electric rates &
between the engine, electric drive unit
departure time
and high voltage battery. These
components will be highlighted when
Programmable charging
they are active.
The current charge mode status can
also be viewed in a temporary pop-up
Charging
in the Colour-Info-Display by pressing
the release button of the charge port
Charge mode selection
door on the driver's door. The Charge
There are three programmable
Start and Charge Complete time
charge modes.
estimations are also displayed on the
From the charge mode status screen,
screen. These estimations are most
Press
8
until Power Flow ,
press Change Charge Mode.
accurate when the vehicle is plugged
Charging and Energy Info are
in and in moderate temperature
displayed.
conditions.

-------------------------------------------------------------------------------------------------------------------------------------------------------------

76
Instruments and controls
Charge mode status
Immediately:
The vehicle estimates the charging
start time considering the departure
start time based on the utility rate
time programmed for the current day
schedule, utility rate preference and
The vehicle starts charging as soon
of the week. Charging will begin at the
the departure time programmed for
as it is connected to an electrical
start time and will be completed by the
the current day of the week. The
outlet.
departure time only if sufficient time is
vehicle will charge during the least
Charging 3 130.
given after the charge cord is plugged
expensive rate periods to achieve a
in.
full battery charge by the departure
Delayed (Departure Time):
time. Electrical rate information from
Delayed (Rate & Departure Time):
the utility company for the charging
location is required for this mode.

-------------------------------------------------------------------------------------------------------------------------------------------------------------

Instruments and controls
77
Departure time entry
Charge rate selection
From the delayed charge mode
From the delayed rate and departure
status screen, press Edit to change
time charge mode status screen,
the departure time for each day of the
press Edit.
week.
Press one of the following options to
select the Charge Rate Preference:
■ Charge during Peak, Mid-Peak, &
Off-Peak Rates: The vehicle can
charge during any rate period to
Select one of the following options:
satisfy the next planned departure
1. Press on the day to change.
■ Edit Electric Rate Schedule
time. However, it will select when to
2. Press + or − to change the hours
■ Edit Departure Time Schedule
charge to minimise the total cost of
and minutes.
■ Select Charge Rate Preference
the charge.
3. Press Back to store changes and
■ Charge during Mid-Peak & Off-
return to the previous screen.
Charge rate preference selection
Peak Rates: The vehicle will charge
From the Departure Time & Rate
during off-peak and/or mid-peak
Charge level selection
Information screen, press Select
rate periods only and it will select
The Select Charge Level Preference
Charge Rate Preference.
when to charge to minimise the
setting allows the customer to select
total cost of the charge.
their vehicle's charge level so it
matches the capability of their
■ Charge during Off-Peak Rates: The
charging location. Charge level
vehicle will only charge during off-
selection 3 130.
peak rate periods.

-------------------------------------------------------------------------------------------------------------------------------------------------------------

78
Instruments and controls
Electric rate plan selection
Summer/Winter schedule start date
Electric rate schedule editing
Electric rates can vary depending on
entering
From the Enter Summer/Winter Start
time, weekday and season.
From the Select Electric Rate Plan
Dates screen, press Edit Summer
screen, press Summer/Winter
Schedule or Edit Winter Schedule.
Contact the utility company to obtain
Schedule, then press Edit.
the rate schedule for your area. The
From the Select Electric Rate Plan
summer and winter start dates must
screen, press Yearly Schedule and
be established to use a summer /
then press Edit.
winter schedule.
From the Departure Time & Rate
Information screen, press Edit
Electric Rate Schedule.
1. Press Summer Start.
2. Press + or − to set the month and
day for the start of summer.
1. Press Weekday or Weekend.
3. Press Winter Start.
2. Press Edit next to the row to
change.
4. Press + or − to set the month and
day for the start of winter.
◆ Weekdays are Monday to
Two electric rate plans are selectable:
Friday; the same rate schedule
5. Press Edit Summer Schedule or
Summer/Winter Schedule or Yearly
is used.
Edit Winter Schedule to edit the
Schedule. To edit:
daily electric rate schedule.
◆ Weekends are Saturday and
1. Press Summer/Winter Schedule
Sunday; the same rate
or Yearly Schedule.
schedule is used.
2. Press Edit.

-------------------------------------------------------------------------------------------------------------------------------------------------------------

Instruments and controls
79
Both weekday and weekend
1. Press + or − to adjust the time.
charge cycle. Additionally, the next
schedules must be set. The rate
planned departure time can be
2. Press Peak, Mid-Peak or Off-
schedule only applies to a 24 hour
temporarily overridden for one charge
Peak to select the electric rate.
period, starting at 0:00 and ending at
cycle. In addition to the in-vehicle
3. Press Back to store changes.
0:00. Five rate changes for each day
overrides via the Colour-Info-Display,
can be entered; not all of them need
Only the finish time can be edited.
there are also other possibilities to
to be used.
The start time is automatically
temporarily override a delayed
populated in the rate table.
charge mode.
The end times must be follow each
other consecutively. If an end time
Charging 3 130.
Electric rate schedule viewing
does not come after a start time, an
From the Select Electric Rate Plan
To temporarily override a delayed
error message will be displayed.
screen, press either View Summer
charge mode and change it to
Follow the instructions given by the
Schedule, View Winter Schedule or
immediate charge mode from inside
message.
View Yearly Schedule.
the vehicle proceed as follows:
Electric rate finish time editing
1. Press the release button of the
charge port door on the driver
From the respective electric rate
door to view the charge mode
schedule screen, press Edit next to
status pop-up in the Colour-Info-
the row to change.
Display.
Temporary charge mode override
and cancel
Programmed delayed charge modes
can be temporarily overridden to an
immediate charge mode for one

-------------------------------------------------------------------------------------------------------------------------------------------------------------

80
Instruments and controls
2. Press Temporary Override.
To cancel the temporary override and
3. Press Charge Immediately on
change it to immediate, press Cancel
3. Press the + or - button to change
Plug-in to temporarily override an
Temporary Charge Mode.
the next departure time.
immediate charge mode.
To temporarily override the next
4. Press Confirm Departure Time to
The revised charge complete time will
planned departure time from inside
temporarily override the next
be automatically displayed.
the vehicle:
planned departure time.
1. Press the release button of the
The revised charge complete time will
charge port door on the driver
be automatically displayed in the
door to view the charge mode
temporary charge mode screen.
status pop-up in the Colour-Info-
Temporary departure time can only
Display.
be updated for the same day as the
original next planned departure time.
Additionally, the vehicle will not
accept a temporary departure time
that is before the present time on that
day.

-------------------------------------------------------------------------------------------------------------------------------------------------------------

Instruments and controls
81
Charging override / interruption pop-
Programmable charging disabled
up
A pop-up will appear if the following
occurs:
There was an unintended loss of AC
power during the plug-in charge
event. For example, there was a
power outage or the charge cord was
unplugged from the wall.
To cancel the temporary override of
the next planned departure time,
When the programmable charging
press Cancel Temporary Departure
system is disabled, the screen and
Time on the bottom of the touch
the pop-up of the default charge
screen of the temporary charge mode
mode status will display - -:- - instead
screen or pop-up, respectively.
of the charge complete time. The
programmable charging system will
be disabled if the charge complete
time cannot be confidently estimated.

-------------------------------------------------------------------------------------------------------------------------------------------------------------

82
Instruments and controls
If the programmable charging system
There are maximum limits to some of
Vehicle personalisation 3 84.
is constantly disabled, seek the
the values displayed. These values
assistance of a workshop.
are replaced with dashes, if the value
Energy efficiency
limits have been reached. To reset
Energy information
these values, the high voltage battery
To view the Energy Usage, Energy
will need to be fully recharged. The
Efficiency and Efficiency Tips, press
circle graph also represents the
8
on the instrument panel and then
percentage of distance travelled
press Energy Info.
using electric mode versus extended
range mode. The lifetime fuel
Energy Usage
economy is a total over the life of the
vehicle. It can only be reset by a
workshop.
This screen is accessed by pressing
Energy Efficiency on the Energy Info
screen. This screen displays the
energy efficiency over the drive cycle
based on driving style and climate
settings. Driving in a more efficient
manner will result in a higher
percentage displayed for driving
This screen displays information for
style. Minimising the use of the
the total of all the drive cycles since
climate control system will result in a
the last time the high voltage battery
Energy usage information will also
higher percentage displayed for
was fully charged. This includes
appear automatically on power off
climate setting.
distance travelled in electric mode,
when the retained power off is active.
distance travelled in extended range
This automatic pop-up can be
mode, total distance travelled, electric
disabled in the vehicle
energy used from the battery, total
personalisation.
fuel used and average fuel economy.

-------------------------------------------------------------------------------------------------------------------------------------------------------------

Instruments and controls
83
Efficiency Tips
■ Cruise control
Vehicle messages
■ Object detection systems
Messages displayed in the Driver
■ Front camera
Information Centre (DIC) indicate the
■ Lighting, bulb replacement
status of the vehicle or some action
■ Wiper/washer system
that may be needed to correct a
condition. Multiple messages may be
■ Doors, windows
displayed one after the other.
■ Radio remote control
Messages that do not require
■ Airbag systems
immediate action can be
■ Engine and electric drive unit
This screen is accessed by pressing
acknowledged and cleared by
Efficiency Tips from the Energy Info
pressing the SELECT knob. The
■ Tyres
screen. This screen provides a guide
messages requiring immediate action
■ Battery and charging
on how to improve energy usage to
cannot be cleared until that action is
■ Vehicle operation modes
increase fuel economy and range.
performed. All messages should be
taken seriously.
■ Speed limit
Follow the instructions given in the
messages.
The system displays messages
regarding the following topics:
■ Fluid levels
■ Starting
■ Maintenance
■ Anti-theft alarm system
■ Brakes
■ Ride control systems

-------------------------------------------------------------------------------------------------------------------------------------------------------------

84
Instruments and controls
■ CONFIG: Press to scroll through
Turning a function on or off
Vehicle personalisation
the available menus across the top
1. Turn the TUNE/MENU knob to
of the touch screen display.
highlight the function.
Vehicle Personalisation can be
accessed by using either the
■ TUNE/MENU:
2. Press the TUNE/MENU knob to
Infotainment controls or the touch
◆ Press to enter, select or activate
turn the function on or off. A
screen in the Colour-Info-Display.
a highlighted menu option.
checkmark next to the function
See the separate Infotainment
indicates that the function is on.
◆ Turn to highlight a menu option.
system manual for more information.
◆ Press to turn a system setting on
Using the touch screen
Using the Infotainment controls
or off.
Use the touch screen icons and
Use the TUNE/MENU knob, the
9BACK:
menus on the Colour-Info-Display to
CONFIG and the 9BACK buttons on
select personalisation features.
◆ Press to exit a menu.
the instrument panel to select
{ = Touch to scroll up.
◆ Press to return to a previous
personalisation features.
screen.
} = Touch to scroll down.
Submenus
Back: Touch Back in the upper right
An arrow on the right-hand edge of
corner of the display to return to the
the menu indicates that it has a
previous menu.
submenu with other options.
Submenus
Selecting a menu option
An arrow on the right-hand edge of
1. Turn the TUNE/MENU knob to
the menu indicates that it has a
highlight the function.
submenu with other options.
2. Press the TUNE/MENU knob to
select the highlighted option. A
checkmark next to the option
indicates the selected option.

-------------------------------------------------------------------------------------------------------------------------------------------------------------

Instruments and controls
85
Selecting a menu option
The vehicle menu features may
Low: Reduced speed.
Touch any of the available menu
include:
Auto heated seats
options on the touch screen to select
■ Climate and air quality
the option. A checkmark next to the
When enabled, the auto heated seat
■ Comfort & Convenience
option indicates the selected option.
button on the touch screen will be
■ Languages
highlighted. This feature will
Turning a function on or off
automatically activate the heated
■ Exterior ambient lighting
Touch the screen where the available
seats function at the level required by
■ Power door locks
function is listed to turn it on or off. A
the interior temperature. Auto heated
checkmark next to the function
■ Remote Lock / Unlock / Start
seats can be turned off by using the
indicates that the function is on.
■ Restore factory settings
heated seat buttons on the instrument
panel.
Entering the personalisation
Climate and air quality
Auto demist
menu
Select the Climate and air quality
If it is on and high humidity is
Press vehicle menu on the touch
menu to display:
detected, the climate control system
screen.
■ Auto fan speed
will adjust the outside air intake, air
■ Auto heated seats
conditioning or heat to decrease
fogging. The fan speed may increase.
■ Auto demist
If high humidity is no longer detected,
■ Engine Assisted Heating
the system will return to previous
operation.
Auto fan speed
Auto fan speed sets the automatic fan
speed to maintain the desired interior
temperature. Choose a blower
setting:
High: Increased speed.
Medium: Moderate speed.

-------------------------------------------------------------------------------------------------------------------------------------------------------------

86
Instruments and controls
Engine Assisted Heating
Button Chime
Exterior ambient lighting
Select one of the following:
This setting allows a tone to be heard
Select the lighting menu and the
when a selection is made using the
following options will be displayed:
■ At Cold Outside Temperatures:
Infotainment system.
allows starting of the engine at
■ Duration upon exit of vehicle
+2°C or below
Energy Summary Exit Pop-up
■ Exterior lighting by unlocking
■ At Very Cold Outside
This setting allows the Energy
Temperatures: allows starting of
Duration upon exit of vehicle
Summary Exit Pop-up to be turned on
the engine at -10°C or below
or off.
This setting allows the selection of
how long the exterior low beam stays
Comfort & Convenience
Personalization by driver
on when leaving the vehicle and it is
Select the Comfort & Convenience
This setting allows the radio to store
dark outside.
menu and the following options will be
favourites selected by driver.
The available options are:
displayed:
■ Off
Charging Cord Theft Alert
■ Chime volume
This setting allows the Charging Cord
■ 30 seconds
■ Button Chime
Theft Alert to be turned on or off.
■ 1 minute
■ Energy Summary Exit Pop-up
■ 2 minutes
Charging Power Loss Alert
■ Personalization by driver
This setting allows the Charging
■ Charging Cord Theft Alert
Exterior lighting by unlocking
Power Loss Alert to be turned on or
This setting allows the vehicle locator
■ Charging Power Loss Alert
off.
lights to be turned on or off. When on,
Chime volume
the low beam, sidelights, tail lights,
Languages
number plate lights and reversing
This setting allows the selection of the
lights will illuminate if ( is pressed on
chime volume level to be either set to
desired language.
the radio remote control.
normal or to high.

-------------------------------------------------------------------------------------------------------------------------------------------------------------

Instruments and controls
87
Power door locks
Remote locking, unlocking,
If Driver door is selected, only the
Select Power door locks and the
starting
driver's door will be unlocked on the
following options will be displayed:
first press of (. All doors will be
Select Remote Lock / Unlock / Start
unlocked on the second press of
■ Auto door unlock
and the following options will be
( within 5 seconds of the previous
displayed:
■ Auto door lock
press.
■ Exterior lighting by unlocking
■ Prevent doorlock while door open
■ Door Unlock
Passive door unlock
Auto door unlock
This setting allows the selection of
■ Passive door unlock
This setting allows selection of which
which doors are unlocked by pressing
■ Passive door lock
doors will automatically unlock if the
the button on the outside door handle.
shift lever is set to P.
■ Remote left in vehicle reminder
The available options are:
■ All doors
Exterior lighting by unlocking
■ All doors
When on, the exterior lights will flash
■ Driver door
■ Driver door
when unlocking the vehicle with the
radio remote control.
Passive door lock
■ Off
This setting allows passive locking to
Door Unlock
be turned on or off and selecting what
Auto door lock
This setting allows the selection of
type of feedback is given.
This setting allows selection if doors
which doors will unlock when
will automatically lock when the shift
The available options are:
pressing ( on the radio remote
lever is set to D.
■ Off
control.
■ On
Prevent doorlock while door open
The available options are:
When on, this setting will keep the
■ ON with Active Chirp
■ All doors
driver's door from locking until the
■ Driver door
door is closed. If this feature is turned
on, the Delayed door lock menu will
If All doors is selected, all doors will
not be available.
be unlocked.

-------------------------------------------------------------------------------------------------------------------------------------------------------------

88
Instruments and controls
Remote left in vehicle reminder
When on, the horn will chirp rapidly
three times when a radio remote
control is left in the vehicle.
Restore factory settings
This setting returns he vehicle
personalisation settings to factory
settings.


Content      ..     3      4      5      6     ..