Vauxhall Vectra (2007 year). Manual - part 5


  Index      Vauxhall     Vauxhall Vectra (2007 year) - manual in english


Search            copyright infringement  


Content      ..     3      4      5      6     ..


Vauxhall Vectra (2007 year). Manual - part 5


66

Seats, interior

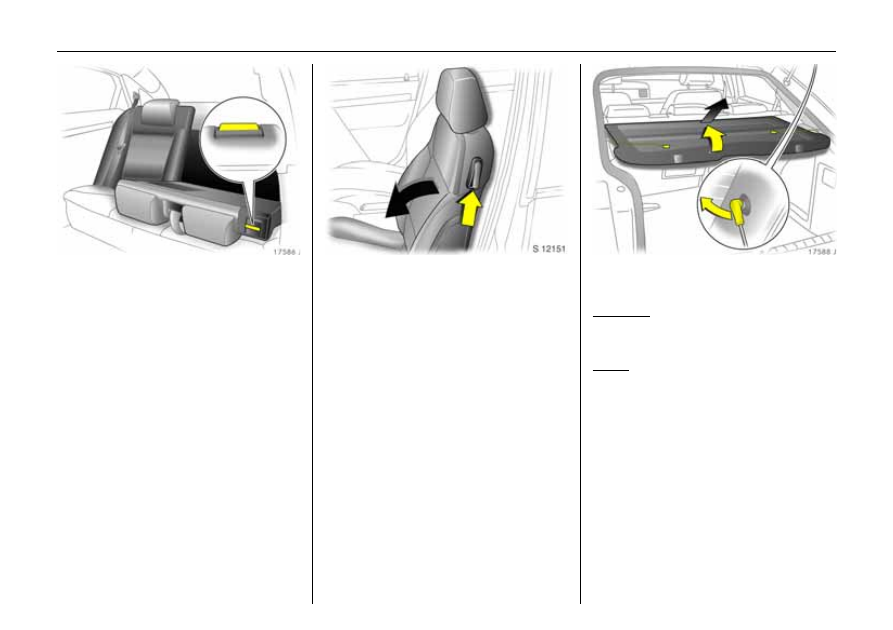
Restoring ba ckrest to an up right position 

Audibly engage the rear seat ba ckrests. 
There is  a locking indicator on the release 

lev er.  If the rear seat ba ckrests  ha ve b een 
correctly locked  the red indicator on the 

release levers must not be  visib le. 

Fold ing down the front passenger’s 

seat 3 
Push head  restra int on front passenger’s 

seat down as far as it will g o. 
Slide front passenger’s seat backw ards. 
Fold front passenger’s seat  forwards by 
ra ising release  lever. 
To  restore, raise  the release lever, restore 
the front seat back rest to an upright 

position and audibly engage. 
Notes on loading 

See pag e 71. 

Luggage com partment cover 

3


5-door Ha tch
Removing

Detach retaining stra ps  from  tailgate. 
Pull cover  from  the side  guides. 
Fitting
Eng age cover in side guides and fold  down. 

Attach reta ining straps to tailgate. 

-------------------------------------------------------------------------------------------------------------------------------------------------------------

67

Seats, interior

Estate

To close
Pull lug gage compartment cover toward s 

rea r  of  vehicle using handle  and hook  into 
side retainers. 
Do not place any heavy  or  sharp-edged  
objects on the  cover. 
To open
Remove luggag e compartment c ov er from  

side b ra ckets. It  rolls up automatically. 

Removing

Open luggage compartment  cover. 
Raise the  release lever on the right of the 

lugg age compartment c ov er. Remove 
cover from the brackets  by lifting first on 

the right, then on the left. 
Fitting

Fit the lug gage compartment cover in the 
bracket  on  the left-hand side, fold up the 

relea se lever on the right-ha nd  side, fit the 
lugg age compartment cover in the bracket 

on the right-hand  side, engage  and press 
the release lever  closed. 

Safety net 

3

, Estate 

The safety net can be fitted  behind the rear 
seats or, with the rear seat ba ckrests fold ed 

down, behind the front seats. 
Passengers must not be carried  b ehind the 

safety net.
Fitting  behind the rear seats

Remove the luggage  com partment cover - 
see left c olumn. 
Fit the ca ssette with rolled safety net into 
the  side brack ets and enga ge b y twisting . 

-------------------------------------------------------------------------------------------------------------------------------------------------------------

68

Seats, interior

Extend the net from the cassette. The roof 

frame houses two  installation  op enings. Fit 
the net rod in the installation  op ening on 

one side and  then the other and engage by 
pushing forwards. 
Fit  the luggage compa rtm ent cover. 

Removing 

Remove the lug gage compartment cover. 
Detach the  safety net  rod  from  the 

brackets in the  roof frame. 
Slide  both  latches inwards; push the 

cassette with rolled  net back wards in  the 
bracket, twist and rem ov e upw ards. 
Fitting behind front seats 
Fold b oth rear seat b ackrests. Place  the 

rolled net  on the floor  behind the front 
seats  in such a wa y that the c og  rail in the 

slit on the  net is to the rear. 

Pull ea ch  side hook from the  cassette and 

attach it to  an  eye 3  in the vehicle floor. 
Extend  the net from the cassette.  The roof 

frame houses tw o insta lla tion openings. Fit 
the  net rod in the  installation  opening on 

one sid e and then the other and engag e by 
pushing forwards. 
Removing 
Detach the safety net rod from the 

brack ets in the roof frame. 
Undo the side hooks from the eyes 3 in the 

vehicle floor. 

-------------------------------------------------------------------------------------------------------------------------------------------------------------

69

Seats, interior

Lashing eyes 

In the luggage compartment, secure items 
being transported against slipping b y 

attaching lashing  straps 3  or a  luggage 
net 3. 

Reversible carpet 

3


Fold ing  floor covering with two different 
surfaces. When transporting objec ts in the 

luggage compartment, fold reversible 
carpet with appropriate surface on top. 

FlexOrganizer 

3


Flexible  system for dividing the luggage 
compartment  or  securing load s in an 

Estate. 
The components are housed  in  a stow age 

compartment at the rear in the load floor - 
see p age  96. 
The system c onsists of: 
z Variable partition net, 

z Variable partition wa ll, 
z Partition rod, 

z Mesh pock ets for  the side  walls, 
z Hooks. 
The components can be mounted  in  the 
two guide ra ils in the  side walls of the 

lugg age compartment. 

The  illustrations show  some possible uses. 
Varia ble partition wa ll 
See Fig. 17596 J. Press the rods of the 

partition w all together slightly and engage 
in the  desired  guid e rail opening s in the 

side  walls. The rods can be eng aged  in 
va rious positions. 
Varia ble partition net 
See Fig.  17597 J.  Push rods of partition net 

together a little  and insert into  relev ant 
openings in side  wall guide  rails.  The rods 

can b e engaged  in various  positions.  The 
partition net ca n be installed horizontally 

or vertically at  different heights. 

-------------------------------------------------------------------------------------------------------------------------------------------------------------

70

Seats, interior

Hooks and m esh pockets for  the side walls 

See  Fig.  17598 J. Enga ge the hook s in the 
openings of the guide rails in the sid e walls 

as indicated in the illustration and turn 90° . 
The m esh pockets ca n  be  hung from the 

hooks. 

Rem oving 

Press together the rods of the  partition 
wall/net or the telescopic rods and rem ov e 

from  the guide rails. Turn the hook s 90° 
and rem ov e. 
FlexOrga nizer stowa ge 
The FlexOrganizer  components are housed 

in  a stowa ge c om partment a t  the rear in 
the load floor. To open, raise the  ha nd le 

and open the flap –  see p age  96, 
Fig. 17611 J. 

To stow a way, pull partition rods, pa rtition 

net rods a nd sepa ra te telescopic rod apart 
in the middle and fold the tw o ha lv es 

together - see Fig. 17599 J. Roll up partition 
and p artition net  and place in 

compa rtm ent with other com ponents. 
Close lid. 

-------------------------------------------------------------------------------------------------------------------------------------------------------------

71

Seats, interior

Notes on loading the vehicle 

z Heav y objec ts in the lug gage 

com partment should  be  placed  against 
the engaged  rea r seat backrests or, if the 

rear seat  backrests are  folded down, 
against the front sea t  backrests. If 

ob jects are to be stacked, the heav ier 
ob jects should be placed  at the bottom. 

Unsec ured objec ts in the lug gage 
com partment would be thrown forwards 

with  great force in  the event of heavy 
braking, for example. 

z Secure objects with lashing  straps 3  

atta ched to lashing eyes –  see p age  69. 

If  heavy loads slip  when the  vehicle is 
braked  heavily or driven around a bend, 

the hand ling of the v ehicle ma y change. 

z Saloon  / H atch: loose objects in the 

lugga ge c om partment should  be 
secured ag ainst slipping using a  

lugga ge net 3 –  see page 69. 

z Estate:  mount the sa fety net 3 when 

transporting  objects in the luggag e 
com partment - see page 67. 

z Estate:  Close luggage compartm ent 

cov er -  see p age  67. 

z When  transporting  objects in the 

lugga ge c om partment the rear  seats 

must be eng aged  - see page 65. 

z Do not a llow the load  to protrude ab ov e 

the upp er edge of the rear seat 
back rests,  or  above the upper ed ge of 

the  front seat b ackrests if the rear seat 
back rests a re folded  down. 

z The warning triangle 3 and first-aid kit 3  

must always b e freely a ccessib le.

z Do not place any objects  in  front of the 

rea r window or on the instrument pa nel. 

They are reflected in the glass, obstruct 
the driver’s view and will be thrown 

through the vehicle, for insta nce in the 
event of heavy b ra king. 

z Objects m ust not be stored in the a irb ag 

inflation area, because they could cause 

injury if the airbag inflates. 

z The load must not obstruct the operation 

of  the pedals, the handbrak e or the 
gears or restrict the driver’s freedom of 

movement. Do not place loose objects in 
the interior. 

z Do not drive with lugga ge compa rtm ent 

open when  tra nsporting  bulky objects, 

for exam ple, since toxic exhaust fumes 
could  penetra te the  interior. 

z Weights, payload and roof loa d - 

see page 293. 

z Driv ing  with a roof load - 

see pages 184, 187, 218. A roof load 

increases the sensitivity of the  vehicle 
to crosswinds and has a detrim ental 

effect on v ehicle ha nd ling ow ing to the 
vehicle’s  hig her centre of gravity. 

9

 Warning

Failure to observe these descrip tions can 
lead  to  injuries which ma y be fatal. 

Vehic le pa ssengers m ust be inform ed 
accordingly. 

-------------------------------------------------------------------------------------------------------------------------------------------------------------

72

Seats, interior

Three-stage safety  system 

Com prising: 
z Three-point seat belts. 
z Belt tensioners at the  front seats. 
z Airbag  systems for driver, front 

passenger and outboard rear seat 

occ upa nts 3 . 

The three stages are activated in sequence 

depending on the sev erity of the  accident: 
z The automatic seat  belt locking d evices 

prevent  the belt  strap from b eing pulled 
out and  thus ensure that the  vehicle 

occ upa nts are retained in their seats. 

z The front seat belts are pulled  down at 

the belt  buckles. This  mea ns the b elts fit 
snugly, the occupants are d ecelerated  

early with the vehic le and the body 
load ing is reduced . 

z The airbag systems are also triggered in 

the event of serious a ccidents and form a 

safety cushion for the occupa nts. 
Depend ing  on  the severity of the 

accident, the front airbags inflate in two 
stages. 

Please read the  instructions provided with 
the child restraint system. 

Three-point seat  belts 

The  vehicle is  equipped with three-point 
seat  belts with automatic retrac tors and 

locking d evices, allowing full  freedom  of 
body movement a lthough the spring 

tensioned seat belts always  ensure a snug  
fit. 
For information on correct  seating  
position –  see pages  52, 77, 82. 
The seat belts lock during heavy 
acc eleration or deceleration. 

9

 Warning

The  airb ag systems serve to supplement 
the  three-point seat b elts  and belt 

tensioners. The seat b elts must therefore 
always be w orn. Disreg ard of these 

instructions m ay lead to injuries or 
end ang er life. Vehicle p assengers must 

be inform ed a ccord ingly. 

-------------------------------------------------------------------------------------------------------------------------------------------------------------

73

Seats, interior

In the  event of an accident, persons  not 

wearing  seat belts endanger  their fellow 
occupants and themselv es. 
Control indicator X for the seat  belt –  
see page 101. 
Seat b elts  are  only intended for  one person. 
They are  not suitable  for anyone under 

12 yea rs of age or under  150  cm tall. 
For children up to 12 yea rs of ag e, w e 

recom mend  the Vauxhall child restraint 
system –  see page 77. 

Belt force limiter s 
on the front seat belts reduce stresses on 

the body by releasing the  seat belt  gently 
during  an  impact.  This allows the body to 

move slightly in a nticipation of the impact. 
Testing  the seat b elts 

Check  all  parts of  the b elt  system from  time 
to time for damage a nd to ensure function. 

Replace dam aged  parts. Following an 
accident, have the seat belts and actuated 

belt tensioners repla ced  by a  work shop. 
Do  not m ake alterations  to  the seat b elts, 

their anchora ges, their  automa tic 
retractors  and  the belt buckles. 
Do  not d amage the seat belt  with  sharp 
ob jects, and d o  not g et it trapp ed. 

Belt tensioners 

The  front seat  belt systems are fitted  with 
belt tensioners. The seat  belts are  pulled 

down and  tensioned at the  belt b uck les in 
the  event of frontal and  rear collisions, 

depending on the  severity  of the accident. 
This  tensions the sea t  belts. 

9

 Warning

Alwa ys wea r  your  seat belt, and that 
means a lso  in  urban traffic a nd  when  you 

are a  rear sea t  passeng er. It  can save 
your life. 
Also, pregnant women must alwa ys wear 
a seat belt –  see pa ge 76. 

-------------------------------------------------------------------------------------------------------------------------------------------------------------

74

Seats, interior

Actua tion of belt tensioners 
Actuation of belt tensioners is indicated by 

continuous  illumination of control 
indicator v - see next colum n. 
If the  belt tensioners are triggered, they 
must be  replaced by a workshop. 
Imp ortant information  - see  page 73. 

Control ind icator  v for  belt tensioners 

The opera tion of the  belt tensioners is 
electronically monitored together with 

the airbag systems and indicated  on 
the instrument cluster by the control 

indica tor v. When the ignition is  switched 
on, the control ind icator illuminates for 

approx. 4 seconds. If it does not illuminate, 
does not go off after 4 seconds or 

illuminates whilst driving, there is a  fa ult in 
the belt tensioner system or the  airbag 

systems - see page 86. The belt tensioner 
or the airbag systems may not a ctiv ate if 

an accident  oc curs. 
Deploym ent of the belt tensioners  is 

indica ted b y continuous illum ination of v. 

The  system’s integrated self-diagnostics 

allows faults to b e q uick ly rem edied. 
If c ontrol indicator v in the instrument 

cluster fails, for reasons of safety, the  text 
AIrbAG app ears on the odometer display. 

Pressing the reset button will cause the text 
to disappear. It  then reapp ears on the 

odometer display 10 sec onds later. 

9

 Warning

Have the c ause of  the fault elim inated 
immediately  by a  workshop. 

-------------------------------------------------------------------------------------------------------------------------------------------------------------

75

Seats, interior

Im portant 
z Do  not fit ac cessories not spec ifically 

released for your vehicle type or store 
ob jects in  the belt tensioner operating 

area (in the area of the belt b uc kles) d ue 
to  the risk  of injury  in  the event the  belt 

tensioners are triggered. 

z Do not m ake any modifications to the 

com ponents  of the belt  tensioners, a s 
this will render the vehicle unroadworthy. 

z The  belt tensioner and  airbag system 

control  electronics can be found  in the 

centre console area . In order to avoid 
malfunctions, d o not store magnetic 

objec ts in this area. 

z When using  the rea r  seats, mak e sure 

that the  components  of the front seat 
belts are not damaged by shoes or other 

objec ts. Do not a llow dirt to enter the 
automatic sea t  belt retractor. 

z We recom mend that you have the front 

seats removed by a w orkshop in the 

event of  actuation of the  belt tensioners.

z The belt tensioners trigger once  only, 

ind ic ated b y the  lighting of the control 
ind ic ator v. Have a  work shop replace 

trig gered belt  tensioners. 

z When disposing of the vehicle, the sa fety 

instructions given for  this must be 
observed . Ta ke the vehicle to a  recycling 

company for disposal. 

9

 Warning

Inc orrect handling  (e.g. removal  or fitting 
of seat belts or belt buckles) can  trigg er 

the belt  tensioners with risk of injury. 

-------------------------------------------------------------------------------------------------------------------------------------------------------------

76

Seats, interior

Using the seat belts 

Fitting seat belts 
Pull  the seat  belt out of the  retractor and 

place it across  the body, mak ing  sure  it  is 
not twisted. 
Insert the la tch plate into the buckle. The 
front sea t b ackrest must not be tilted back  

too far or the seat belt will not op erate 
properly. The recommended angle of 

inclina tion is 25° . Mak e sure that the lap 
belt is  not twisted  and that it fits  snugly 

across the body. Tension the belt 
frequently whilst d riv ing  by tugging the 

diagonal pa rt of the belt. 

Bulk y clothing  will impede  the snug  fit  of 
the seat b elt. The seat belt must  not  be 

placed  over hard or break able ob jects in 
the pockets of your clothing (e.g. p ens, 

keys, spectacles) as this may cause injury. 
Do  not p lace  any objects, such as 

ha ndb ags or mobile telephones, between 
the seat b elt and your  body. 

Height adjustm ent 

Height adjustm ent of upper  anc horage 
point for front seat belts: 
1. Pull out the  seat belt slightly. 
2. Front seat  belts:  Push the button  down or 

push the  belt g uide up. 
Rear sea t  belts: Press the belt guide and 

push up or d ow n. 

3. Set desired height. 
4. Allow  belt g uide to audibly engage. 
Do not adjust height whilst  driving. 

9

 Warning

On pregna nt women in particular, the lap  

belt must  be  positioned a s low  as 
possible across the pelvis so as not to put 

too much pressure on the  abdomen.

-------------------------------------------------------------------------------------------------------------------------------------------------------------

77

Seats, interior

Adjust height such that the seat belt passes 

over the wearer’s shoulder and rests 
against the shoulder. It must not pass over 

the neck or upper arm. 

Rem oving the b elt 

To remove the seat belt , press the red 
button on the  catch; the  seat belt  retracts 

by itself. 

Child restraint  systems 

3


When using a child restraint system, follow 

the  instructions for installation and use. 
The country in w hich you are trav elling 

ma y not perm it the use of child restraint 
systems on certain  seats. Always comply 

with the  loc al or national  regulations. 
Selecting  the right system  

Your child  should  travel  facing  backw ards 
in the vehicle  for  as  long as p ossible.  A child 

has a very weak  cervical spinal colum n and 
in the  event of  an accident  is  less likely to 

suffer injury  in  a rea r-facing, semi-lying 
position than if sea ted upright. 

9

 Warning

Never ca rry child restraint systems on 
your lap, risk of fatal injury. 

-------------------------------------------------------------------------------------------------------------------------------------------------------------

78

Seats, interior

Permissible options for fitting a  child restraint

1)

1)

For reas ons o f safety, w e recom mend that the child restraint be installed o n

one of th e o utboard rear seats. 

Weight and 

age class

2)

2)

We reco mmen d the use of each system u ntil the child reaches the upper weight lim it.

On front p assenger’s 

seat 

On outboard  rear 

seats 

On centre rea r sea t 

Group 0: 

up to  10 kg  
or approx. 

10 months 
Group 0+: 

up to  13 kg  
or approx. 

2 years 

B

1

, +

U, + 

Group I: 

9 to 18 kg 
or approx. 

8 months to 
4 years 

B

2

, + 

U, + 

Group II: 
15 to 25 kg 
 

or approx. 
3 to 7 years 
Group III: 
22 to 36 kg 
 

or approx. 
6 to 12  years 

X U U 

B

1

= Limited,  only with seat occupancy 

recognition and Vauxhall child 

restraint system with transponders. 
If the  child  restraint  system is being 

secured using a three-point seat 
belt, m ove seat height adjustment 3  

to upperm ost position. Move front 
passenger’s sea t as far back as 

possible and move front passenger’s 
seat b elt anchorage point to lowest 

position. 

B

2

= Limited,  only with seat occupancy 

recognition and Vauxhall child 

restraint system with transponders. 
If the  child  restraint  system is being 

secured using a three-point seat 
belt, m ove seat height adjustment 3  

to upperm ost position. Move front 
passenger’s sea t as far back as 

possible so  that  vehicle sa fety b elt 
runs from anchorage point towards 

the front. 

-------------------------------------------------------------------------------------------------------------------------------------------------------------

79

Seats, interior

Note 
z Children under 12 years or under 150 cm 

tall should only travel in an appropriate 
child restraint. 

z When transporting children, use the child 

restraint systems suitable for the child’s 

weight. 

z Ensure tha t the child restraint system  has 

been correctly fitted -  see  instruc tions 
provided with child restraint system. 

z The covers of the Vauxhall child restraint 

system can be wiped clean. 

z Do not stic k anything on the child 

restraint systems a nd  do not cover them 

with any  other materia ls. 

z Only allow the c hild  to enter and exit on 

the side of the vehicle facing aw ay from 
the road . 

z A child restraint system  whic h  has been 

sub jected to stress in an a ccident must 

be  rep la ced. 

z Secure or remove  child  restra int systems 

carried in the v ehicle  when not in use. 

Mounting  brackets 3 for IS OFIX child  
restraint systems 

The brackets located between the backrest 
and seat cushion are  used for mounting 

ISOFIX child restraint systems.
Plea se follow  the instructions 

acc om panying the ISOFIX child restraint 
system. 
Only ISOFIX child  restraint systems 
app rov ed for the  vehicle may be used. 

U = Can b e used  universally in 

combination with a three-point 

seat belt.

+ = Vehicle sea t available with ISOFIX 

fixings. When using ISOFIX, only 

ISOFIX child restra int system s 
approved for the v ehicle  may b e 

used. 

X = No child restraint system permitted 

in this weight class. 

-------------------------------------------------------------------------------------------------------------------------------------------------------------

80

Seats, interior

Airbag system 

The a irb ag system c onsists of several 
separate systems. 
Front airb ag system 
The front airbag system will be triggered in 

the event  of  a serious ac cident involving a 
frontal  impact and  forms safety cushions 

for the driver and front passenger.  The 
forward movement  of  the driver and front 

passenger  is checked  and the  risk  of 
injuries to the upper body a nd head are 

thereby substantially  reduced. 

Side airb ag system  3 

The sid e airbag  is triggered in the event of 
a side-on c ollision to form a safety cushion 

for the driver or front passenger in the 
respective door area. This  substantially 

reduces the risk of injury to the upp er body 
and pelv is. 

Cur tain airbag system  3 

The  curtain a irba g system triggers  in  the 
event of a  side-on  collision  and provides a  

safety barrier in the head area on the 
respective side of the v ehicle. This red uces 

the risk  of injury to the head considera bly in 
the  event of a side-on collision. 

-------------------------------------------------------------------------------------------------------------------------------------------------------------

81

Seats, interior

Airbag system 

Front airb ag 
The front airbag  system  is identified by the 

word AIRBAG on the steering wheel and 
above the  glov e c om partment. 
The front airbag  system  comprises:
z an  airbag with inflator in the steering 

wheel a nd  a second one behind the trim  
panel ab ov e the glove  compartment, 

z control electronics w ith im pact sensors, 
z control indicator for airbag systems v in 

instrum ent cluster,

z seat occ upa ncy rec og nition 3,
z the  control indicator for Va uxha ll  child  

restraint systems 

y

 with  tra nsponders  3  

in the od om eter displa y.

The front airb ag system will be trigg ered : 

z depending on the  severity of the 

accident, 

z depending on the  type of impact, 
z within the range shown in the illustration,
z indep endent of side airbag a nd  curta in 

airbag system 3. 

Exception: 
Front p assenger’s seat with seat 

occupancy recognition system  3. The seat 
occupancy recognition system dea ctivates 

the  front and side airbags 3 on the front 
passenger’s  side if the front passenger’s 

seat is unoccupied or a Vauxhall child 
restraint system w ith transponders 3 has 

been fitted  to the front passenger’s seat. 
Seat occupancy recognition - see pag e 87. 

Vauxhall child restraint system with 
transponders 3 - see page 78. 
Examples  of  events triggering the front 
airbag  system: 

z Impact  against a  non-yielding obstacle: 

the front  airbags are  trigg ered  at low 

vehicle speed. 

z Impact  against a  yield ing  obstacle:

(such as another vehicle): the front 
airbags are  only triggered at a  hig her 

vehicle speed. 

-------------------------------------------------------------------------------------------------------------------------------------------------------------


Content      ..     3      4      5      6     ..