Saturn Outlook (2010 year). Manual - part 2
 

  Index      Saturn     Saturn Outlook (2010 year) - manual in english


Search            copyright infringement  


Content      ..      1      2      3      ..


Saturn Outlook (2010 year). Manual - part 2


1-12

In Brief

6

Delays wiping cycle. Turn the

band up for more frequent wipes or
down for less frequent wipes.

1 : Slow wipes.

2 : Fast wipes.

Windshield Washer

J

Press the button at the end of

the turn signal/lane change lever to
spray washer fluid on the
windshield.

See Windshield Wiper/Washer on
page 5‑5
.

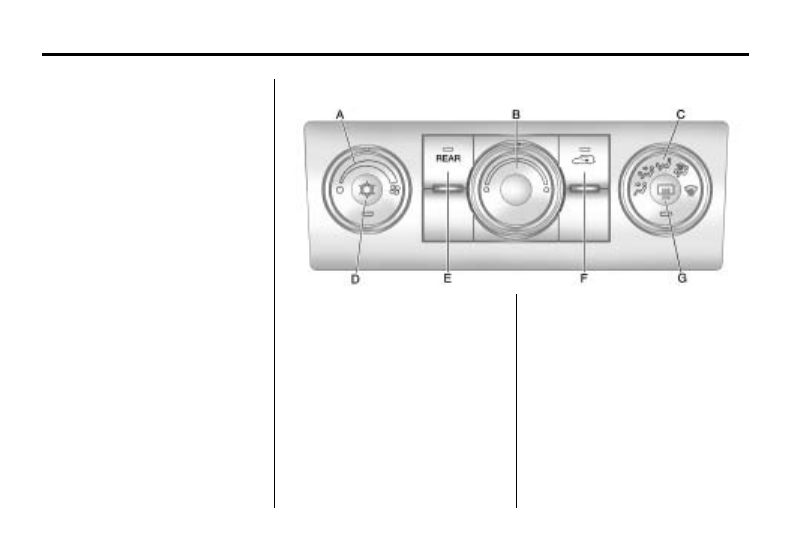
Climate Controls

A. Fan Control

B. Temperature Control

C. Air Delivery Mode Control

D. Air Conditioning

E. REAR (Rear Climate Control)

F. Air Recirculation

G. Rear Window Defogger

-------------------------------------------------------------------------------------------------------------------------------------------------------------

In Brief

1-13

A. Fan Control

B. AUTO

C. Defrost

D. Air Recirculation

E. REAR (Rear Climate Control)

F. Air Delivery Mode Control

G. Driver Side Temperature Control

H. Display

I.

Power (On/Off)

J. Rear Window Defogger

K. Air Conditioning

L. PASS (Passenger)

M. Passenger Side Temperature

Control

See Climate Control Systems on
page 8‑1 
or Dual Automatic
Climate Control System on
page 8‑4 
(If Equipped). For more
information about the rear climate
control, see Rear Climate Control
System (Rear Climate Control Only)
on page 8‑10 
or Rear Climate
Control System (Rear Climate with
Rear Seat Audio) on page 8‑11
.

-------------------------------------------------------------------------------------------------------------------------------------------------------------

1-14

In Brief

Vehicle Features

Radio(s)

Radio with CD, DVD, and USB Port

O

Press to turn the system on

and off. Turn to increase or
decrease the volume.

BAND: Press to choose between
FM, AM, or XM™, if equipped.

f

Select radio stations.

© ¨

Seek or scan stations.

4

Change the display between the

radio station frequency and the
time, if equipped. While the ignition
is off, press

4

to display the time.

For more information about these
and other radio features, see
Operation on page 7‑2.

Storing a Favorite Station

A maximum of 36 stations can be
stored as favorites using the six
softkeys located below the radio
station frequency tabs and by using
the radio FAV button. Press FAV to
go through up to six pages of
favorites, each having six favorite
stations available per page. Each
page of favorites can contain any
combination of AM, FM, or XM
stations.

See AM-FM Radio on page 7‑6.

-------------------------------------------------------------------------------------------------------------------------------------------------------------

In Brief

1-15

Setting the Clock

To set the time and date for the
radio with CD, DVD, and USB Port:

1. Turn the ignition key to ACC/

ACCESSORY or ON/RUN, then
press

O

, to turn the radio on.

2. Press

G

to display HR, MIN,

MM, DD, YYYY (hour, minute,
month, day, and year).

3. Press the pushbutton located

under any one of the labels to be
changed.

4. To increase or decrease the time

or date, turn

f

clockwise or

counter-clockwise.

For detailed instructions on setting
the clock for the vehicles specific
audio system, see Clock on
page 5‑8
.

Satellite Radio

Vehicles with an XM™ Satellite
Radio tuner and a valid XM Satellite
Radio subscription can receive XM
programming.

XM Satellite Radio Service

XM is a satellite radio service that is
based in the 48 contiguous United
States and 10 Canadian provinces.
XM Satellite Radio has a wide
variety of programming and
commercial-free music,
coast-to-coast, and in digital-quality
sound. A fee is required to receive
the XM service. For more
information, contact XM at in the
U.S. and Canada.

For more information refer to:

.

www.xmradio.com or call
1-800-929-2100 (U.S.).

.

www.xmradio.ca or call
1-877-438-9677 (Canada).

See Satellite Radio on page 7‑7.

Portable Audio Devices

This vehicle may have an auxiliary
input located on the radio faceplate
and a USB port located in the center
console. External devices such as
iPod

®

, laptop computers, MP3

players, CD changers, USB storage
device, etc. can be connected to the
auxiliary port using a 3.5 mm (1/8 in)
input jack or the USB port
depending on the audio system.

See Auxiliary Devices on
page 7‑33
.

Bluetooth

®

The in-vehicle Bluetooth system
allows users with a
Bluetooth-enabled cell phone to
make and receive hands-free calls
using the vehicle’s audio system,
microphone and controls.

-------------------------------------------------------------------------------------------------------------------------------------------------------------

1-16

In Brief

The Bluetooth-enabled cell phone
must be paired with the in-vehicle
Bluetooth system before it can be
used in the vehicle. Not all phones
will support all functions.

See Bluetooth on page 7‑45.

Steering Wheel Controls

w

/

x

Press to change favorite

radio stations, select tracks on a
CD/DVD, or to navigate tracks or
folders on an iPod

®

or USB device.

b g

Press to silence the vehicle

speakers only. Press again to turn
the sound on. Press and hold longer
than two seconds to interact with
OnStar

®

or Bluetooth systems.

+

e

e

Increases or decreases

volume.

c

Press to reject an incoming

call, or to end a call.

SRCE : Press to switch between
the radio, CD, and for vehicles with,
DVD, front auxiliary, and rear
auxiliary.

¨

Press to seek the next radio

station, the next track or chapter
while sourced to the CD or DVD
slot, or to select tracks and folders
on an iPod

®

or USB device.

For more information, see Steering
Wheel Controls on page 5‑3
.

Navigation System

The vehicle's navigation system
provides detailed maps of most
major freeways and roads

throughout the United States and
Canada. After a destination has
been set, the system provides
turn-by-turn instructions for reaching
the destination. In addition, the
system can help locate a variety of
points of interest (POI), such as
banks, airports, restaurants,
and more.

See the vehicle's Navigation System
manual for more information.

Driver Information
Center (DIC)

V

Press to set or reset certain

functions and to turn off or
acknowledge messages on the DIC.

-------------------------------------------------------------------------------------------------------------------------------------------------------------

In Brief

1-17

U

Press to customize the feature

settings on your vehicle. See
Vehicle Personalization (With DIC
Buttons) on page 5‑42 
for more
information.

T

Press to display the oil life,

park assist on vehicles with this
feature, units, tire pressure readings
on vehicles with this feature, RKE
transmitter programming, and
compass calibration and zone
setting on vehicles with this feature.

3

Press this button to display

the odometer, trip odometers, fuel
range, average economy, timer, fuel
used, and average speed.

Some vehicles do not have the
buttons shown, however some of
the menus can be viewed by using
the trip odometer reset stem.

See Driver Information Center (DIC)
(With DIC Buttons) on page 5‑24 
or
Driver Information Center (DIC)
(Without DIC Buttons) on
page 5‑30
.

Cruise Control

T

On/Off.

+ RES: Press to accelerate or
resume speed.

SET– : Press to set speed or
decrease speed.

[

Press to cancel cruise control.

See Cruise Control on page 9‑30.

Storage Compartments

For vehicles with a second row
center console, open each area to
access the storage compartment
inside.

-------------------------------------------------------------------------------------------------------------------------------------------------------------

1-18

In Brief

Press the buttons (B, C) on the front
of the consoles to access the upper
and lower storage areas.

Increase the storage area by folding
the top of the console forward. Lift
up on rear console handle (A) and
pull forward.

See Floor Console Storage on
page 4‑2
.

Power Outlets

The vehicle has three 12-volt
accessory power outlets which can
be used to plug in electrical
equipment, such as a cellular
telephone.

The power outlets are located:

.

On the instrument panel below
the climate controls.

.

At the rear of the center floor
console.

.

In the rear cargo area.

To use the outlets, remove the
cover.

See Power Outlets on page 5‑9.

Sunroof

The ignition must be in ON/RUN or
ACC/ACCESSORY to operate the
sunroof and power sunshade. See
Retained Accessory Power (RAP)
on page 9‑17

The switch to operate the front
sunroof is on the headliner above
the rearview mirror.

Vent: Press the front or rear of the
switch to vent or close the sunroof.

Express-open/Express-close:
From the closed position, press and
release the rear or front of the
switch to express-open or
express-close the sunroof.

For more information see Sunroof
on page 2‑22
.

-------------------------------------------------------------------------------------------------------------------------------------------------------------

In Brief

1-19

Performance and
Maintenance

StabiliTrak

®

The traction control system limits
wheel spin and the StabiliTrak
system assists with directional
control of the vehicle in difficult
driving conditions. Both systems
turn on automatically every time the
vehicle is started.

.

To turn off the traction control
part of StabiliTrak, press and
release

5

located on the

instrument panel in front of the
shift lever.

L

illuminates and the

appropriate DIC message is
displayed. See Vehicle
Messages on page 5‑33
.

.

The StabiliTrak system
remains on.

For more information, see
StabiliTrak System on page 9‑28

Tire Pressure Monitor

This vehicle may have a Tire
Pressure Monitor System (TPMS).

The Tire Pressure Monitor System
alerts you when a significant
reduction in pressure occurs in one
or more of your vehicle’s tires by
illuminating the low tire pressure
warning light on the instrument
cluster. The warning light will remain
on until the tire pressure is
corrected. The proper tire pressures
for your vehicle are listed on the
Tire and Loading Information label
located on the driver side center
pillar (B pillar). See Vehicle Load
Limits on page 9‑10
.

You may notice during cooler
conditions that the low tire pressure
warning light will appear when the

vehicle is first started and then turn
off as you drive. This may be an
early indicator that your tire
pressures are getting low and the
tires need to be inflated to the
proper pressure.

Note: The Tire Pressure Monitor
System can alert you about low tire
pressure, but it does not replace
normal monthly tire maintenance.
It is the driver’s responsibility to
maintain correct tire pressures.

See Tire Pressure Monitor System
on page 10‑44 
and Tire Pressure
Monitor Operation on page 10‑46
.

Tire Sealant and
Compressor Kit

This vehicle may come with a jack
and spare tire or a tire sealant and
compressor kit. The kit can be used
to seal small punctures in the tread
area of the tire.

See Tire Sealant and Compressor
Kit on page 10‑59 
for complete
operating information.

-------------------------------------------------------------------------------------------------------------------------------------------------------------

1-20

In Brief

Engine Oil Life System

The engine oil life system calculates
engine oil life based on vehicle use
and displays the CHANGE ENGINE
OIL SOON message when it is time
to change the engine oil and filter.
The oil life system should be reset
to 100% only following an oil
change.

Resetting the Oil Life System

1. Turn the ignition to ON/RUN,

with the engine off.

2. If the vehicle has Driver

Information Center (DIC)
buttons: Press the vehicle
information button until OIL LIFE
REMAINING displays.

If the vehicle does not have
Driver Information Center (DIC)
buttons: The vehicle must be in
P (Park) to access this display.
Press the trip odometer reset
stem until OIL LIFE REMAINING
displays.

3. If the vehicle has Driver

Information Center (DIC)
buttons: Press and hold the set/
reset button until 100% is
displayed. Three chimes sound
and the CHANGE ENGINE OIL
SOON message goes off.

If the vehicle does not have
Driver Information Center (DIC)
buttons: Press and hold the trip
odometer reset stem until OIL
LIFE REMAINING shows 100%.
Three chimes sound and the
CHANGE ENGINE OIL SOON
message goes off.

4. Turn the key to LOCK/OFF.

See Engine Oil Life System on
page 10‑10
.

Driving for Better Fuel
Economy

Driving habits can affect fuel
mileage. Here are some driving tips
to get the best fuel economy
possible.

.

Avoid fast starts and accelerate
smoothly.

.

Brake gradually and avoid
abrupt stops.

.

Avoid idling the engine for long
periods of time.

.

When road and weather
conditions are appropriate, use
cruise control, if equipped.

.

Always follow posted speed
limits or drive more slowly when
conditions require.

.

Keep vehicle tires properly
inflated.

.

Combine several trips into a
single trip.

-------------------------------------------------------------------------------------------------------------------------------------------------------------

In Brief

1-21

.

Replace the vehicle's tires with
the same TPC Spec number
molded into the tire's sidewall
near the size.

.

Follow recommended scheduled
maintenance.

Roadside Assistance
Program

U.S.: 1-800-553-6000

TTY Users: 1-888-889-2438

Canada: 1-800-268-6800

As the owner of a new Saturn, you
are automatically enrolled in the
Roadside Assistance program. This
program provides technically trained
advisors who are available 24 hours
a day, 365 days a year, minor repair
information or towing arrangements.

Roadside Assistance and OnStar

If you have a current OnStar
subscription, press the OnStar
button and the current GPS location
will be sent to an OnStar Advisor
who will assess your problem,

contact Roadside Assistance, and
relay exact location to get you the
help you need.

Online Owner Center

The Online Owner Center is a
complimentary service that includes
online service reminders, vehicle
maintenance tips, online owner
manual, special privileges
and more.

Sign up today at:
www.gmownercenter.com/saturn
(U.S.) or www.gm.ca (Canada).

OnStar

®

OnStar

®

uses several innovative

technologies and live advisors to
provide a wide range of safety,
security, navigation, diagnostics,
and calling services.

Automatic Crash Response

In a crash, built in sensors can
automatically alert an OnStar
advisor who is immediately
connected to the vehicle to see if
you need help.

How OnStar Service Works

Q

This blue button connects you

to a specially trained OnStar advisor
to verify your account information
and to answer questions.

]

Push this red emergency

button to get priority help from
specially trained OnStar emergency
advisors.

X

Push this button for hands-free,

voice-activated calling and to give
voice commands for turn-by-turn
navigation.

Crisis Assist, Stolen Vehicle
Assistance, Vehicle Diagnostics,
Remote Door Unlock, Roadside
Assistance, Turn-by-Turn Navigation
and Hands-Free Calling are
available on most vehicles. Not all

-------------------------------------------------------------------------------------------------------------------------------------------------------------

1-22

In Brief

OnStar services are available on all
vehicles. For more information see
the OnStar Owner's Guide or visit
www.onstar.com (U.S.) or
www.onstar.ca (Canada), contact
OnStar at 1-888-4-ONSTAR
(1-888-466-7827) or TTY
1-877-248-2080, or press

Q

to

speak with an OnStar advisor
24 hours a day, 7 days a week.

For a full description of OnStar
services and system limitations, see
the OnStar Owner's Guide in the
glove box.

OnStar service is subject to the
OnStar terms and conditions
included in the OnStar Subscriber
Information.

OnStar service cannot work unless
the vehicle is in a place where
OnStar has an agreement with a
wireless service provider for service
in that area. OnStar service also
cannot work unless the vehicle is in
a place where the wireless service
provider OnStar has hired for that

area has coverage, network
capacity and reception when the
service is needed, and technology
that is compatible with the OnStar
service. Not all services are
available everywhere, particularly in
remote or enclosed areas, or at all
times.

The OnStar system can record and
transmit vehicle information. This
information is automatically sent to
an OnStar call center when

Q

is

pressed,

]

is pressed, or if the

airbags or ACR system deploy. This
information usually includes the
vehicle's GPS location and, in the
event of a crash, additional
information regarding the crash that
the vehicle was involved in (e.g. the
direction from which the vehicle was
hit). When the virtual advisor feature
of OnStar hands-free calling is
used, the vehicle also sends OnStar
the vehicle's GPS location so they
can provide services where it is
located.

Location information about the
vehicle is only available if the GPS
satellite signals are unobstructed
and available.

The vehicle must have a working
electrical system, including
adequate battery power, for the
OnStar equipment to operate. There
are other problems OnStar cannot
control that may prevent OnStar
from providing OnStar service at
any particular time or place. Some
examples are damage to important
parts of the vehicle in a crash, hills,
tall buildings, tunnels, weather or
wireless phone network congestion.

OnStar Steering Wheel
Controls

This vehicle may have a Talk/Mute
button that can be used to interact
with OnStar hands-free calling. See
Steering Wheel Controls on
page 5‑3 
for more information.

-------------------------------------------------------------------------------------------------------------------------------------------------------------

In Brief

1-23

On some vehicles, the mute button
can be used to dial numbers into
voice mail systems, or to dial phone
extensions. See the OnStar Owner's
Guide for more information.

Your Responsibility

Increase the volume of the radio if
the OnStar advisor cannot be heard.

If the light next to the OnStar
buttons is red, the system may not
be functioning properly. Press

Q

and request a vehicle diagnostic.
If the light appears clear (no light is
appearing), your OnStar
subscription has expired and all
services have been deactivated.
Press

Q

to confirm that the OnStar

equipment is active.

-------------------------------------------------------------------------------------------------------------------------------------------------------------

Keys, Doors and Windows

2-1

Keys, Doors and
Windows

Keys and Locks

Keys . . . . . . . . . . . . . . . . . . . . . . . . . . 2-2
Remote Keyless Entry (RKE)

System . . . . . . . . . . . . . . . . . . . . . . 2-2

Remote Keyless Entry (RKE)

System Operation . . . . . . . . . . . 2-3

Remote Vehicle Start . . . . . . . . . 2-5
Door Locks . . . . . . . . . . . . . . . . . . . 2-7
Power Door Locks . . . . . . . . . . . . 2-7
Delayed Locking . . . . . . . . . . . . . . 2-7
Automatic Door Locks . . . . . . . . . 2-8
Lockout Protection . . . . . . . . . . . . 2-8
Safety Locks . . . . . . . . . . . . . . . . . . 2-8

Doors

Liftgate . . . . . . . . . . . . . . . . . . . . . . . . 2-9

Vehicle Security

Vehicle Security . . . . . . . . . . . . . . 2-13
Anti-Theft Alarm System . . . . . 2-13
Immobilizer . . . . . . . . . . . . . . . . . . 2-14
Immobilizer Operation . . . . . . . 2-14

Exterior Mirrors

Convex Mirrors . . . . . . . . . . . . . . 2-16
Power Mirrors . . . . . . . . . . . . . . . . 2-16
Folding Mirrors . . . . . . . . . . . . . . . 2-16
Heated Mirrors . . . . . . . . . . . . . . . 2-17
Park Tilt Mirrors . . . . . . . . . . . . . . 2-18

Interior Mirrors

Manual Rearview Mirror . . . . . . 2-18
Automatic Dimming Rearview

Mirror . . . . . . . . . . . . . . . . . . . . . . . 2-18

Windows

Windows . . . . . . . . . . . . . . . . . . . . . 2-19
Power Windows . . . . . . . . . . . . . 2-20
Sun Visors . . . . . . . . . . . . . . . . . . . 2-21

Roof

Sunroof . . . . . . . . . . . . . . . . . . . . . . 2-22

-------------------------------------------------------------------------------------------------------------------------------------------------------------

2-2

Keys, Doors and Windows

Keys and Locks

Keys

{

WARNING

Leaving children in a vehicle with
the ignition key is dangerous for
many reasons, children or others
could be badly injured or even
killed. They could operate the
power windows or other controls
or even make the vehicle move.
The windows will function with the
keys in the ignition and children
could be seriously injured or killed
if caught in the path of a closing
window. Do not leave the keys in
a vehicle with children.

The key is used for the ignition and
all door locks.

The key has a bar-coded key tag
that the dealer/retailer or qualified
locksmith can use to make new
keys. Store this information in a safe
place, not in the vehicle.

See your dealer/retailer if a
replacement key or additional key is
needed.

Notice: If you ever lock your keys
in the vehicle, you may have to
damage the vehicle to get in. Be
sure you have spare keys.

If you are locked out of the vehicle,
call the Roadside Assistance
Center. See Roadside Assistance
Program on page 13‑5
.

Remote Keyless Entry
(RKE) System

See Radio Frequency Statement on
page 13‑16 
for information regarding
Part 15 of the Federal
Communications Commission (FCC)
Rules and RSS-210/211 of Industry
and Science Canada.

Changes or modifications to this
system by other than an authorized
service facility could void
authorization to use this equipment.

-------------------------------------------------------------------------------------------------------------------------------------------------------------

Keys, Doors and Windows

2-3

If there is a decrease in the RKE
operating range:

.

Check the distance. The
transmitter may be too far from
the vehicle.

.

Check the location. Other
vehicles or objects may be
blocking the signal.

.

Check the transmitter's battery.
See “Battery Replacement” later
in this section.

.

If the transmitter is still not
working correctly, see your
dealer/retailer or a qualified
technician for service.

Remote Keyless Entry
(RKE) System Operation

The Remote Keyless Entry (RKE)
transmitter functions work up to
60 m (195 feet) away from the
vehicle.

There are other conditions which
can affect the performance of the
transmitter. See Remote Keyless
Entry (RKE) System on page 2‑2
.

With Remote Start and Power

Liftgate Shown, Without Similar

/

(Remote Vehicle Start): For

vehicles with this feature, see
Remote Vehicle Start on page 2‑5
for additional information.

Q

(Lock): Press to lock all the

doors.

If enabled through the Driver
Information Center (DIC), the
parking lamps flash once to indicate
locking has occurred. If enabled
through the DIC, the horn sounds
when

Q

is pressed again within

five seconds. See Vehicle
Personalization (With DIC Buttons)
on page 5‑42 
for additional
information.

Pressing

Q

may arm the content

theft-deterrent system. See
Anti-Theft Alarm System on
page 2‑13
.

K

(Unlock): Press once to unlock

only the driver door. If

K

is pressed

again within five seconds, all
remaining doors unlock. The interior
lamps come on and stay on for
20 seconds or until the ignition is
turned on.

If enabled through the DIC, the
parking lamps flash twice to indicate
unlocking has occurred. See Vehicle
Personalization (With DIC Buttons)
on page 5‑42
.

-------------------------------------------------------------------------------------------------------------------------------------------------------------

2-4

Keys, Doors and Windows

Pressing

K

on the RKE transmitter

disarms the content theft-deterrent
system. See Anti-Theft Alarm
System on page 2‑13
.

&

(Power Liftgate): Press and

hold until the liftgate begins to move
to open or close the liftgate. The
taillamps flash and a chime sounds
to indicate when the liftgate is
opening or closing.

L

(Vehicle Locator/Panic

Alarm): Press and release to
locate the vehicle. The parking
lamps flash and the horn sounds
three times.

Press and hold

L

for more than

two seconds to activate the panic
alarm. The parking lamps flash and
the horn sounds repeatedly for
30 seconds. The alarm turns off
when the ignition is moved to ON/
RUN or

L

is pressed again. The

ignition must be in LOCK/OFF for
the panic alarm to work.

Programming Transmitters to
the Vehicle

Only RKE transmitters programmed
to this vehicle will work. If a
transmitter is lost or stolen, a
replacement can be purchased and
programmed through your dealer/
retailer. When the replacement
transmitter is programmed to this
vehicle using the DIC, all remaining
transmitters must also be
reprogrammed. Any lost or stolen
transmitters will no longer work
once the new transmitter is
programmed. Each vehicle can
have up to eight transmitters
programmed to it. See “Relearn
Remote Key” under Driver
Information Center (DIC) (With DIC
Buttons) on page 5‑24 
or Driver
Information Center (DIC) (Without
DIC Buttons) on page 5‑30 
for
instructions on how to program
transmitters to this vehicle.

Battery Replacement

Replace the battery if the REPLACE
BATTERY IN REMOTE KEY
message displays in the DIC.

Notice: When replacing the
battery, do not touch any of the
circuitry on the transmitter. Static
from your body could damage the
transmitter.

1. Separate the transmitter with a

flat, thin object inserted into the
notch on the side.

2. Remove the old battery. Do not

use a metal object.

-------------------------------------------------------------------------------------------------------------------------------------------------------------


Content      ..      1      2      3      ..