Oldsmobile Aurora (2001 year). Manual - part 18


  Index      Oldsmobile     Oldsmobile Aurora (2001 year) - manual in english


Search            copyright infringement  


Content      ..     16      17      18      19     ..


Oldsmobile Aurora (2001 year). Manual - part 18


-------------------------------------------------------------------------------------------------------------------------------------------------------------
6-28

Checking Coolant

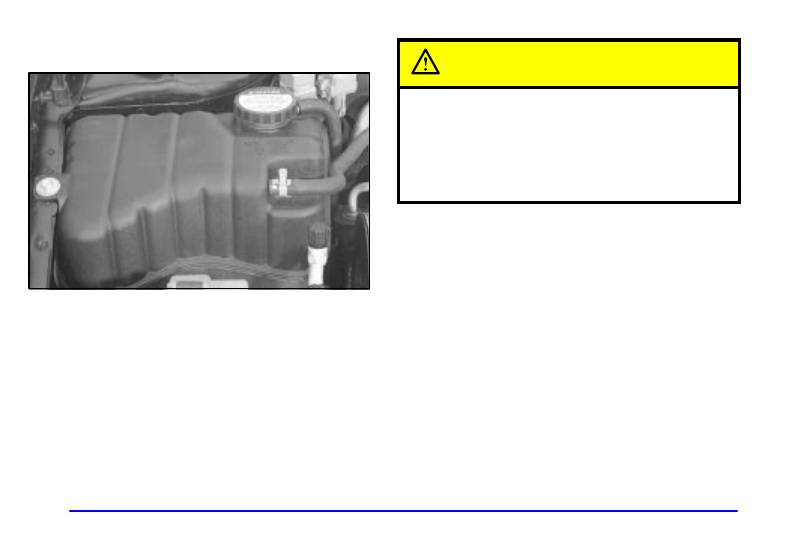
The engine coolant surge tank is located on the
passenger’s side of the engine compartment. See
“Engine Compartment Overview” in the Index for more
information on location.

CAUTION:

Turning the surge tank pressure cap when the
engine and radiator are hot can allow steam and
scalding liquids to blow out and burn you badly.
Never turn the surge tank pressure cap 

--

 even a

little 

--

 when the engine and radiator are hot.

The vehicle must be on a level surface. When your
engine is cold, the coolant level should be at the base of
the filler neck.

-------------------------------------------------------------------------------------------------------------------------------------------------------------

-------------------------------------------------------------------------------------------------------------------------------------------------------------

6-29

If the LOW ENGINE COOLANT DIC message comes
on and stays on, it means you’re low on engine coolant.

Adding Coolant

If you need more coolant, add the proper DEX

-

COOL

R

coolant mixture at the surge tank, but only when the
engine is cool.

CAUTION:

You can be burned if you spill coolant on hot
engine parts. Coolant contains ethylene glycol,
and it will burn if the engine parts are hot
enough. Don’t spill coolant on a hot engine.

When replacing the pressure cap, make sure it 
is hand

-

tight.

-------------------------------------------------------------------------------------------------------------------------------------------------------------

-------------------------------------------------------------------------------------------------------------------------------------------------------------

6-30

Cooling System Pressure Cap

The cooling system pressure cap is located on the 
surge tank.

NOTICE:

Your cooling system pressure cap is a 15 psi 
(105 kPa) pressure

-

type cap and must be tightly

installed to prevent coolant loss and possible
engine damage from overheating.

Power Steering Fluid

When to Check Power Steering Fluid

It is not necessary to regularly check power steering fluid
unless you suspect there is a leak in the system or you hear
an unusual noise. A fluid loss in this system could indicate
a problem. Have the system inspected and repaired.

See “Engine Compartment Overview” in the Index for
more information on location.

How to Check Power Steering Fluid

Turn the key off, let the engine compartment cool down,
wipe the cap and the top of the reservoir clean, then
unscrew the cap and wipe the dipstick with a clean rag.
Replace the cap and completely tighten it. Then remove
the cap again and look at the fluid level on the dipstick.

The level should be at the FULL COLD mark. If
necessary, add only enough fluid to bring the level up 
to the mark.

What to Use

To determine what kind of fluid to use, see
“Recommended Fluids and Lubricants” in the Index.
Always use the proper fluid. Failure to use the proper
fluid can cause leaks and damage hoses and seals.

-------------------------------------------------------------------------------------------------------------------------------------------------------------

-------------------------------------------------------------------------------------------------------------------------------------------------------------

6-31

Windshield Washer Fluid

What to Use

When you need windshield washer fluid, be sure to read
the manufacturer’s instructions before use. If you will be
operating your vehicle in an area where the temperature
may fall below freezing, use a fluid that has sufficient
protection against freezing.

Adding Washer Fluid

The windshield washer fluid
reservoir is located at the
front of the engine
compartment on the
passenger’s side. See
“Engine Compartment
Overview” in the Index 
for more information 
on location.

When the tank contains 0.5 quarts (0.5 liters) or less, the
message LOW WASHER FLUID will be displayed on
the Driver Information Center (DIC).

Open the cap labeled WASHER FLUID. 
Add washer fluid until the tank is full.

NOTICE:

When using concentrated washer fluid,

follow the manufacturer’s instructions for
adding water.

Don’t mix water with ready

-

to

-

use washer

fluid. Water can cause the solution to freeze
and damage your washer fluid tank and
other parts of the washer system. Also,
water doesn’t clean as well as washer fluid.

Fill your washer fluid tank only

three

-

quarters full when it’s very cold. 

This allows for expansion if freezing occurs,
which could damage the tank if it is
completely full.

Don’t use engine coolant (antifreeze) in

your windshield washer. It can damage
your washer system and paint.

-------------------------------------------------------------------------------------------------------------------------------------------------------------

-------------------------------------------------------------------------------------------------------------------------------------------------------------

6-32

Brakes

Brake Fluid

See “Engine Compartment
Overview” in the Index 
for more information 
on location.

Your brake master cylinder reservoir is on the driver’s side of 
the engine compartment. It is filled with DOT

-

3 brake fluid.

There are only two reasons why the brake fluid level in the
reservoir might go down. The first is that the brake fluid
goes down to an acceptable level during normal brake
lining wear. When new linings are put in, the fluid level
goes back up. The other reason is that fluid is leaking out
of the brake system. If it is, you should have your brake
system fixed, since a leak means that sooner or later your
brakes won’t work well, or won’t work at all.

So, it isn’t a good idea to “top off” your brake fluid.
Adding brake fluid won’t correct a leak. If you add fluid
when your linings are worn, then you’ll have too much
fluid when you get new brake linings. You should add
(or remove) brake fluid, as necessary, only when work is
done on the brake hydraulic system.

CAUTION:

If you have too much brake fluid, it can spill on
the engine. The fluid will burn if the engine is hot
enough. You or others could be burned, and your
vehicle could be damaged. Add brake fluid 
only when work is done on the brake 
hydraulic system.

When your brake fluid falls to a low level, your brake
warning light will come on. A chime will sound if you
try to drive with this warning light on. See “Brake
System Warning Light” in the Index.

-------------------------------------------------------------------------------------------------------------------------------------------------------------

-------------------------------------------------------------------------------------------------------------------------------------------------------------

6-33

What to Add

When you do need brake fluid, use only DOT

-

3 brake

fluid. Use new brake fluid from a sealed container only.
Refer to “Recommended Fluids and Lubricants” in the
Maintenance Schedule.

Always clean the brake fluid reservoir cap and the area
around the cap before removing it. This will help keep
dirt from entering the reservoir.

CAUTION:

With the wrong kind of fluid in your brake
system, your brakes may not work well, or they
may not even work at all. This could cause a
crash. Always use the proper brake fluid.

NOTICE:

Using the wrong fluid can badly damage

brake system parts. For example, just a few
drops of mineral

-

based oil, such as engine

oil, in your brake system can damage brake
system parts so badly that they’ll have to be
replaced. Don’t let someone put in the
wrong kind of fluid.

If you spill brake fluid on your vehicle’s

painted surfaces, the paint finish can be
damaged. Be careful not to spill brake fluid
on your vehicle. If you do, wash it off
immediately. See “Appearance Care” in 
the Index.

-------------------------------------------------------------------------------------------------------------------------------------------------------------

-------------------------------------------------------------------------------------------------------------------------------------------------------------

6-34

Brake Wear

Your vehicle has four

-

wheel disc brakes.

Disc brake pads have built

-

in wear indicators that make a

high

-

pitched warning sound when the brake pads are worn

and new pads are needed. The sound may come and go or
be heard all the time your vehicle is moving (except when
you are pushing on the brake pedal firmly).

CAUTION:

The brake wear warning sound means that soon
your brakes won’t work well. That could lead to
an accident. When you hear the brake wear
warning sound, have your vehicle serviced.

NOTICE:

Continuing to drive with worn

-

out brake pads

could result in costly brake repair.

Some driving conditions or climates may cause a brake
squeal when the brakes are first applied or lightly applied.
This does not mean something is wrong with your brakes.

Properly torqued wheel nuts are necessary to help
prevent brake pulsation. When tires are rotated, inspect
brake pads for wear and evenly tighten wheel nuts in the
proper sequence to GM torque specifications.

Brake linings should always be replaced as complete
axle sets.

See “Brake System Inspection” in Section 7 of this manual
under Part C “Periodic Maintenance Inspections.”

Brake Pedal Travel

See your dealer if the brake pedal does not return to
normal height, or if there is a rapid increase in pedal
travel. This could be a sign of brake trouble.

Brake Adjustment

Every time you apply the brakes, with or without the
vehicle moving, your brakes adjust for wear.

-------------------------------------------------------------------------------------------------------------------------------------------------------------

-------------------------------------------------------------------------------------------------------------------------------------------------------------

6-35

Replacing Brake System Parts

The braking system on a vehicle is complex. Its many
parts have to be of top quality and work well together if
the vehicle is to have really good braking. Your vehicle
was designed and tested with top

-

quality GM brake

parts. When you replace parts of your braking 
system 

--

 for example, when your brake linings wear

down and you have to have new ones put in 

--

 be sure

you get new approved GM replacement parts. If you
don’t, your brakes may no longer work properly. For
example, if someone puts in brake linings that are wrong
for your vehicle, the balance between your front and
rear brakes can change 

--

 for the worse. The braking

performance you’ve come to expect can change in many
other ways if someone puts in the wrong replacement
brake parts.

Battery

Your new vehicle comes with a maintenance free
ACDelco

R

 battery. When it’s time for a new battery, get

one that has the replacement number shown on the original
battery’s label. We recommend an ACDelco battery.

The battery is located under the rear seat cushion. 
To access the battery, see “Removing the Rear Seat
Cushion” in the Index. You don’t need to access the
battery to jump start your vehicle. See “Jump Starting”
in the Index.

CAUTION:

A battery that isn’t properly vented can let
sulfuric acid fumes into the area under the rear
seat cushion. These fumes can damage your rear
seat safety belt systems. You may not be able to
see this damage, and the safety belts might not
provide the protection needed in a crash. If a
replacement battery is ever needed, it must be
vented in the same manner as the original
battery. Always make sure that the vent hose 
is properly reattached before reinstalling the 
seat cushion.

-------------------------------------------------------------------------------------------------------------------------------------------------------------

-------------------------------------------------------------------------------------------------------------------------------------------------------------

6-36

To be sure the vent hose (A) is properly attached, the
vent hose connectors (B) must be securely reattached to
the vent outlets (C) on each side of the battery, and the
vent assembly grommet (D) must be secured to the 
floor pan (E).

Vehicle Storage

If you’re not going to drive your vehicle for 25 days or more, 
remove the black, negative (

-

) cable from the battery. 

This will help keep your battery from running down.

CAUTION:

Batteries have acid that can burn you and gas
that can explode. You can be badly hurt if you
aren’t careful. See “Jump Starting” in the Index
for tips on working around a battery without
getting hurt.

Contact your dealer to learn how to prepare your vehicle
for longer storage periods.

Also, for your audio system, see “Theft

-

Deterrent

Feature” in the Index.

-------------------------------------------------------------------------------------------------------------------------------------------------------------

-------------------------------------------------------------------------------------------------------------------------------------------------------------

6-37

Bulb Replacement

This section describes bulb changing procedures for
some of your interior and exterior lamps. For any bulb
changing procedure not listed in this section, contact
your dealer’s service department.

For the type of bulb to use, see “Replacement Bulbs” in
the Index.

Halogen Bulbs

CAUTION:

Halogen bulbs have pressurized gas inside and
can burst if you drop or scratch the bulb. You or
others could be injured. Be sure to read and
follow the instructions on the bulb package.

Headlamps

For the proper bulb type, see “Replacement Bulbs” in
the Index.

1. Remove the two bolts with a 10 mm socket.

2. Use a large screwdriver by the outside mount to

separate the lamp assembly from the outboard snap
mounting pin. Slide the headlamp assembly outward
and lift it out.

-------------------------------------------------------------------------------------------------------------------------------------------------------------

-------------------------------------------------------------------------------------------------------------------------------------------------------------

6-38

3. Disconnect the wiring harness from the 

headlamp assembly.

4. Lift the tabs to remove the bulb from the assembly.

5. Replace the bulb. Push the bulb assembly in and 

turn it clockwise to install the bulb assembly into the
headlamp assembly. Then reconnect the wiring
harness to the lamp assembly.

-------------------------------------------------------------------------------------------------------------------------------------------------------------

-------------------------------------------------------------------------------------------------------------------------------------------------------------

6-39

6. Slide the lamp assembly back into place by lining up

the track on the bottom of the assembly with the
guide on the vehicle. Then connect the outboard snap
and secure the lamp assembly with the two bolts.

Headlamp Aiming

Your vehicle has a visual optical headlamp aiming
system equipped with horizontal aim indicators. The
aim has been pre

-

set at the factory and should need 

no further adjustment. This is true even though your
horizontal aim indicators may not fall exactly on 
the “0” (zero) marks on their scales.

-------------------------------------------------------------------------------------------------------------------------------------------------------------

-------------------------------------------------------------------------------------------------------------------------------------------------------------

6-40

If your vehicle is damaged in an accident, the headlamp
aim may be affected. Aim adjustment to the low beam
may be necessary if it is difficult to see lane markers
(for horizontal aim), or if oncoming drivers flash their
high beams at you (for vertical aim). If you believe your
headlamps need to be re

-

aimed, we recommend that you

take your vehicle to your dealer for service. However, it
is possible for you to re

-

aim your headlamps as

described in the following procedure.

NOTICE:

To make sure your headlamps are aimed
properly, read all the instructions before
beginning. Failure to follow these instructions
could cause damage to headlamp parts.

The vehicle should be properly prepared as follows:
D The vehicle should be placed so the headlamps are

25 ft. (7.6 m) from a light colored wall or other 
flat surface.

D The vehicle must have all four tires on a perfectly

level surface which is level all the way to the wall or
other flat surface.

D The vehicle should be placed so it is perpendicular to

the wall or other flat surface.

D The vehicle should not have any snow, ice or mud

attached to it.

D The vehicle should be fully assembled and all other

work stopped while headlamp aiming is being done.

D The vehicle should be normally loaded with a full

tank of fuel and one person or 160 lbs. (75 kg) on the
driver’s seat.

D Tires should be properly inflated.
Headlamp aiming is done with the vehicle low beam
lamps. The high beam lamps will be correctly aimed if
the low beam lamps are aimed properly.

The headlamp aiming devices are under the hood near
the headlamps.

-------------------------------------------------------------------------------------------------------------------------------------------------------------

-------------------------------------------------------------------------------------------------------------------------------------------------------------

6-41

If you believe your headlamps need horizontal
(left/right) adjustment, follow the horizontal aiming
procedure. If you believe your headlamps need only
vertical (up/down) adjustment, follow only the vertical
aiming procedure.

Adjustment screws can be turned with an E8 Torx

R

socket or T15 Torx screwdriver.

Headlamp Horizontal Aiming

Turn the horizontal aiming screw (A) until the 
indicator (B) is lined up with zero.

Once the horizontal aim is adjusted, then adjust the
vertical aim.

-------------------------------------------------------------------------------------------------------------------------------------------------------------

-------------------------------------------------------------------------------------------------------------------------------------------------------------

6-42

Headlamp Vertical Aiming

1. Find the aim dot on the lens of the lamps.

2. Measure the distance from the ground to the aim dot

on each lamp; if left low beam, subtract two inches.
Record this distance.

3. At the wall or other flat surface, measure from the

floor to the recorded distance and draw a horizontal
line the width of the vehicle.

-------------------------------------------------------------------------------------------------------------------------------------------------------------

-------------------------------------------------------------------------------------------------------------------------------------------------------------

6-43

4. Turn on the low beam headlamps and cover the lamp

not being evaluated. The ambient light should allow
the beam cut off to be seen on the wall.

5. Turn the vertical aiming screw (C) until the

headlamp beam is aimed to the horizontal line. It is
recommended to cover the lamp that is not being
evaluated to better see the beam being aimed.

-------------------------------------------------------------------------------------------------------------------------------------------------------------


Content      ..     16      17      18      19     ..