Snowmobile Arctic Cat (2009 year). Manual - part 16


  Index      Snowmobiles / ATV     Snowmobile Arctic Cat - service manual 2009 year


Search            


Content   ..  14  15  16  17   ..


Snowmobile Arctic Cat (2009 year). Manual - part 16


MAINTENANCE

57

Also, drive belts have a break-in period

of approximately 20 miles. After

installing a new drive belt, drive the

snowmobile for 20 miles at 1/2 throttle

or less. This will allow the drive belt to

gain its optimum flexibility and will

extend drive belt life.
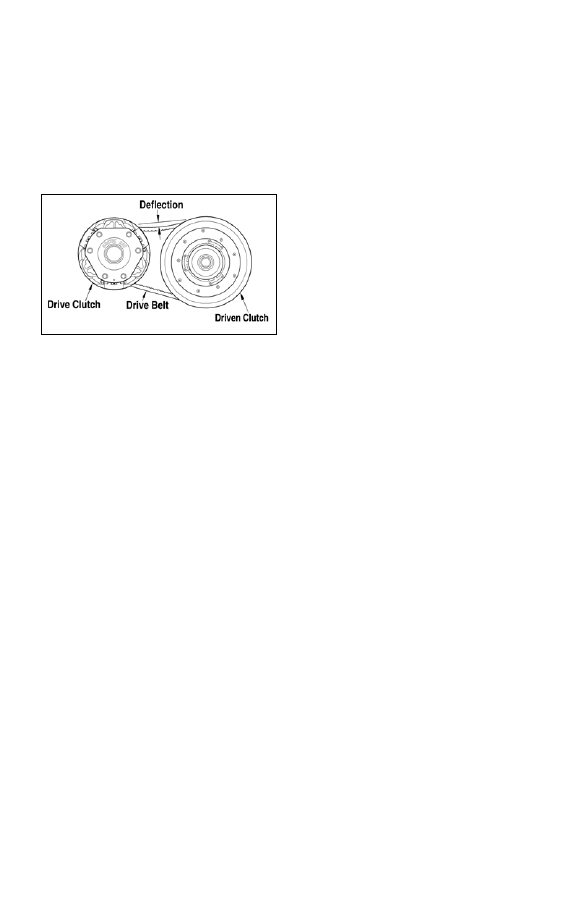
Checking/Adjusting 

Drive Belt Deflection

0743-319

The drive belt must have the proper fit

in the drive clutch and driven pulley.

To check for proper drive belt fit, use

the following procedure.

1. Place a straightedge on the top of

the drive belt. The straightedge

should reach from the drive clutch

to the top of the driven pulley.

 NOTE: Make sure the drive belt
is all the way out in the driven pul-
ley before checking drive belt fit.

2. Using a stiff ruler centered

between the drive clutch and

driven pulley, push down on the

drive belt just enough to remove

all slack and note the amount of

deflection. The deflection should

be within the range of 28.5-31.8

mm (1 1/8-1 1/4 in.).

3. To correct drive belt deflection,

remove the sheave adjuster from

the pulley, remove or add shim

washers to the adjuster, and install

the adjuster.

 NOTE: Adding shim washers will
decrease belt deflection and remov-
ing shim washers will increase belt
deflection. Available shim washers
from Arctic Cat are p/n 0648-714
(0.090 in.) - one included in the tool
kit, p/n 0648-715 (0.030 in.), and p/n
0648-716 (0.060 in.).

 NOTE: Removing/adding shim
washers may be done by the snow-
mobile owner if qualified to do so.
If the owner does not feel qualified,
take the snowmobile to an autho-
rized Arctic Cat Snowmobile dealer
for this service. This service is at
the discretion and expense of the
snowmobile owner.

Removing Drive Belt

 NOTE: Changing a drive belt can
be done by the snowmobile owner
if qualified to do so. If the owner
does not feel qualified, take the
snowmobile to an authorized Arc-
tic Cat Snowmobile dealer for this
service. This service is at the dis-
cretion and expense of the snow-
mobile owner.

1. Turn ignition key to the OFF posi-

tion and wait for all moving parts

to stop.

2. Set the brake lever lock.

3. Open the left-side access panel;

then remove the belt guard.

4. Remove the cap screw, lock

washer, washer, and sheave

adjuster from the end of the driven

pulley.

 NOTE: Assure that the shims
and O-ring are not removed from
the adjuster.

58

MAINTENANCE

0743-395

5. Remove the cap screw (w/lock

washer and washer) from the

adjuster, turn the adjuster around

(reverse it), and insert the cap

screw (w/lock washer and washer)

into the adjuster.

0743-396

6. Install the sheave adjuster and cap

screw (w/lock washer and washer)

onto the driven pulley; then

tighten the cap screw until the

movable sheave opens far enough

to allow the belt to be removed.

 NOTE: Before installing the drive
belt, use a suitable cleaning sol-
vent to thoroughly clean the
sheaves.

7. Remove the drive belt from the

driven pulley first; then from the

drive clutch.

Installing Drive Belt

1. Place the drive belt (so the part

number can be read) between the

sheaves of the drive clutch first;

then between the sheaves of the

driven pulley.

2. Remove the sheave adjuster and

install it in its original position

(beveled side out); then install the

cap screw, lock washer, washer,

and sheave adjuster back into the

driven pulley. Tighten the cap

screw to 32 ft-lb.

3. Install the belt guard; then close the

left-side access panel.

4. Release the brake lever lock.

TRACK TENSION

Track tension is directly related to the

overall performance of the snowmobile.

If the track is too loose, it may slap

against the tunnel causing wear or it

may “ratchet” on the track drive sprock-

ets. If extremely loose, the idler wheels

may climb over the track lugs forcing

the track against the tunnel causing the

track to “lock.” Arctic Cat recommends

that the track tension be checked daily

during the first 300 miles of operation

and once a week thereafter and adjusted

according to need. The track will stretch

and take a “set” during break-in. Track

deflection must be maintained within

the recommended range.

! CAUTION

Do not apply Loctite to the driven
pulley cap screw or component
damage may occur.

! WARNING

Never operate the snowmobile
without the belt guard/access
panel secured in place.

! WARNING

Track tension must be properly
maintained. Personal injury could
result if a track is allowed to
become excessively loose.

MAINTENANCE

59

Checking Track 

Tension

1. Remove excess ice and snow

buildup from the track, track drive

sprockets, and the inside of the

skid frame.

2. Place the snowmobile up on a

shielded safety stand. Check to

make sure the track is 5-8 cm (2-3

in.) off the floor.

3. At mid-point of the track (on the

bottom side), hook a spring scale

around a track clip; then pull down

on the scale to the recommended

pressure. Measure the deflection

(distance) between the bottom of

the wear strip and the inside sur-

face of the track clip. Compare the

measurement with the chart.

0743-188

0743-191

 NOTE: On the M-Series, mea-
surement is from the bottom of the
wear strip at the point of the shock
pad on the slide rail.

Adjusting Track 

Tension

1. Loosen the rear idler wheel adjust-

ing bolt jam nuts.

739-636B

 NOTE: To ensure proper track
tension adjustment, perform all
adjustments on both sides of the
snowmobile.

2. If the deflection (distance between

the bottom of the wear strip and

the inside of the track) exceeds

specifications, tighten the adjust-

ing bolts to take up excessive slack

in the track.

! WARNING

DO NOT attempt to check or adjust
track tension with engine running.
Turn ignition key to the OFF posi-
tion. Personal injury could result
from contact with a rotating track.

Model

Setup 

Tension

After 

Break-In 

Tension

Bearcat 570/
T-Series/TZ1 
Models @ 20 lb

44-51 mm 
(1 3/4-2 in.)

51-57 mm
(2-2 1/4 in.)

Bearcat XT 
Models @ 20 lb

38-44 mm
(1 1/2-1 3/4
in.)

38-44
(1 1/2-1 3/4 
in.)

F-Series 
Models @ 20 lb

44-51 mm
(1 3/4-2 in.)

51-57 mm
(2-2 1/4 in.)

Z1 
Models @ 20 lb

44-51 mm
(1 3/4-2 in.)

51-57 mm
(2-2 1/4 in.)

Crossfire 
Models @ 20 lb

44-51 mm
(1 3/4-2 in.)

51-57 mm
(2-2 1/4 in.)

M-Series 
Models @ 10 lb

51-64 mm
(2-2 1/2 in.)

51-64 mm
(2-2 1/2 in.)

60

MAINTENANCE

3. If the distance between the bottom

of the wear strip and the inside sur-

face of the track is less than speci-

fied, loosen the adjusting bolts to

increase the slack in the track.

4. Check track alignment (see Track

Alignment sub-section).

5. When proper track tension is

obtained, tighten the adjusting bolt

jam nuts against the axle housings.

 NOTE: Since track tension and
track alignment are interrelated,
always check both even if only one
adjustment seems necessary.

TRACK ALIGNMENT

Proper track alignment is obtained

when the rear idler wheels are equal

distance from the inner track drive

lugs. Excessive wear to the idler

wheels, drive lugs, and track will occur

if the track is improperly aligned. Arc-

tic Cat recommends that the track

alignment be checked once a week or

whenever the track tension is adjusted.

Checking Track 

Alignment

1. Remove excess ice and snow

buildup from the track, track drive

sprockets, and the inside of the

skid frame.

2. Position the tips of the skis against

a wall; then using a shielded safety

stand, raise the rear of the snow-

mobile off the floor making sure

the track is free to rotate.

3. Start the engine and accelerate

slightly. Use only enough throttle

to turn the track several revolu-

tions. SHUT ENGINE OFF.

 NOTE: Allow the track to coast to
a stop. DO NOT apply the brake
because it could produce an inac-
curate alignment condition.

4. When the track stops rotating,

check the relationship of the rear

idler wheels and the inner track

drive lugs. If the rear idler wheels

are centered between the inner

track drive lugs, no adjustment is

necessary.

! WARNING

If jam nuts are not tightened prop-
erly, the adjusting bolts could
loosen causing the track to
become extremely loose and,
under some operating conditions,
allow the idler wheels to climb over
the track lugs forcing the track
against the tunnel causing the
track to “lock.” If a track “locks”
during operation, severe personal
injury could result.

! WARNING

Make sure the ignition key is in the
OFF position and the track is not
rotating before checking or adjust-
ing track alignment. Personal
injury could result if contact is
made with a rotating track.

! WARNING

The tips of the skis must be posi-
tioned against a wall or similar
object.

! WARNING

DO NOT stand behind the snowmo-
bile or near the rotating track.
NEVER run the track at high speed
when the track is suspended.


Content   ..  14  15  16  17   ..