Snowmobile Arctic Cat (2002 year). Manual - part 108


  Index      Snowmobiles / ATV     Snowmobile Arctic Cat - service manual 2002 year


Search            


Content   ..  106  107  108  109   ..


Snowmobile Arctic Cat (2002 year). Manual - part 108


7-44

INSTALLING

728-384B

1. Connect the wiring harness and place the seat into

position. Secure with two screws, lock nuts, and

washers.

2. Place the taillight housing into position and secure

to the seat base with two lock nuts and washers.

Tighten securely.

3. Install the taillight bulb, gasket, and lens. Secure

lens with four screws.

4. Secure the backing plate to the taillight housing

with the existing machine screws.
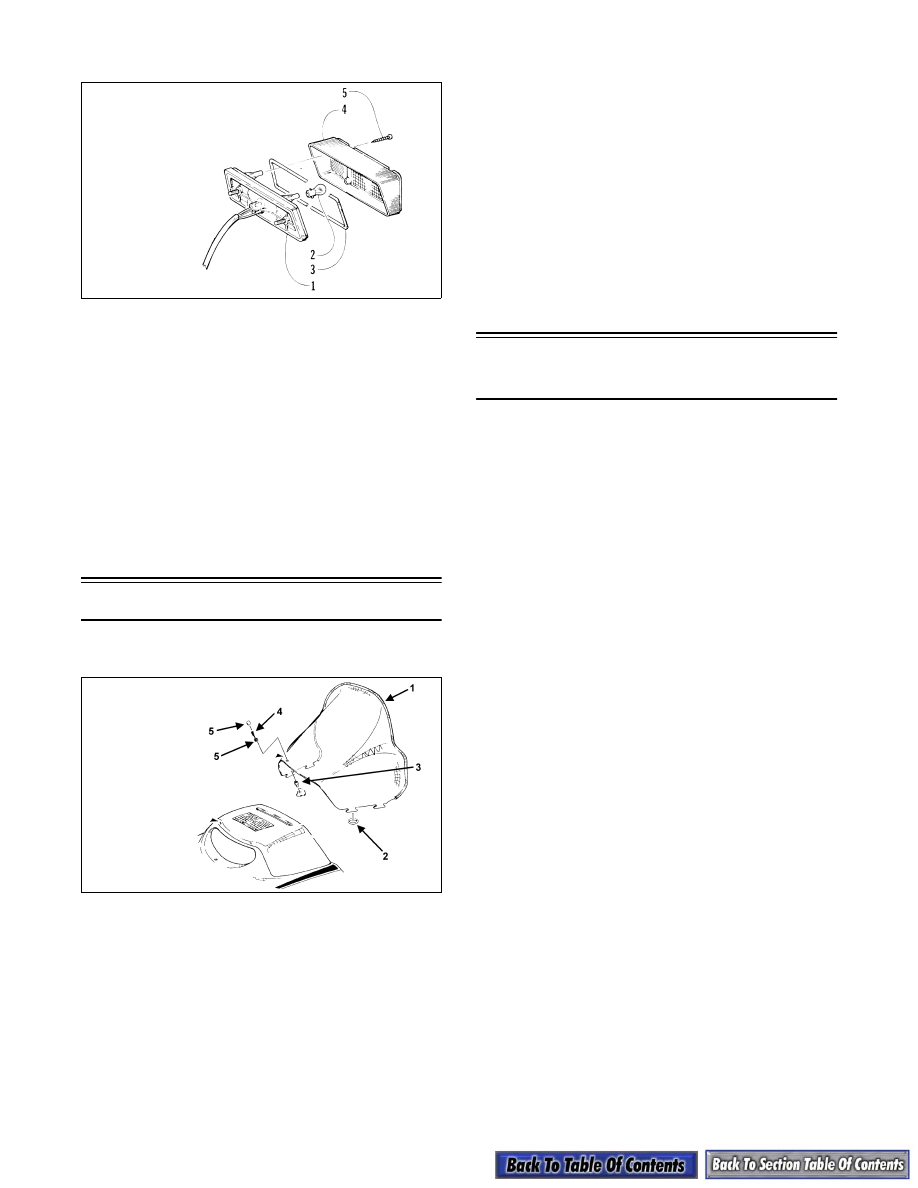
Windshield

REMOVING

731-745A

1. Remove the O-rings securing windshield to the

hood.

2. Remove the caps covering the screws; then

remove the screws w/snaps.

3. Remove the windshield.

INSTALLING

1. Place the windshield into position and install the

O-rings.

2. Secure the windshield to the hood with screws w/

snaps. Install the caps.

Backrest/Rack/Taillight 

Assembly

REMOVING

1. Remove the cap screws, washers, and cap nuts

securing the rack to the backrest.

2. In turn on each side, remove the two cap screws

(inside the tunnel) securing the backrest assembly

to the tunnel. Account for the washers.

3. Disconnect the passenger handwarmer wiring

harness.

4. Remove the backrest assembly from the tunnel.

Account for the two spacers.

KEY

1. Taillight w/Socket Assy
2. Bulb
3. Gasket
4. Lens
5. Retaining Screw

KEY

1. Windshield
2. O-Ring
3. Expansion Nut
4. Machine Screw
5. Snap and Cap

7-45

7

INSTALLING

0736-253

0733-368

1. Place the backrest assembly and spacers (located

on the rear hole on each side) into position and

align holes with tunnel mounting holes.

2. Install the cap screws with washers from the inside

of the tunnel and secure with the washers and lock

nuts. Tighten securely.

3. In turn on each side, install the 1/4-in. cap screw in

the front hole and the 5/16-in. cap screw in the rear

hole. Secure with a flat washer and lock nut.

Tighten securely.

4. Connect the passenger handwarmer wiring

harness.

5. Place the rack into position and secure with the

cap screws, washers, and cap.

KEY

1. Backrest
2. Cover
3. Axle
4. Cup Washer
5. Tension Block
6. Washer
7. Lock Washer
8. Washer
9. Spacer

10. Lock Nut
11. Machine Screw
12. Retainer
13. Machine Screw
14. Adjuster Arm
15. Retaining 

Screw

16. Lens
17. Gasket
18. Bulb
19. Housing
20. Retainer
21. Bracket
22. Bracket
23. Switch
24. Cover
25. Nut w/Washer
26. Bracket

27. Cap Screw
28. E-Ring
29. T-Nut
30. Reflector
31. Clip
32. Lever
33. O-Ring
34. Self-Tapping 

Screw

35. Retainer
36. Handhold

 37. Warmer 

Element

38. Handgrip
39. Washer
40. Lever
41. Deflector
42. Warmer 

Harness (L)

43. Washer
44. Washer
45. Washer
46. Self-Tapping 

Screw

47. Decal
48. Decal
49. Warmer 

Harness (R)

KEY

1. Backrest
2. Cover
3. Machine Screw
4. Cap Nut
5. Rack
6. Handgrip
7. Machine Screw
8. Tube Closure
9. Bracket

10. Cap Screw
11. Rivet
12. Washer
13. Decal
14. Decal
15. Foam

7-46

Tunnel/Rear Bumper/ 

Snowflap

„

NOTE: Determine which style tunnel assembly is

being disassembled and refer to the appropriate
illustration for component details; then remove/
disassemble and install/assemble accordingly.
Some components will vary from model to model.
The technician should use discretion and sound
judgment.

0736-883

Key

1. Tunnel Assy
2. Plate
3. Plate
4. Rivet
5. Bracket
6. Plate
7. Lock Nut
8. Rivet
9. Bracket

10. Footrest
11. Support
12. End Cap
13. Rivet
14. Decal
15. Cover
16. Decal
17. Self-Tapping Screw
18. Washer
19. Reflector
20. Clip
21. Snowflap
22. Rivet
23. Washer
24. Cap Screw
25. Bumper
26. Cap Screw
27. Flag Assy
28. Flag
29. Flag Pole
30. Mount

31. Washer
32. Cap Screw
33. Plug
34. Decal
35. Cable Tie
36. Voltage Regulator
37. Lock  Nut

7-47

7

0737-009

0736-077

KEY

1. Tunnel Assy
2. End Plate
3. Rivet
4. Bracket
5. Rivet
6. Mounting Plate
7. Tunnel Roll
8. Bumper
9. Snowflap

10. U-Nut
11. U-Nut
12. Decal
13. Decal
14. Machine Screw
15. Washer
16. Lock Nut
17. Reflector
18. Retaining Clip
19. Clamp
20. Rivet
21. Bracket
22. Plug
23. Decal
24. Decal
25. Decal
26. Decal
27. Clamp
28. Rivet

KEY

1. Tunnel Assy
2. Bracket
3. Mounting Plate
4. Rivet
5. Decal
6. Decal
7. Rear Bumper
8. Self-Tapping Screw
9. Footrest

10. Plug
11. Trim
12. Clamp
13. Decal
14. Decal
15. Bracket
16. Washer
17. Lock Nut
18. U-Nut
19. Machine Screw
20. Snowflap
21. U-Nut
22. Rivet


Content   ..  106  107  108  109   ..