Snowmobile Yamaha RX1 (2003 year). Manual - part 16


  Index      Snowmobiles / ATV     Snowmobile Yamaha RX10H/RX10SH, RX10MH/RX10MSH, RX10RH/RX10RSH - service manual 2003 year


Search            


Content   ..  14  15  16  17   ..


Snowmobile Yamaha RX1 (2003 year). Manual - part 16


8-11

ESU00349

Changing the engine oil

It is recommended to have a Yamaha dealer change the
engine oil.

WARNING

Engine oil is extremely hot immediately after the
engine is turned off. Coming into contact with or get-
ting any engine oil on your clothes could result in
burns. 

@

CAUTION:

Do not run the engine with too much or not
enough oil in the oil tank. Oil could spray out or
the engine could be damaged. 

Be sure to change the engine oil after the first
800 km (500 mi) of operation, and every 3,200 km
(2,000 mi) thereafter or at the start of a new sea-
son, otherwise the engine will wear quickly. 

The oil filter cartridge should be replaced every
20,000 km (12,000 mi) of operation. Have a
Yamaha dealer replace the oil filter cartridge. 

To change the engine oil (without oil filter cartridge
replacement)

1. Place the snowmobile on a level surface and apply

the parking brake. 

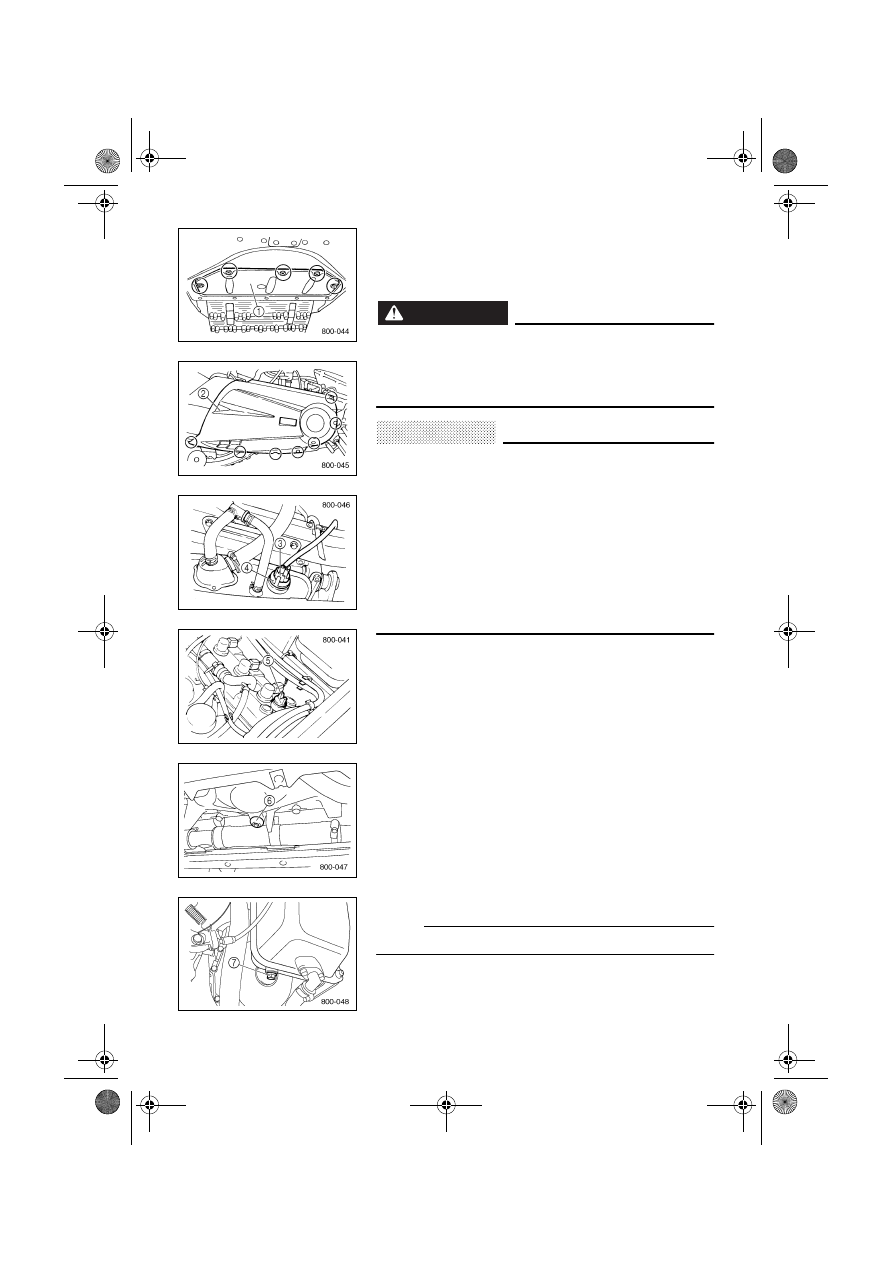
2. Remove the bottom panel 

1 and right side cover 2. 

3. Start the engine, warm it up for several minutes, and

then turn it off. 

4. Place oil pans under both the engine and the oil tank

to collect the used oil. 

5. Remove the oil level gauge coupler 

3. 

6. Remove the oil level gauge/dipstick 

4 and the cylin-

der head cap 

5, and then remove the crankcase

engine oil drain bolt 

6 and the oil tank engine oil

drain bolt 

7 to drain the oil from the crankcase and

the oil tank.

NOTE:

Dispose of used oil according to local regulations. 

@

7. Install the engine oil drain bolts, and then tighten

them to the specified torques.

8-12

8. Add 2.0 L (1.8 Imp qt, 2.1 US qt) of the recommended

engine oil to the oil tank, and then install and tighten
the oil level gauge/dipstick and the cylinder head cap.

9. Start the engine, warm it up for several minutes, and

then turn it off.

10. Add sufficient oil of the recommended type to raise it

to the “F” level mark on the oil level gauge/dipstick.
(See page 6-3 for checking procedure.)

CAUTION:

When adding the engine oil, be careful not to fill
above the “F” level mark on the oil level gauge/
dipstick. 

Make sure that no foreign material enters the
engine oil tank. 

@

11. Start the engine, and then let it idle for several min-

utes while checking it for oil leakage. If oil is leaking,
immediately turn the engine off and make sure the
engine oil drain bolts and oil level gauge/dipstick are
installed correctly. 

12. Turn the engine off, and then install the bottom cover

and right side cover.

CAUTION:

If oil is leaking or the oil level warning indicator comes
on when the engine is running, immediately turn the
engine off and have a Yamaha dealer check the snow-
mobile. Continuing to operate the engine under such
conditions could cause severe engine damage. 

@

Tightening torques: 

Crankcase engine oil drain bolt: 

30 Nm (3.0 m·kgf, 22 ft·lb)

Oil tank engine oil drain bolt: 

16 Nm (1.6 m·kgf, 11 ft·lb)

Recommended engine oil: 

See page 6-2. 

Oil quantity: 

With oil filter cartridge replacement: 

3.0 L (2.6 Imp qt, 3.2 US qt) 

Without oil filter cartridge replacement: 

2.8 L (2.5 Imp qt, 3.0 US qt) 

Total amount: 

3.8 L (3.3 Imp qt, 4.0 US qt)

8-13

ESU00161 

Cooling system

Air bleeding the cooling system

WARNING

Do not remove the coolant reservoir cap when
the engine is hot. Scalding hot fluid and steam
may be blown out under pressure, which could
cause serious injury. 
When the engine has cooled, place a thick rag or
towel over the coolant reservoir cap, slowly rotate
the cap counterclockwise to the detent. This pro-
cedure allows any residual pressure to escape.
When the hissing sound has stopped, press
down on the cap while turning counterclockwise
and remove it. 

The cooling system must be bled of air if the
coolant reservoir becomes empty, if air can be
seen in the cooling system, or if there is a cooling
system leak. Consult a Yamaha dealer. 

@

CAUTION:

Operating the engine with an improperly bled cool-
ing system can cause overheating and severe
engine damage. 

@

8-14

Coolant replenishment

1. Remove the coolant reservoir cap and pour the cool-

ant to the “COLD LEVEL” mark.

1 “COLD LEVEL” mark 
2 Coolant reservoir cap

2. Start the engine and add coolant until the coolant

level does not go down, and then stop the engine.

3. Fill the coolant reservoir with coolant to the “COLD

LEVEL” mark.

4. Install the coolant reservoir cap. Check for any cool-

ant leakage.

NOTE:

If you find any leaks, consult a Yamaha dealer. 

Recommended coolant: 
High quality ethylene glycol antifreeze containing corro-
sion inhibitors. 
Coolant and water mixed ratio: 60:40 
Total amount: 4.7 L (4.14 Imp qt, 4.97 US qt)


Content   ..  14  15  16  17   ..